Hi all! I hope this post finds you having a great Sunday with your family! My family is super busy with make-up baseball games right now since it has rained for the last three weeks but I have still managed to sneak in some craft time! My latest project is another revamp. You may remember my Decoupage I posted a few months ago. Well, it’s not that I don’t like it, it just wasn’t the look I was going for in my bedroom. It was nice while it lasted but I had a lightbulb moment one day that I couldn’t ignore!
This is what it started as….
It’s no secret we are big fans of burlap right now! You just can’t beat the price and I love the texture for this time of year.
I purchased each canvas at Hobby Lobby for $5.00!
I used this Easy Tacker that I purchased at Hobby Lobby with a 40% off coupon for $4.00…
to staple the burlap around the back of each canvas. I started at the top and bottom by pulling tight and stapling as I went (so easy).
I then moved on to the sides making sure to fold the corners very clean and secured them with staples as well.
Now for the stencils! Since Santa has not brought me a Cricut Expression yet I had to get clever and make my own LARGE stencils! After scouring google for a large letter to no avail, I retreated to my Microsoft Office Word for help! I opened a new document and inserted word art. From there, I chose my font (Script MT Bold), typed the letter I wanted, sized it and clicked print!
I cut out the letter from each page to form a stencil. A little dry brush of Americana Burnt Umber Acrylic with a stencil brush…..
4 nail heads hammered in the corners, 2 in the center….
and a bow stapled to the back for hanging make this project complete!
Before….
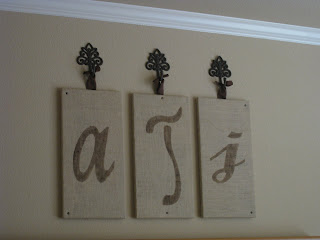
After!
I used the same hooks that I bought for the Decoupage for $3.00 each at Hobby Lobby! The burlap was under $2.00 per yard and I used just a little over a yard!
The T is for our last name, the a is for my name and the j is for my hubby! I love my new Burlap Wall Monogram! You can’t beat the price and I love the texture it brings to my bedroom!
Don’t Forget!
I Made it with Gorilla Glue Link Party and Giveaway November 5!
Info on the party HERE!
Grab our BUTTON to Help get the word out!


I will also be linking up here!!!


Girl…I love it! We are kindred spirits. I have bought 5 yards of burlap from HL this week! I just finished a burlap project and have three more in the works. I am a "burlap babe", or maybe a "burlap beauty"? I prefer the last one.
Great job!
Traci
Thanks for the info on the stencil. I recently recovered a small footstool and wanted to put a monogram on it, but couldn't find what I wanted. Now I know how!
that's cute! ok so i made my way over here from ucreate, and must say, you NEED to show us how to do the piping on the chair like you did!
PRETTY PLEASE??
Very cool! Such a quick project!
Nancy
I nominated you two crafty ladies as "Kreativ Bloggers" on my blog. Stop by when you get a chance!
that turned out so great!! I love those wall hooks, too.
I hope your cricut is waiting for you under your christmas tree 🙂
OMGOSH!!! I have the stuff to make the SAME thing, but I'm doing it on one bigger canvas…. I LOVE the way yours turned out….I live in Alabama, and we monogram everything we can get our hands on down here!
I just did a stenciled monogram on burlap project yesterday for my daughter's birthday party. Posted about it here:
http://cottageinstincts.blogspot.com/2009/10/saturday-night-special.html
Burlap looks fab stenciled, and your monogram is so cute. I have those same hooks from hobby blobby. :o)
peace.
I like how it's subtle and personal at the same time! Super cute!
This is so cute I love it! I had no idea there were so many thing to use burlap for until this month!
LOVE! Thank you for my burlap fix this morning!
-Jill
Love that!! Simply adorable.
I love it ! I'm going on a field trip to Hobby Lobby for the first time today !!
These turned out so CUTE! Love the idea. Wouldn't they be fun with nailheads around the border too? Hope you're having a good day!
pk @ Room Remix
This is so cute!!! I love that idea. I want a Cricut too!