Happy FRIDAY! I have a really fun weekend project for you today guys! I shared a teaser of it last night on Instagram, and had some great (and funny) guesses as to what it might be. Make sure to FOLLOW US ON INSTAGRAM and Pinterest to keep up with all of our DIY projects!
I decided it was time to build a new and improved wine rack for the dining room. I love the last one I made, but I was ready for a little change! Check out how my new DIY Wine Rack turned out!
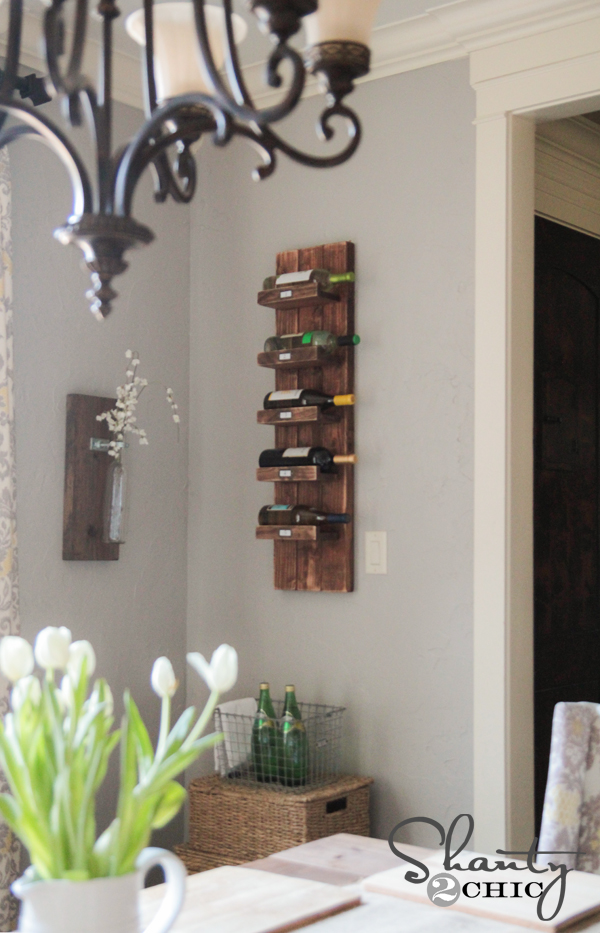
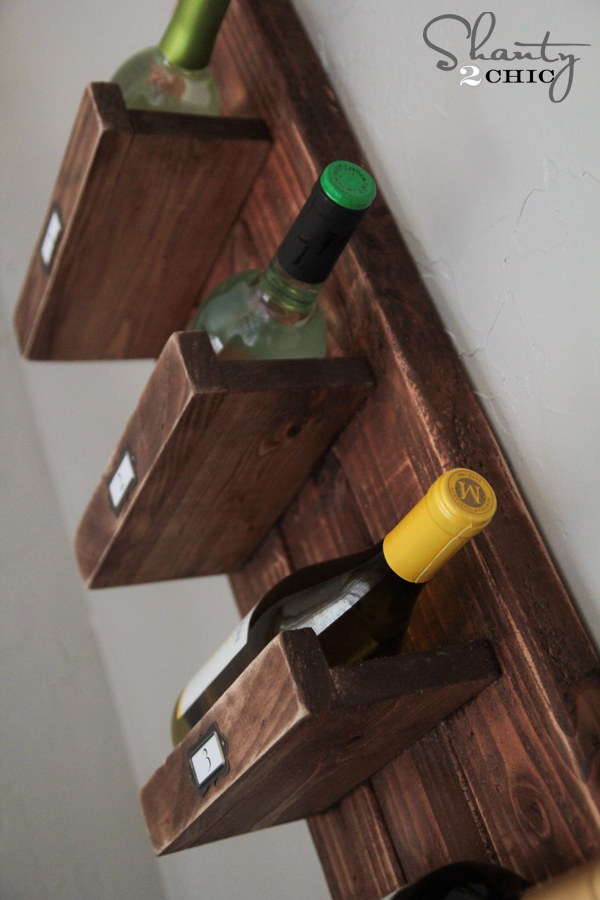
How cute?! I mean, every wine rack should be cute… Right?? This is a very simple build! It is a perfect first time Kreg Jig project for those of you that still haven’t tried yours out yet.
Let’s get started!
Supply List
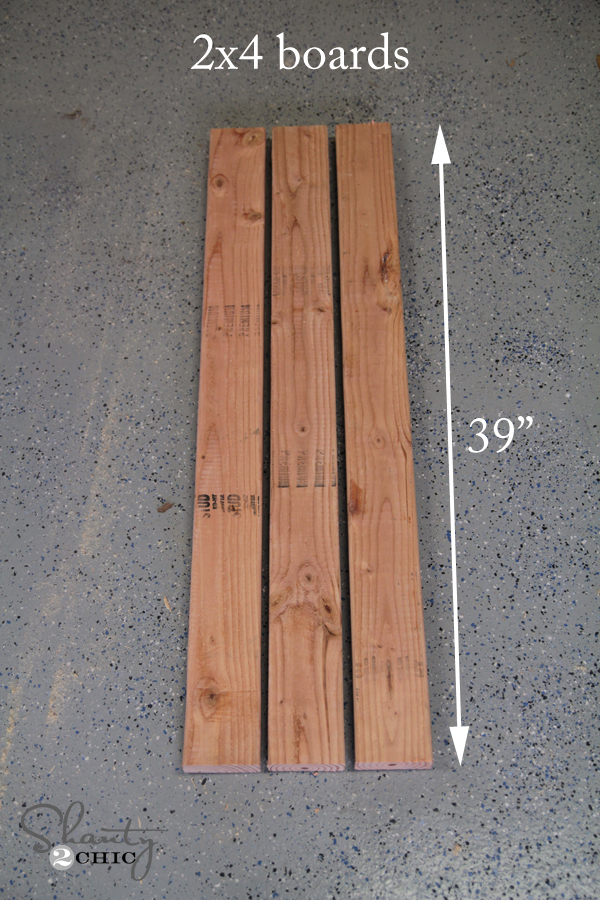
1 – 2 x 4 x 10 board
1 – 1 x 4 x 8 pine or white wood board
1 – 1 x 2 x 4 pine or white wood board
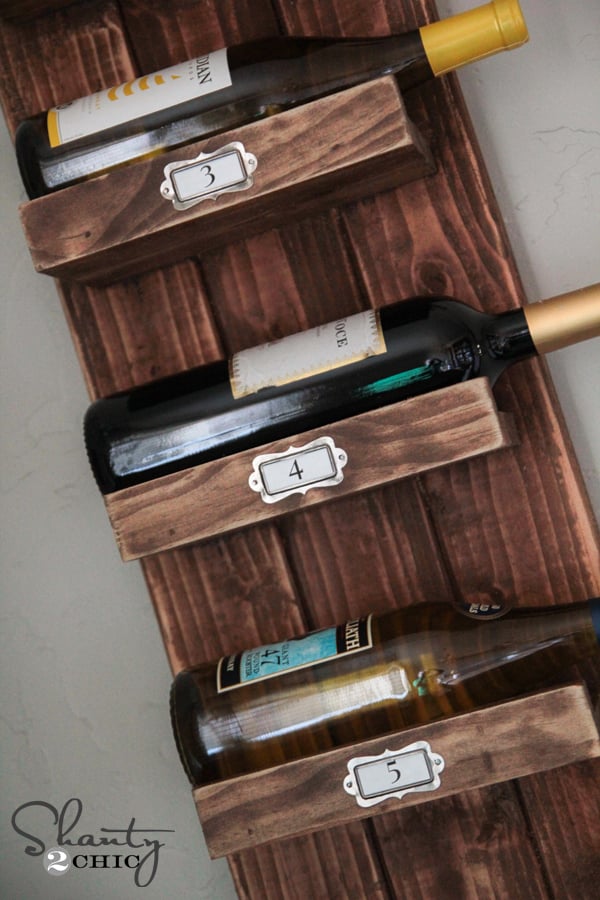
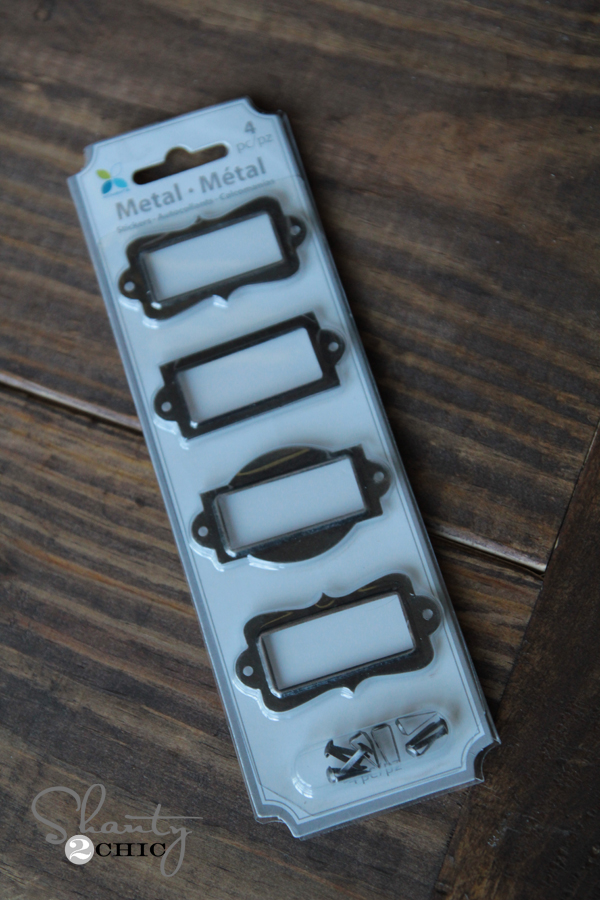
Metal label holders (optional)
The total cost of wood was under $8! Actually, I had enough scraps to make this baby free, and many of you may also.
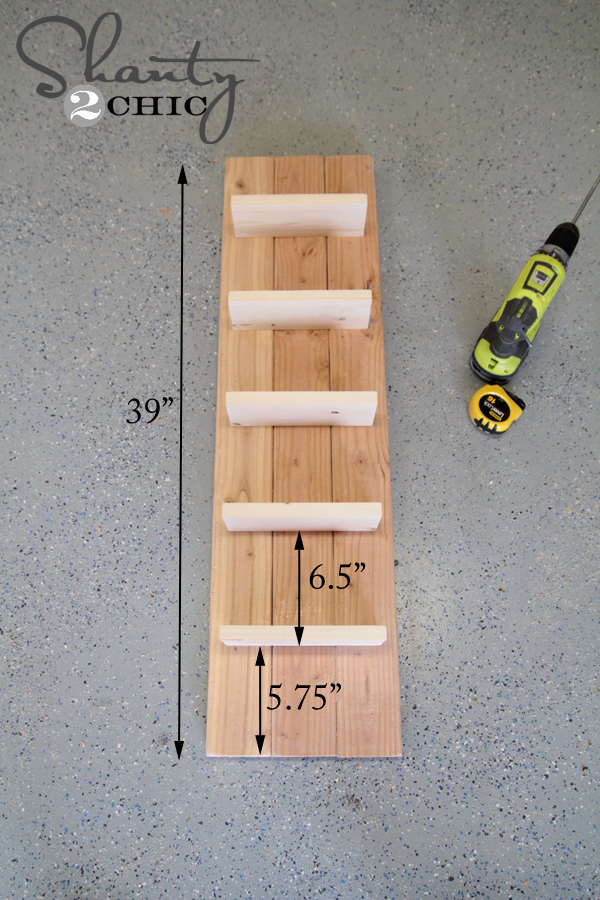
I started by cutting my 2 x 4 into 3 pieces that were each 39″ long.
Time to add some pocket holes! I used my K5 Kreg Jig![]()
for this part. I recently upgraded to the K5, and it is my very best friend. I love all the new features making it even easier to use.
This is how I lined my wood up in the jig.

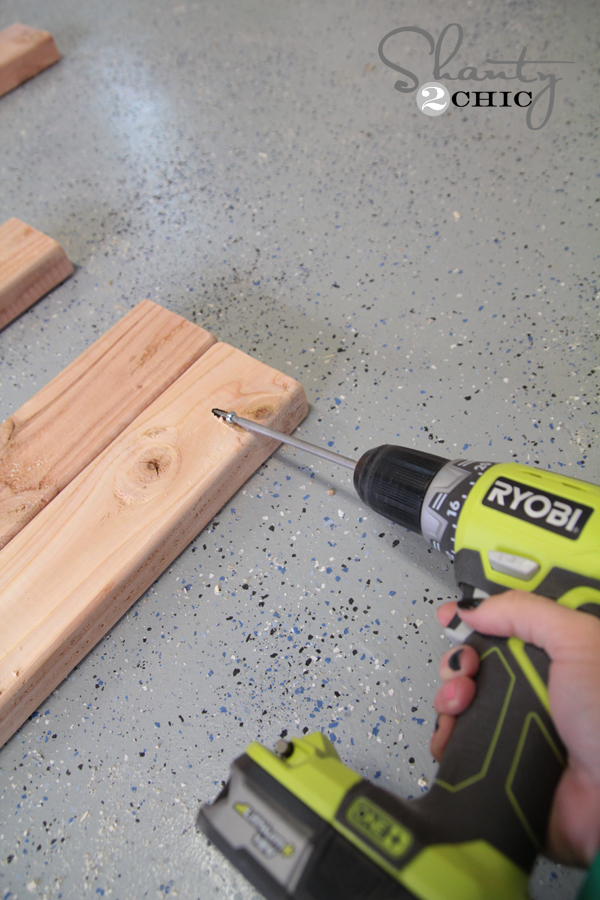
I put 1.5″ pocket holes about every 8″ down one side of 2 of my boards. You can see I have it set at 1.5″ on the side of the jig.
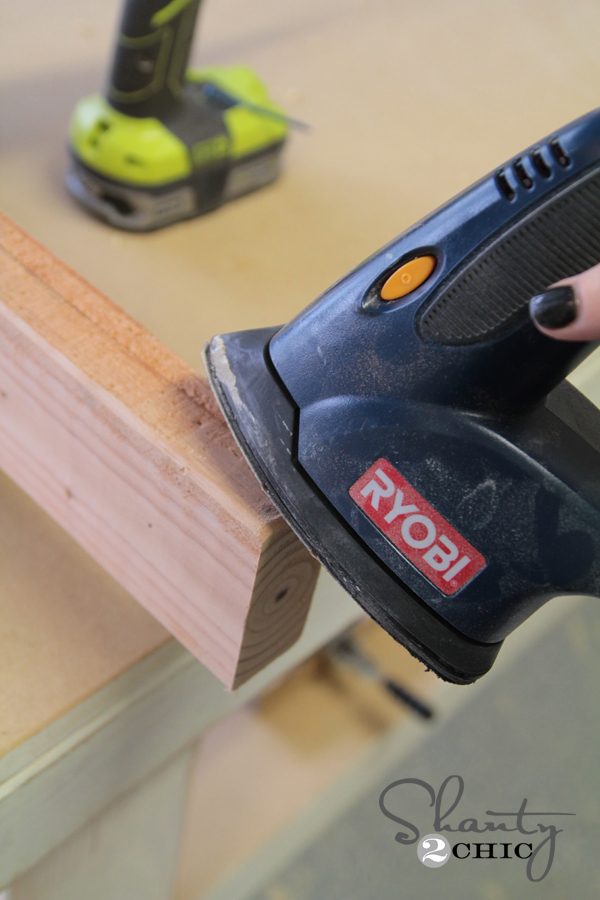
I used my Ryobi cordless drill to make the pocket holes like this!

I also used my Ryobi Corner Cat sander to smooth my edges and round my corners on this part.
This is what my boards looked like at this point…

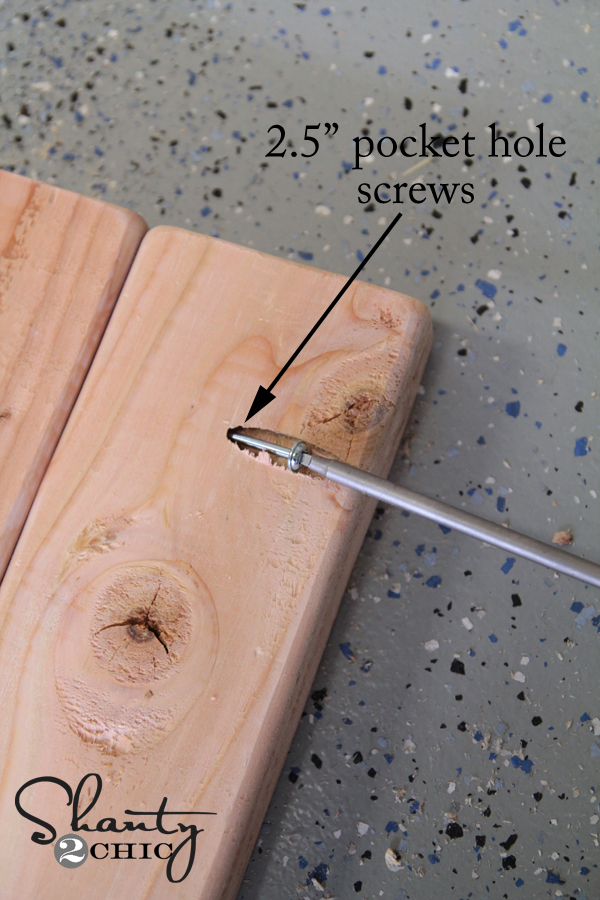
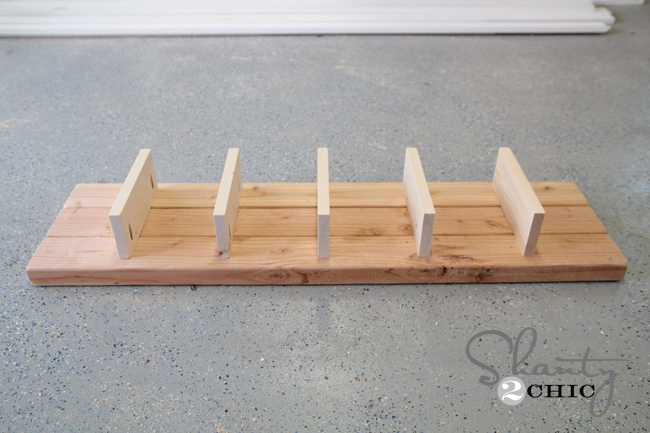
Next I used my drill with the Kreg driver attachment (comes with the Kreg Jig) to attach my boards using 2.5″ pocket hole screws.
Once they were all attached, it looked like this!

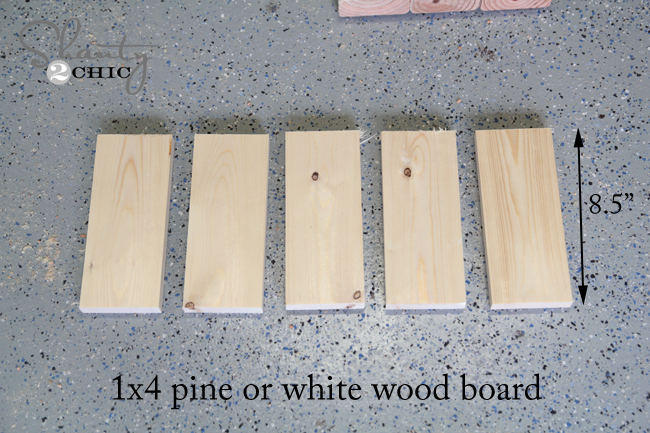
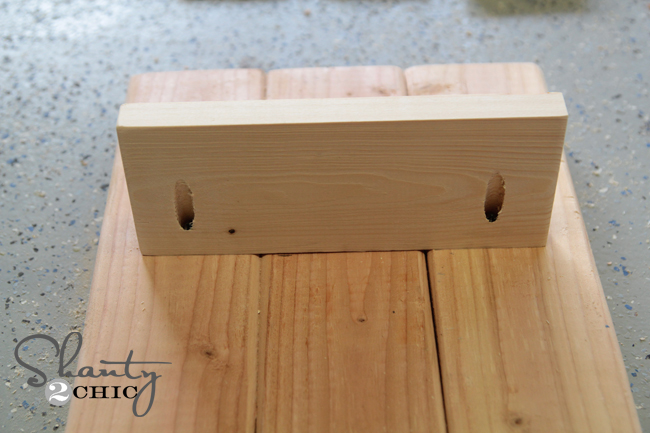
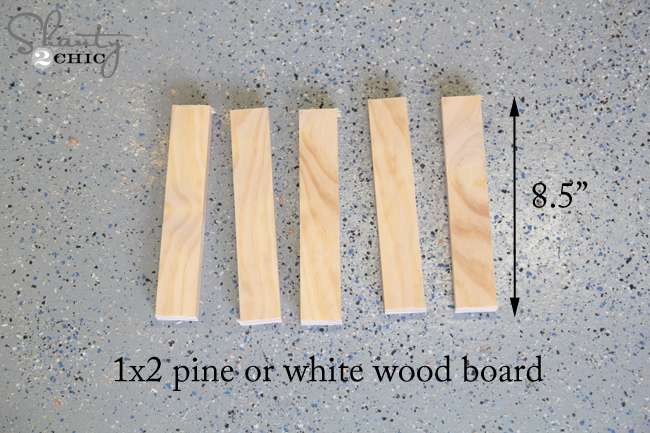
For my shelf pieces, I cut my 1×4 into 5 pieces that were each 8.5″ long.
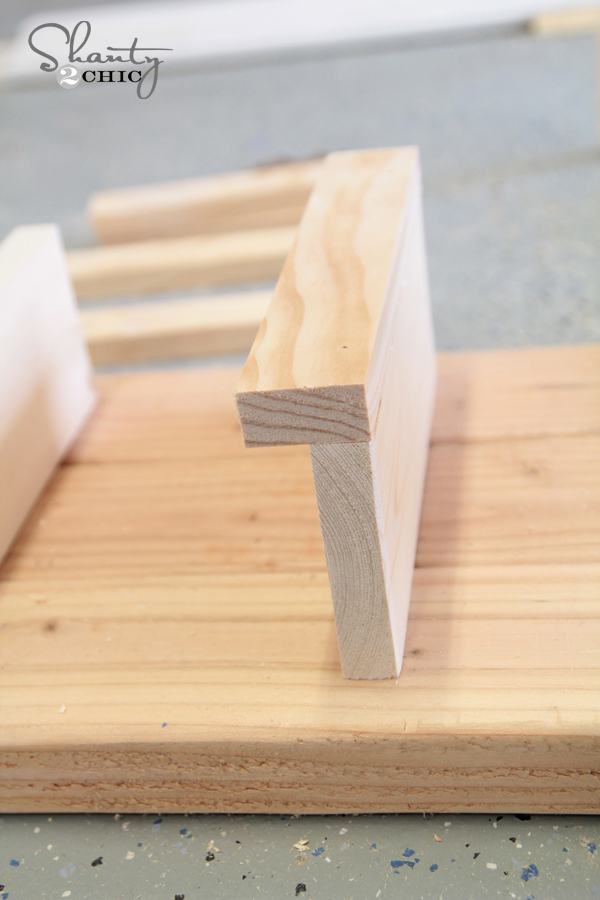
I used my Kreg Jig again to add pocket holes, but since this wood is not as thick, I made 3/4″ pocket holes.

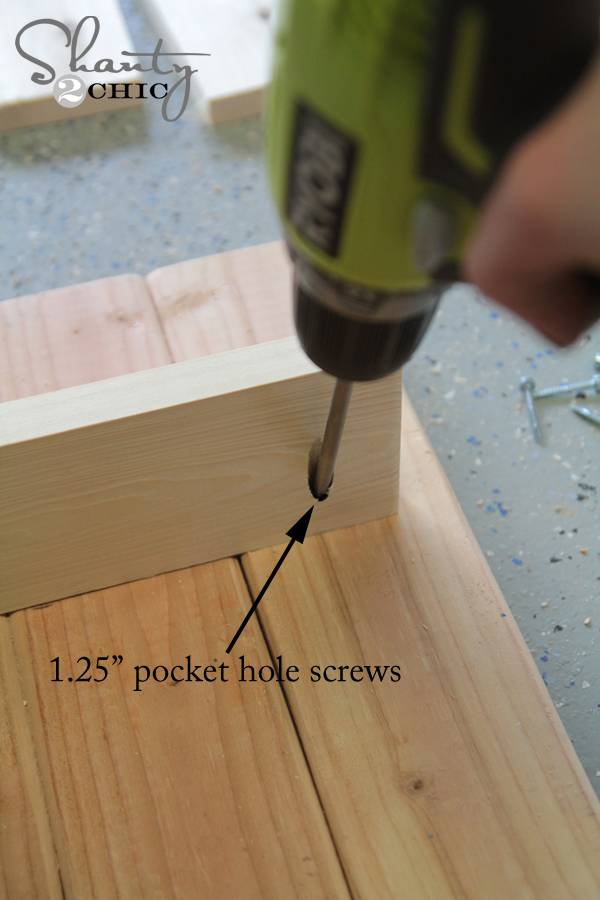
Next, I attach the shelves to the boards using 1.25″ pocket hole screws like this. I did run a line of wood glue beneath each shelf before attaching.
This is what a shelf attached looks like…
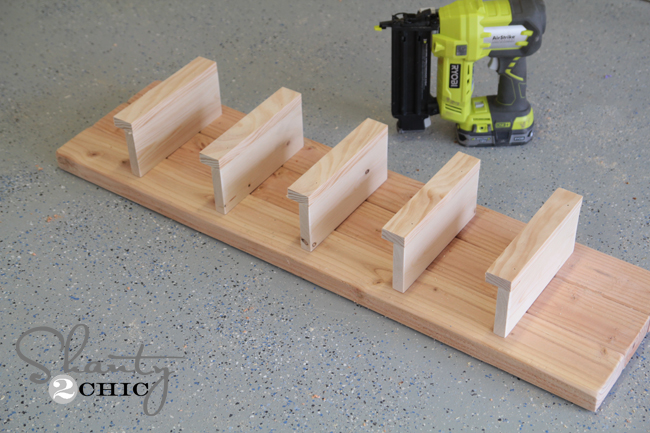
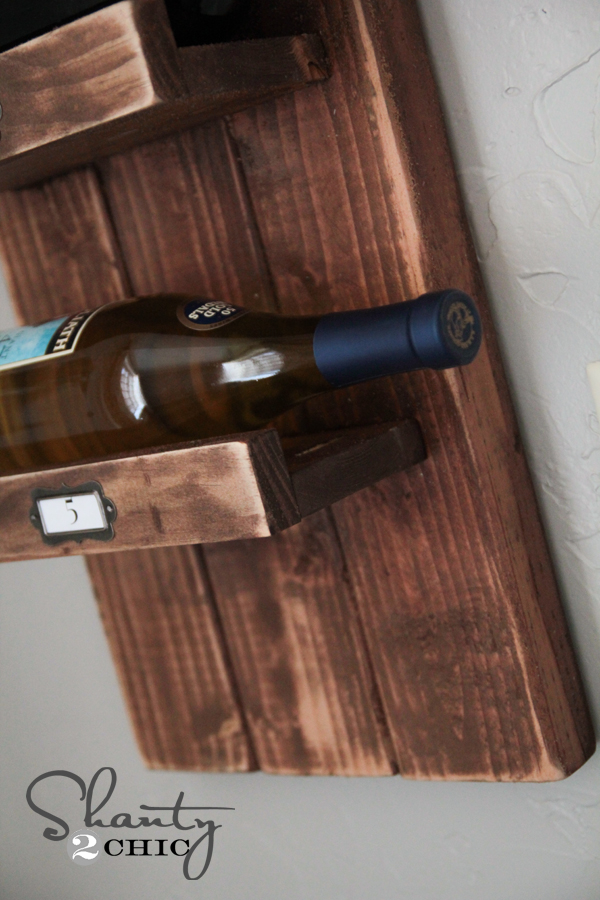
And here you can see where I placed my shelves. Each shelf is 6.5″ apart.
Here is a side view.
And a shot of my pocket holes once it was all attached!
I didn’t worry about filling these, because I know there will be a bottle on top of them keeping them covered. You can fill yours if you want though!
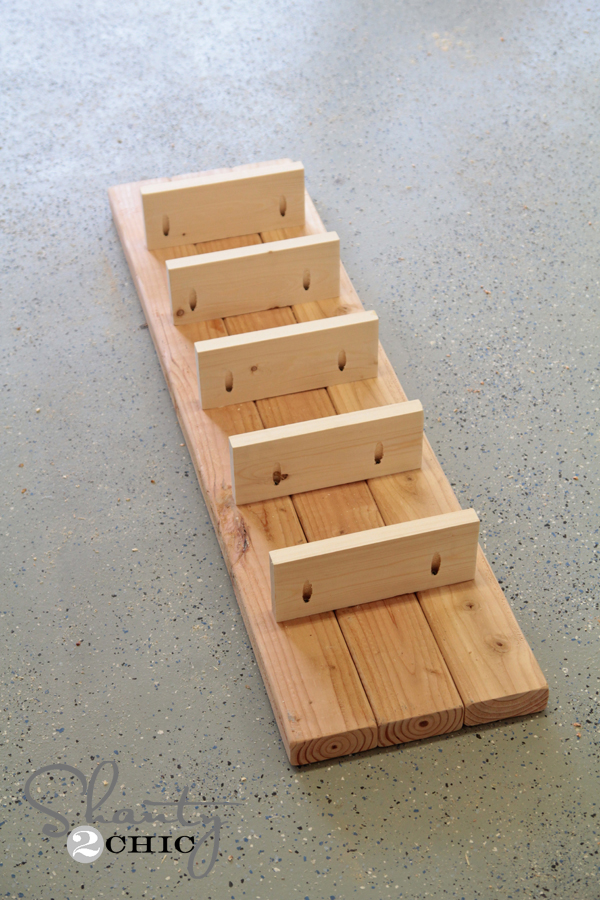
Now for the edge pieces. I used my 1×2 for this part and cut 5 pieces also at 8.5″ each.
I added a line of wood glue to each shelf piece.

Then, I used my ever so handy Ryobi AirStrike nail gun (LOVE THIS BAD BOY) to attach the front pieces. Seriously… Easiest and most awesome tool guys.

Here is what it looks like all attached!
I chose to stain mine using Varathane Stain from Home Depot in a color called American Walnut.
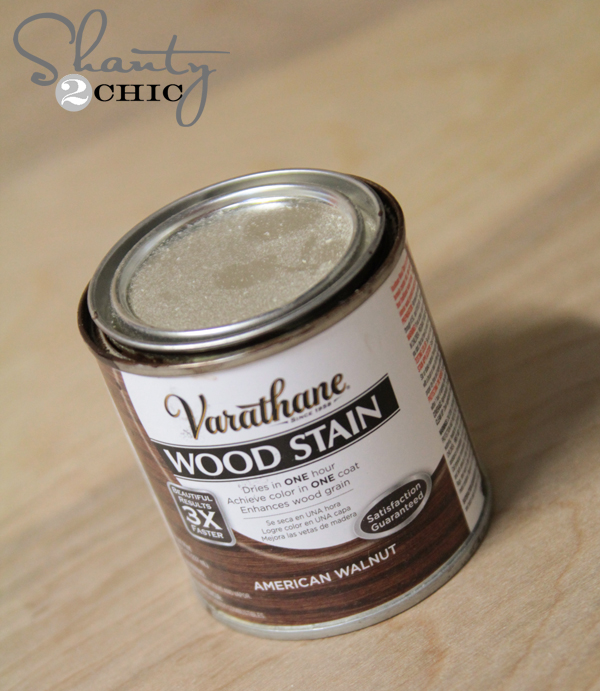
Love this stuff… It dries in under an hour and only requires one coat. My kind of stain people!
Once it dried, I used my corner cat sander again to distress my edges a bit before adding my labels.
I found these metal label holders at Michael’s. I like these on Amazon too!![]()
I just used small finish nails to attach each one.
Now for the fun part (or not)…. Attaching it to the wall. This really isn’t difficult to do. This is a heavy piece, so I wanted to go directly into the stud of the wall. My first step was using my stud finder to locate the stud. This is a small tool that you run along the wall and it beeps when it finds a stud. This is the one I use.![]()
I pre-drilled a small hole where my stud would line up with the wine rack into the back of the rack like this.

Next, I used my impact driver (you can also use your drill) to attach a torx screw through the wine rack and into the stud in the wall. I like using the driver because it is effortless. This thing is so strong and easy to use, and it makes jobs like this a breeze.

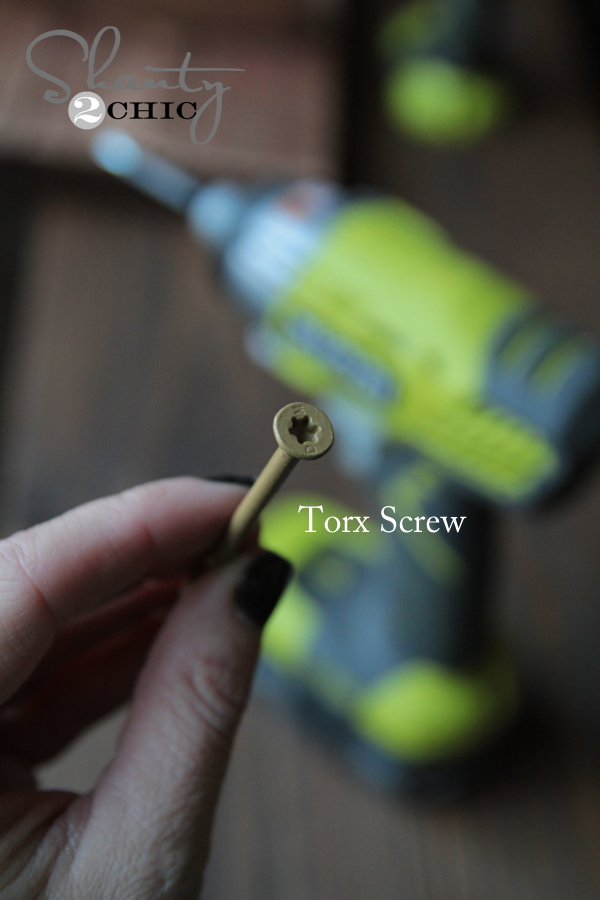
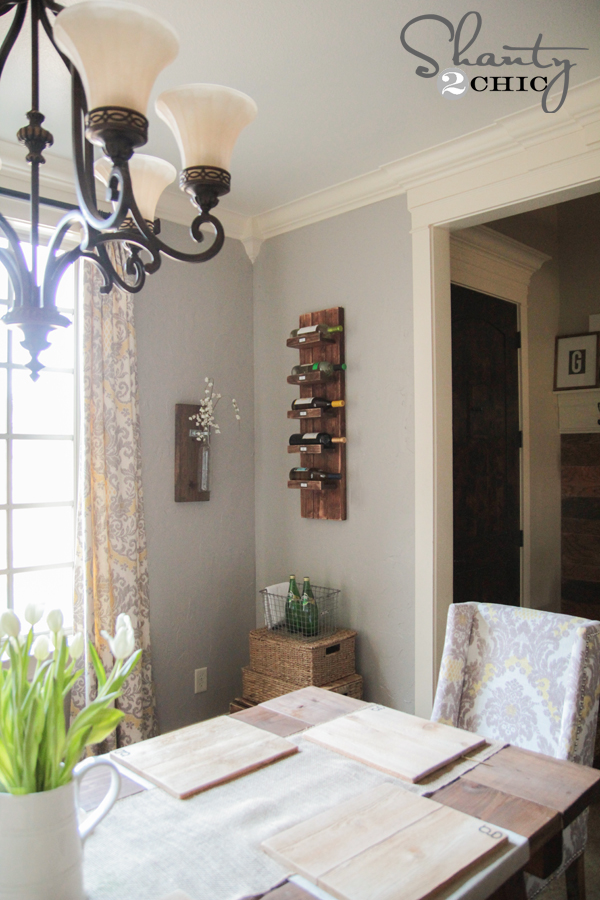
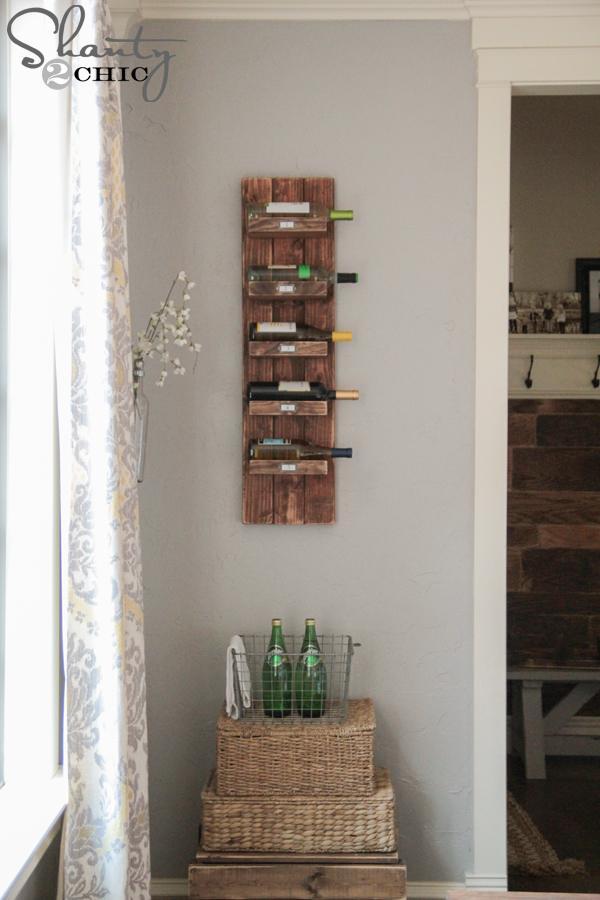
I attached mine using 3 screws into the stud and I was done! Here is how she turned out!


What do you think? I would LOVE for you to share it and PIN it with your friends guys!
Thanks so much for stopping by…Enjoy this super quick and easy weekend project! Cheers 😉
~Whitney

Can this be made with 1×8 instead of the 1×4. I think this would be great to store sterilite shoe box size boxes on. I dont know how to figure out the strength of the glue and screws, lol
Thanks for these plans! I did modify somewhat …2×4 instead of 1×4 pine,
6 3/4 spacing to accommodate wider shelves for wine bottles. Used hammered black painted horseshoes to hold bottles. Minwax Weathered oak stain with polyurethane coats. A great weekend project!
Thanks for these plans! I did modify somewhat …2×4 instead of 1×4 pine,
6 3/4 spacing to accommodate wider shelves for wine bottles. Used hammered black painted horseshoes to hold bottles. A great weekend project!
My very first DIY project. It was super easy. Thank you so much ladies. Great instructions.
i made this wine rack but instead of using 3 2x4s i used one solid piece of wood ,, and it looks the same and was easier ,, i also used a satin finish to the walnut stain,,,i had a hard time finding the metal tags but i finally found them,, and instead of writing 1,2,3,4,5, i wrote,, red,white,favorite,table and desert on mine !! i love it and it is beautiful !!!
I made this Sunday and love it. I made it longer and added a place to hang a couple wine glasses and the cork screw. It looks great in my dining room.
did you use 1×2’s for the wine glass holder? I love this addition I was actually contemplating trying that as well
Yes, I’d like to know also!
This is totally out of the subject but me and my wife want to know the name of the paint in the room please!!
When using wood glue you should always coat the entire edge with glue. Not just a line. Use a 1″ wide foam brush. They are less than $1 each and spread the glue very well. I like to use a water resistant glue like Titebond II. After stain you should always coat with a clear coat. I like clear brushing laquer as it comes in different shines, matte, satin and gloss and dries real fast. Plus it can be thinned and sprayed.
What is your wall color? I LOVE it!!!
This I see is a takeoff from the towel rack. I made the towel rack and made a slight change to it. Instead of using the nail gun to put the lip on the shelves I just put kreg pockets holes on both sides of the shelf itself. No holes to fill and you can’t see them anyway. I think this may be my next project. Love the site – keep ’em coming.
I love this! And wine 🙂 What a great idea.
I love it! I just found my weekend project!
I love it, what a fabulous wine rack and your tutorial is wonderful. Such a pretty room. Hugs, Marty