Hey there! I’ve been having so much fun decorating for fall! I had to stop and share my latest addition!
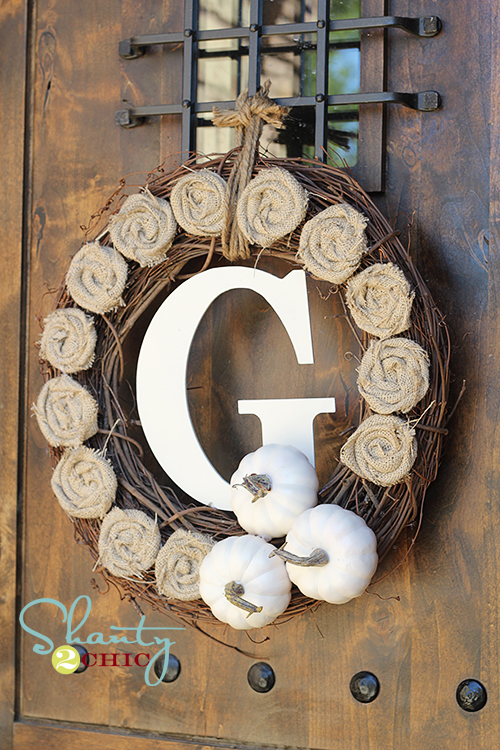
 I made this cute little fall pumpkin this week and I just love it:)
 I started with this fake pumpkin that I purchased at Michael’s for $7.
 I taped off the stem
 and hot glued these chipboard letters (also purchased at Michael’s).
 I then spray painted all over with my favorite cream-colored spray paint.
 It was kind of plain so I used Whit’s easy tutorial for her flat rolled rosettes and hot glued three to the pumpkin as well!
 That was it! Super quick, easy and cheap;)


Did I mention I LOVE fall:) Thanks so much for stopping by!
~Ashley

What a fabulous twist on the pumpkin craze. These are just Gorgeous! Please come share them at my Halloween link party at http://igottacreate.blogspot.com!
Love this idea. Your pumpkin is fabulous and chic.
Ruth
How fun! 🙂 I chose to decorate with white pumpkins and lots of warm brown accents this fall too – so I love your color combo! 🙂 The burlap flowers are such a fun touch! Thanks for sharing!
Great idea! I like carving pumpkins with my daughter (and we will do a couple this year) but I LOVE this idea – no mushy messy to clean up and SO cute!
OH!!!! I LOVE IT!!! SO creative!! 🙂
OMG! I LOOOOVE this idea:) Beautiful!
OMG I LOVE your pumpkin!! So darn cute!! I’m pinning it!
Wow! I can’t tell you how much I love this idea!! I HAVE to make one!
Ooh, this is the cutest little pumpkin ever. And, thanks for showing us how to do it!
hugs
Sissie
Um I love this! SOOO much!!! Pretty sure I NEED to make one for my house now. THANKS!!!
I LOVE LOVE LOVE the cream colored pumpkins!
That is so cute!!bellesbazaar-heather.blogspot.com
I like this. Gotta put chip boards letters on my next crafting trip. I have been painting pumpkins to match my home decor as well. My husband has been wondering why I’m painting pumpkins white and blue. Ha!
Gorgeous! I just love the color and the accents!
I cannot tell you how much I love this!! SO CUTE! I am totally going to feature this post on my blog sometime in the next month. Thank you so much for the inspiration!!