Hey friends!!
This next project has been in the works for a looooong time. I’m so happy to finally have it done!
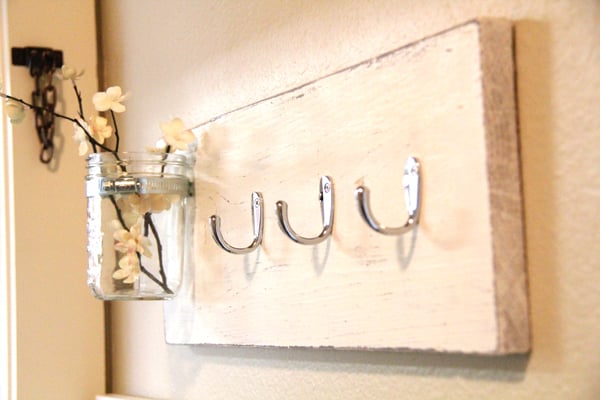
I found a great picture of an entry on google a few months back and pinned it. I have been eyeballing it ever since. I have always wanted a mantle in my house, but don’t have room on the fireplace. This isn’t quite a mantle, but it kind of feels like one to me! It took me an afternoon to finish!
I started with 1 2×6 cut at 5.5 ft and 1 2×8 cut at 5 ft.
I attached the 2×6 to the top of the 2×8 using wood glue and 2″ drywall screws. I put the screws in through the top of the 2×6. This is what it looked like…

My next step was to add just a bit of molding to chic it up a bit. I didn’t want to mess with cutting crown, so I decided to use a casing instead. Casing is flat on the back and is much easier to cut and attach in my opinion. I just cut the corners at a 45 degree angle and I was set. I attached the casing using wood glue and finishing nails.

That’s it for the building! Super easy, huh??? I caulked my edges and nail holes. After it dried I sanded the whole thing using 120 grit sand paper.
My next step was to paint her!
I used my very favorite….
Rust-Oleum Painter’s Touch in Heirloom White

You can get it at Home Depot and Hobby Lobby!
I sprayed 2 coats on and let it dry.
I found my hooks at Hobby Lobby for $2.99 a piece. I bought 7 because I am planning on hanging our stockings on this. I used 1″ drywall screws to attach them to the 2×8.

That was it! I had my stepdad help me hang it up because it was super heavy. I marked my studs on the wall using a stud finder. We used 3″ long screws to drill through the 2×8 and into the studs in the wall. We put 4 in and it is super sturdy! I filled the holes with wood filler and put a little touch up paint on them to cover it up. Good as new! And, I didn’t have to worry about finding the right hardware.
Want to see it all finished???
Ok!


What do you think??
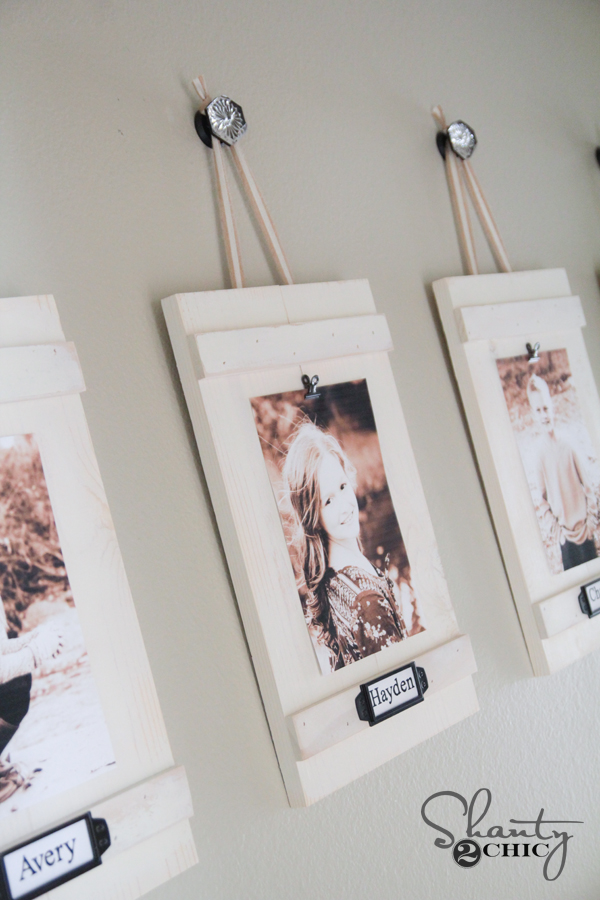
I am finally able to display LOTS of my kiddos pics which I LOVE!

Hope you like it!
It was SO easy! And, it was under $40. More than half of that was the hooks!
Thanks so much for stopping by! We have some super fun things coming up that we are excited to share with you so stick around!
~Whitney


Love it… It’s amazing what you can do with a few creative ideas…. and paint… always paint 🙂
I love to DIY!!!
Blessings,
Diana
We have a faux mantel, too. But, our is an old pottery Barn shelf. i love the fact that you created yours from scratch. (Our is too narrow – if I have made it by hand i would have made it deeper….)
Thanks for sharing!
I love this project. I think I might do this for our daughter…as a surprise. Love the idea of the stockings being hung there too.
Really cute. Love those hooks.
This is so beautiful. I don’t have a fireplace or a mantel in my house either!
Thank You! so much for the inspiration and precise instructions. I’m thinking I’ll have one in my living room by Saturday evening!
Oh this is awesome!!!!!! Love it! Thanks for sharing!
Can you please, please tell me where you got the brown-ish finish corner pieces up by the ceiling??? I have some very ugly ones that are beige and plastic that came in our home, and we managed to break one during out move into the home. My hubby and I live in Houston, TX area, so should have similar selections to the DFW area. Thank you so much!!!
Awesome! And you’re front door is gorgeous!!
Great entry way and that’s the cutest color thanks for sharing!
wow, so simple! beautiful job!
gail
Whitney it’s beautiful, frugal, and useful – those are the best kind of projects. Job well done.
Love the whole look of it!! So clean and friendly. bellesbazaar-heather.blogspot.com
That is absolutely BEAUTIFUL! Love it – Love it – Love it!
WOW! That shelf is gorgeous! It is simple yet so elegant! I love it! Thank you so much for sharing!