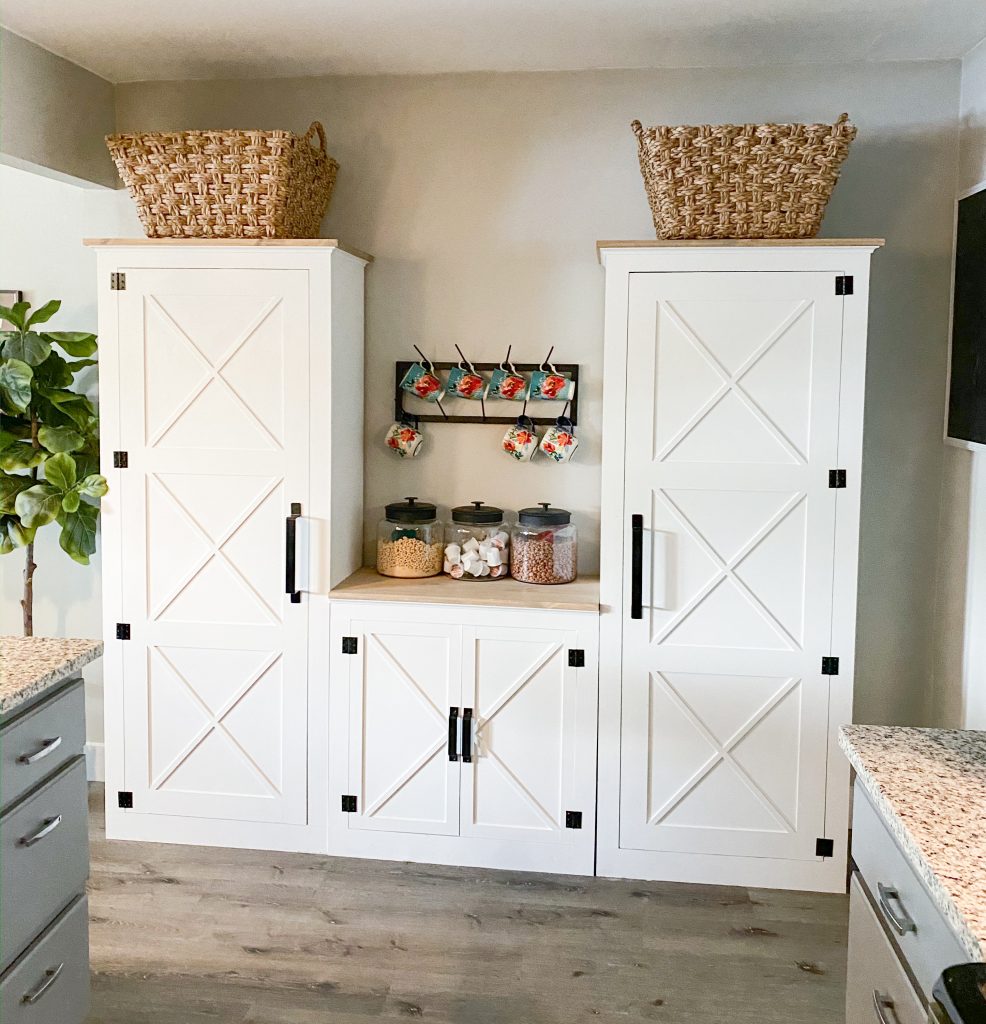
Everybody needs a good pantry cabinet. Learn how to build this pantry cabinet with free plans! It is perfect for small spaces and extra storage in the kitchen!
Hey hey friends!! We hope everyone is staying safe and happy! We are SO HAPPY! Our baby sis (you know, the one we have done like 3 shanty house crashes for) just moved back to DFW. She’s been in the Houston area for 7 years, and we are SO thankful to have her back. While they find where they plan to stay more longterm, they found a rental down the road from us. It’s the cutest house that will be great for this year. She has 5 kiddos, and the only thing this house was lacking was a pantry or cupboard. So, I built her one! She does have a good amount of kitchen cabinets, but this will give her extra storage space for dishes, small appliances, dry goods and food storage.
A pantry cabinet is a perfect solution for a small kitchen. Now I want one too haha! Check out the video of this DIY pantry cabinet by clicking the play button and I also share the instructions below!
You can download and print the FREE PLANS by jumping to the bottom of the post and clicking the link!
Jump to Free Plans!Table of Contents
How to Build a DIY Pantry Cabinet
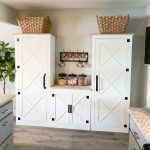
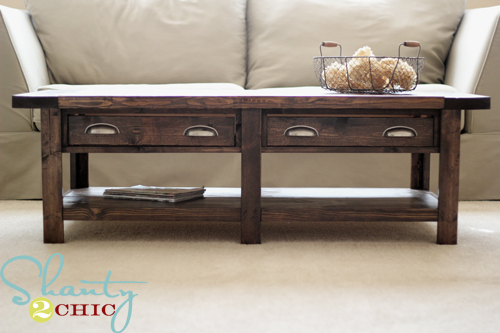
I love how cute this pantry system turned out! One of the benefits of building your own pantry cabinet is that it will be a solid wood piece, and you can build it in different depths and widths to fit your needs. And, think beyond the food and kitchen. This would also make a great storage pantry. There are many different types of uses you can achieve with this build! I will be sharing plans for the middle coffee cabinet addition soon! Look how cute it is in her house!
Building the box of the DIY Pantry Cabinet with Plywood
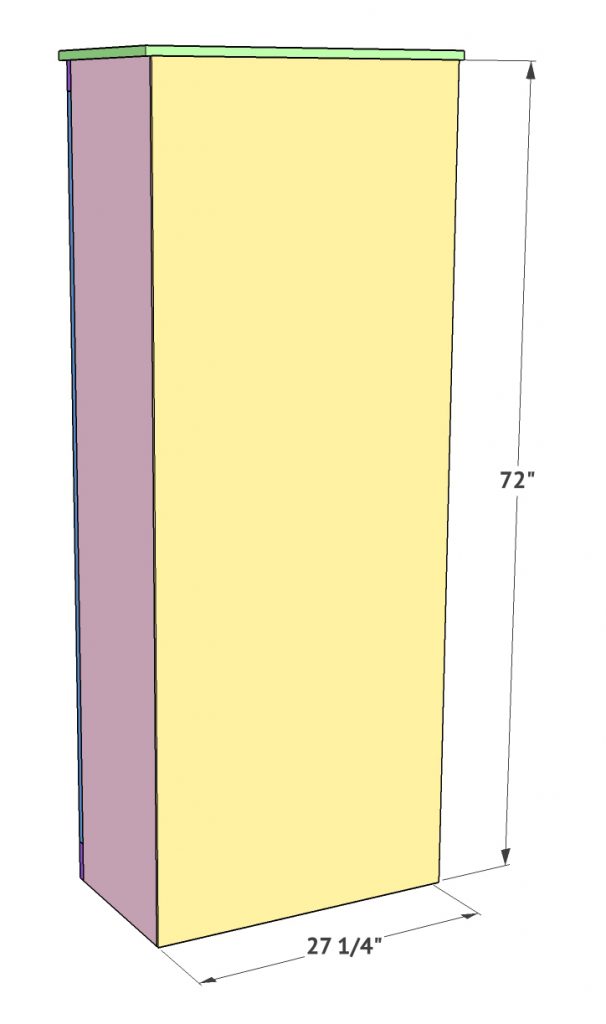
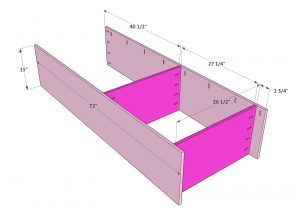
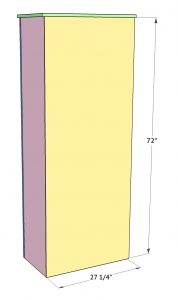
Let’s get started with this DIY Pantry Cabinet! The body of this pantry is constructed with 3/4” plywood. Cut each long side as well as the bottom and middle shelves. If you are adding shelf pin holes to your sides, be sure to do that before attaching the shelf boards on this step. You can check out our video for tips on adding shelf pins to your pantry cabinet. Attach the shelf boards to the sides using wood glue and 1.25” pocket hole screws through 3/4” pocket holes.
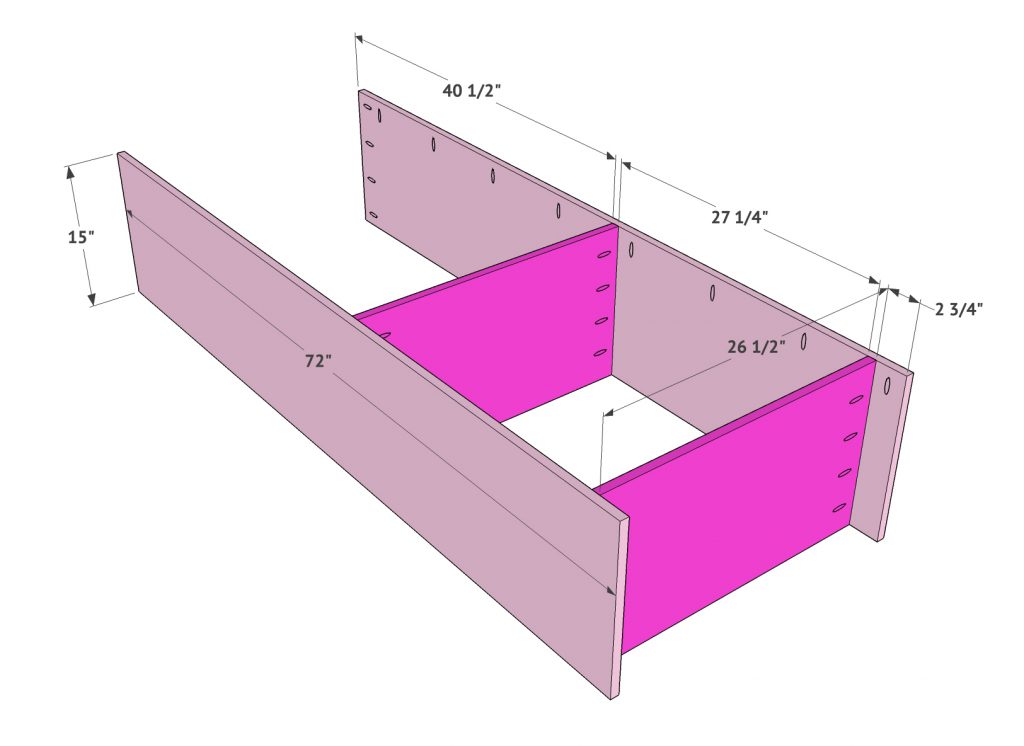
Now, attach the back support board to the top and back of the cabinet. This board will be used to secure the cabinet to the wall onces it’s finished. Add 3/4” pocket holes along the top and sides of this board. Attach it to the side boards using wood glue and 1.25” pocket hole screws through the 3/4” pocket holes. The top pocket holes will be used to attach the top in a later step.
Front of the Cabinet
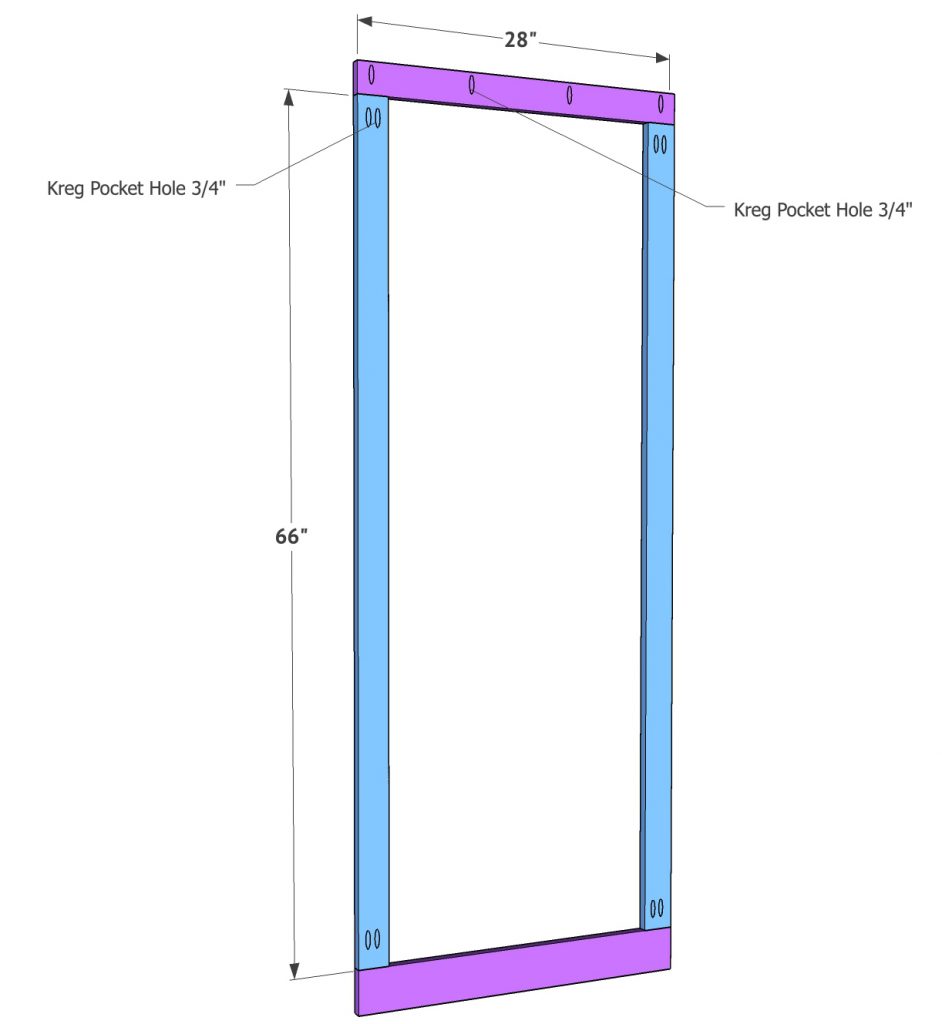
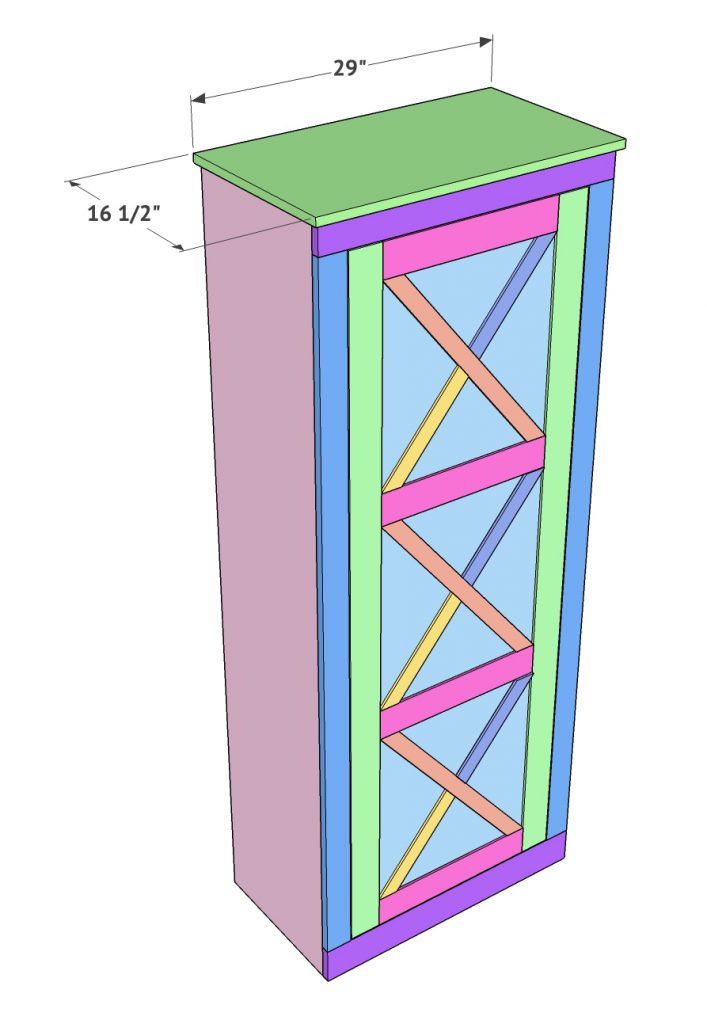
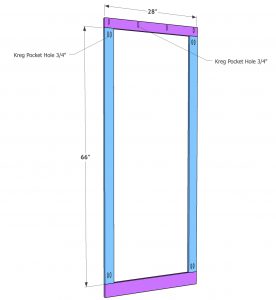
Build the face frame next. The top and side boards are 1×3 and the bottom board is a 1×4. Add 3/4” pocket holes on the top and bottoms of the side boards. Also add 3/4” pocket holes along one long side of the top board. Attach all boards to create the frame using wood glue and 1.25” pocket hole screws.
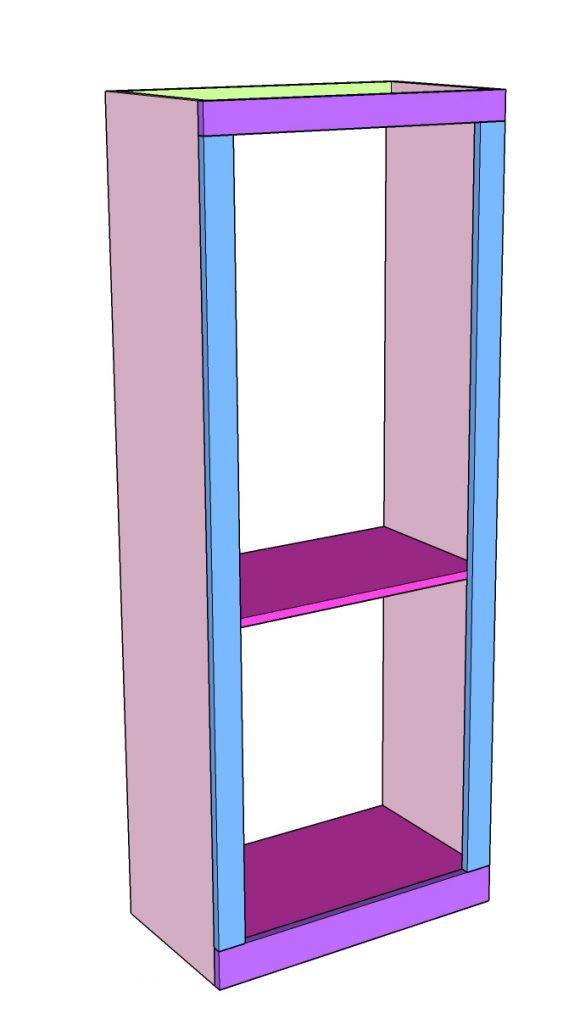
Attach the face frame to the front of the cabinet using wood glue and 1.25” pocket hole screws through the pocket holes on the inside of the cabinet and into the face frame. Make sure the face frame is flush with the top and sides of the cabinet.
Build the Cabinet Doors
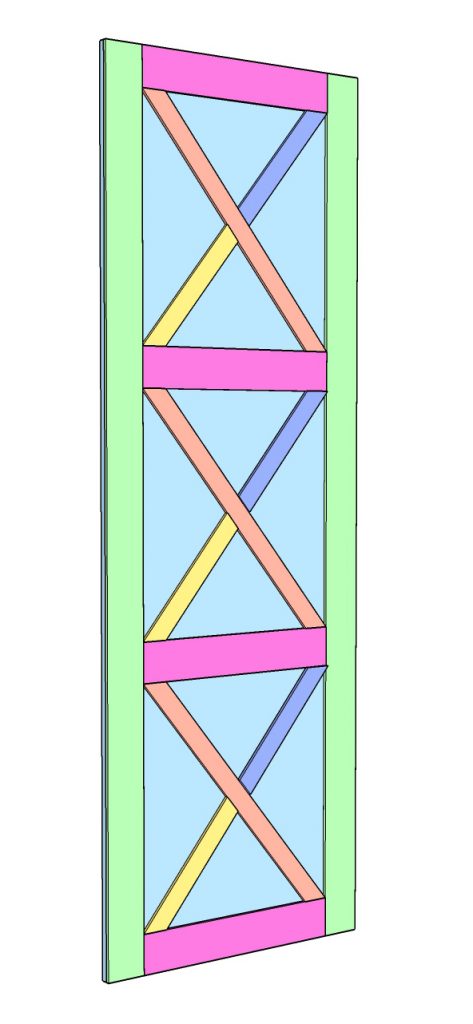
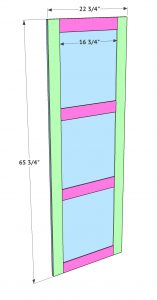
Now it’s time to build the door! The back of the door is 1/2” hardwood plywood. The trim on the front of the door is called bender board. These boards can typically be found in the outdoor landscaping section of the hardware store. If you can’t find them, you can also use 1/4” craft boards for the trim part. I used my table saw to rip the vertical and horizontal boards first. Then, I cut each one to size and attached them using wood glue and 5/8” brad nails.

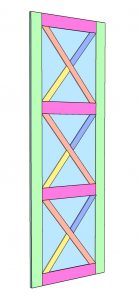
The diagonal boards are ripped to 1.5” wide each. I didn’t add dimensions for the diagonal boards because these are easiest to measure by holding in place and marking the cut with a pencil. Attach them the same way using glue and nails.
The top of the cabinet is a edge glued panel. These come in different sizes and are ready to stain or paint. Attach the top using wood glue and 1.25” pocket hole screws through the pocket holes at the top of the cabinet and into the wood panel.
The Back of the Pantry Cabinet
The back of the pantry is 1/4” hardwood plywood. Cut this piece to size and attach it to the back using 3/4” brad nails or staples. You can also add this board after installing your drawers to make that part even easier!
Adjustable Shelves for the Pantry Cabinet
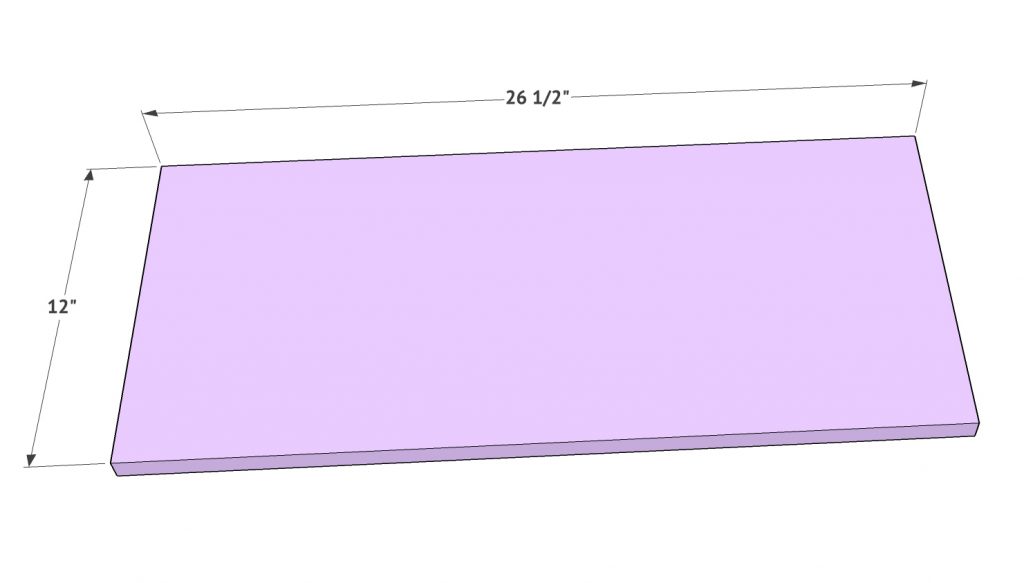
The shelf boards will all be created with 3/4” hardwood plywood. I show 3 in the cut list, but you can make less or more depending on your storage needs. If you did not add shelf pin holes to your cabinet, you can attach the shelves using 1.25” pocket hole screws through 3/4” pocket holes on the bottom of each shelf board. If you did use shelf pin holes, you will want to cut these boards about 1/4” shorter to allow room for the shelf pins on each side.
Drawers for the Pantry Cabinet
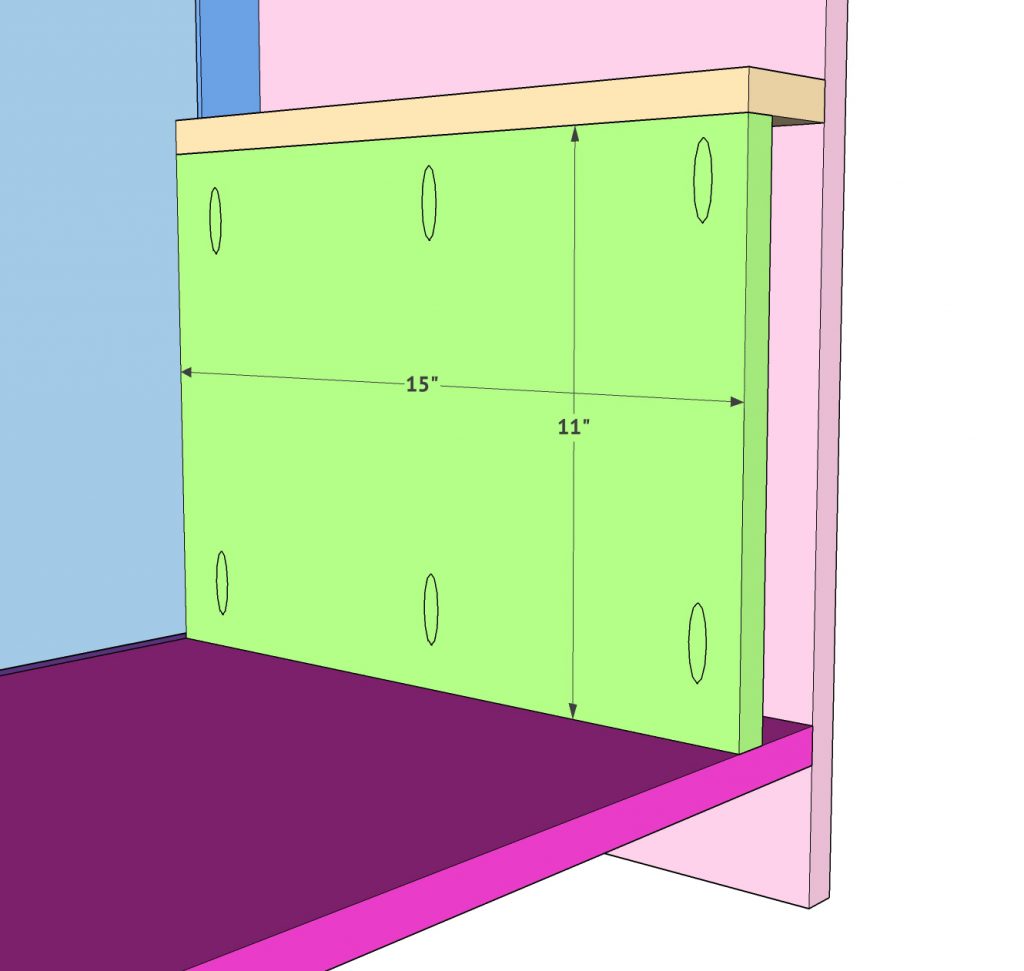
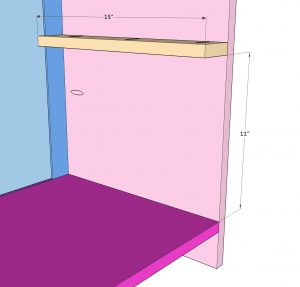
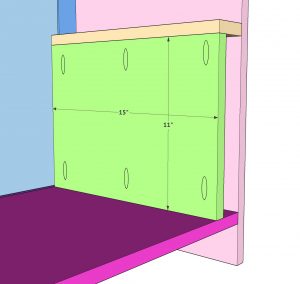
Next, build the supports for the drawers. This is also created with 3/4” plywood. Use a table saw to cut these pieces to size. Add 3/4” pocket holes to the top of the top board first and attach them to the sides using wood glue and 1.25” pocket hole screws. You will repeat this step on the opposite side of the cabinet as well. Add 3/4” pocket holes to the top and bottom of the vertical board and attach it in place using wood glue and 1.25” pocket hole screws. Again, repeat this on the opposite side of the cabinet. These will be the boards your drawer slides attach to.

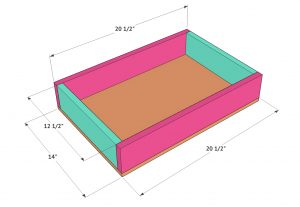
The final step is creating your drawers. I used 3/4” plywood for the sides of the drawers. You can also use 1×4 boards. Attach each corner using wood glue and 1.25” brad nails to create the box. The base of each drawer is 1/2” plywood. Attach it to the box using wood glue and 1.25” brad nails. Refer to our video for tips on installing the drawers into the pantry! And there you have it a DIY Pantry Cabinet!

I found the drawer slides HERE!
I found the door pulls HERE!
I found the hinges HERE!
DIY Pantry Cabinet
Instructions
- The body of this pantry is constructed with 3/4” plywood. Cut each long side as well as the bottom and middle shelves. If you are adding shelf pin holes to your sides, be sure to do that before attaching the shelf boards on this step. You can check out our video for tips on adding shelf pins to your pantry cabinet. Attach the shelf boards to the sides using wood glue and 1.25” pocket hole screws through 3/4” pocket holes.

- Now, attach the back support board to the top and back of the cabinet. This board will be used to secure the cabinet to the wall onces it’s finished. Add 3/4” pocket holes along the top and sides of this board. Attach it to the side boards using wood glue and 1.25” pocket hole screws through the 3/4” pocket holes. The top pocket holes will be used to attach the top in a later step.

- Build the face frame next. The top and side boards are 1×3 and the bottom board is a 1×4. Add 3/4” pocket holes on the top and bottoms of the side boards. Also add 3/4” pocket holes along one long side of the top board. Attach all boards to create the frame using wood glue and 1.25” pocket hole screws.

- Attach the face frame to the front of the cabinet using wood glue and 1.25” pocket hole screws through the pocket holes on the inside of the cabinet and into the face frame. Make sure the face frame is flush with the top and sides of the cabinet.

- Now it’s time to build the door! The back of the door is 1/2” hardwood plywood. The trim on the front of the door is called bender board. These boards can typically be found in the outdoor landscaping section of the hardware store. If you can’t find them, you can also use 1/4” craft boards for the trim part. I used my table saw to rip the vertical and horizontal boards first. Then, I cut each one to size and attached them using wood glue and 5/8” brad nails.

- The diagonal boards are ripped to 1.5” wide each. I didn’t add dimensions for the diagonal boards because these are easiest to measure by holding in place and marking the cut with a pencil. Attach them the same way using glue and nails.

- The top of the cabinet is a edge glued panel. These come in different sizes and are ready to stain or paint. Attach the top using wood glue and 1.25” pocket hole screws through the pocket holes at the top of the cabinet and into the wood panel.

- The back of the pantry is 1/4” hardwood plywood. Cut this piece to size and attach it to the back using 3/4” brad nails or staples. You can also add this board after installing your drawers to make that part even easier!

- The shelf boards will all be created with 3/4” hardwood plywood. I show 3 in the cut list, but you can make less or more depending on your storage needs. If you did not add shelf pin holes to your cabinet, you can attach the shelves using 1.25” pocket hole screws through 3/4” pocket holes on the bottom of each shelf board. If you did use shelf pin holes, you will want to cut these boards about 1/4” shorter to allow room for the shelf pins on each side.

- Next, build the supports for the drawers. This is also created with 3/4” plywood. Use a table saw to cut these pieces to size. Add 3/4” pocket holes to the top of the top board first and attach them to the sides using wood glue and 1.25” pocket hole screws. You will repeat this step on the opposite side of the cabinet as well. Add 3/4” pocket holes to the top and bottom of the vertical board and attach it in place using wood glue and 1.25” pocket hole screws. Again, repeat this on the opposite side of the cabinet. These will be the boards your drawer slides attach to.


- The final step is creating your drawers. I used 3/4” plywood for the sides of the drawers. You can also use 1×4 boards. Attach each corner using wood glue and 1.25” brad nails to create the box. The base of each drawer is 1/2” plywood. Attach it to the box using wood glue and 1.25” brad nails. Refer to our video for tips on installing the drawers into the pantry!


Why is so hard to answer these people I see that you haven’t answered 1 person that’s bad
I see the detailed list of supplies…
Any chance you list tools as well. I’m a newbie and will need it all lol
Are these plans for only 1 of the tower cabinets or for both of them?
Hi we are interested in building the pantry cabinet. Can you tell me the overall height width and length of all 3 sections please? Thank you much.
Thank you for the instructions! I’m diligently searching for the coffee cabinet instructions. I see that other people have requested, but not sure if you told them where to find that? I’d love to get those and would be willing to pay for those. You should definately charge for the plans with all the work you put into this. I’m actually considering trying to do this and I’ve never built anything. I do need those coffee table plans. I’d try and wing it with one of the other plans, but hoping you have that already? Thank you!
What was the total cost of the materials? Thanks!
what is the thickness of the edge glue panel?
Will you be sharing plans of the middle coffee bar portion?
what paint and sheen did you use? looks great!
Did you find out the paint color? I was wondering as well.
At this point, I painted the doors and cabinet before attaching them. I used Sherwin-Williams Pure White paint in Pure White SW7005. I used a satin finish for this. I also stained the top board before actually attaching it, but you can also tape it off and stain it if it is already attached. I used THIS STAIN for the top of the cabinet.
At this point, I painted the doors and cabinet before attaching them. I used Sherwin-Williams Pure White paint in Pure White SW7005. I used a satin finish for this. I also stained the top board before actually attaching it, but you can also tape it off and stain it if it is already attached. I used THIS STAIN for the top of the cabinet.
Which software do you use to create this plans? Sketchup?
This was the answer to all of my problems in the kitchen. I would love to have this completed before the holidays. I almost have the two towers built. I was wondering when you were planning on getting the plans uploaded for the coffee bar portion. I know ya’ll are quite busy so I hated to ask. Thank ya’ll for everything you do.
Did you leave the insides of the pantry cabinet unpainted? Also I’m trying to find the plans for the shorter middle cabinet…. love this!
Cant wait to try it. However I did notice a mistake in either you materials list or you cutting direction. On the materials list you have 1/2″ (48 x 96) plywood listed twice. In the cutting list, you have 1/4″ plywood listed.
Hello we are getting ready to build, but we really need the coffee cabinet instructions.
Great build!!! I love these cabinets! What plans did you use for the”coffee cabinet” in the center of the two pantry cabinets?
What kind of hinges do you use to attach the door?
There are links in the post right before the downloadable plans.
I found the drawer slides HERE!
I found the door pulls HERE!
I found the hinges HERE!
how many sheets of plywood of each size did you use? do you have a cut list as well?
If you download the free print plans, there is a supply list and cut list in it
You are an amazing builder and simply adorable. What is the product you have on your garage floor?
I’m so excited to finally see this! I have been waiting since I saw something forever ago on Instagram. I recently moved and the house does not have a pantry so I need to build one in our laundry room, this is perfect! Thanks so much.