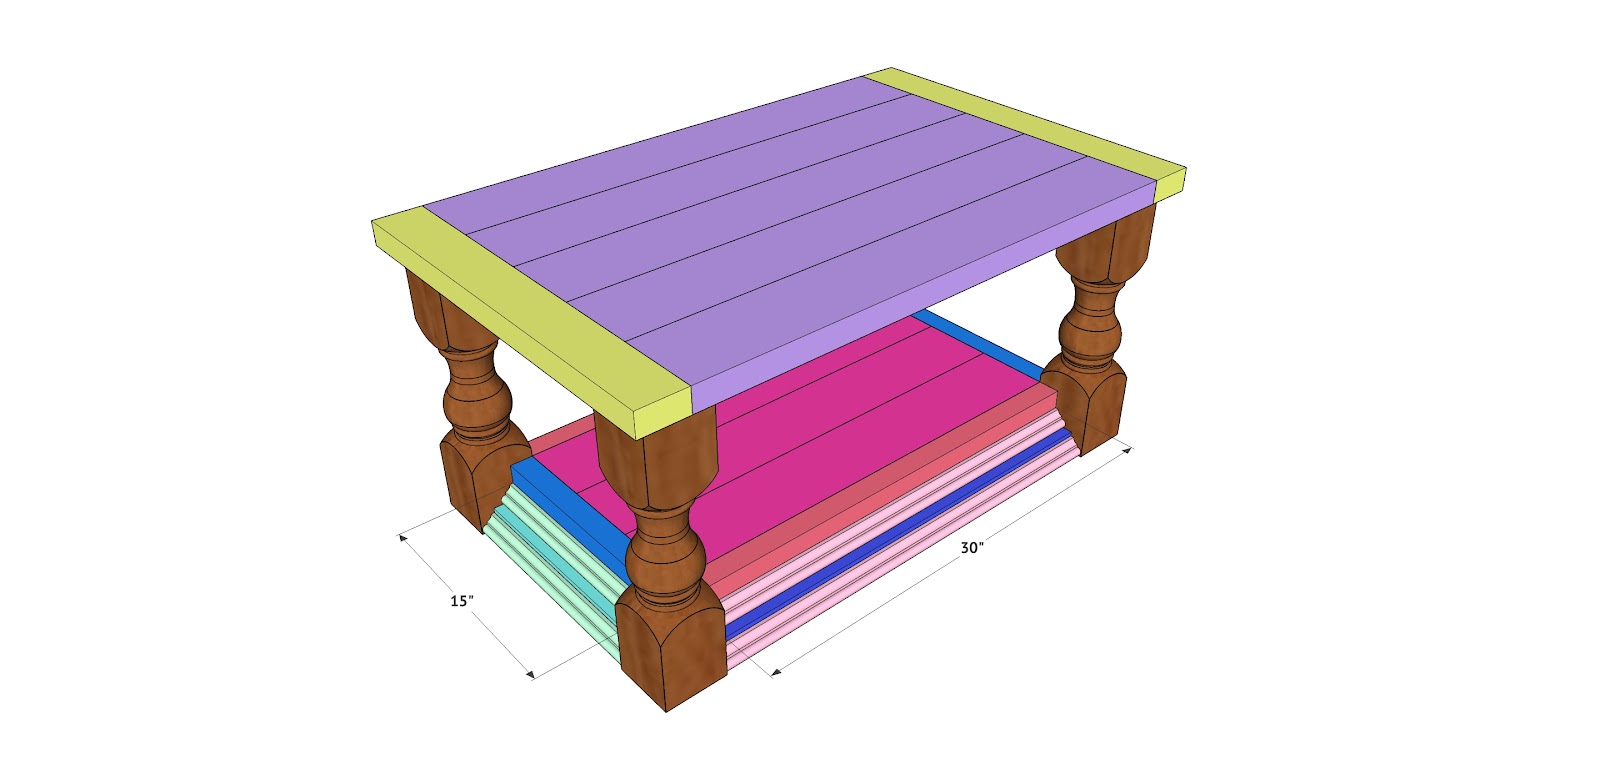
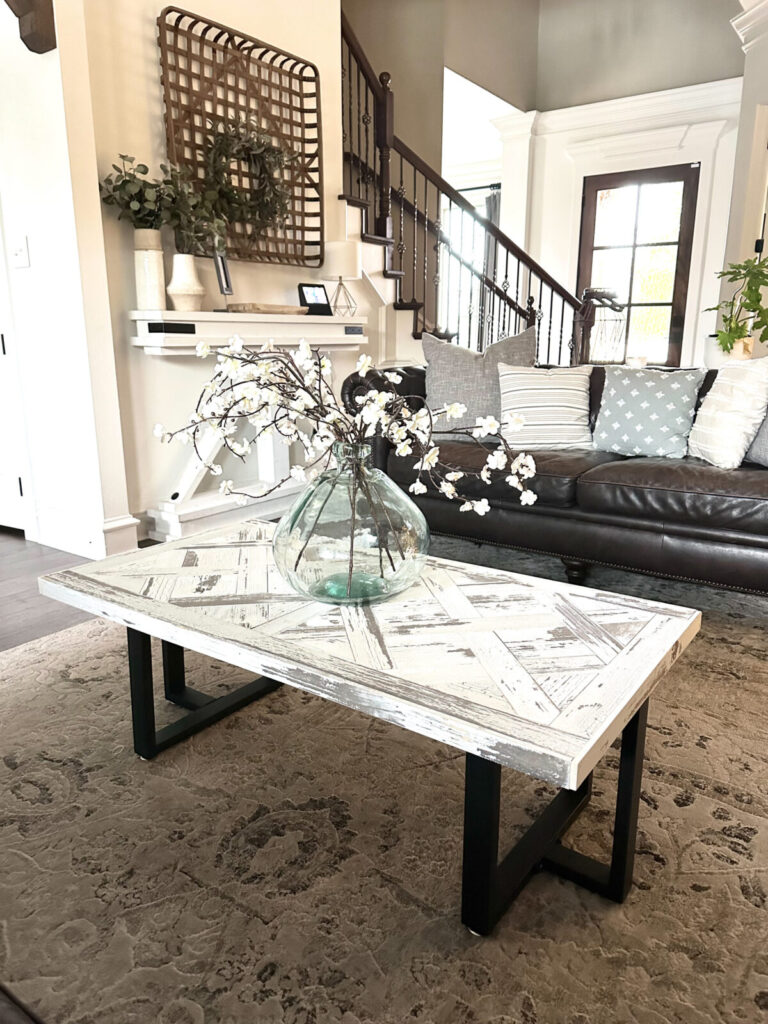
Hey friends! I hope everyone is doing great! One thing at my house that has taken a beating during this quarantine life is our coffee table. It has become the command hub for video games for my kiddos… Yes, we have seen an uptick in video games at my house 🙂 So, I wanted to give them a coffee table that could play hard just like they do. It’s strong and beefy yet oh so pretty! Check out my video tutorial on how I built this DIY video game coffee table below!
I love how pretty it turned out!

I teamed up with Minwax on this table! I used a mix of two of my favorite Minwax stains to create the pretty finish. First, let’s build the table! You can get the free plans to download and print at the bottom of this post!
Click here to jump to the free plans!You can find the legs HERE on Amazon!
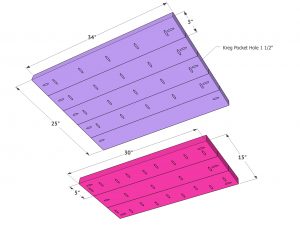
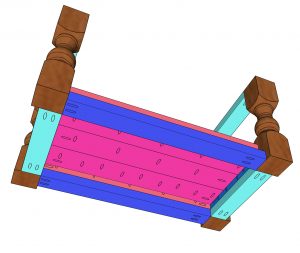
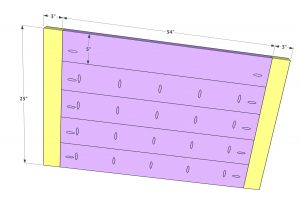
The first step is to cut and plank the top of the table and the shelf boards as well. These are 2×6 boards ripped to 5” wide each. Attach each board together using 2.5” pocket hole screws through 1.5” pocket holes. Make sure to add pocket holes all around the outside of the shelf boards because these holes will be used to attach the shelf in a later step.

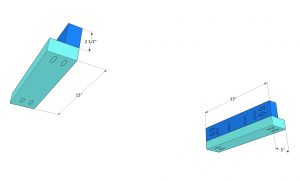
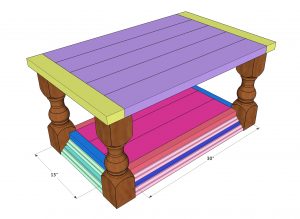
Now create the bottom “L” pieces. These are also ripped from 2×6 boards, but you can also use 2×4 boards. The bottom pieces are 3” wide each and the top pieces are each 2.5” wide. Attach the top boards to the bottom boards using wood glue and 2.5” pocket hole screws through 1.5” pocket holes. Make sure to add 1.5” pocket holes on each end of both boards to connect the legs in a later step. You will build two short “L” pieces and 2 long ones.


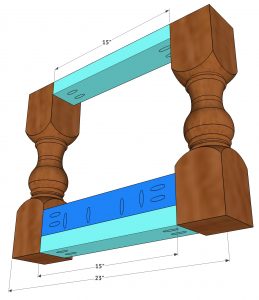
Attach two legs using one of the smaller “L” pieces. Use wood glue and 2.5” pocket hole screws through the 1.5” pocket holes to attach them. They will line up flush with the inside corner of the legs. Also, attach the top runner using wood glue and 2.5” pocket hole screws. The pocket holes on this board can be on either the top or bottom. They won’t be visible either way. Then, repeat these steps to the other pair of legs.

Now attach those two pairs of legs together with the longer “L” pieces. These will also sit flush on the inside of the legs as well as flush with the base of the legs. Attach them using wood glue and 2.5” pocket hole screws.

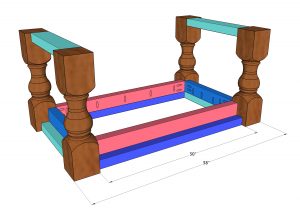
Set the shelf boards in place and attach them with 2.5” pocket hole screws and wood glue through the pocket holes on the outside of the shelf boards and into the “L” pieces of the table. You want the shelf boards to be flush with the top of the “L” pieces to create a shelf with no edge.

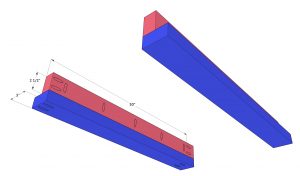
Now attach the top longer runners to create the table top
supports. These will be attached using wood glue and 2.5” pocket hole
screws through the 1.5” pocket holes and into each leg. Make sure they are flush with the tops of the legs and flush with the inside corners.

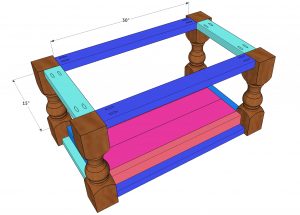
Add the breadboards to the edges of the table top planks using 2.5” pocket hole screws through the planks and into the breadboards. These are 2×4 or 2×6 boards that are ripped to 3” wide. Then, attach the table top to the table base using wood glue and 2.5” wood screws through the table top supports and into the top. There will be a 1” overhang on each side of the legs.


The final step is adding the small trim pieces. I used a 1” cap moulding for my table, but any small trim will do. Cut each piece to size and attach it to the sides of the table using wood glue and 1.5” brad nails. I used two pieces of trim for each side to dress it up!
Here she is just before I added my trim pieces and stain…
I chose to use one of my favorite stain combinations for this project. I LOVE mixing stains. It is a simple way to get a super custom finish. These are the two Minwax colors I used for my table. You can click HERE to see where to purchase the stains!
Minwax Wood Finish Penetrating Stain in Classic Gray
Minwax Wood Finish Penetrating Stain in Golden Oak


Just mix two parts of each. So, I use a measuring cup and add ½ cup of each into a plastic container and mix it with a stir stick. Then, I used a brush made for stains to apply it to the table. I work in small sections and wipe the excess before moving on to the next part.

You can also add a pre-stain which prevent streaks and blotches by evening out the absorption of oil-based stains.
Once you are done staining, it’s a good idea to add a protective finish. These add long lasting protection to your wood surface.
I love the color this blend of stain achieves! Minwax has over 200 stain color options between their different stain lines, so the possibilities are endless!
You can check out their website for all the different color and product options! You can also follow them on Instagram and Facebook for project inspiration! And click HERE for even more inspiration!
I found the baskets for under the table HERE at Pottery Barn. These are the larger sized baskets.


DIY Gaming Coffee Table
Instructions
- The first step is to cut and plank the top of the table and the shelf boards as well. These are 2×6 boards ripped to 5” wide each. Attach each board together using 2.5” pocket hole screws through 1.5” pocket holes. Make sure to add pocket holes all around the outside of the shelf boards because these holes will be used to attach the shelf in a later step.

- Now create the bottom “L” pieces. These are also ripped from 2×6 boards, but you can also use 2×4 boards. The bottom pieces are 3” wide each and the top pieces are each 2.5” wide. Attach the top boards to the bottom boards using wood glue and 2.5” pocket hole screws through 1.5” pocket holes. Make sure to add 1.5” pocket holes on each end of both boards to connect the legs in a later step. You will build two short “L” pieces and 2 long ones.


- Attach two legs using one of the smaller “L” pieces. Use wood glue and 2.5” pocket hole screws through the 1.5” pocket holes to attach them. They will line up flush with the inside corner of the legs. Also, attach the top runner using wood glue and 2.5” pocket hole screws. The pocket holes on this board can be on either the top or bottom. They won’t be visible either way. Then, repeat these steps to the other pair of legs.

- Now attach those two pairs of legs together with the longer “L” pieces. These will also sit flush on the inside of the legs as well as flush with the base of the legs. Attach them using wood glue and 2.5” pocket hole screws.

- Set the shelf boards in place and attach them with 2.5” pocket hole screws and wood glue through the pocket holes on the outside of the shelf boards and into the “L” pieces of the table. You want the shelf boards to be flush with the top of the “L” pieces to create a shelf with no edge.

- Now attach the top longer runners to create the table top supports. These will be attached using wood glue and 2.5” pocket hole screws through the 1.5” pocket holes and into each leg. Make sure they are flush with the tops of the legs and flush with the inside corners.

- Add the breadboards to the edges of the table top planks using 2.5” pocket hole screws through the planks and into the breadboards. These are 2×4 or 2×6 boards that are ripped to 3” wide. Then, attach the table top to the table base using wood glue and 2.5” wood screws through the table top supports and into the top. There will be a 1” overhang on each side of the legs.

- The final step is adding the small trim pieces. I used a 1” cap moulding for my table, but any small trim will do. Cut each piece to size and attach it to the sides of the table using wood glue and 1.5” brad nails. I used two pieces of trim for each side to dress it up!

Also, be sure to share all your projects with us using hashtag #shanty2chic on social media! Happy Building!

Where did you get the legs??
Good post. I learned a lot about games from this article. I hope your future posts will be just as interesting. I’m looking forward to it.
Thank you for sharing, your article is very good.