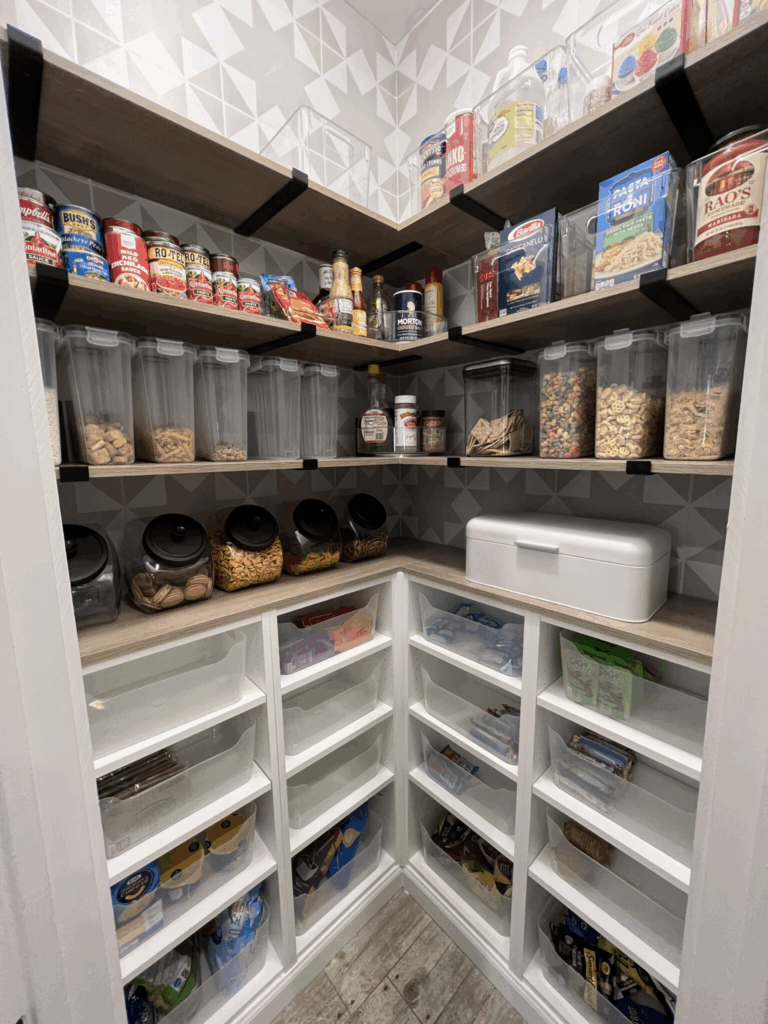
DIY Corner Pantry Makeover: Budget-Friendly Ideas to Organize Your Space
Hey friends!
Lately, I’ve been on an organizing kick – like, label-every-bin and clear-every-shelf kind of mood. After finishing up the under-the-stairs closet remodel, I had pantry renovation on my mind. So I finally tackled our corner pantry, and I couldn’t be happier with how it turned out!
You can check out the full renovation reel here:
Instagram Reel – Pantry Makeover
Pantry Cabinet Solution: IKEA Billy Bookcases
For my pantry cubbies, I went with the tried-and-true Billy Bookcases from IKEA. I used four of them in total, and added one extra shelf per unit (only $5 each!) to maximize storage space. They’re easy to assemble and come finished, so you don’t need to worry about painting or staining.
You can find the bookcases I used here.
Budget-Friendly Countertop and Shelves
I scored some super affordable shelf boards that worked perfectly for the countertop and open shelving. A 4-foot board was just $10! They come in a variety of finishes and lengths, and the color I picked adds just the right warmth.
- Find the shelf boards here.
Peel and Stick Backsplash (That Actually Sticks)
To bring in a pop of texture and color, I added a peel-and-stick vinyl backsplash to the walls. It was quick, easy, and totally transformed the space. Pro tip: because of the Texas humidity, I secured each tile with construction adhesive for extra hold.
Here’s the tile I used.
Here’s the adhesive.
Stylish and Sturdy Shelf Brackets
For the open shelves, I used these minimalist black metal shelf brackets that are as strong as they are affordable. I made sure to anchor them into studs—because kids + shelves = better safe than sorry! I also used a lip-free bracket style in the corners where shelves overlapped. That saved me from having to trim the width on each board.
Standard brackets with lip.
Lip-free corner brackets.
Pantry Organization Must-Haves
Here’s everything I used to keep this DIY pantry makeover both functional and pretty! These picks are great for small pantry storage, especially if you’re trying to maximize every inch.
- Clear plastic bins (medium) for cubbies
- Lazy Susan corner organizers
- Airtight cereal containers
- Tiered can organizers
- Clear tubs for open shelves
- Glass tilted jars with black lids
- Bread box – obsessed with this one!
That’s a wrap on my corner pantry makeover! I hope this gives you some inspiration if you’re planning your own DIY pantry renovation. Let me know if you have any questions—I love chatting all things home organization!
Check out my Closet Under The Stairs Makeover!

Hi! I have been inspired by your pantry reno and have already purchased the bookshelves and extra shelves from IKEA. My question for you is the trimming pieces, can you explain what you did for the baseboard trim of the bookshelves and where the corners meet?!
Thank you so much!!
Hello. Love the new pantry. Can you please tell me the name of the shelf brackets and where you purchased them. When I try to click on where to buy them, nothing happens 😞. Thanks for sharing your lovely projects!
Hi, I was wondering what your pantry dimensions are?
Dimensions of pantry! Space between shelves etc
Hello, thanks for sharing! Just out of curiosity, do you have a second link to the medium bins? The current link isn’t working, thanks in advance!
Yall she has a video on their actual website that you can click from this page. She shows you how she does things and where she puts the screws. 😊
Where is the link? All I can find is the blog link. Sorry if I’m just not seeing it.
Hello. Curious as to how a 11.25″ bracket with a lip will fit a 12″ shelf? I’m not an engineer, but it seems that the shelf would be too large for the brackets you linked on your site. If there is no lip, I see how it will fit, but since these brackets have a lip it seems the shelf diameter is larger. I love your idea and would love to know how you made it fit. Thanks!
in the explanation above it says:
If you use the brackets with a lip you will need to shave about a quarter of an inch off each shelf board. If you use the ones without a lip, you won’t need to cut any width off the shelf boards.
my thought: if one is very handy and with the right tool, one could just make a notch where the bracket fits… it requires a bit more planning and precision
What were the dimensions of your pantry? What did you use to attached the boards to the top of the ikea book cases?
Thanks
You seem educated when you will keep your house clean and decor the house beautifully
How long did it take you to complete this project?
Yes, I am curious about the dimensions of your space as well. I am getting ready to do pantry makeover and this has inspired me!
Several people have asked the dimensions of your space and I am curious as well. I haven’t seen a response yet. This has inspired me to tackle my pantry, but I’d love to know your dimensions.
Thank you.
What was the size of your space? I’m trying to figure out if these shelves will work for me.
No but I found some 1 1/4inch screws that worked! I used the wall brackets that came with the Ikea shelves and installed them on the wall first. Then i pre drilled holes on the top and used my 1 1/4inch screws to secure the top of the bracket since it was long enough to go into the shelf on top of the book case as well. I pre drilled holes to connect the book cases one at the bottom in the middle and one at the top in the middle. I hope that all makes sense and helps you with your project! Mine is still on going as I had to wait for shipping on the wall tiles.
I am tackling my pantry now! What size screws did you use to secure the cubby’s together and the shelf top to the top of them? Also did you use the wall brackets that ikea provided to secure them to the wall?
I am currently working on this project myself. Did they reply to you about your question?