
DIY Loft Bed Part 1
Learn how to build this DIY Loft Bed with free plans and a how-to video from Shanty2Chic! This is a great beginner build and you get so much bang for your buck with 3 pieces of furniture in one! Get the full set of Part 1 Plans inclucing the supply list HERE!
Equipment
- Miter Saw
- Drill
- Kreg Jig
- Table Saw (optional)
- Brad Nailer
- Sander
Ingredients
- 4 2x10x8
- 14 2x4x8
- 11 2x2x8
- 12 1x4x8
- 2 3/4x48"x96" Hardwood Plywood
- 1 1/4" Pocket Hole Screws
- 2 1/2" Pocket Hold Screws
- 1 1/4" Brad Nails
- 3" Wood Screws
- 1 1/4" Wood Screws
- Wood Glue
Instructions
Cut List
- Cut List 1

- Cut List 2

- Cut List 3

- Cut List 4
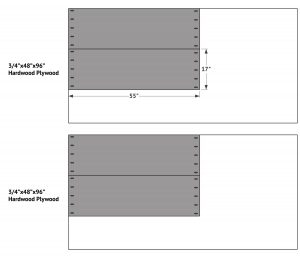
Front and Back Assemblies
- Step 1 - Cut the back assembly pieces to size and drill 1 1/2″ pocket holes according to the cut list.

- Step 2 - Cut the front assembly pieces to size and drill 1 1/2″ pocket holes according to the cut list. Attach the pieces together with 2 1/2″ pocket hole screws and wood glue.

Side Assemblies
- Step 1 - Cut the shelf side assembly to size and drill 1 1/2" pocket holes according to the cut list. Attach the pieces together with 2 1/2" pocket hole screws and wood glue. The outside of the horizontal pieces should be flush with the outside edges of the legs.

- Step 2 - Cut the desk side assembly pieces to size and drill 1 1/2″ pocket holes according to the cut list. Attach the pieces together with 2 1/2″ pocket hole screws and wood glue. The outside of the horizontal pieces should be flush with the outside of the legs.
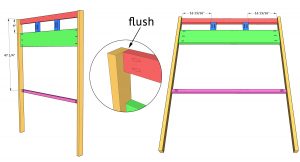
Building the Loft Bed Frame
- Step 1 - Attach the back assembly to the studs behind the wall with 3″ wood screws. Attach the side assemblies to the back assembly with 2 1/2" pocket hole screws and wood glue.
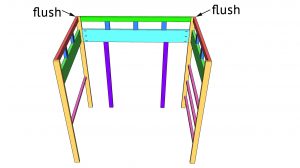
- Step 2 - Attach the front assembly to the side assemblies with 2 1/2" pocket hole screws and wood glue.
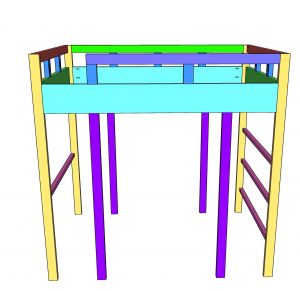
- I’ll be back with the second half of this Loft Bed soon! Make sure to share your builds with us on social media and use #shanty2chic so we can share them too!Happy Building!
