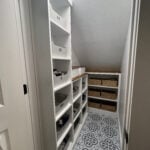
DIY Closet Under Stairs Makeover
Turn an awkward under-stairs closet into useful storage with ready-made bookcases, peel-and-stick tile, wood countertops, and baskets. This layout can be adjusted to fit your own space.
Servings: 1 closet
Equipment
- Tape Measure
- Pencil
- Drill
- Table Saw
- Miter Saw
- Nailer
Ingredients
- IKEA Billy bookcases in sizes that fit your closet
- 3/4 " edge-glued pine panels
- 1 " wood screws
- Golden Oak stain
- Polycrylic optional
- Peel-and-stick floor tile
- Pre-finished shiplap wall panels
- Sherwin-Williams Pure White paint
- Storage tubs
- Storage baskets
- Instructions
Instructions
- Empty the closet and measure the floor, walls, and ceiling height at several points under the stairs.
- Plan the bookcase layout, placing taller storage where you have the most headroom and shorter units where the ceiling slopes lower.
- Prep and paint the closet.
- Install the peel-and-stick floor tile following the manufacturer’s instructions.
- Assemble the bookcases and position them according to your layout. Secure them as directed by the manufacturer.
- Measure the installed bookcases and cut 3/4" pine panels to fit. Leave a slight overhang if desired.
- Attach the countertops with 1" wood screws driven up through the tops of the bookcases, then stain the wood.
- Add the pre-finished wall panels above the shorter shelving.
- Finish the closet with storage tubs and baskets sized to fit your shelves.
Notes
- Every under-stairs closet is different, so adjust the bookcase sizes and layout to fit your space.
- Measure countertops after the bookcases are installed for the best fit.
- A coat of polycrylic can be added for extra protection.