I gained a ton of function and storage with this closet under the stairs makeover! This is an easy DIY project to help you maximize your space and organization.

Table of Contents
Read This Before You Makeover Your Closet
- Skill level: Beginner
- Tools required: Standard DIY tools (no specialty equipment)
- Approximate build time: 1–3 days
- Cost at time of build: Varies by material choice
- What I’d do differently today: See notes below
- Who this project is (and isn’t) for: This is ideal for homeowners who want a custom closet without the custom price! This isn’t for homeowner’s that do not prefer to DIY.
Would I Build This the Same Way Today?
This project was completed in 2022. If I were building it today, I would keep the overall design but I’d change the pattern of the tiles and maybe the color.
Materials and personal preference evolve but the structure and the approach of this project still hold up well!
Makeover Reel on Instagram
Check out my closet I just gave a cute makeover to! This closet under the stairs has always been an impractical eyesore. I have had the hardest time making it functional… until now! Check out the transformation HERE on Instagram!
Before the makeover
This closet has always provided good space for me, but I found that I never was able to utilize the full space. The back of the closet is where things would go to die.

Products I used on the makeover
Here is the info on the products I used!
Bookcases
The bookcases are Billy bookcases from Ikea. With lumber prices through the roof right now, these were a very practical and affordable alternative! I purchased 4 different bookcases and assembled each before putting them in the closet.
See the Tall bookcase HERE –
See the Short and slim bookcase HERE
See the Short and wide bookcase HERE
Floor Tile
I chose to use this peel and stick floor tile for this closet for a few reasons. It’s super affordable, fast, water resistant and easy to clean! Plus, it’s so darn cute.

I placed it over stained concrete, but it goes over a variety of surfaces. I love how it brightened the space up and I also love that it was done in 30 mintues 😉
You can see the peel and stick tile I used HERE! Free shipping and mine came same day!
Wood Countertops
For the wood on top of the shorter bookcases, I used these edge glued pine panels from Lowe’s.

With lumber being so high currently, these are a great alternative when you need a larger surface of wood. Also, they take stain really pretty! You can find them HERE and they have several sizes depending on what you need. I used Golden Oak stain on mine.
Storage Tubs
I used these storage tubs which are my very favorite on one wall of the closet. I LOVE these things.

They hold a ton and they come in cute colors too. You can find them HERE! I used the medium size for the cubbies on mine and it’s a perfect fit!
Storage Baskets
I used THESE baskets for the bookcase against the back wall.

These are great and also a perfect fit for this space. You can find them HERE! I used the small size.
Shiplap Wall Panels
I wanted to add a little something on the wall above the shorter shelves so I used THESE WALL PANELS.


They are a great price and come pre-finished which is an added bonus!
Paint Color
I painted the closet with Sherwin-Williams Pure White which was a great match to the already finished Ikea cabinets.
The finish!
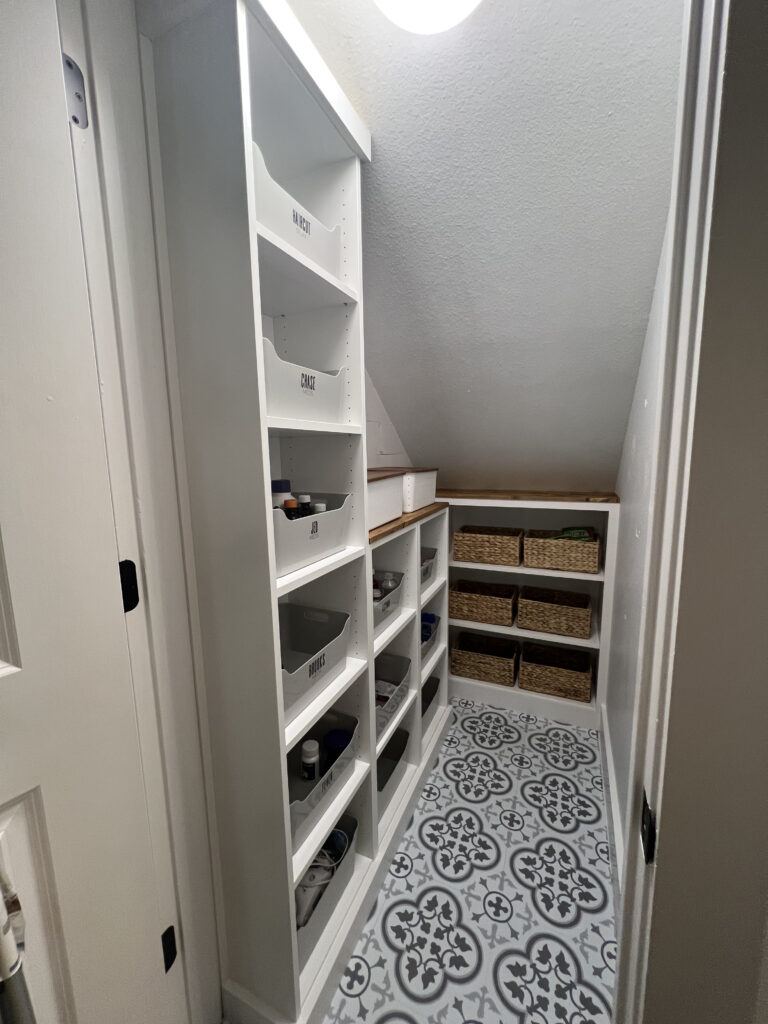
I love the outcome! I feel like I have SO much more usable space and storage, and it feels so fresh and bright as well. Be sure to share your closet makeovers with us if we have inspired you to tackle your own!
Check out my Corner Pantry Renovation!
Check out my DIY Spice Rack!
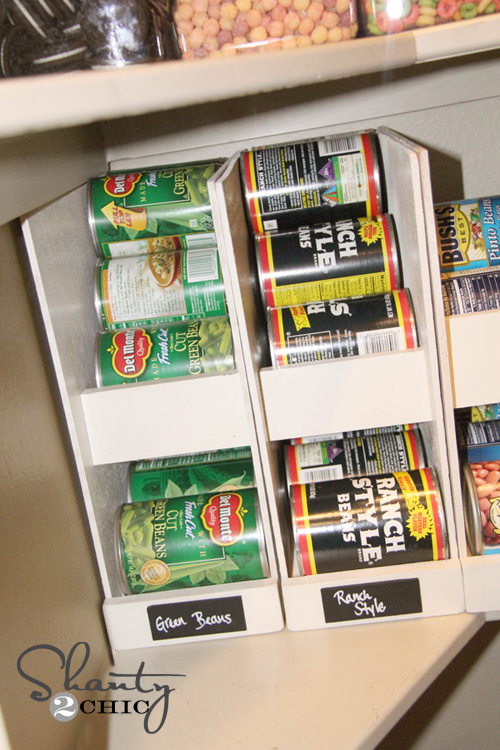
Checkout my DIY Canned Food Storage!
Frequently Asked Questions
How much does it cost to build this project?
The materials, size of your closet and layout of the book cases will ultimately determine the cost. You can get a good idea of the cost by clicking the product links and estimating your layout cost.
Is this project beginner friendly?
Yes! The majority of our projects are beginner friendly. The bulk of the build is assembling the cabinets. The tile and paint are simple and all you need is a drill and a saw!
Can the dimensions be adjusted?
Yes, this is a completely custom project that you can adjust to fit your closet space and needs. Planning is key to determine which pieces you need and where you want them to be installed.
What tools are absolutely required?
You’ll need a miter saw, nailer and a drill to complete this project.
Would you still recommend this approach today?
I would definitely recommend this approach today. It was a very simple, inexpensive way to get a custom closet design without breaking the bank! This project is still going strong today with lots of use!

What an inspiring transformation! This project is a perfect example of how unused spaces can be converted into highly functional storage with thoughtful planning and creative design. The detailed walkthrough and practical tips make it easier for readers to visualize and replicate the makeover in their own homes.
The overall finish also highlights the importance of choosing durable plywood and quality interior materials for long-lasting results. Anyone planning a similar renovation can explore a wide range of plywood, laminates, boards, and other interior products at https://www.plywoodbazar.com to find suitable materials for their project.
Thank you for sharing such a creative and well-executed makeover. It’s a great source of inspiration for homeowners and DIY enthusiasts looking to maximize every inch of their living space.
What trimming did you use around the bookcases?
Hi there. I was wondering what the dimensions of your pantry are. It looks to be about the same size as mine but not sure.
Thanks.
I would like to know this also plz
Hi! I’m making this my summer project and I’m excited! Having a hard time finding the tallest Billy shelf. Was wondering, did you trim around the shelves? It looks like you did. If so what did you use?
Would you be willing to share the dimensions of your closet. So curious how this would fit in mine!!! I love it! You did an awesome job!
I would love to know this as well!
Same, what are your closed dimensions. Have the same setup, and there is no way I can fit 3 shelves at 30+ wide on the one side.
Hi! LOVE LOVE LOVE this idea. I have the same type of closet in our home that i want to improve so badly. Do you have the dimensions of your closet so I can see how it compares to mine? Thanks!
Would love to know if this would fit my closet too. Could you please give the dimensions of the closet?
Hi, great job. I was wondering what color paint did you use for your bottom and upper wood cuts, that match the ikea shelve. Thanks
Amazing! What did you put on top of the shelves? Some sort of wood top?
WOOD COUNTERTOPS
For the wood on top of the shorter bookcases, I used edge glued pine panels from Lowe’s. With lumber being so high currently, these are a great alternative when you need a larger surface of wood. Also, they take stain really pretty! You can find them HERE and they have several sizes depending on what you need. I used Golden Oak stain on mine.