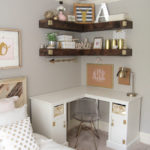
DIY Corner Floating Shelves
Come build these super easy and inexpensive DIY Corner Floating Shelves with free easy to follow plans by Shanty2Chic!
Ingredients
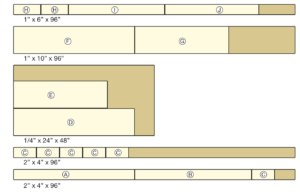
- 2 2x4x8 pine or whitewood
- 1 1/4” X 24” X 48” plywood
- 1 1” x 10” x 8’
- 1 1” x 6” x 8’
- 1-1/2” pocket screws
- 1-1/4” brad nails
- 3” Spax screws
- Wood Glue
Instructions
- Cut List
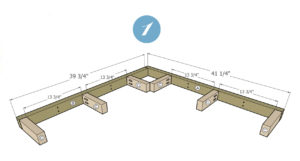
- Begin by constructing the wall cleats. Drill for 2-1/2” pocket screws in the cleat braces and attach to the wall cleats as shown. First hold up the longer wall cleat and mark where your studs are. Repeat with your shorter wall cleat, making sure you start 1-1/2” out from the wall to compensate where the first cleat will be. Drill two pilot holes for the torx screws. Using a level hold the longer cleat up to the wall and drive 3” torx screws at the marked locations (above illustrations are rough estimates, your locations may very). Repeat with shorter cleat, making sure both are level.
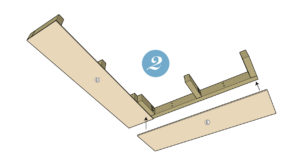
- Using 1-1/4” brad nails and wood glue attach the bottom plywood panels, starting with the longer panel first and making sure you are flush on the outside edges.
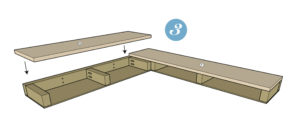
- Next attach the top of the shelf with 1-1/4” brad nails and wood glue. Again, make sure outside edges are flush.
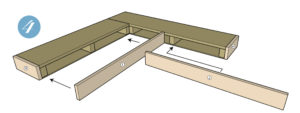
- Finally, add the trim. It is best to cut the remaining pieces to fit.PLEASE SEE NOTE ON THE CUT LIST PAGE ABOUT USING 2X3 MATERIAL FOR THE CLEATS. THIS WILL ALLOW YOU USE 1X4 WOOD FOR THE TRIM WITHOUT HAVING TO DO ANY RIPPING.First you will measure the height of your shelves, from the bottom of the plywood to the top of the 1x10 material. It should be about 4-1⁄2”. Rip your 1x6 material down to this measurement. Then begin with the sides and attach with 1/4” brad nails and wood glue. Next attach the long front trim. Finally the short front trim. Now, tape off the wall and apply the finish of your choice.
- Click HERE to get a printable version of these plans!