DIY Outdoor Plant Stand
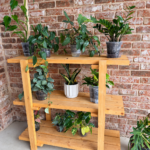
Build this DIY outdoor plant stand with three spacious slatted shelves using only seven 2x6 boards. The slatted shelves allow water to drain through, making it perfect for displaying plants outdoors or inside. Download and print the free plans HERE!
Equipment
- - Kreg Jig 720PRO
- Kreg Quick-Flip
- - Drill/driver
- Miter Saw
- Table Saw
- Tape Measure
Ingredients
- 7 2 x6 boards
- Wood glue
- 2 1/2 " Kreg Blue-Kote Pocket-Hole Screws
- 2 1/2 " wood screws
- Exterior wood finish or sealant
Instructions
- Build the Side Assemblies
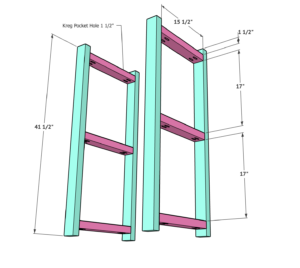
- Cut the legs and rungs according to the cut list. Drill 1 1/2" pocket holes in both ends of each rung. Attach three rungs between each pair of legs with wood glue and 2 1/2" pocket-hole screws to create two identical side assemblies. Follow the measurements shown in the plans for placement, spacing the rungs 17" apart. The legs are 41 1/2" long and the rungs are 15 1/2" long.
- Build the Shelves
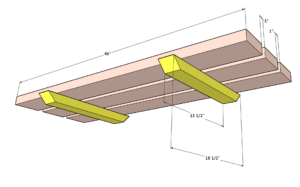
- Build three identical shelf assemblies. Space the three 46" shelf boards 1" apart, as shown in the plans. Cut the shelf supports 18 1/2" long, long point to long point, with a 45° angle on each end. Center the supports under the shelf boards, positioning them 15 1/2" apart. Add wood glue, predrill and countersink the holes, then secure the supports to the shelf boards with 2 1/2" screws.
- Attach the Shelves
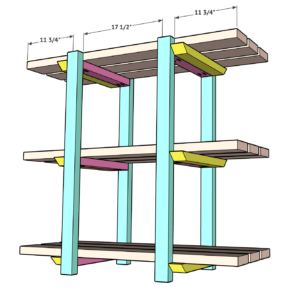
- Position the three shelf assemblies between the two side assemblies. Center the legs on each shelf using the measurements shown in the plans: 11 3/4" from each end with 17 1/2" between the legs. Add wood glue where the shelf supports meet the side assemblies. Predrill and countersink the holes, then attach each shelf securely with 2 1/2" screws. Start with the top shelf, then attach the middle shelf and finish with the bottom shelf.
Notes
Finish the plant stand with an exterior-rated protective finish if it will be used outdoors. The slatted shelf design allows excess water to drain through when watering plants.