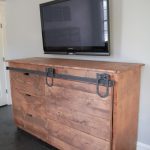
DIY Sliding Barn Door Console Table
Build a large DIY sliding barn door console with three drawers, open shelving, and rustic metal barn door hardware. This woodworking project uses plywood, pocket-hole joinery, and free printable plans.
Servings: 1 Console table
Cost: $250–$350
Equipment
- Table Saw
- Jigsaw
- Kreg Jig
- - Drill/driver
- Impact driver
- - Speed Square
- Kreg right-angle clamp
- Finish Nailer
- - Clamps
- Measuring tape
- Sander
Ingredients
- Hardwood plywood
- 1 x2 lumber
- Lumber for the sliding door and top
- 1 1/4 " pocket-hole screws
- 2 1/2 " pocket-hole screws
- 1 1/4 " wood screws
- 1 1/4 " finish nails
- Wood glue
- Sliding barn door hardware kit
- Varathane Early American Wood Stain
Instructions
- Cut all plywood and lumber pieces according to the free plans.
- Cut the notches in the side panels with a jigsaw.
- Assemble the main cabinet shell with pocket holes and 1 1/4" pocket-hole screws.
- Add the back support, front bottom board, trim pieces, and top supports.
- Build the face frame and attach it with wood glue and 1 1/4" finish nails.
- Install the center divider, rear support, and shelves.
- Build the drawer boxes, attach the bottoms, and cut the recessed drawer pulls.
- Fit and attach the drawer fronts with wood glue and 1 1/4" wood screws.
- Install and test the sliding barn door track before staining.
- Build the sliding door with 1 1/2" pocket holes and 2 1/2" pocket-hole screws.
- Sand and stain the entire console.
- Move the console into place, attach the top if needed, and install the sliding door.
Notes
- The cost is approximate because the price for the barn door hardware, not the full lumber, may vary.
- Check the cabinet for square as you assemble it.
- Fit the drawer fronts to the actual openings instead of relying only on the plan dimensions.
- The original plans allow about 1/8" clearance around the drawer fronts, but Whitney preferred closer to 1/4" for a little more wiggle room.
- Test-fit the barn door hardware before staining.
- This is a large, heavy piece, so having another person help move it is a very good idea.
- Hardware kits vary, so follow the manufacturer’s mounting and clearance instructions for the specific barn door track you use.