***I have completed the matching benches to this table and you can get the plans for the benches HERE!***
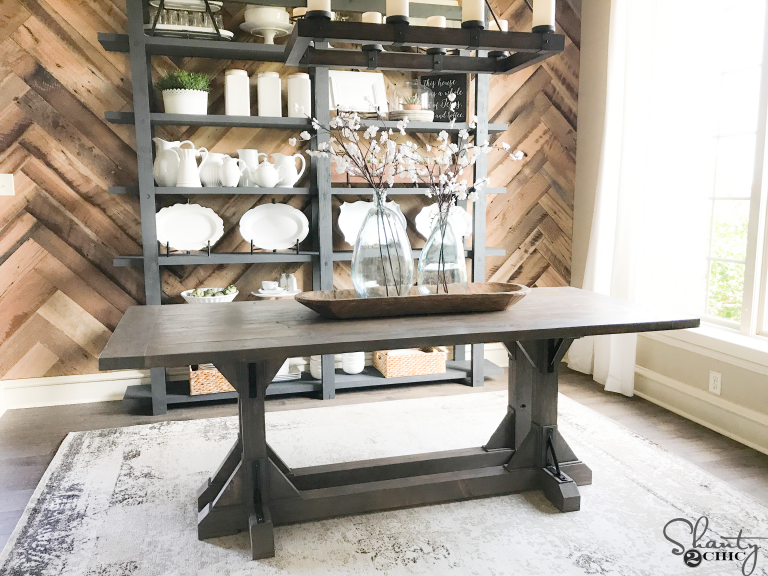
Happy Friday! Holy moly, I am so excited to share my latest build with you! I had to take a break from all the Christmas posts to share my new farmhouse table because I just couldn’t wait!

I got the inspiration from a beautiful table that I saw while I was out shopping. There is no way I could have a $1,000 (plus shipping and tax) dining table in our home with 2 boys and a toddler![]() So, as always, I enlisted the help of our very sweet and talented friend, Ana White! She nailed it and after her awesome plans and my elbow grease, I now have a ridiculously gorgeous, expensive-looking, grand dining table and it only cost me $125! I know, insane!
So, as always, I enlisted the help of our very sweet and talented friend, Ana White! She nailed it and after her awesome plans and my elbow grease, I now have a ridiculously gorgeous, expensive-looking, grand dining table and it only cost me $125! I know, insane!
I have shared the steps I took and the tips I learned as I went. This was not challenging at all and it took me about 10 hours of work from cutting the wood to applying the finish!
Find Ana’s plans HERE!
Let’s start with the legs:


A little Gorilla Glue Wood Glue goes a long way!
Easy enough![]() Now let’s build the bases:
Now let’s build the bases:
I used my Kobalt sliding compound miter to make the mitered cuts.


Time to put these babies together!


Adding the decorative arcs:


I love my cordless 18-volt Ryobi jig saw. This step may seem intimidating but it is very simple! Just draw an arc on each piece and follow with the jig saw. I use my Ryobi cordless sander to sand away any jagged cuts.
Now for the table top:


I constructed the entire table top with my Kreg Jig®, Gorilla Glue and my cordless Ryobi brad nailer.
On to the finish:

I picked my favorite, Rust-Oleum Early American stain, to stain this table. I applied one-coat with a bristle brush and wiped away after 5 minutes. Tip: because this table is so big, I worked small areas at a time…i.e. legs first, one side of table top, etc. I also stained the legs, runner and table top separately before attaching.

I applied one-coat of Rust-oleum Ultimate Polyurethane (in Satin), with a bristle brush, to protect the finish.
***This table is 9 ft. and heavy (not a bad thing![]() )! After the stain was dry, I brought the pieces in the house to assemble the table. I chose to attach the table top to the legs before pushing the runner through and this worked great for us. I also did not use wood glue to attach the table top to the legs (just wood screws) so that it can be disassembled and moved easily.***
)! After the stain was dry, I brought the pieces in the house to assemble the table. I chose to attach the table top to the legs before pushing the runner through and this worked great for us. I also did not use wood glue to attach the table top to the legs (just wood screws) so that it can be disassembled and moved easily.***
That’s it!


Who would have thought 2×4’s and pine boards could be so fancy![]()
Click HERE for the matching Bench Plans!
Thanks so much for stopping by!
~Ashley
I have added links to purchase items/tools I used in this post for your convenience!
Kreg Pocket Hole System
Ryobi Cordless Jig Saw

Kobalt Compound Sliding Miter Saw

Gorilla Glue Wood Glue
Ryobi 18-Volt Drill

Ryobi Brad Nailer


Absolutely lovely! We have been looking at farm house tables to build one for our house as well. they only question we have is with using the 2X4s for the top will food get stuck in the cracks? I don’t want to have to get out my butter knife after every dinner and scrape out the cracks. Thanks for the plans and idea!
Thank you:). The top is planked with 1×6 boards and they aren’t rounded. I don’t think that would be a problem at all. I also have a coffee table planked with 1×6 and I haven’t had any problems:)
Sent from my iPad
I adore this table, my husband and I have been looking for a new table for our family, we just had a baby so we have 4 kids and us that need to be able to fit at the table, plus we always have huge family gathering at our house. I hate looking in the stores because table I like I dont want to pay for knowing that my little ones will most likely scratch it or something, and most stores in my area don’t have sturdy tables that will last which is what i want..I am hoping to be able to talk my husband into letting me try this, he is always in favor of saving money and I think he will love this table. Thank you for sharing!
Thank you Bobbi:). Goo luck and please share pictures:)
Sent from my iPad
Amazing job!!! Quite stunning!
Thank you Bethany!
Sent from my iPad
Are you kidding me! This table rocks!!!
LOL! Thank you Donna;)
Sent from my iPad
Absolutely gorgeous! Great job! I recently got a great free table base from Craig’s list, it has no top, so I am planning to build one. I was a bit intimidated by the prospect, but you have inspired me to actually do it! I hope mine turns out half as nice as yours!
This is just gorgeous. I’m curious as to what you will be using for seating with it. Bench or chairs or both?
It is simply divine how you made it out of 2×4’s! I am so intrigued!!!
Jenny @ http://jennylynndesignz.blogspot.com/
This is wonderful, and something you can pass down for generations. Good job!
It’s stunning! I know what I am going to be doing over the long cold winter months. Thanks for sharing!
Any dimensions for the 2 by 4’s?
Hey Rob,
The plans for the table are on Ana’s site. I linked to them at the top of the post:). Hope this helps:)
Sent from my iPad
This is amazing! Can you tell me what kind of wood you used? I live in California and when I price out pine it is SOOO expensive. It would cost about $500-600 to make that table out of pine here.
I used the cheapest 2x’s (no more than $4 for the 2×8’s) and the 1×6’s were white wood and run about $4 each as well. The only select pine I purchased was for the 1×3 and 1×2 simply because my hardware store does not carry a cheaper product. Those were about $7 each. Hope this helps!
Thank you so much! The stores here carry douglas fir, so that would be ok for the 2 x’s, correct?
Should be! I don’t know what the actual 2x’s that I used are called but they are stud quality if that helps:)
Spruce – Pine – Douglas Fir are all very close to the same thing. 2×4’s and other framing lumber you find at the big box stores are all made from one of these 3 types of trees and can be used interchangeably.
Thank you for clarifying Jim:)
Sent from my iPad
Great Job Ashley! I love it!
Thanks so much Mindi:)
Awesome job! If I didn’t already have a table I might actually attempt to make this!
Thank you Sue! It so happens our little sister was in need of a table so I gave her ours and built this one;)
That looks beautiful! Great job!
Thank you Danielle
This is a beautiful table! I built one last year and it has adjustable table legs. The legs are perfect because the kids can lower it so they can use it for crafts. I love it, and yours is beautiful as well!