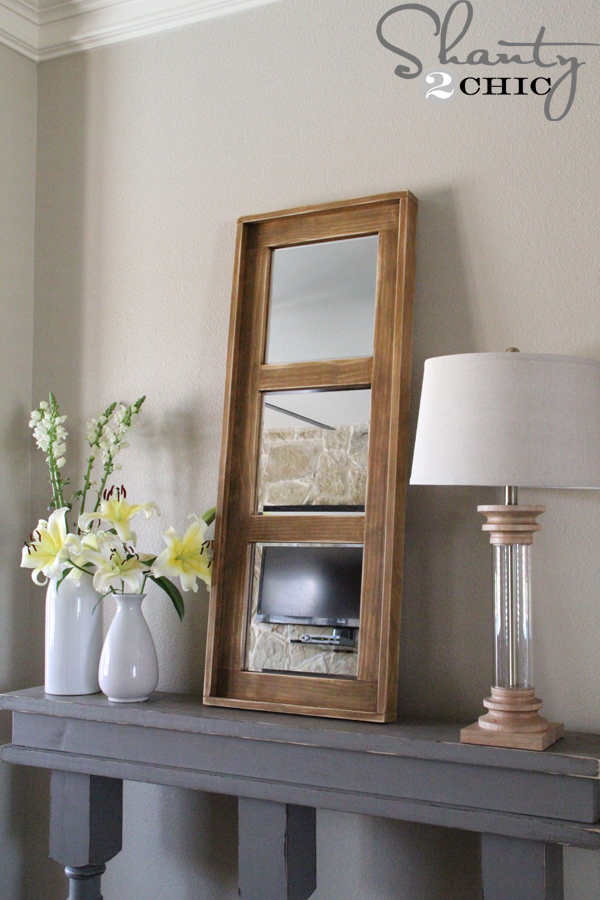
Hey there! I just put together this mirror in about an hour and it only cost me $15!

I love the simplicity to it! Here’s how you can make your own:)
DIY Mirror
 I purchased this Mainstay door mirror from Wal-Mart for $5. I had to do a little demolition on the cheap, plastic trim that was glued to it.
 I started by ripping off the paper backing.
 I then used a utility knife to cut the glue (it seemed to be close to a hot glue consistency). Make sure that you cut where the glue and the trim meet.
 Now this is the part that is very important. The trim will come off very easily and without cracking the mirror if you pull it away from the mirror. Do NOT try to bend it away from the mirror from front to back. Just pull it away.
 After I removed the trim I cleaned the mirror with a little Windex:)
Now for the frame:
If you have never owned a saw, this is the perfect tool for you to purchase!
It will make this project so easy and it is the perfect starter saw if you are interested in building!

I purchased 2 1×4 white wood boards and cut down 4 pieces with 45 degree angles at each end to build the frame.
2 @ 48″ (long point to long point)
2 @ 1 7 1/4″ (long point to long point)
 This was the fun part for me because it was soooo easy:) I flipped the boards over so that the bad sides were showing and glued the frame together with Gorilla Glue wood glue. To keep them together while the dried, I used my staple gun (purchased years ago at Hobby Lobby). It worked like a charm!
 After the glue was dry, I flipped the frame over and stained it with Rust-Oleum dark walnut stain. I let one coat sit for about 10 minutes!

 For the final step, I attached the mirror to the back of the frame with Liquid Nails (I applied the liquid nails to the back of the frame (edges closest to the middle) and laid the mirror on top of it). A little goes a long way.


I decided to prop it up next to my Pottery Barn Inspired Media Console🙂
 I just love easy and cheap projects! $15 and 1 hour for a decorative mirror is a steal:) And the versatility is endless! I would love one hanging on a wall in my house or even over my mantle!
If you love this I would LOVE your pins;)
Thank you:)
Also, be sure to keep up with the Shanty Sisters on Facebook!
Ashley


I just started this project and am in the process of removing the original frame from the Walmart mirror. Did you have a difficult time getting the glue detached from the original frame? It seems that when I am doing this it is not giving way so easily. Thanks 🙂
Hi sheena,
I scored the glue line several times especially at the corners. The frame pulled off easy.
Sent from my iPad
I’m confused about the measurements. I went to make this but something didn’t seem right when I went to buy the wood. I’m assuming 1×4 is 1 ft x 4 ft. It says you bought 2 of those. That would only give you enough wood to make the 2 sides at 48 inches (4 ft=48 inches) each correct? So I would need to buy extra wood to make the shorter top and bottom piece? Maybe I’m missing something here.
Hi, you purchase a 1×4 @ 8ft. They are called 1×4’s because they are 3/4″ thick and 3.5″ wide. So, you will purchase 2- 1×4’s at the standard 8ft long. Hope this helps.
Could you do this with a jigsaw? I was recently talked out of buying a hand saw & mitre box similar to yours by the home depot lady and I bought a jigsaw instead. I’m scared to plug it in but I’m ready to get crafting!
Ashley you are the bomb girl! So glad I found this pin on Pinterest! We have a cheapo mirror that we were going to throw out, but the sis and I may spruce that little baby on up. I’m guessing we can get wood cut from Lowe’s or somewhere? We don’t have a hand saw and I surely don’t want to cut my fingers (I’m clumsy) 😉
This is amazing – I’ve been scared to actually cut wood myself (get the hubby to do it), but you make it look so easy! Definitely going to try.
This is amazing – I’ve been scared to actually cut wood myself (get the hubby to do it), but you make it look so easy! Definitely going to try.
What a great idea? I have to do this to my cheap mirror.
Thank you so much!!
I made this today & it turned out great; thank you so much for sharing your step by step instructions!
Awesome Michelle! Thanks so much for sharing. We’d lover for you to email it to us so we can share it with our Facebook friends;)
Nice work! I own the same miter box at home and I often use it to frame my canvases.
This is such a great idea!! I am so stealing this for the wall in our master bedroom….perfect weekend project – YAY
My husband got me a large mirror from work a year ago. I have really wanted to add a wide frame around it but had no idea where to start. I am so excited about finding this post and can’t wait to try it this weekend! Thank you so much for sharing.
One of the best DIY projects I’ve read! I’ve been looking for a classy mirror like this for a while (instead of my ugly walmart one) for the bedroom! I’ll definitely be transforming it soon!
Love the mirror. Just a note. If you’ve gone to that much trouble to make your own beautiful mirror, don’t use Windex spray on it. The glass/mirror businesses tell you that is the quickest way to ruin an expensive mirror. Not sure an inexpensive one would hold up either. The windex gets in between the backing,the glass and the mirrored part and eats away at it turning it black. I have two mirrors this has happened to. :-\
I love this! This reminds me of the IKEA mirror I have in my living room that I thought I had gotten for a decent price at $100. I’ve had a mirror in my closet that I ripped the plastic trim from for years! I’m so doing this on Friday since its my day off. wooh whoo!
THIS IS ABSOLUTELY adorable!! and i cant wait to try it!! (a lil nervous, but i’m going for it! i’ve never operated a saw before) ok, but for the wood–you buy 2 1X4 pieces and cut the 2 shorter (17 1/4″ pieces) pieces off and that leaves you with the 2 @ 48″ and the 2 @ 17 1/4″? is that right? I just want to make sure–because i was thinking the 4 ft boad would only total 48 inches so if i cut any off–then it wouldnt be long enough? just wanting to make sure i buy enough wood!! thanks so much!!
mackenzie