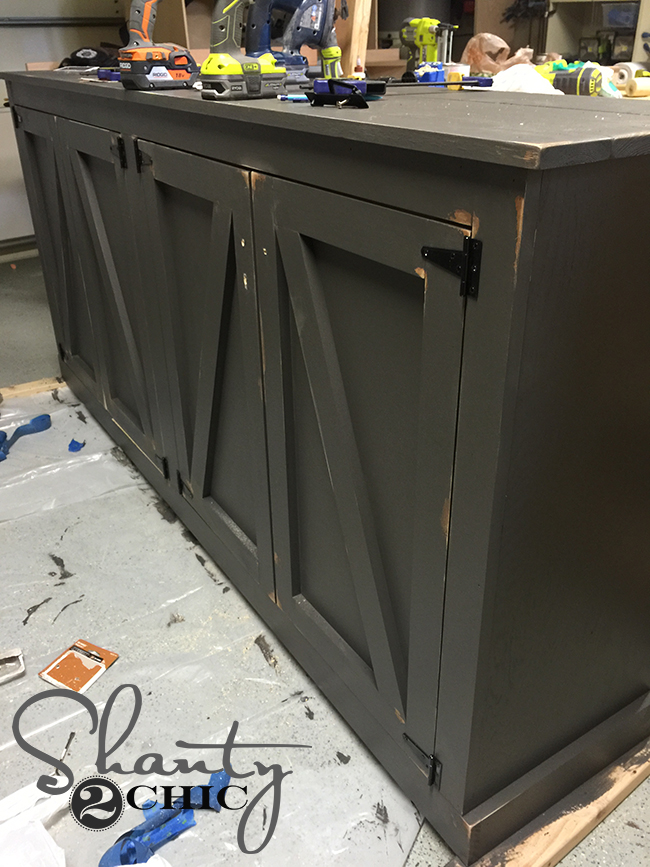
Hey friends! Thanks so much for your continued support of our pilot Open Concept on HGTV! You can see lots of before and after shots of the remodel by clicking HERE! I am here today to share the free plans and tutorial for the DIY Locker Cabinet! Here it is in their home!

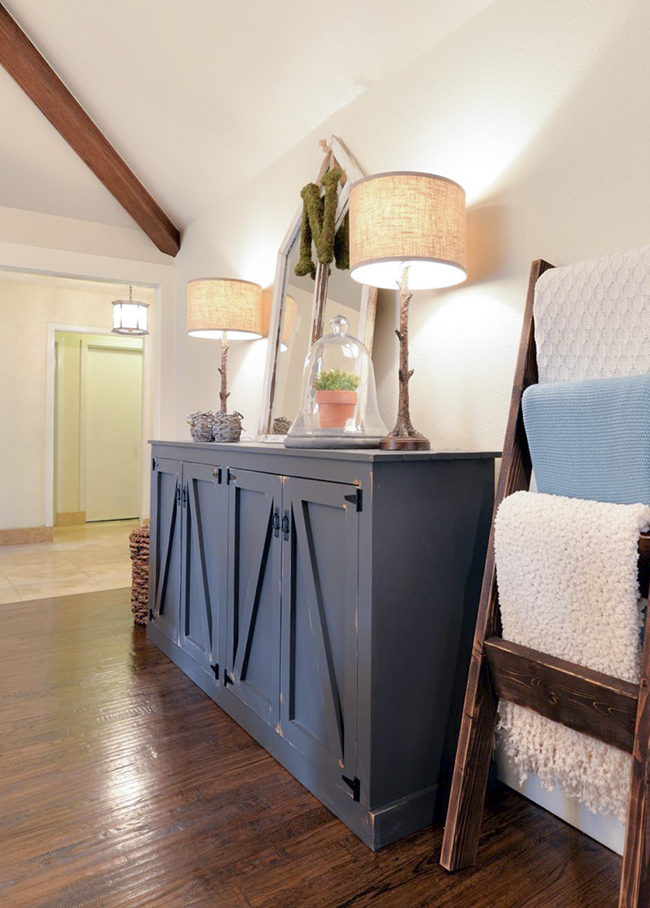
Isn’t it GORG? I love it. As always, I will walk you through the entire build here. You can also download and print the free plans by clicking HERE or the button below!
Let’s get started!
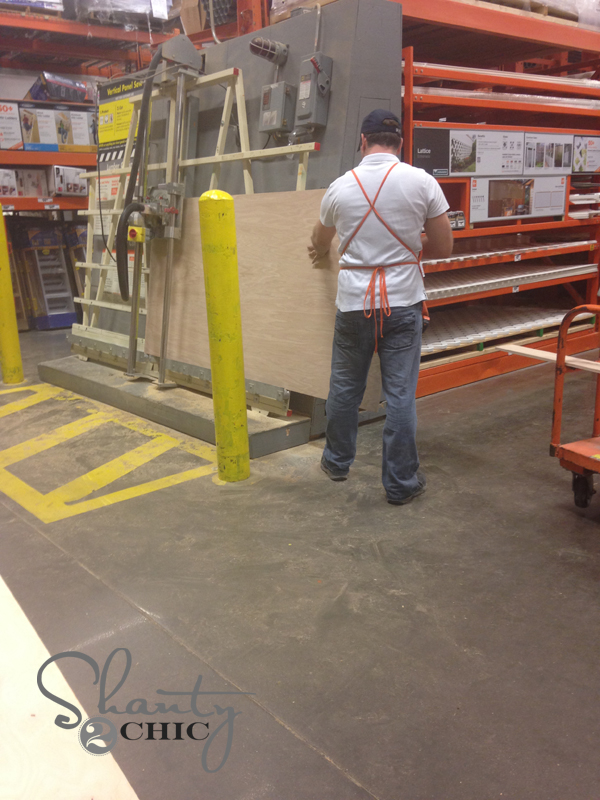
The majority of this piece uses hardwood plywood. What the heck is that? Good question! Hardwood plywood is plywood that comes in 4′ x 8′ sheets and s0me smaller sizes. Our very favorite brand to use is Purebond Plywood. You can find it at Home Depot. The outside layer of the plywood is a hardwood veneer like oak or birch. So, you get the look of a hardwood at the cost of plywood. Can’t beat that people! Plus, it’s super straight making it easy to work with which makes me happy!
The plywood sheets are big, and often impossible to fit into your car… Especially when you have 5 kids in the back ???? We like to have Home Depot make the rip cuts for us in order to get it in the car at home.
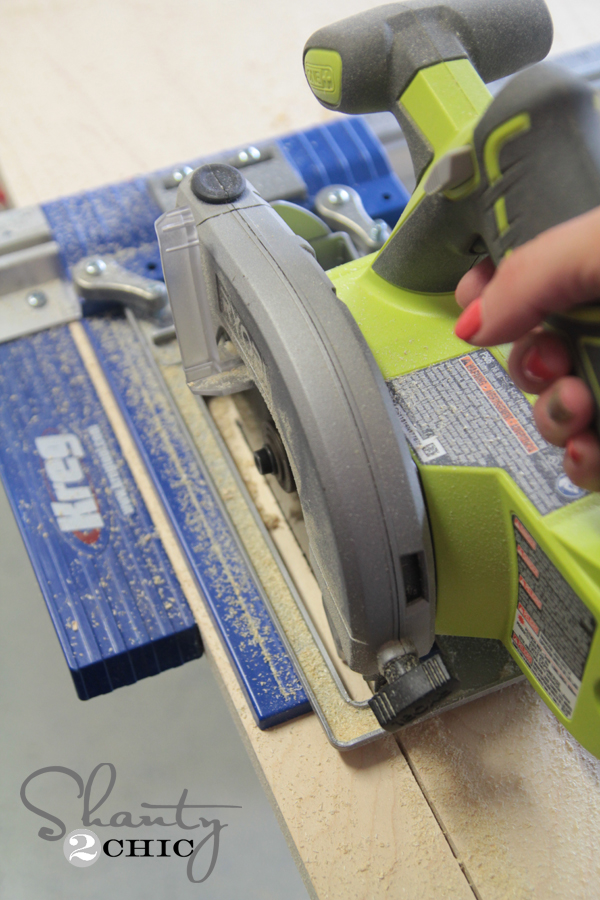
Once I had it home, I made most of my other cuts using Kreg’s RipCut. This is a really cool attachment that fits onto your circular saw. You can adjust it to make straight cuts at certain measurements. It’s very accurate and easy to use.
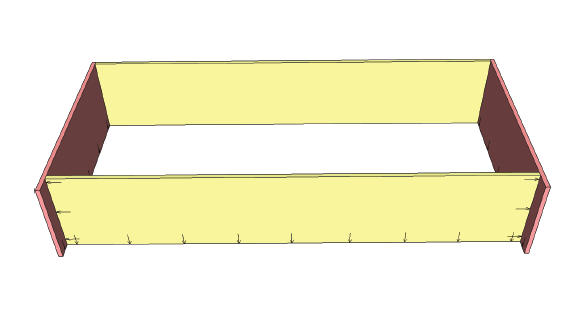
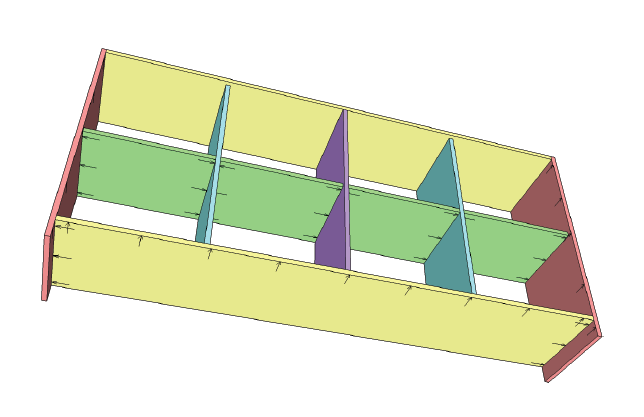
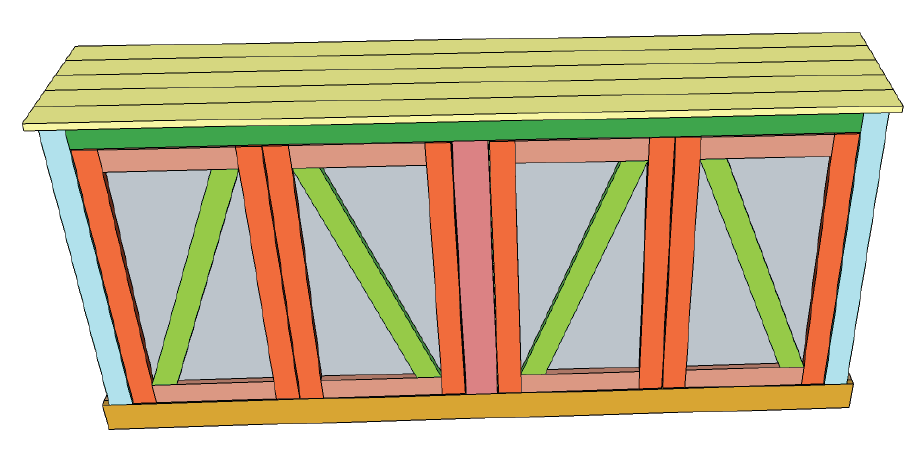
Really this build is very simple. It’s big… But, simple. You build the box of the sideboard first, and then add the trim and the doors. For the box, I used my Kreg Jig.
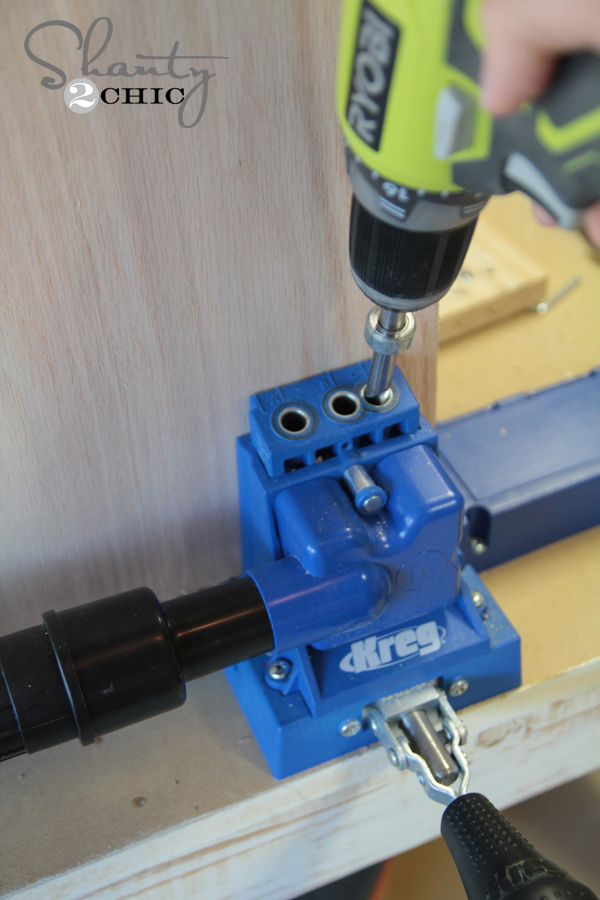
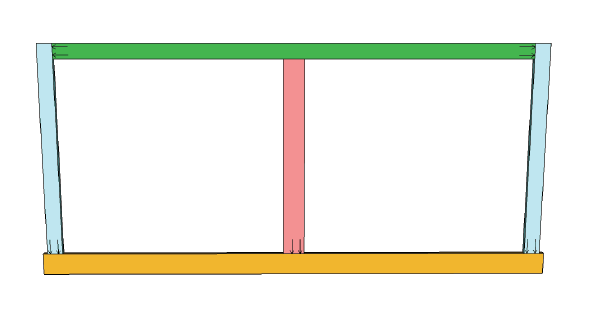
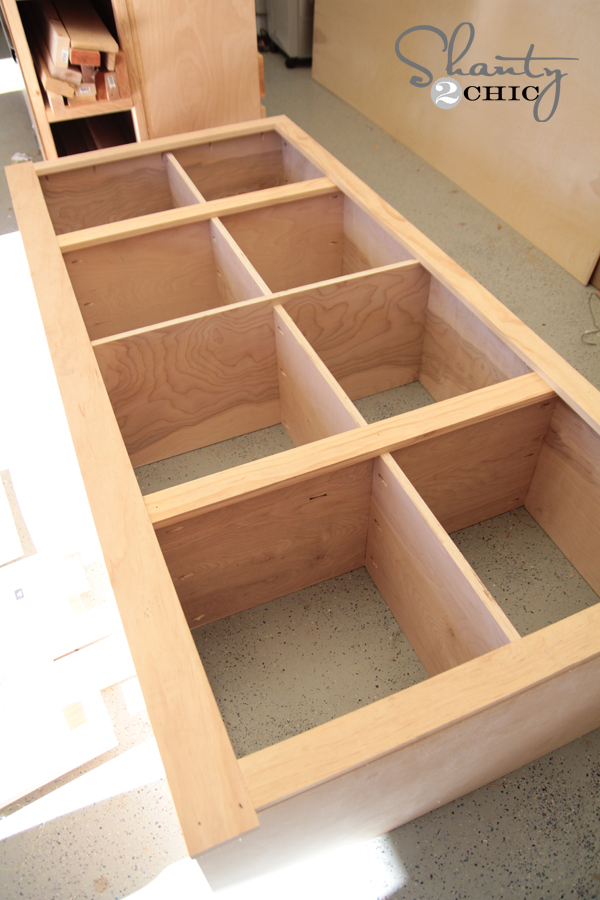
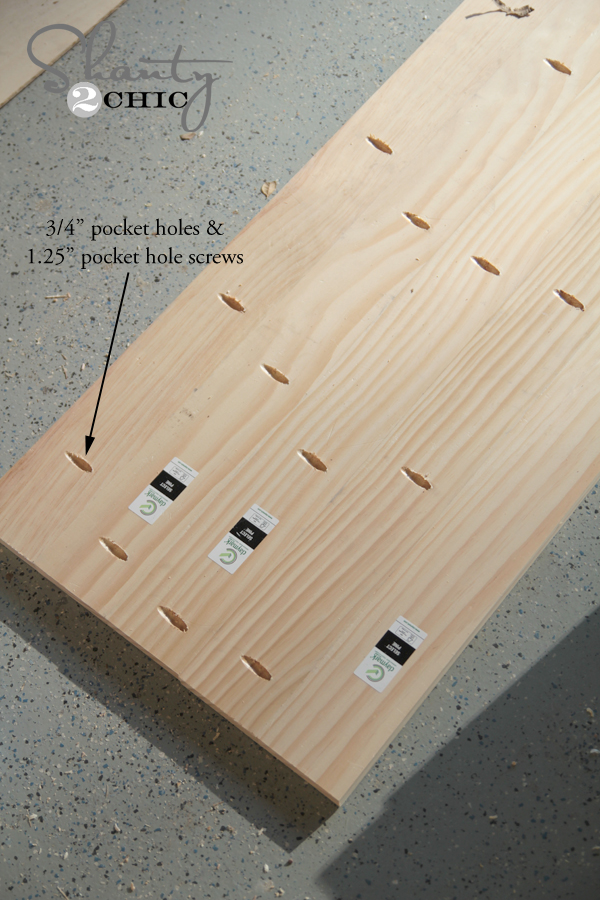
First, you will build the frame of the cabinet. These are your bottom, top and side pieces.
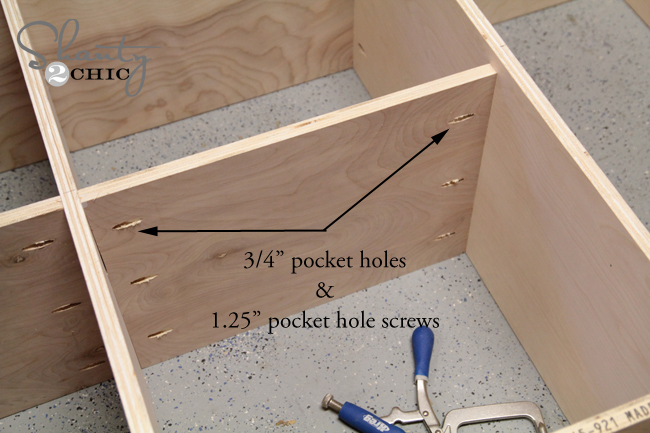
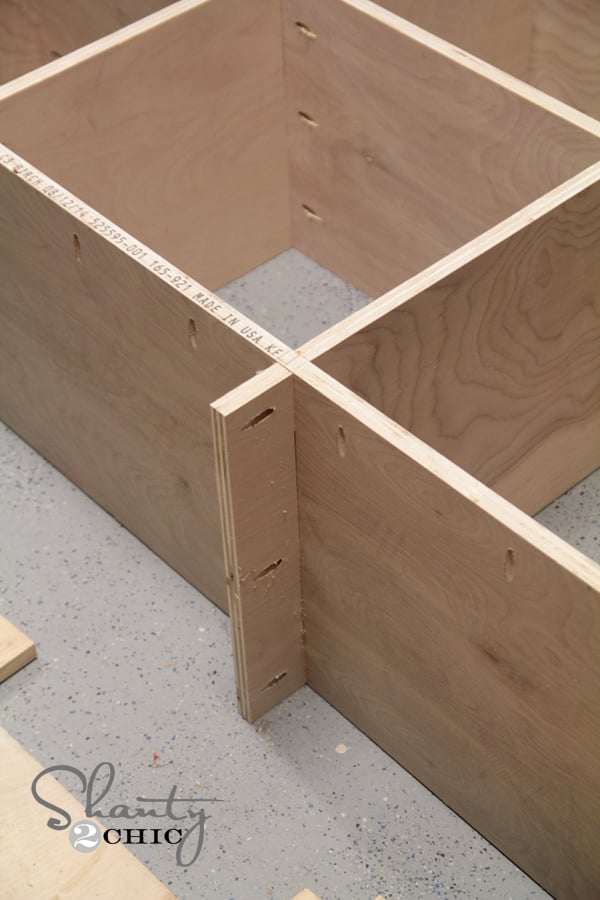
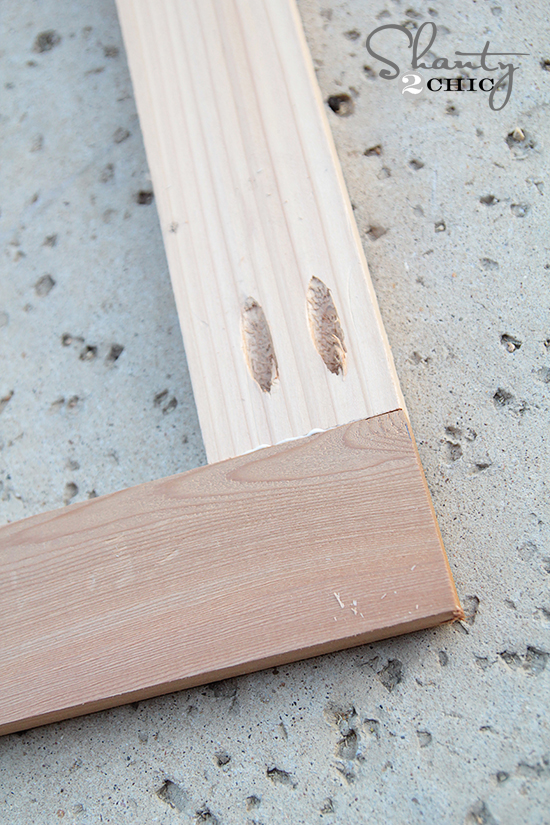
I used 3/4″ pocket holes and 1.25″ pocket hole screws for all of my joints. I also used a line of Titebond 3 wood glue on each joint.
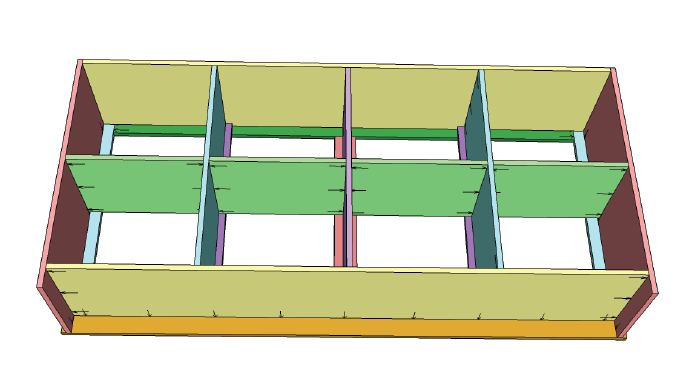
Next, you will add your vertical dividers. I like to mark the placement of mine with pencils and use a speed square to make sure the placement is right.
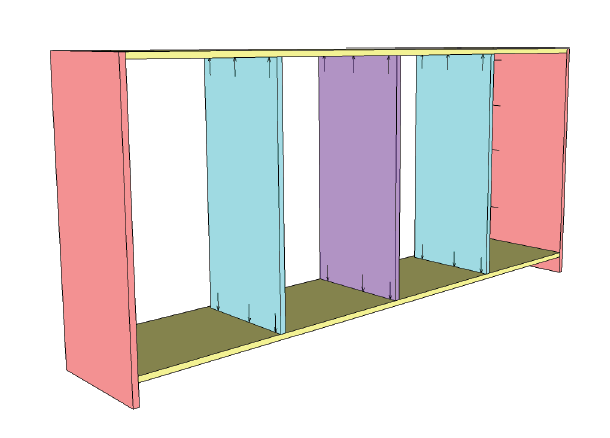
After adding the vertical dividers, I added my shelf pieces. You can add these at whichever height best fits your storage needs. You can see below my placement of the pocket holes.
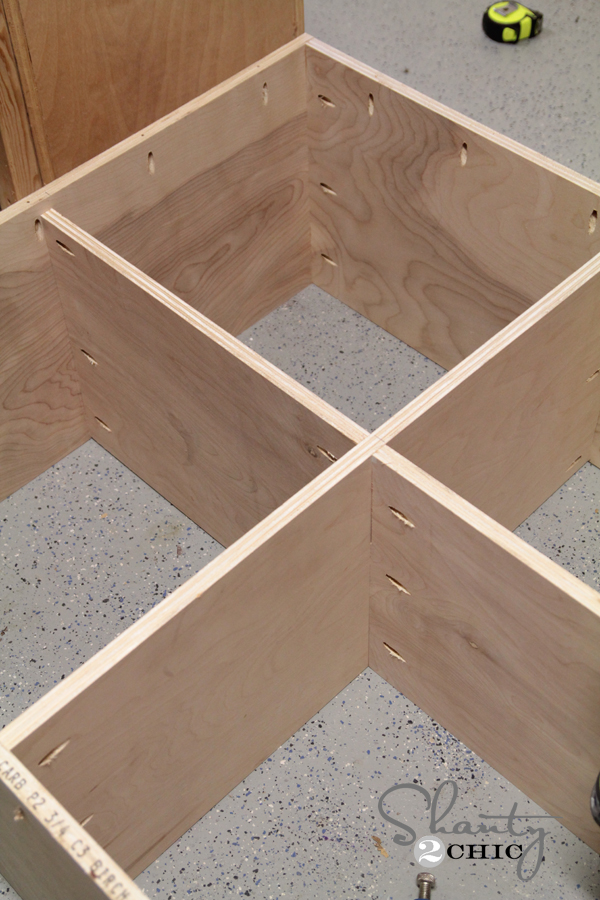
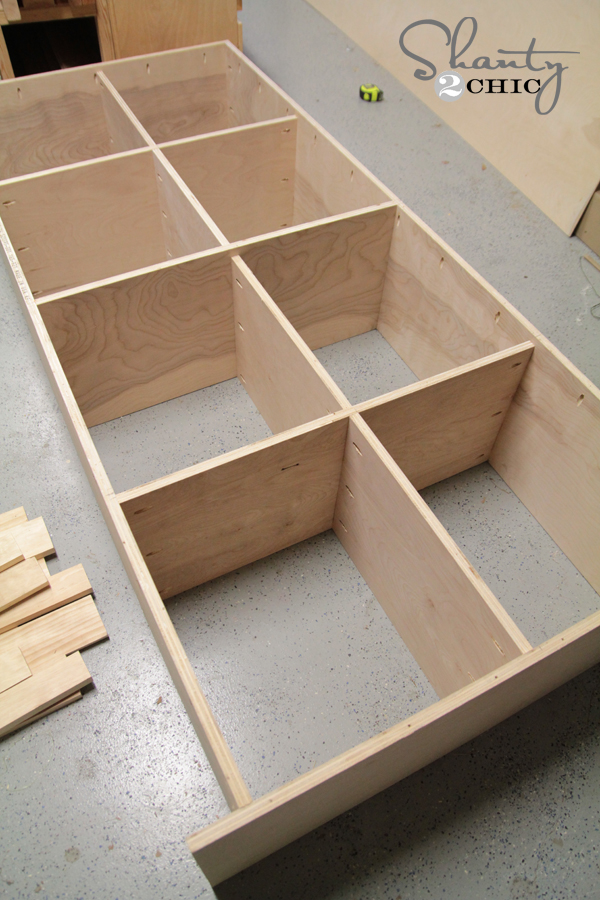
I also decided to add a small piece in the middle to serve as a brace for the weight to keep it from sagging. I plan to fill this baby up with dishes! I did this by cutting a small piece of the plywood and attaching it with wood glue and pocket hole screws.
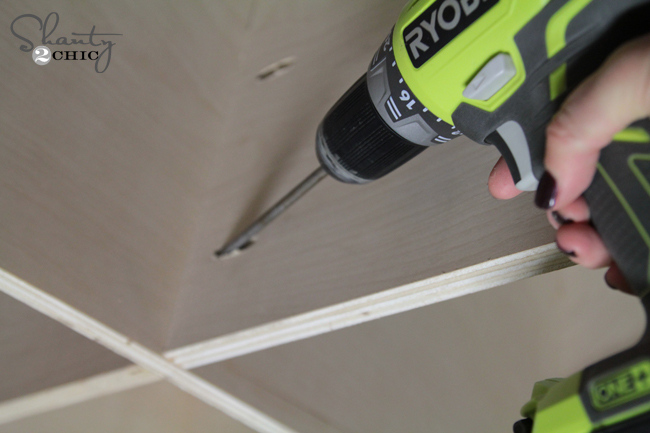
You will use a drill with the Kreg bit to attach all of these screws. The bit is included with the Kreg Jig. I used my Ryobi 18V One+ drill for mine. WE LOVE THIS DRILL. It’s the perfect size and has a ton of power. I actually have 2 to keep me from switching bits… #lazygirlprobs ????
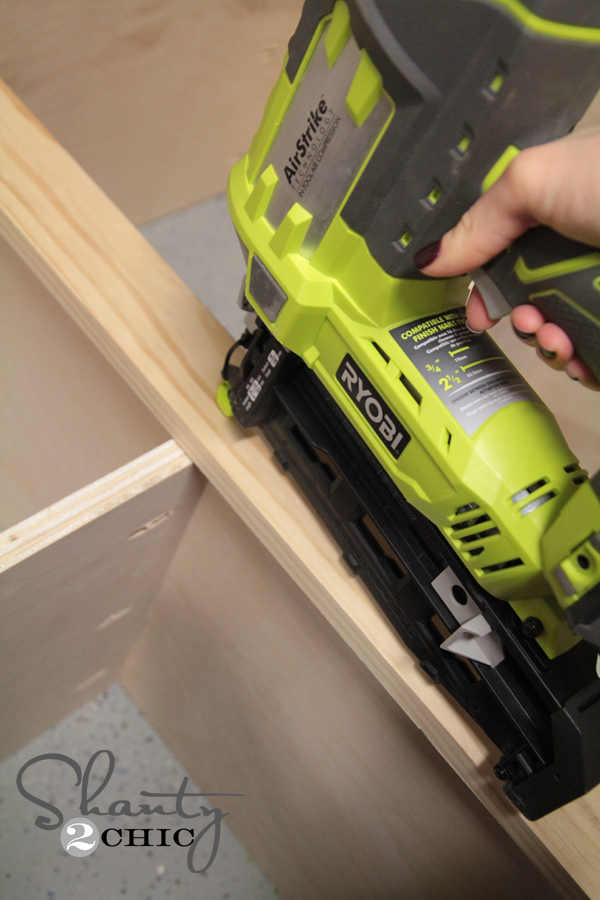
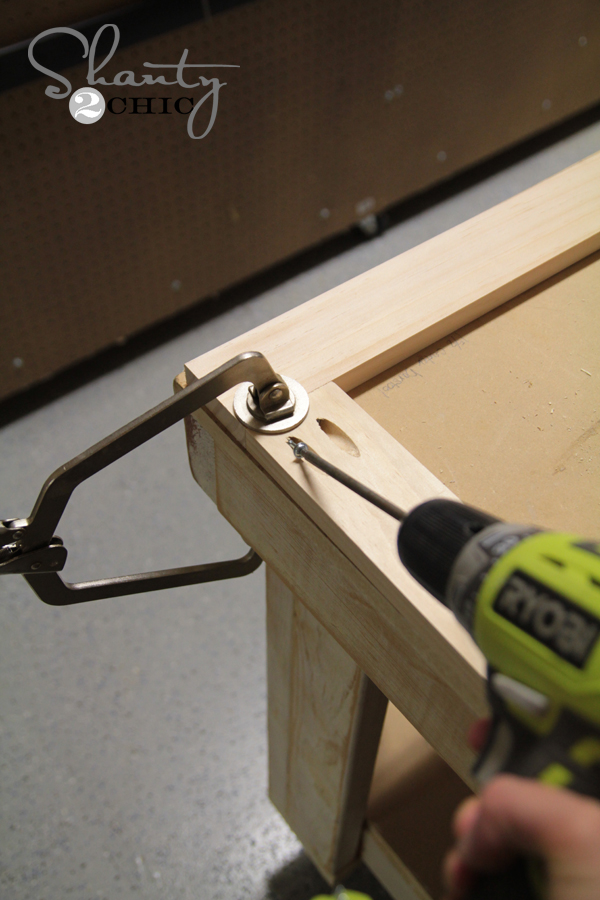
Once you have the entire box assembled you will add your trim pieces. First, build out the face frame. I also used 3/4″ pocket holes and 1.25″ pocket hole screws on this part.
I then attached the face frame to the cabinet front.
I used 1.25″ pocket hole screws through the bottom pocket holes, and I also used my Ryobi 16V Finish Nailer for this part. Yes… A battery finish nailer. It’s amazing. You need it too.
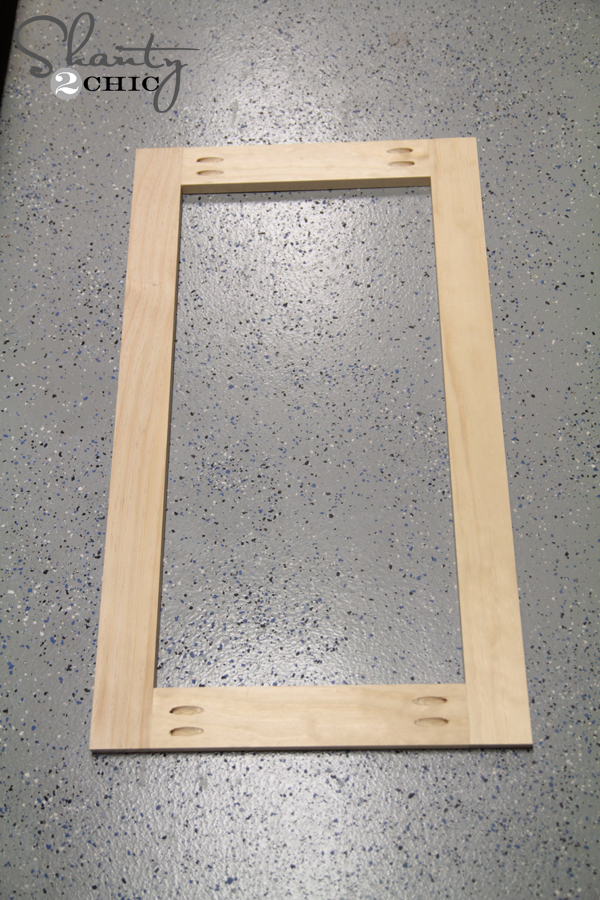
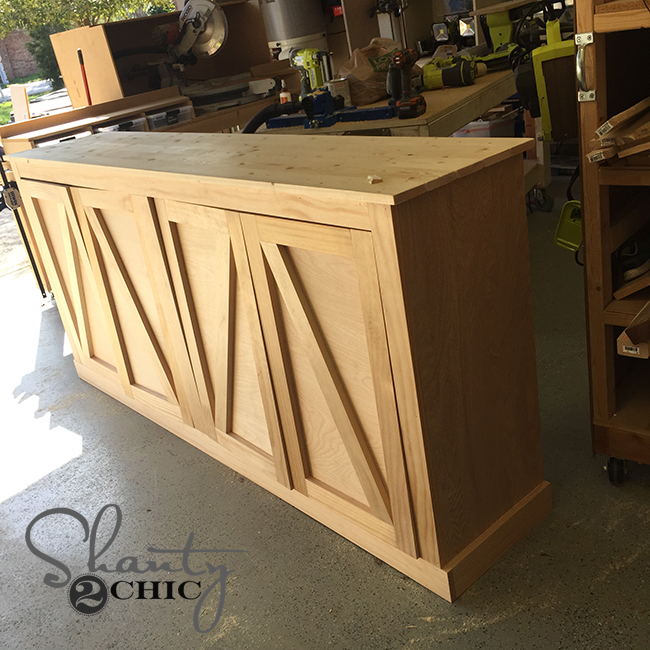
The base of my sideboard looked like this….
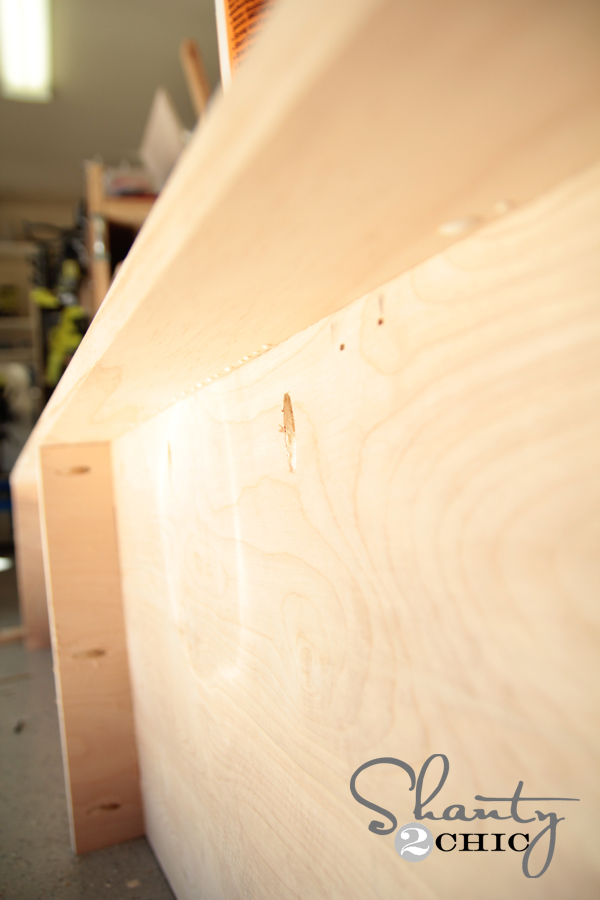
And it’s framed!
The back uses 1/4″ Purebond Plywood. I have Home Depot cut this down for me as well. This is best attached using an 18g stapler, but you can also use a finish nailer.
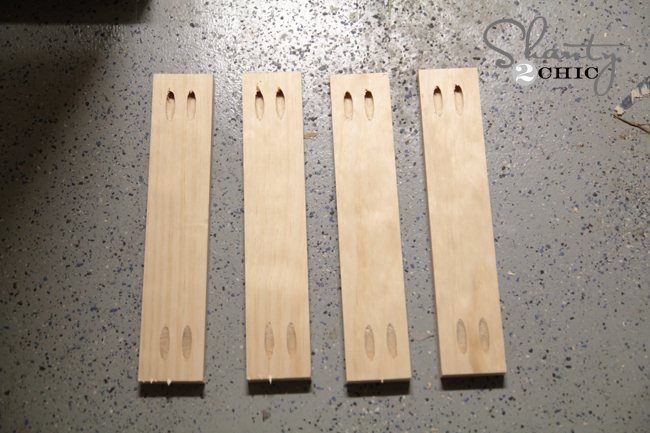
To create the doors, I used my Kreg Jig as well. I made the pocket holes on my shorter pieces and attached them to the longer ones using 1.25″ pocket hole screws.
Although we give you guys the cuts for these doors, I always like to measure the opening before making the cuts to be sure on the size. I like to make the doors 1/8″ smaller all around, which would be 1/4″ smaller than the width and height of each opening. For the doors, you will have 4 longer pieces without pocket holes like this.

You will also have 4 smaller pieces each with pocket holes on both ends like this.
I attached these pieces using wood glue and 1.25″ pocket holes screws to create rectangles.

Each door looks like this!
Then, cover each door back with a piece of 1/4″ Purebond Plywood and attach using wood glue and 3/4″ brad nails.
I cut the horizontal trim pieces to size and attached them using wood glue and brad nails from the back of the door into the trim pieces.
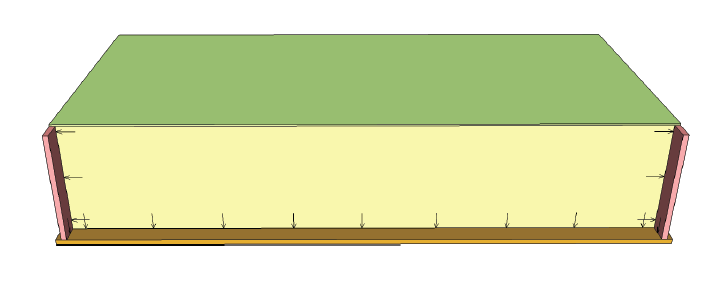
Next, I built and attached the planked top. I created the plank top by using 3/4″ pocket holes down 4 of my 5 boards. Then, I used 1.25″ pocket hole screws through those to attach it all.
Before attaching it to the top I added a bunch of wood glue to the top of my sideboard. I had a little fun with this part…

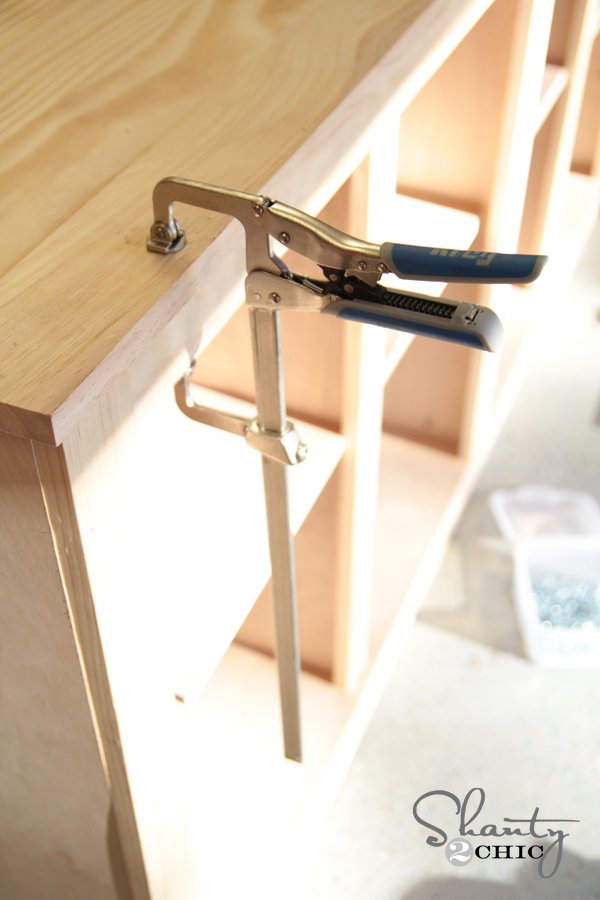
To attach the top, I used my new (and wonderful) Kreg bar clamps. I love easy bar clamps. These are so awesome… They are self adjusting and easy to use. I used mine to hold the top in place while I used the finish nailer to attach the top with 1.25″ finish nails.
This is what she looks like all finished up and ready for paint!
I used an AMAZING color on this piece. It’s called Urbane Bronze by Sherwin-Williams… Seriously, it’s the perfect dark grey.
I found my hardware at Home Depot.
These are the Liberty Hardware pulls I used!
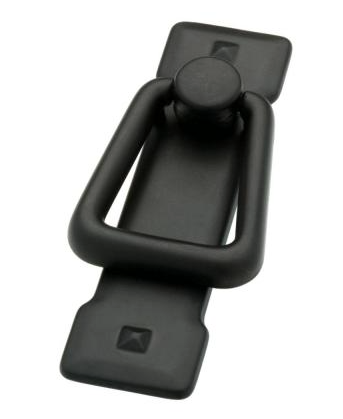
I used my drill to attach everything.
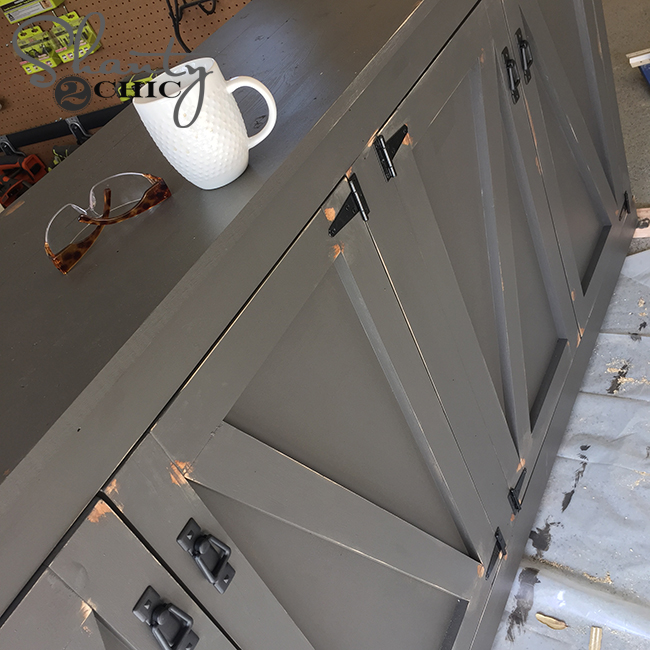
I also added a hook to the inside of each cabinet so the kids could hang their backpacks and stuff. And, here it is all finished and on display!
What do you think? I may go take it back I love it so much 😉

Love this piece!! Thank you so much for sharing your plans!
Hi Amy!
I was curious what color stain you used for the top of the locker cabinet? Also, how long did it take you to complete this project? It turned out beautifully 🙂
Hi Amber! Thank you! I used only one coat of Minwax (Jacobean color) stain and about 5 coats of Varathane Poly. The whole project took about two weeks to complete bc I had family in town for a portion of the time. I also have a toddler, so I can really only “play” when she is napping. This project could easily be done much faster. They really did a great job with the plans. I only made a couple of easy to fix oops which were completely my fault for not reading carefully 😉 Hope this helps. Go build it 😀
Hi Amy!
So I finally completed the locker cabinet and it only took me three weeks, lol… I have been looking for overlay hinges for the last two weeks and no such luck. Any suggestions based off your purchase?
variation on a theme. Added sliding barn doors, outside doors are in-set, country hutch top with wire doors, and dimming LED lighting
You girls are so sweet for sharing your ideas. I love this piece! I’ve bought the hardware, made the cuts, and holes are drilled. I am about to put it all together once my darling daughter goes to bed. Bedtime might be a few mins early tonight bc I am so excited to get started. Just a couple questions about the paint… When you painted, did you prime, or just paint. Also, did you use Vaseline in the corners before painting or just sand certain spots? Finally, did you spray or use a brush/roller? Can’t say thanks enough for being so generous with great plans!!
Did you get a response about paint? I used birch veneer plywood on some and poplar in other parts. Not sure how to finish it. I like chalk paint with wax. But maybe a latex is better? What was used in the original post? Urbane Bronze by Sherwin-Williams Is listed as the color. But what kind of paint? Latex? Oil or water based primer?
What are the dimensions of this locker cabinet once its finished? I’m curious if it will fit my space or not.
The overall dimensions are on the plans 🙂
Hey there, I’m considering making this and using it as a dresser in our master bedroom. Does it say somewhere what the degree is for the angle cuts on the doors? Thanks so much!!
My husband made it without the doors for our nursery. We’re going to use the bottom shelves for toy storage, and the top for books.
Do you think this piece would make a good tv stand?
The first picture the color looks almost blue. I want a nice dark grey. Is this color grey or dark blue?
It’s grey but you need to sample it in the room you want to make sure. Too many things affect the way paint looks. Hope this helps!
What type (latex, oil, etc.) of paint did you use? Also, is there a primer you would recommend? Thanks!
how much does this project cost?
The wood, glue and nails costed me around $230. The hardware is around $60. Haven’t gotten to the paint just yet, but give or take, $300+. Although, this piece you could easily buy for $800+. I’d say it’s a steal!!!
What paint color is on the walls? Its very pretty.
Out of curiosity, how much did that sheet of Plywood cost you?
A 4’x8′ sheet is $49 in Texas!
Unbelievable.. In Australia, for a similarly size/quality sheet of plywood (2440x1220x18mm @ Aa grade), it’s $152!! (current conversion puts that at $109 USD).
We could get CD grade (2400x1200x19mm) for $75 AUD, but that’s not a very good quality board..
I’m so jealous of the price of timber there!
$44.98 a sheet for purebond poplar here in Central FL.
It turned out beautiful. You sure know how to make gorgeous things!
You girls are amazing and an inspiration. I am a 53 year old mom of two, one being a 28 year old girl that has blessed me with two grandsons. You both remind me of her, cute as all get out and very determined! Let me say, you make girls proud!! After watching Open Concept and checking out your site, I am hooked, and will be starting to make some of the pieces you show here, and without a doubt, will soon have my daughter hooked with me as well! Will you be posting plans for that gorgeous coffee table?….an inner voice is telling me I need it!!
Love Love the cabinet and LOOOVED the Show! Thank you so much for all the great detail tutorials. Maybe one day I can afford a kreg jig and be able to do something that you do. I’ve been able to make some of the smaller projects but not the bigger ones. Praying one day I can. I can hardly wait for your posts!! You both are amazing!
Thank you so much Jamie! It is worth saving for! They will change the way you build… Promise. Thank you for your sweet message!