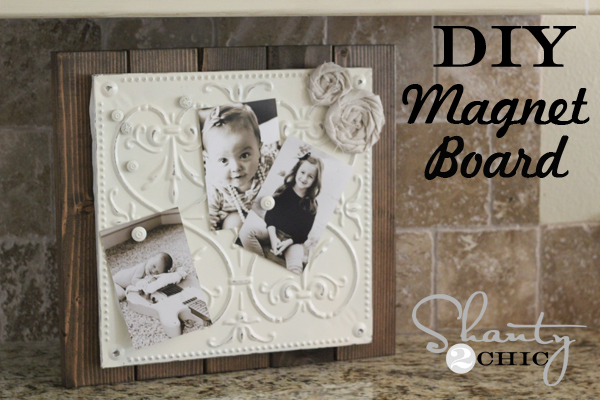
Hey guys! Hope you are all having a great week! I am so excited to share my latest project with you! I love having a place to stash little notes, photos and reminders in my kitchen. With the addition of baby #5 I decided it was time to upscale my kitchen memo board. I made this for my counter, but you can also easily add a hanger to the back and make it for a wall! Here is how it turned out…
This is super easy to make, and yah… Only $12! My kind of DIY ;-)!
I used 1 2×4 from Lowe’s for under $2. I cut it into 5 – 16″ pieces. You can also have the hardware store cut it for you!
I used Gorilla Wood Glue to attach my pieces.
You will need to hold them together until they dry which doesn’t take long. I used a clamp, but tape works great too! Very shanty… I know. 😉
While those were drying I worked on the tin and magnets. I found this great tin at Hobby Lobby for $9 on clearance… Woohoo! For those of you that don’t have a Hobby Lobby you can buy it online HERE! Make sure to use a coupon!
For my magnets I used some fun buttons from Hobby Lobby as well. You can use anything for magnets, but I love the way these look with the tin!
I used a pair of pliers to cut the shank off the back like this…
And then gave both my tin and buttons a coat of Rust-Oleum Painter’s Touch in Heirloom White. While they were drying I stained my wood. I used my very fav… Rust-Oleum Premium Wood Stain in Dark Walnut. You can find it at Lowe’s.
After everything dried I used some sand paper to distress my tin a bit, and attached it to my wood like this. I used Gorilla Glue Epoxy to attach it.
I held the tin in place with some tape until it dried. I also used the Epoxy to attach little magnets to the back of my buttons.
That’s it! Super easy and cheap!! I love how big it is for this fam of 7! I’m sure mine will be cluttered with reminders for late field trip forms and such, but for now I will make it cute 😉 Oh and I couldn’t resist adding a couple rosettes to the top. It was begging for them.
What do you think??
Hope you like it!! It really is so easy to make, and can be used in pretty much any room in the house. It also makes a great teacher gift, new baby gift… ok just about any kind of gift! And I think the $12 makes it even cuter!
Thanks so much for stopping by! I would love for you to pin this like crazy below ;-)!! Thanks so much guys!! Have a great day!
~Whitney


After making your DIY chalk board & key hooks I took down one of these tins to hang it. Wasn’t sure what I was going to do with it. Now I know.
I love the step by step directions with pictures. I am one of those people who need pictures to be able to follow directions…lol
I love this DIY and Im in the middle of making it right now! Just wondering where you found those magnets?? Thanks!!!
Hey Jess!
I actually bought buttons, cut the shank off with pliers and used Gorilla Glue Epoxy to attach a magnet to the back of them. I also painted them to match the board. Hope this helps! 🙂
This turned out too cute! Affordable and super easy! I’m sharing this over on my FB today. This is great!
I made two of these. The first one I used the 2″ x 4″ wood and the other one I used a 1″ x 4″ wood. The 1 x 4 turned out so much better. Perfect for hanging or putting in a stand.
Wow!!! I love this! So Beautiful! I was just wondering off the subject of the project, what color is your cabinets in the kitchen? I love them as well! =)
wow this looks great, I think I will make a few of them for my craft room!! Thanks
⭐?⭐?⭐?⭐?⭐?⭐?
⭐?⭐?⭐?⭐?⭐?⭐?
⭐?⭐?⭐?⭐?⭐?⭐?
I LOVE the magnetic memo board I built, but I used a different plan that’s a bit better than the one on this website. I’m obsessed with mine! I built my own using the plans at www. WoodworkPlans.info – highly recommended you check those out too. They are detailed and super easy to read and understand unlike several others I found online. The amount of plans there is mind-boggling… there’s like 16,000 plans or something like that for tons of different projects. Definitely enough to keep me busy with projects for many more years to come haha
Head on over to www. WoodworkPlans.info if you want to learn more – click the pink link above for some more plans! Best of luck on your building adventures!
⭐?⭐?⭐?⭐?⭐?⭐?
⭐?⭐?⭐?⭐?⭐?⭐?
⭐?⭐?⭐?⭐?⭐?⭐?
⭐?⭐?⭐?⭐?⭐?⭐?
⭐?⭐?⭐?⭐?⭐?⭐?
⭐?⭐?⭐?⭐?⭐?⭐?
I LOVE the magnetic memo board I built, but I used a different plan that’s a bit better than the one on this website. I’m obsessed with mine! I built my own using the plans at www. WoodworkPlans.info – highly recommended you check those out too. They are detailed and super easy to read and understand unlike several others I found online. The amount of plans there is mind-boggling… there’s like 16,000 plans or something like that for tons of different projects. Definitely enough to keep me busy with projects for many more years to come haha
Head on over to www. WoodworkPlans.info if you want to learn more – click the pink link above for some more plans! Best of luck on your building adventures!
⭐?⭐?⭐?⭐?⭐?⭐?
⭐?⭐?⭐?⭐?⭐?⭐?
⭐?⭐?⭐?⭐?⭐?⭐?
So cute! I will be making this soon! I am pinning this also!
So cute! I’m thinking you should be able to use those tin ceiling tiles you can buy at Lowe’s. I’m thinking it would be inexpensive, but I would have to check. Thanks for sharing this, I hope to make one for a gift!
Noticed your comment to pin like crazy. Just thought I’d let you know that a week or two ago I pinned your DIY Magazine tray and within a day it had around 50 repins! 🙂 It’s amazing how fast they spread.
Your work is very inspiring. Now if I could just turn off the blogs and get working….
did the tin tile come with the wood frame backing?
I was wondering the same thing.