
I built these DIY chunky shelves with industrial brackets for my bedroom after finding the cutest metal brackets from Crates & Pallet. I loved the brackets on their own, but I wanted thick, chunky wood shelves that looked more like reclaimed beams than standard shelf boards.
How fun are those?
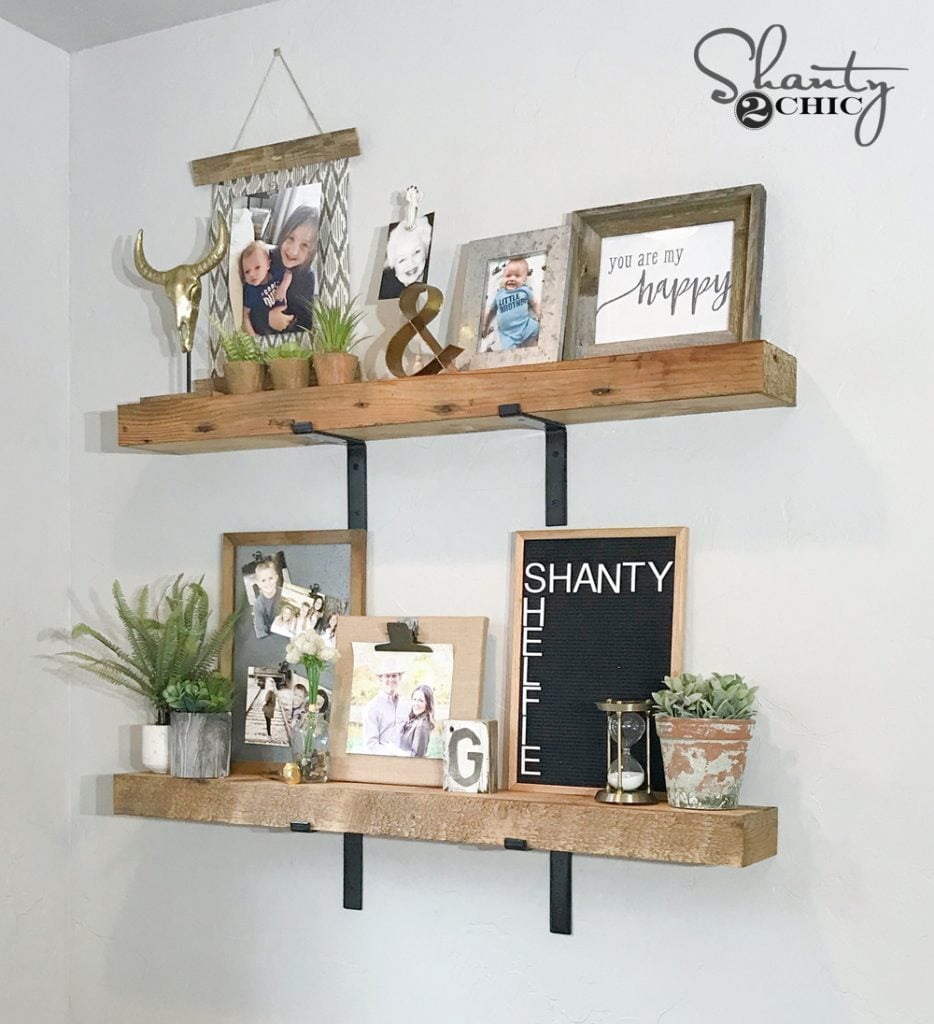
Table of Contents
Why I Love These Chunky Wood Shelves
These shelves have so much character without requiring a complicated build.
- The industrial metal brackets are designed to fit standard dimensional lumber.
- The hollow box gives you the look of a thick reclaimed beam without the weight of one.
- You can customize the wood and finish to match your room.
- The shelf is built mostly with straight cuts, plus a few 45° miters for the trim.
- Free printable plans and a video tutorial are available to follow along.
One thing I really liked about these brackets is that they are designed to hold a standard 1×8 or 2×8 board. If you don’t want to build the chunky box version, you could simply buy a board, finish it, and set it right into the brackets.
For mine, I wanted that thicker reclaimed wood look, so we took it a step further.
Key Supplies and Why I Used Them
1×8 boards: These create the top and bottom of the shelf box. Because the finished shelf needs to fit inside the brackets, I ripped them down to account for the thickness of my trim.
1×2 boards: These create the lightweight frame inside each shelf and give the top and bottom boards something solid to attach to.
Reclaimed wood trim: I used 3/8″-thick reclaimed wood that was 3″ wide. This wraps the exposed edges and gives the finished shelf the look of one thick piece of aged wood.
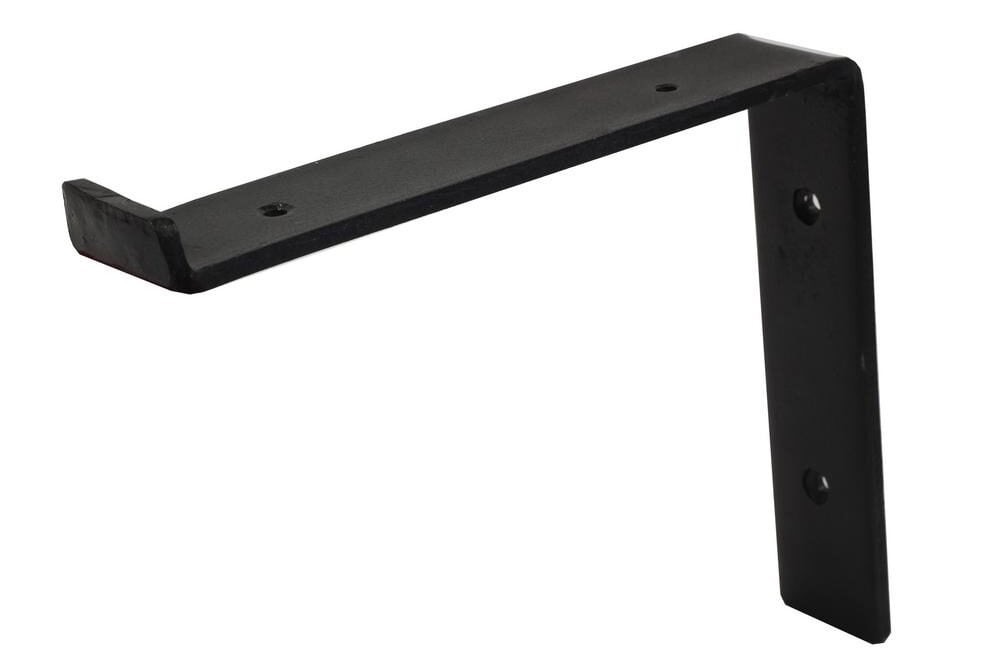
Metal brackets by Crates & Pallet: These are designed around dimensional lumber and are what give the shelves their industrial look.
1 1/4″ brad nails and wood glue: I used these throughout the shelf box assembly and to attach the trim.
3″ wood screws: I used these to mount the brackets directly into wall studs.
1″ wood screws: These attach the finished shelf box to the brackets from underneath.
How to Build DIY Chunky Shelves with Industrial Brackets
The complete printable plans and How-To Card are below, but I’ll walk you through how we built the shelves first.
We built a simple hollow shelf box, wrapped it with reclaimed wood trim, and mounted it right onto the metal brackets. Be sure to grab the FREE printable plans before you get started.
Determine the Finished Shelf Width
Before cutting the top and bottom boards, determine how wide the finished shelf needs to be to fit inside your brackets.
The brackets we used are made to fit the width of a standard 8″ board, which is actually 7 1/4″ wide.
Because I was wrapping the shelf with 3/8″-thick reclaimed wood trim, I needed to remove that thickness from both sides of the shelf box. I ripped 3/8″ off the width of the 1×8 boards used for the top and bottom.
If your trim is thicker, adjust this measurement accordingly. For example, if you use 3/4″-thick 1× material for the trim, you would need to account for that extra thickness when ripping your top and bottom boards.
This measurement matters because the finished box needs to slide neatly into the brackets.
Build the Shelf Frame
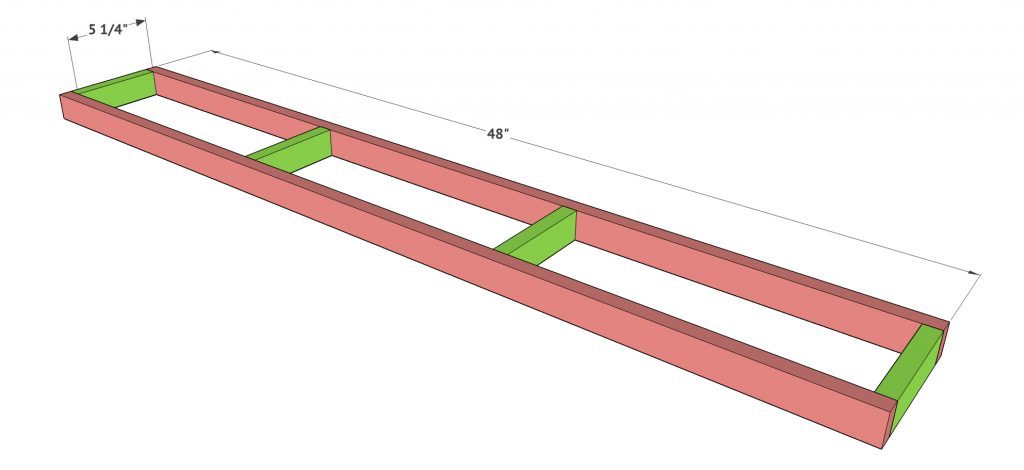
Now build the inside frame of the shelf using 1×2 boards.
Make the cuts according to the free plans, then assemble the frame with wood glue and 1 1/4″ brad nails.
The frame creates the structure inside the shelf while keeping the finished piece lighter than a solid chunk of wood.
Attach the First 1×8 Board
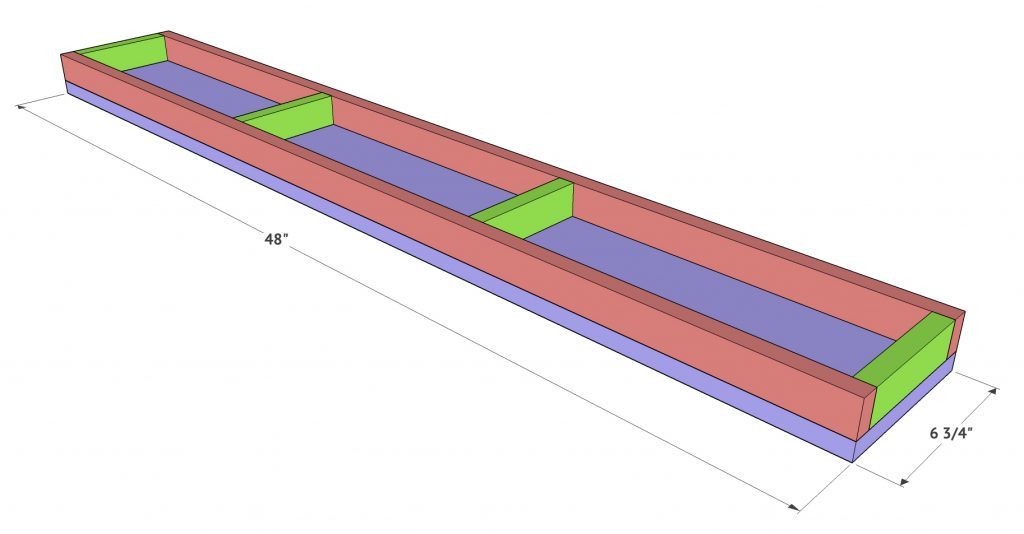
Attach one of the ripped 1×8 boards to the frame with wood glue and 1 1/4″ brad nails.
Make sure the edges stay flush as you nail everything together.
Add the Second Board
Flip the shelf over and attach the second ripped 1×8 board the same way using wood glue and 1 1/4″ brad nails.
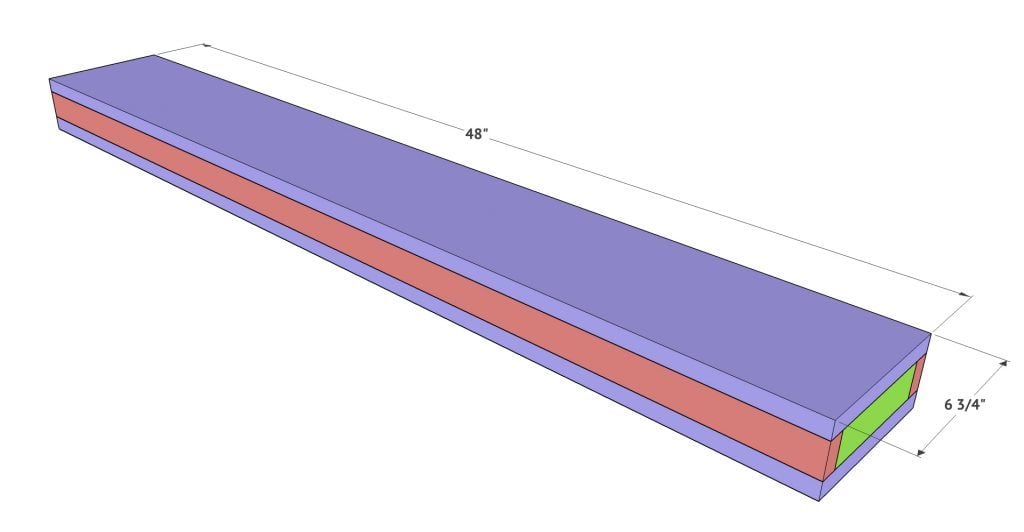
At this point, you have the basic shelf box built.
Add the Front Trim
Now it’s time to wrap the shelf in reclaimed wood.
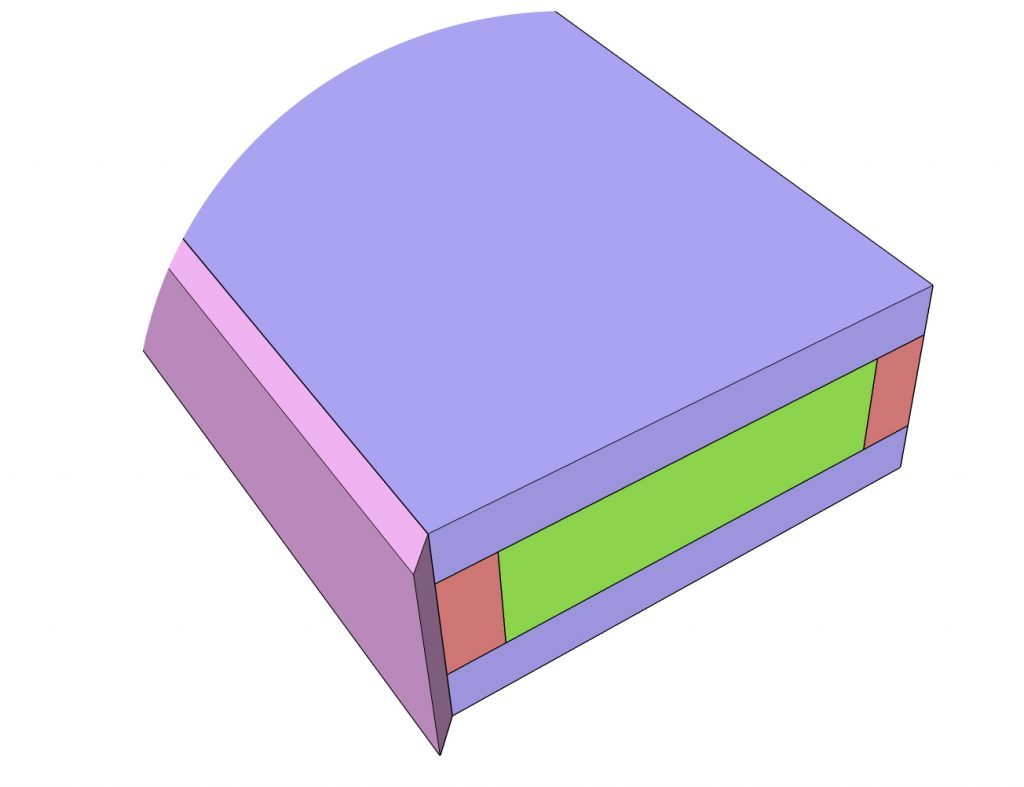
Start with the front trim piece. Mine was cut 48″ long from short point to short point, with both ends mitered at 45°.
Attach it to the front of the shelf using wood glue and 1 1/4″ brad nails.
The mitered corners help the trim look like one continuous piece wrapping around the shelf.
Add the Side Trim
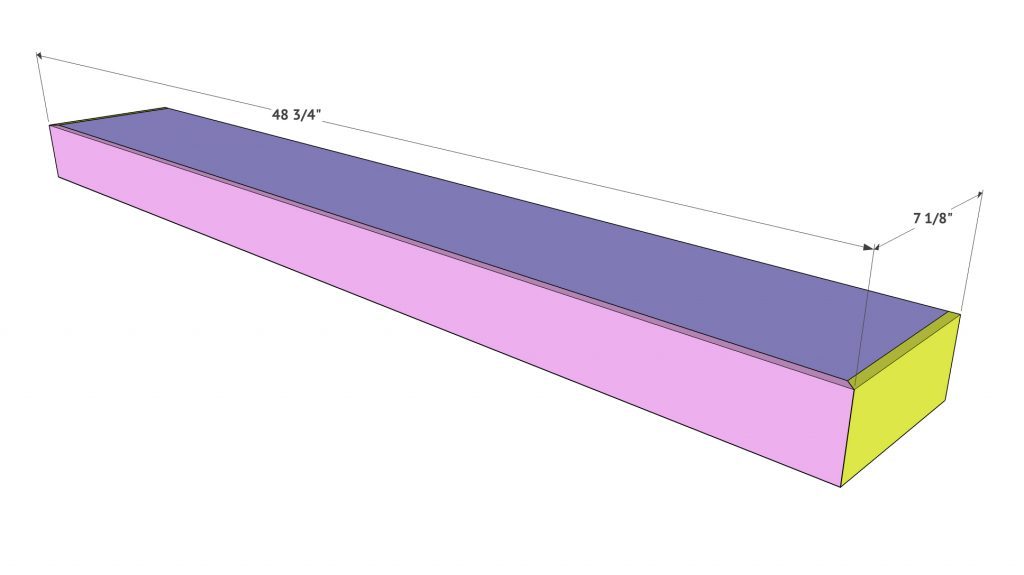
Cut the two side trim pieces next.
The front end of each side piece gets a 45° miter so it meets the front trim cleanly. The back end stays square because it will sit against the wall.
Attach both side pieces with wood glue and 1 1/4″ brad nails.
I like to measure these pieces directly from the assembled shelf before making the final cuts. Small differences in lumber thickness can change the fit just enough to matter at a mitered corner.
Add Stain or Paint the Shelf and the Side Trim
Now add your finish.
Because I used reclaimed wood for the trim, I chose a stain for the new wood on the top and bottom that coordinated with the reclaimed boards.
Let the finish dry completely before installing the shelves.
Attach the Brackets to the Wall
While the shelves were drying, we installed the metal brackets.
I attached mine directly to wall studs using 3″ wood screws.
If you cannot hit a stud where the brackets need to go, use wall anchors that are appropriately rated for your wall type and the weight the shelves will hold.
Make sure the brackets are level with each other before tightening everything down.
Secure the Shelf to the Brackets
Set the finished shelf box into the brackets.
Once everything is positioned correctly, drive 1″ wood screws up through the brackets and into the bottom of the shelf box.
And that was it!
Expert Tips
A few small details make a big difference with this build.
- Measure your actual trim thickness before ripping the 1×8 boards. The finished width needs to fit your specific brackets.
- Measure the side trim pieces to fit. Mitered corners look much better when they are cut from the assembled shelf rather than relying only on a written measurement.
- Check the brackets for level before mounting the shelf. Once the box is installed, even a small difference will be noticeable.
- Mount into studs when possible. These shelves may eventually hold more weight than you expect once books and decor are added.
- Let the finish dry completely before installation. It is much easier than trying to touch up stain around mounted brackets.
Ways to Customize These Shelves
There are several easy ways to change the look without changing the basic build.
- Paint the shelf box and leave the brackets black for a cleaner modern-industrial look.
- Use new 1× lumber instead of reclaimed trim and stain the whole shelf one color.
- Try a warmer or lighter stain depending on the furniture already in your room.
- Build the shelf at a different length, but remember that changing the length may also change the frame pieces and bracket placement.
Frequently Asked Questions
For this exact version, the top and bottom 1×8 boards were ripped narrower so the completed shelf would fit inside the brackets after adding the reclaimed wood trim. You will need a safe way to make those rip cuts. If you do not have the tools for that, the brackets themselves are designed to accept a standard 1×8 or 2×8 board, so you can also create a much simpler shelf without building the chunky box.
Yes. The reclaimed wood is decorative and gives these shelves their rustic look. You can use another trim material, but measure its actual thickness before determining the width of the top and bottom boards.
Absolutely. Paint would give these the same chunky shape with a cleaner or more modern look.
I chose to install mine directly into studs using 3″ wood screws. If your bracket placement does not line up with studs, you will need anchors suitable for your wall construction and the load you plan to place on the shelves. I would not guess at a specific weight rating without the hardware manufacturer’s documentation.
More DIY Shelf Projects
If you love this chunky shelf look, we have several other versions you can build too. Our DIY Floating Shelves use a hidden cleat for a clean look, while these DIY Floating Shelves with Pipe add another fun industrial detail. You can also check out our DIY Floating Shelves with Hardware if you like mixing wood and metal, or build a set of DIY Floating Corner Shelves to make use of an empty corner.
I love how much thicker these look than a standard board sitting on brackets. The reclaimed wood gives them the chunky look I wanted, and those metal brackets add just the right industrial detail.
If you build a set, we would love to see them! Share your finished project and tag Shanty2Chic on Instagram or use #shanty2chic so we can check it out. And leave us a star rating so this projects reaches more friends!
✂️ Printable Tutorial
DIY Chunky Shelves with Industrial Brackets
Tools
- Table Saw
- Miter Saw
- Brad Nailer
- Drill
- Measuring tape
Supplies
- 1 ×8 boards
- 1 ×2 boards
- 3 “-wide reclaimed wood trim 3/8″ thick
- Crates & Pallet metal shelf brackets
- Wood glue
- 1 1/4 ” brad nails
- 3 ” wood screws
- 1 ” wood screws
- Wood stain or paint
- Appropriate wall anchors if needed
Instructions
- Size the shelf boards. Measure the brackets and account for the thickness of your trim. For 3/8″-thick trim, rip 3/8″ from the width of each 1×8 top and bottom board.
- Build the frame. Cut the 1×2 boards according to the plans and assemble the shelf frame with wood glue and 1 1/4″ brad nails.
- Attach the top and bottom. Secure the ripped 1×8 boards to both sides of the frame with wood glue and 1 1/4″ brad nails.
- Add the front trim. Cut the front trim to 48″ from short point to short point with 45° miters on both ends. Attach it with wood glue and brad nails.
- Add the side trim. Cut each side piece with a 45° miter at the front and a square cut at the wall. Attach with wood glue and brad nails.
- Finish the shelf. Stain or paint the completed shelf and let it dry completely.
- Install the brackets. Level the brackets and secure them to wall studs with 3″ wood screws, or use appropriately rated anchors when studs are unavailable.
- Install the shelf. Set the shelf box into the brackets and secure it from underneath with 1″ wood screws.
Video
Notes
- Measure the actual thickness of your trim before ripping the 1×8 boards.
- The completed shelf must fit inside the brackets.
- The brackets used in this project fit a standard 1×8 or 2×8 board, which is approximately 7 1/4″ wide.
- Measure the side trim pieces directly from the assembled shelf for the best mitered fit.
- Check that both brackets are level before installing the shelf.
- Mount the brackets into wall studs whenever possible.
- Drying time will depend on the stain or paint you choose.

This is a fantastic DIY shelving project that perfectly blends industrial style with practical functionality. The chunky shelves have a bold, modern look while offering plenty of storage and display space. The step-by-step tutorial is clear and detailed, making it a great resource for both beginners and experienced woodworking enthusiasts.
Projects like these showcase how the right combination of quality materials and craftsmanship can create furniture that is both durable and visually appealing. For anyone planning similar DIY builds, **https://www.plywoodbazar.com** is a valuable platform to explore a wide range of plywood, boards, laminates, and other interior materials for custom furniture and home improvement projects.
Thank you for sharing such a creative and well-explained tutorial. It’s an excellent source of inspiration for anyone who enjoys woodworking and modern home décor.
Where did you get the reclaimed wood for trim?
AWESOME!
My husband and I have been working on the Ladder Shelves you made. I’ll send a picture when we are done.
Jackie
AWESOME!
My husband and I have been working on the Ladder Shelves you made. I’ll send a picture when we are done.
Jackie