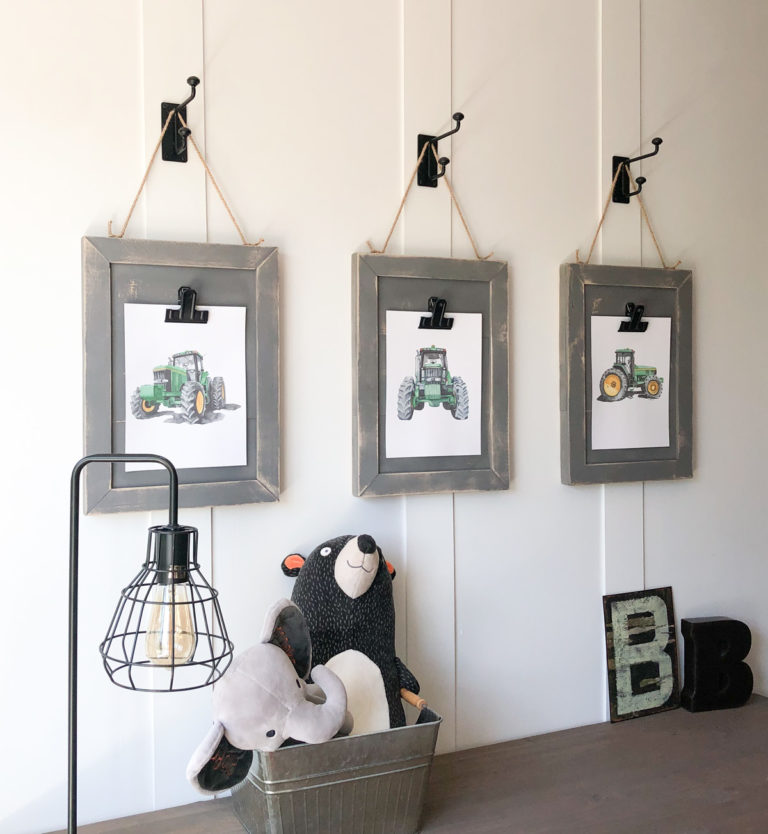
As someone currently living in a rental home, I’m always looking for creative ways to make my space feel homey – without spending a fortune or putting holes in the walls. It can be tough to decorate when you have limits on what you can change, but this project checked all the boxes: it’s budget-friendly, renter-safe, and adds a big impact to your space. These custom wall art frames are super easy to make, let you switch out artwork whenever you want, and best of all—they won’t leave a mark when it’s time to move out! These would be great with a family photo as well! These can be easily modified to the right size to fit your space.

Let’s jump right in.
Table of Contents
What You’ll Need:
Tools & Materials:
- 1×2 pine boards (buy them pre-cut or rip them from scrap wood)
- Wood glue
- 1¼” brad nails + nail gun (or hammer and finish nails)
- Miter saw (or miter box) for 45° angle cuts
- Stain (optional)
- Half-inch staples + staple gun
- Canvas panels
- Black clips (from Target, Amazon, or hardware store)
- Super glue (I used Gorilla Glue Gel)
- Drawer pulls (used as top detail)
- Decorative wall hooks
- Brass thumbtacks or upholstery tacks
- Command picture hanging strips
- Scissors
- Ruler or scrap wood
- Printable artwork (mine was from Etsy)
- Poster prints (I used Walgreens’ 1-hour photo)
- Level and pencil
Step 1: Build the Inside DIY Frame
Custom framing is really expensive, so we like to create our own. Start by building the inner part of each frame that will hold your canvas panel. You can use clamps on this part to help hold your wood pieces in place.
- Cut your 1x2s so that the inside of the frame is about ¼ inch wider than your canvas panel on all sides.
- Use a 45° angle on the joints of each piece of wood for a clean, mitered look.
- For the inside frame, the shorter boards are cut 17” long point to Long point. The longer boards are cut 21 1/4” inches long point to long point.
- For the outside frame, the longer boards are cut at 22 1/2” inches long point to Long point. The shorter boards are cut at 18 1/4” inches long point to long point.
- Glue and nail the corners together using wood glue and 1¼” brad nails.
Repeat this for three frames if you’re making a set like I did!


Step 2: Add the Outer Frame
Now we’ll add an outer trim to create a professional, finished look on the sides of the frame.
- Use more 1×2 boards, again cutting them with 45° angles.
- Lay the inside frame face-down on something that raises it about ¼” off your surface (scrap wood or a ruler works great).
- Attach the outer frame around the edge using wood glue and brad nails.
This will create a lip at the back of your frame so the canvas panel sits inside, flush with the front.

Step 3: Stain and Let Dry
Now that the frames are assembled:
- Apply your favorite wood stain to the entire frame and use rags to wipe the excess stain.
- Let it dry completely.
This is also a great time to prepare the other elements of the project while you wait!


Step 4: Prep the Clips
I found a pack of hangers at Target with cute black clips and decided to disassemble them to reuse the clips. I love using clips to hang photos and art because of the convenience and look!
- You can also find similar clips on Amazon or at craft stores. I have used these clips from Amazon in the past.
- These allow you to swap out your artwork easily, which is my favorite part!


Step 5: Attach the Canvas Panels
I used inexpensive canvas panels for my mat. Once your frames are dry, flip them face down and place your canvas panels inside. I linked to a pack of 12 on Amazon but you can also buy them in smaller amounts at a craft store like Hobby Lobby.
- Use a staple gun with ½” staples to secure the canvases to the inside frame.
- Don’t have a stapler? No problem—you can also use wood glue.


Step 6: Add Hardware
Time for the fun part—decorative hardware!
- I used drawer pulls (about $10 for all three at Hobby Lobby).
- Center one drawer pull at the top of each frame and attach with wood screws.
These give the illusion that the frame is hanging from the pull—even though it’s not really holding the weight.


Step 7: Get Your Artwork Ready
I found digital artwork on Etsy for around $10 and uploaded it to Walgreens for 1-hour poster prints—less than $20 for all three! I had mine printed as 11×14 poster prints on satin paper. Etsy has so many options to choose from to get the look you are wanting. This also makes it really inexpensive to change your art out later when you want something new.
- When the prints are ready, cut off the white border using scissors.
- Place each print in your frame and decide where you want the clip to go.

Step 8: Attach Clips
Once you know where your artwork will hang:
- Use Gorilla Glue Gel to attach each clip to the frame.
- Let it dry for a few minutes—this glue dries fast and holds strong!
Now you can easily clip in and swap out your artwork whenever you want.


Step 9: Hanging the Frames
If you’re a renter like me, you’ll love this part!
- Use Command Picture Hanging Strips on the back of the frame to attach the frames to the wall.
- I used a level and pencil to mark a straight line where the bottom of each frame should sit. I used a tape measure and pencil to mark the center of the space where I am hanging my frames.
- Press each frame onto the wall firmly for a few seconds to ensure they stick.


Step 10: Add the Decorative Hook
This part is just for looks—but it adds so much charm!
- Slip a decorative hook through the drawer pull at the top.
- Attach the hook to the wall using a brass thumbtack.
This makes it look like the frame is hanging from the hook, but really, the weight is supported by the Command strips.

Final Thoughts
These custom wall frames turned out better than I imagined. They’re budget-friendly, renter-safe, and perfect for rotating artwork throughout the year.
Whether you’re decorating your entryway, bedroom, or home office – these DIY frames are a great weekend project using only a few basic power tools you’ll be proud of! Be sure to share photos with us of your frames and share this tutorial and instructions with your friends!

Check out our other DIY Frame Projects!
If you loved this project and you’re looking for more ways to add style and personality to your walls without spending a ton—or damaging them—be sure to check out the other DIY frame ideas we have on the blog! From gallery wall tricks to budget-friendly display solutions, there’s plenty of inspiration to help you create a space you love, no matter where you live. Happy crafting!
Here are a few examples!