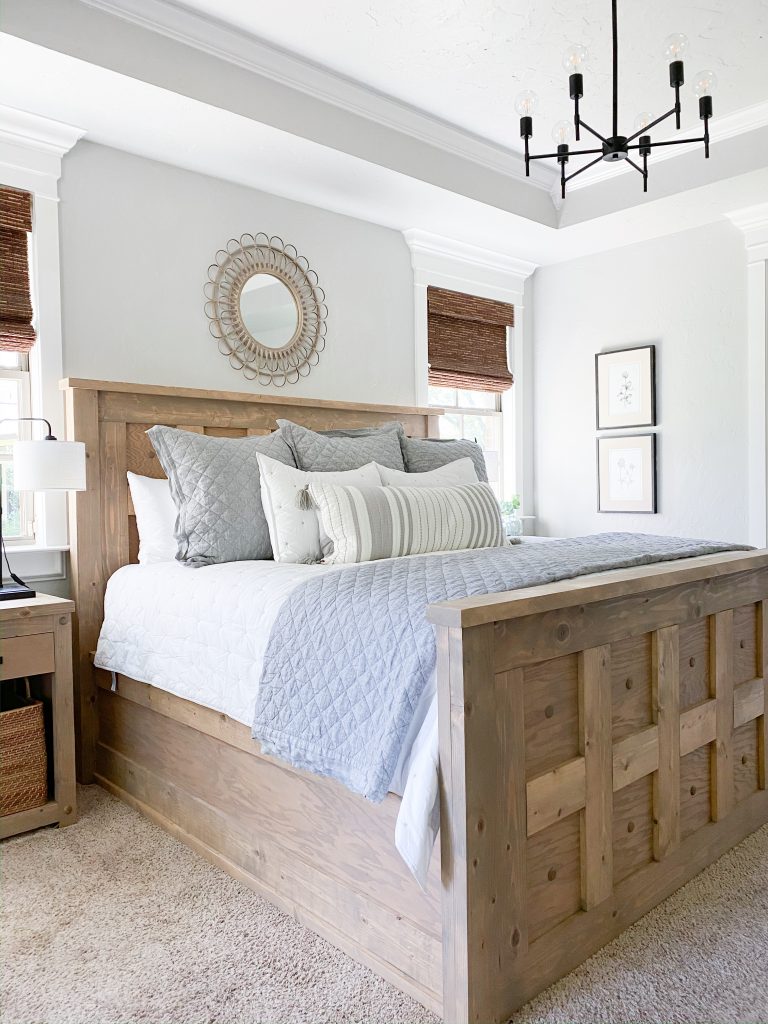
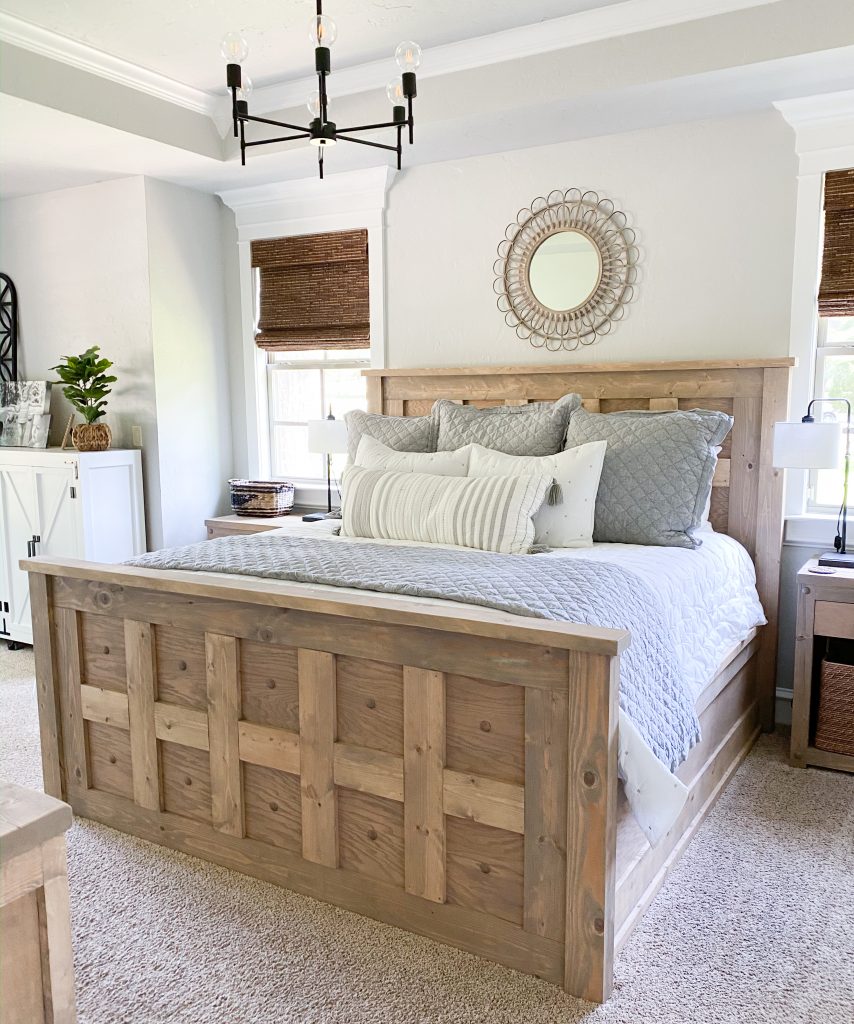
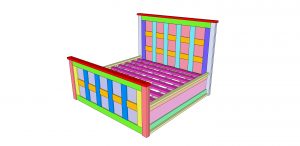
GUYSSSSS…. This DIY King Panel Bed is my new favorite build to date! I love it so much! It’s a beast, but it’s a very straightforward build. You will need a table saw for ripping down boards on this one! You can find a link for the free printable plans at the bottom of this post! I also tell you how to create the custom finish… It’s SO SIMPLE! You can also see the links to everything I said I would link to… Promise I won’t forget haha! But first… Look at her…
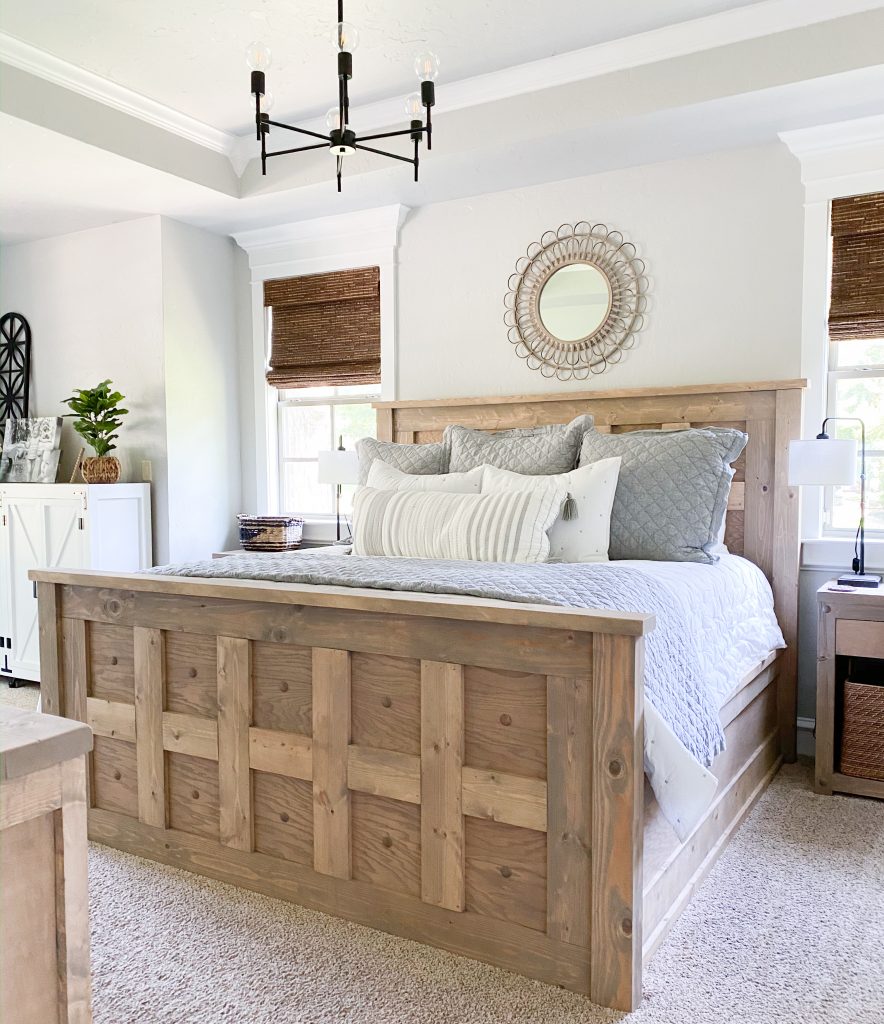
Isn’t she dreamy?? I love love love it. Come check out the video on how I built it below!
I spent under $350 in lumber for this bed! That is a steal when you compare prices on comparable beds to purchase.
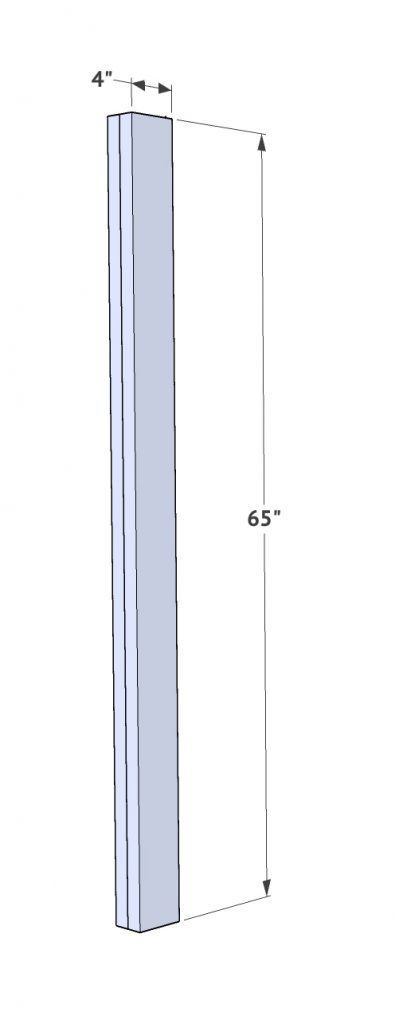
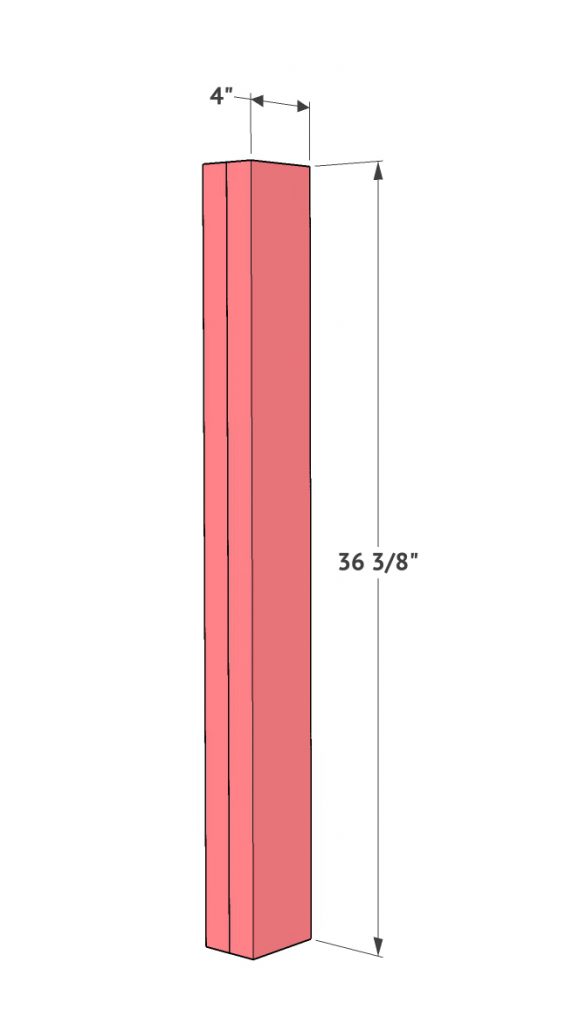
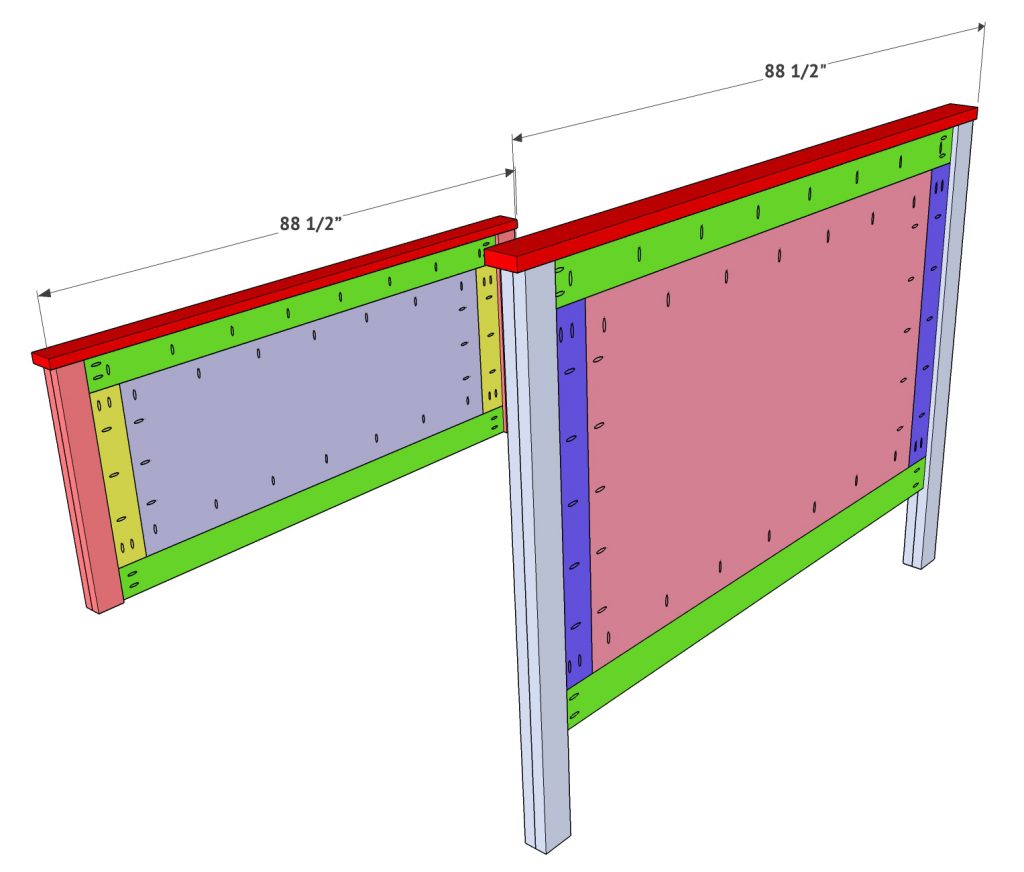
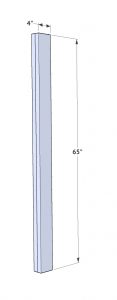
The first step is building your legs for both the headboard and footboard.
These are 2×6 boards that are ripped with a table saw to 4” wide each. Add glue between both boards and clamp very tightly until the glue dries. You will build 2 headboard legs and 2 footboard legs. While they are drying,
you can begin building the rest of the bed.
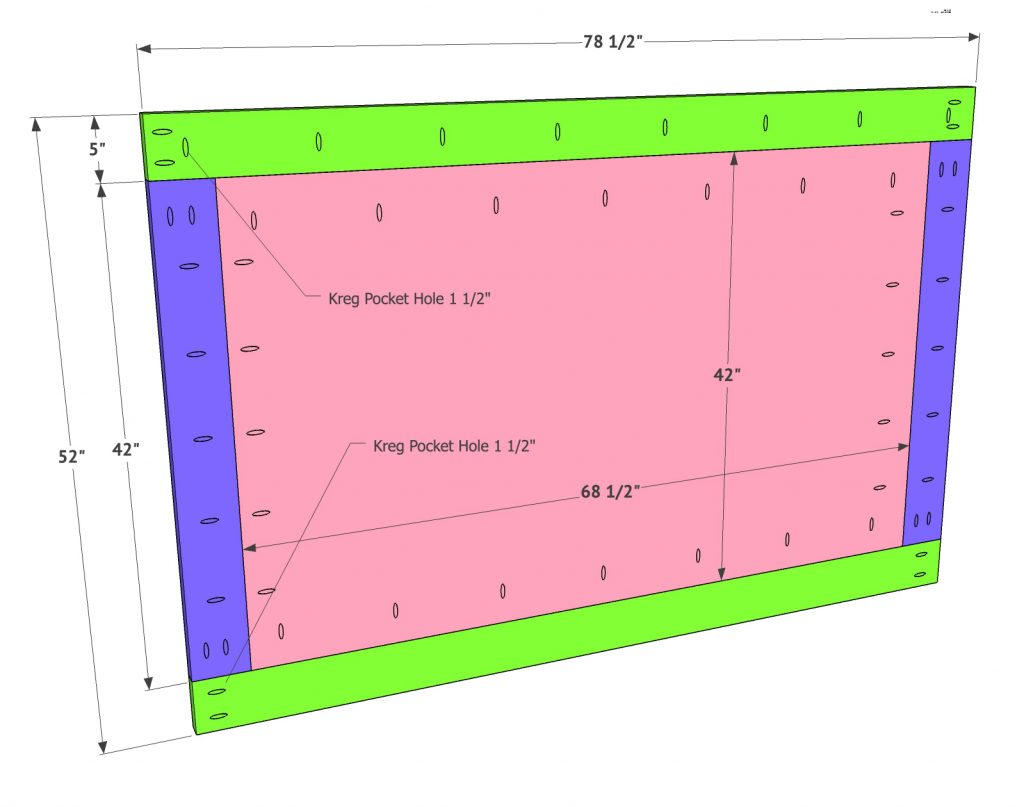
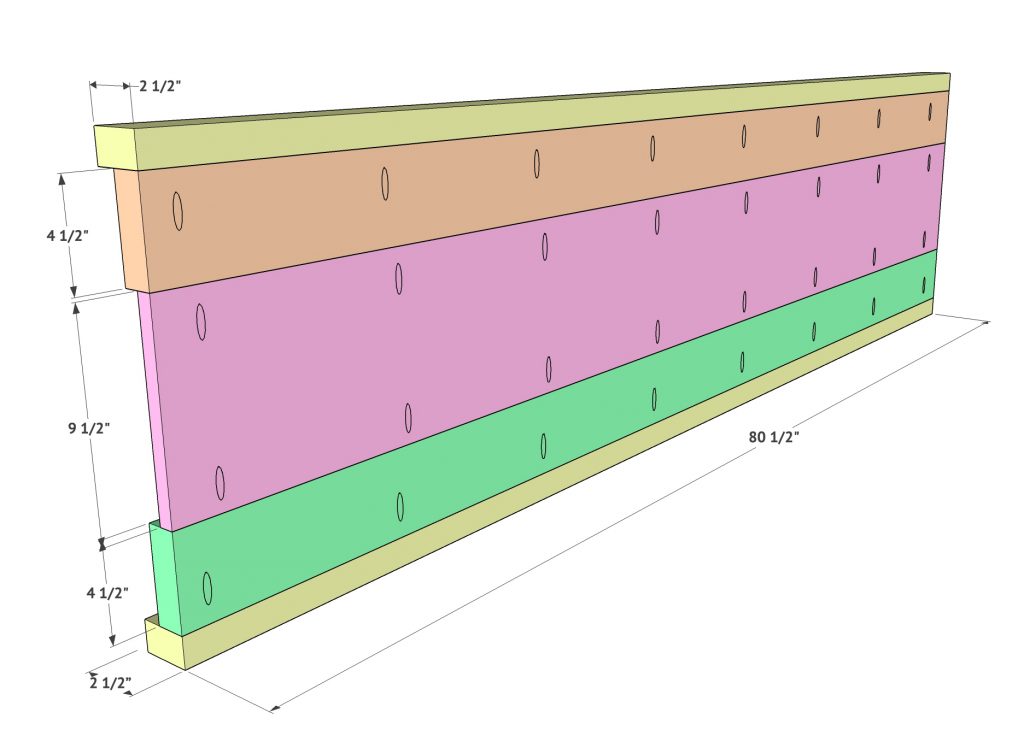
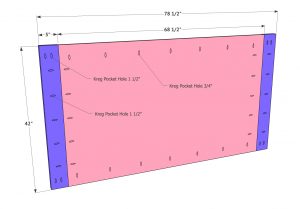
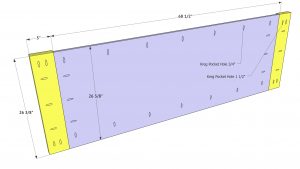
Add 3/4” pocket holes around all 4 sides of the headboard plywood panel. These pocket holes will face the back. Add 1.5” pocket holes down one side of each vertical headboard frame piece. Attach the plywood to the frame boards using wood glue and 1.5” pocket hole screws. The tops and bottoms of the frame boards will be flush with the top and bottom of the plywood, and the backs will be flush with the back of the plywood.

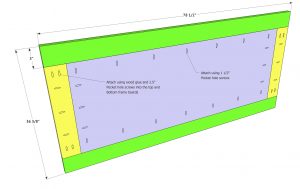
Add 1.5” pocket holes down the top horizontal frame board, and also add 1.5” pocket holes to the ends of both horizontal frame boards. Attach these boards to the plywood using 1.5” pocket hole screws through the plywood and into the frame boards, and also with 2.5” pocket hole screws through the vertical frame boards and into the top and bottom frame boards.
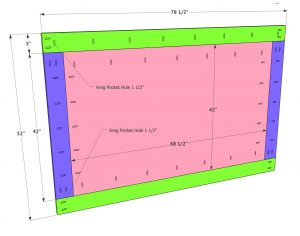
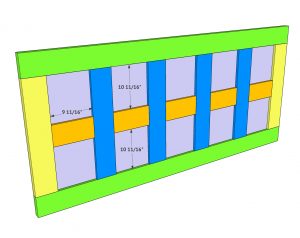
Next, add the trim pieces to the headboard. These are 1×6 boards that are ripped to 5” each. They are all spaced equally. Cut each board to size and attach to the plywood using wood glue and 1.25” brad nails.
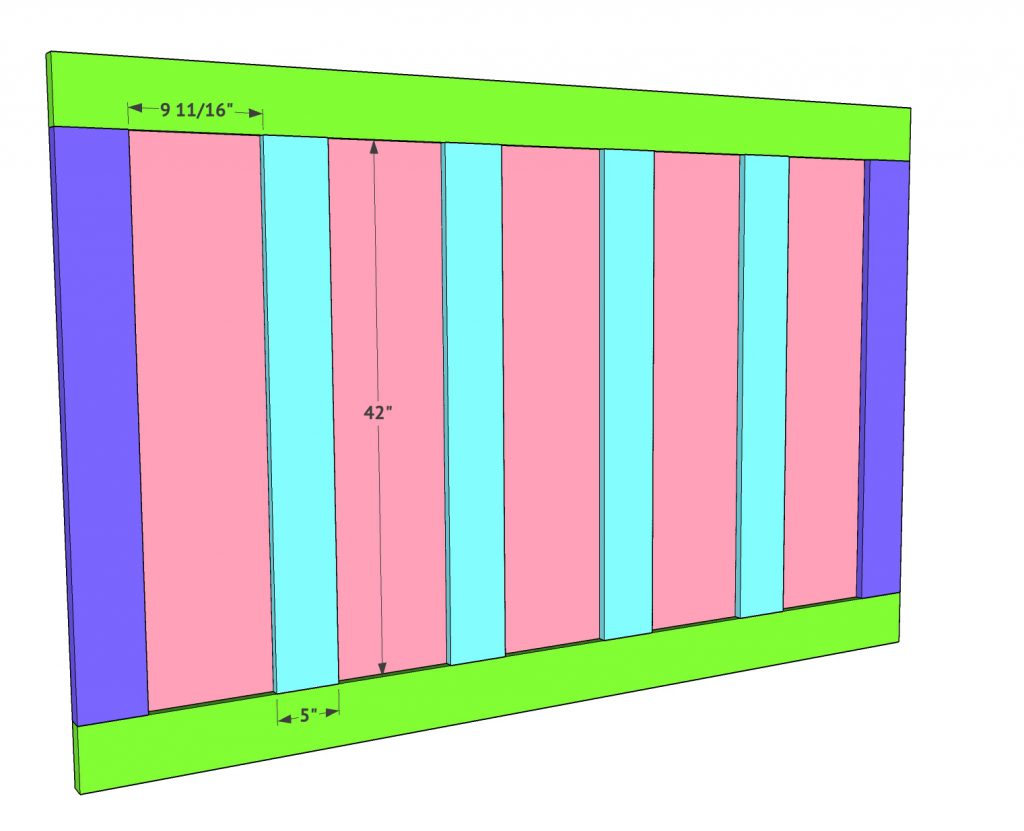
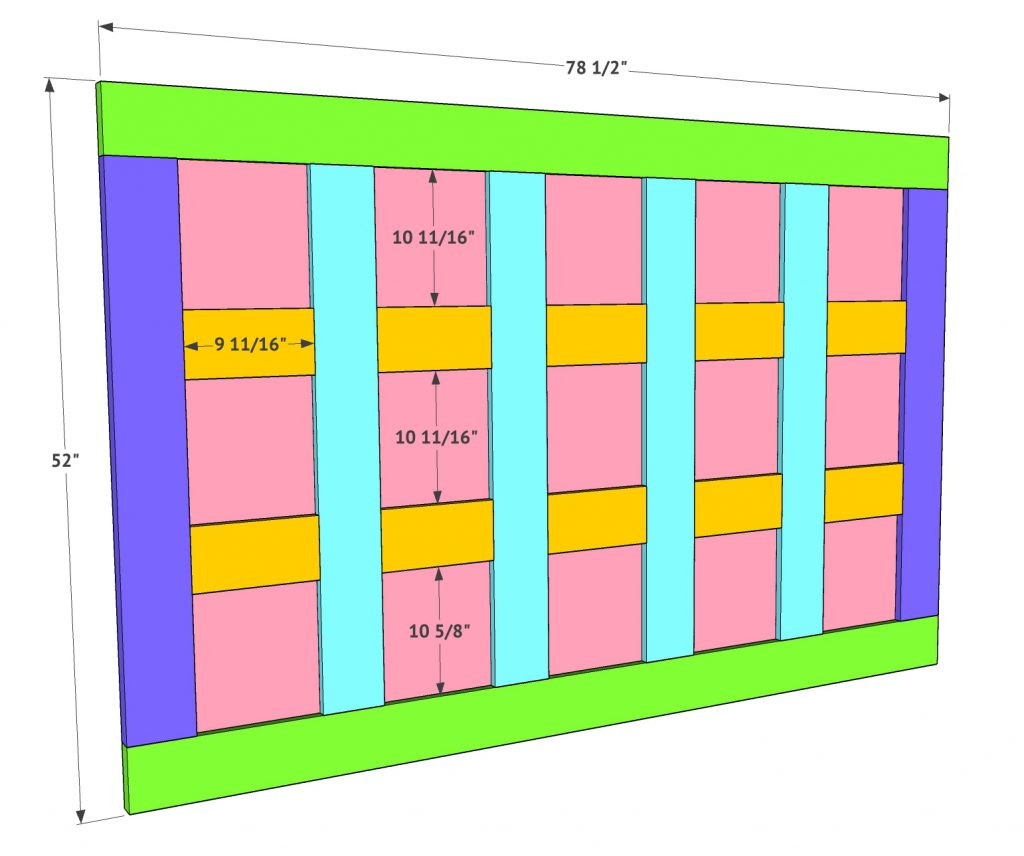
The horizontal trim pieces are also 1×6 boards that are ripped to 5” wide each. Cut each to size and attach them to the plywood using wood glue and 1.25” brad nails. These will also be spaced evenly on the plywood.
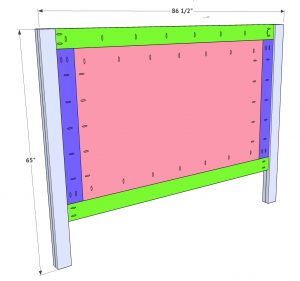
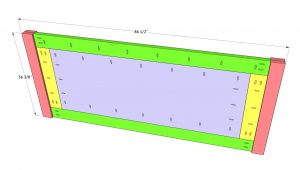
Make sure your legs are dry from step 1 before attaching them! Place some scrap 1x boards on the ground and lay the headboard panel on top of them with the front facing down. This will set your panel 3/4” off the ground. Place the headboard legs against each side and line the tops up flush with the top of the headboard panel. Add a line of glue between the legs and headboard panel and then attach them using 2.5” pocket hole screws through the panel and into each leg.

Now you are ready to start the footboard. The assembly of the footboard is identical to the headboard. The only differences you will have are the measurements. Follow the assembly instructions you used on the headboard to assemble the footboard but follow the measurements of the footboard.


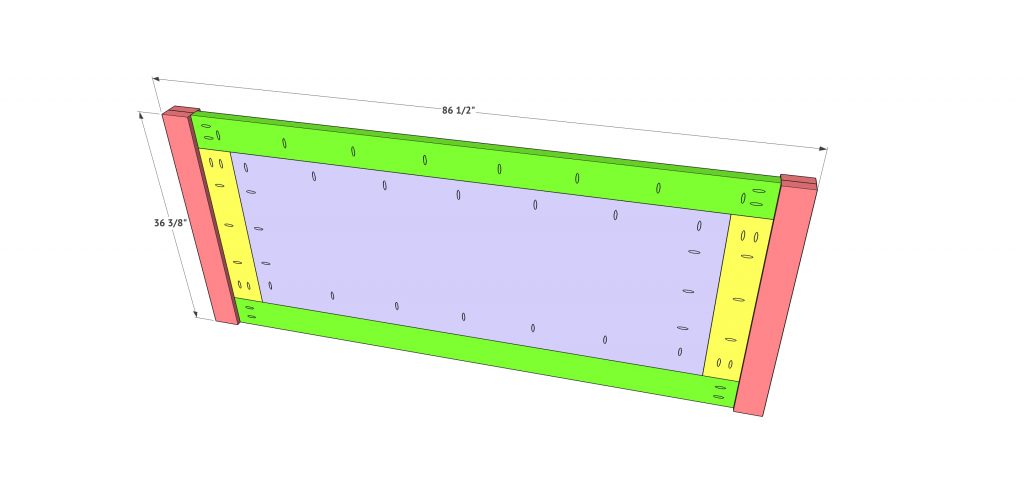
At this point, add the two top trim boards to both the headboard and the footboard. These are 2×6 or 2×4 boards ripped to 2.5” wide each. Attach them to the tops using wood glue and 2.5” pocket hole screws through the backs of the headboard and footboard and into each trim piece.
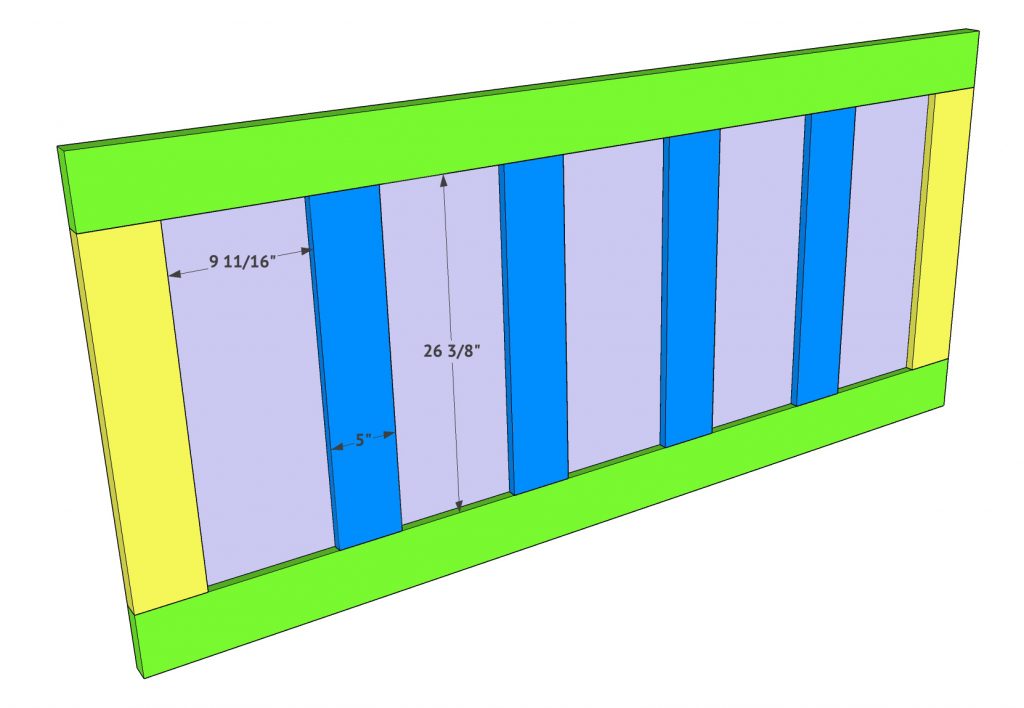
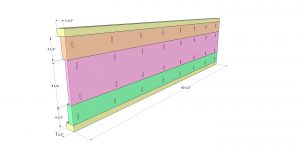
Build the 2 sides next. Each one is layered with 5 boards. The top and bottom boards are 2×4 or 2×6 ripped to 2.5” wide each. The orange and green boards are 2×6 boards ripped to 4.5” wide. The middle board is 3/4” hardwood plywood. Cut each to size and attach each layer using wood glue and pocket hole screws.
At this point, stain or finish all 4 pieces. Once they are dry, you are ready to move it in and assemble. Don’t use wood glue on assembly! This will make it easier to move the bed later when needed. Each mattress requires it’s own different support. Research yours before creating the supports. The following shows how I created mine. We use a hybrid mattress and the slat system works perfect. I attached the 2×4 runners with 2.5” pocket hole screws into the front and back of the bed. I also attached the cleats to each side rail using 2” wood screws. Place these all with the top at the same level. You can decide where that level is based on how high you want your mattress to sit.
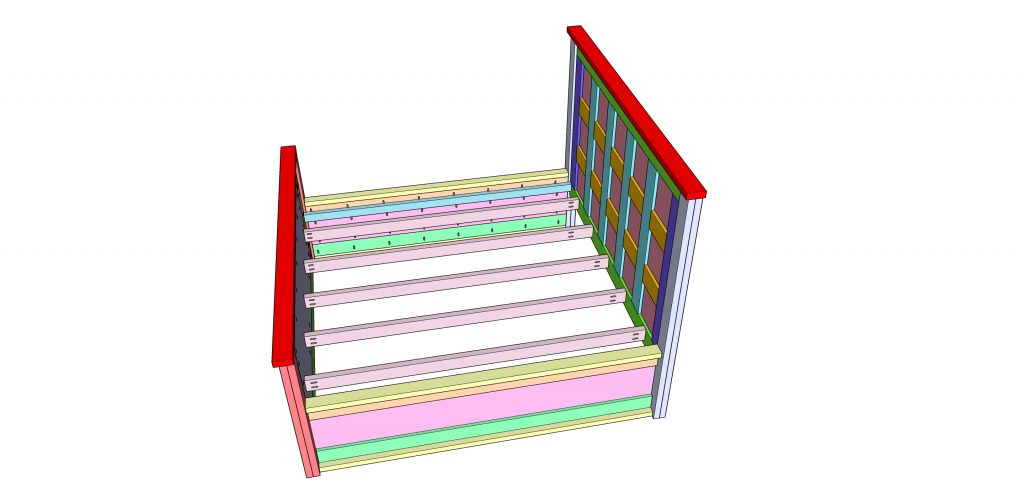
I then laid the mattress supports on top of all of those. These are also 2×4 boards, and I attached each end to the cleats using 2” wood screws.

Now let’s talk about the finish! I really wanted to brighten the room up, and I sampled several finishes before I decided to mix my own. This is SO easy. It’s like cooking.
I used 5 parts of this stain… You can find it HERE on Amazon!

I mixed that with 1 part of this stain… You can find it HERE!
All you have to do is pour the parts into tray or cup and then mix them with a stir stick. So, you could mix 1 1/4 cups of Golden Oak with 1/4 cup of Willow Gray to get the finish I created. It’s PERFECTION!
The small round decorative pieces I used can be found on Amazon HERE! I ordered 2 packs to do both headboard and footboard and that will also give you enough to do the nightstands and TV console I will be sharing soon.

The Forstner bit I used is AMAZING. It cuts so quickly and clean. You can find it HERE on Amazon!

You can see my new Craftsman 18g nail gun HERE on amazon! I LOVE this thing. It shoots so smoothly and quietly compared to others!

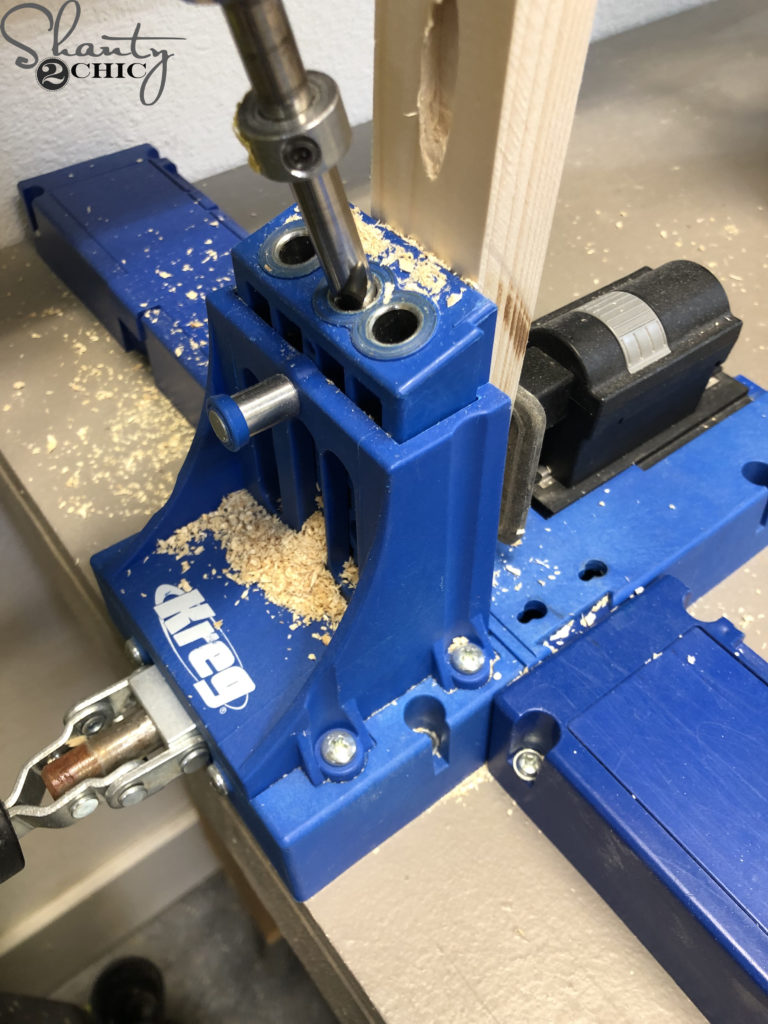
I used my K5 Kreg Jig for the pocket holes! LOVE this baby too… y’all knew that. Here is a link on Amazon!
I found my bedding at Pottery Barn and West Elm and love it so much. Actually the quilt from West Elm is my favorite I have ever purchased for bedding. It’s so soft and looks so full on the bed without being too thick. It’s also on sale right now… YEAH!
You can find the white quilt HERE at West Elm!
You can find the white standard shams HERE at West Elm!
You can find the grey quilt HERE at Pottery Barn! I got the Flagstone color.
You can find the euro shams HERE at Pottery Barn! I also got the Flagstone color in these.
The light above my bed is a crazy good find I made on amazon! It’s only $100! You can find it HERE!
The wall color is Dolphin Fin by Behr and the trim color is Pure White by Sherwin-Williams.
Now… let’s look at her some more….
DIY King Panel Bed
Instructions
- The first step is building your legs for both the headboard and footboard. These are 2×6 boards that are ripped with a table saw to 4” wide each. Add glue between both boards and clamp very tightly until the glue dries. You will build 2 headboard legs and 2 footboard legs. While they are drying, you can begin building the rest of the bed.

- Here are the dimensions for the footboard legs.

- Add 3/4” pocket holes around all 4 sides of the headboard plywood panel. These pocket holes will face the back. Add 1.5” pocket holes down one side of each vertical headboard frame piece. Attach the plywood to the frame boards using wood glue and 1.5” pocket hole screws. The tops and bottoms of the frame boards will be flush with the top and bottom of the plywood, and the backs will be flush with the back of the plywood.

- Add 1.5” pocket holes down the top horizontal frame board, and also add 1.5” pocket holes to the ends of both horizontal frame boards. Attach these boards to the plywood using 1.5” pocket hole screws through the plywood and into the frame boards, and also with 2.5” pocket hole screws through the vertical frame boards and into the top and bottom frame boards.

- Next, add the trim pieces to the headboard. These are 1×6 boards that are ripped to 5”each. They are all spaced equally. Cut each board to size and attach to the plywood using wood glue and 1.25” brad nails.

- The horizontal trim pieces are also 1×6 boards that are ripped to 5” wide each. Cut each to size and attach them to the plywood using wood glue and 1.25” brad nails. These will also be spaced evenly on the plywood.

- Make sure your legs are dry from step 1 before attaching them! Place some scrap 1x boards on the ground and lay the headboard panel on top of them with the front facing down. This will set your panel 3/4” off the ground. Place the headboard legs against each side and line the tops up flush with the top of the headboard panel. Add a line of glue between the legs and headboard panel and then attach them using 2.5” pocket hole screws through the panel and into each leg.

- Now you are ready to start the footboard. The assembly of the footboard is identical to the headboard. The only differences you will have are the measurements. Follow the assembly instructions you used on the headboard to assemble the footboard but follow the measurements of the footboard.


- At this point, add the two top trim boards to both the headboard and the footboard. These are 2×6 or 2×4 boards ripped to 2.5” wide each. Attach them to the tops using wood glue and 2.5” pocket hole screws through the backs of the headboard and footboard and into each trim piece.

- Build the 2 sides next. Each one is layered with 5 boards. The top and bottom boards are 2×4 or 2×6 ripped to 2.5” wide each. The orange and green boards are 2×6 boards ripped to 4.5” wide. The middle board is 3/4” hardwood plywood. Cut each to size and attach each layer using wood glue and pocket hole screws.

- At this point, stain or finish all 4 pieces. Once they are dry, you are ready to move it in and assemble. Don’t use wood glue on assembly! This will make it easier to move the bed later when needed. Each mattress requires it’s own different support. Research yours before creating the supports. The following shows how I created mine. We use a hybrid mattress and the slat system works perfect. I attached the 2×4 runners with 2.5” pocket hole screws into the front and back of the bed. I also attached the cleats to each side rail using 2” wood screws. Place these all with the top at the same level. You can decide where that level is based on how high you want your mattress to sit.
- I then laid the mattress supports on top of all of those. These are also 2×4 boards, and I attached each end to the cleats using 2” wood screws.


Hi. I love this bed. Can I please have these plans for a queen size? If there are no plans can you tell me what alterations I would need to make to allow for a queen size bed? Thank you so much in advance.
Did you ever get the queen size measurements for this bed?
The only measurement that will change for a queen bed will be the headboard and footboard. I made mine headboard and footboard 69 3/4″ long but 69 1/2″ would work also. I wanted a little extra room to tuck my comforter.
Instead of using pocket holes to attach the bedframe together in my bedroom, I used heavy duty bedframe brackets found on Amazon. This made it easier to put the bed together, also to move the bed the bed if need be.
FYI be cautious of where you buy your lumber, Home Depot lumber is always warped. Fortunately, i have a planer to help.
I built it in a queen size, the only adjustment we made was the sheets of plywood for the headboard and footboard were cut to 52.5″ wide. Everything else stayed the same.
You did not make any other adjustments to the length of the bed? It was just shortening the width to convert to a queen?
Would love to have the nightstand and the TV console plans as well. I will be building this soon and would like the matching nightsands
This is a beautiful bed. Watched your RIP video. Got now why you rip. I don’t have a table saw.
Have you shared the nightstand plans?
Are there plans for a dresser to match the bed? Please and thank you! Need a dresser to complete the room. ♥️
I would love them too!! The night stands as well!!
I do love this design. My brother has already built one and has inspired me to do the same.
I will be doing a slight modification to add drawers as there is a lot of unused space in under the mattress in this gorgeous design. Seems a shame to waste it! Thanks for this wonderful design!
Can you tell me how you make a queen storage bed out of this design. I love your designs by the way. I can wait to have the courage to try and build one.
What a great piece of workmanship, just a thought to save a bit of space and make the bed extremely versatile, possible design with SIDE DRAWERS for storage
Do you have a plan in this fir a twin bed. This is my favorite one!
I want to add side storage drawers do you have plans that are interchangeable from another build?
Absolutely love this bed design and amazed at how easy the construction of it is . Although after reading all your dimensions for it the only thing I can’t seem to find is the thickness of the plywood being used . I’m assuming its 3/4 in. But it may be 1/2 in which is what I’m going to use in order to help with the weight. Thanks again for the design and build , you ladies are quite amazing as well . Keep doing what your doing its apparent that its by God’s design.
If you open the link to print the plans, it shows the cut list and yes, it’s 3/4” plywood
Love this!!! Can I get measurements for a full size bed?
Do you have queen measurements?
Need these as well!
Where did you get your shades on the windows?
You can find those on amazon
Love the bed!! I would love to see plans for this in a Queen and a twin? Anyway plans may be available? Thanks
Such a beautiful piece! Are there measurements for a Queen??
Hi. I love this bed. Can I please have these plans for a queen size? If there are no plans can you tell me what alterations I would need to make to allow for a queen size bed? Thank you so much in advance.
So cute! Where is the light fixture from?
Need this! But we have a CA King, can you tell us what changes would need to be made for that?! ?
King – 76″ x 80″
CA King – 72″ x 84″
With the California King, you’ll want to make the head board and foot board a little narrower, but increase the length of the mattress supports to accommodate the 4″ of length.
Gorgeous! I found links to everything but the mirror above the bed. It’s beautiful and wondering where I could get one?
Do you have a plan in this fir a twin bed. This is my favorite one!
Dimensions for a Queen bed