Coffee Table Reveal
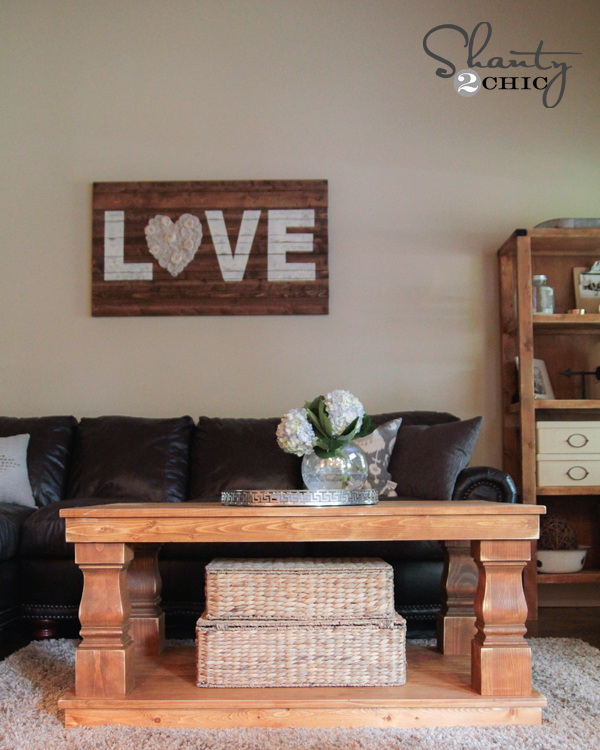
So, I shared my DIY Coffee Table with you all a few days ago and now I’m back to share how I finished it!
I love the size, the functionality and the “old” look….. and the fact that it only cost me $40 to build!!!
I started by painting the legs with a favorite ~ Rust-Oleum Heirloom White spray paint.
Next, I stained the top of the table with two coats of Minwax Dark Walnut Stain. I painted it on with a foam brush, let it sit for about 15 minutes, wiped it off with an old cloth and repeated after 24 hours.
After another 24 hours I painted on 1 coat of Minwax Polycrylic Gloss with a Purdy brush.
To achieve a more “worn” look, I used my 3M sanding block to distress the edges of all of the legs…
and I followed up with a bit of Minwax Dark Walnut stain on the distressed edges. Yes, I am doing this over my carpet. I was so anxious to get the table in the house that I forgot to distress it:)
Ahh! I LOVE it:) This is where I do all of my blogging:)
Room for decor, my laptop, coffee and toys of course!
And, in case you get a crazy urge to “sit on a coffee table”….
Christy, this one’s for you;) No creaking, wobbling, swaying…. Nope, this table is built SOLID!
Thanks so much for stopping by:)
~Ashley
I’m really disappointed that I use stainable wood filler, and the stain didn’t cover it well 🙁 I can see all the spots where the filler was. I had planned on leaving the top stained, and the legs white, now I’ll have to do the opposite.
Any hints as to what to use that would work?
Hi Ashley! Was wondering if you could just share a little more detail about how you did the corners? how much did you sand them? what did you use to put the stain on? how long did you leave the stain on? 1 or 2 coats? Mine looks a little messy on the edges, doesn’t have that nice look like yours! Thanks!!!
What is the color name on the spray paint that’s the exact color I want for my coffee table and bench I’m redoing. I want to sand and stain just like u did as well! Perfect!!
Hi Ashley, your table is beautiful! I have never built anything either, but just got onto Ana’s site and I’m ready to start a new hobbie! I love creating! Was wondering what the finished dimensions of your table are as I think I like the square also? I saw on one of the posts you changed the Leg joiners 39″, side aprons 34″,bread boards 45 1/2 from Ana’s plans, so are all the other cuts the same as her plans? Thanks so much!
I love the way your coffee table came out. I have a similar one and similar couches. I was wondering where you got the teal (what color blue?) pillows that are on the couch. They would match my living room perfect.
I am in the process of making this table as we speak! I am having so much fun, it’s my first ever project like this! I am wondering – how did you project the table top while spraying the legs/bottom portion of the table? If you could let me know, I would so appreciate it! THANKS!
I spray painted the legs and aprons before I assembled the top. If you have already assembled it I would stain the table first then spray paint. You can paint over stain but you cannot stain over paint:)
Sent from my iPad
It turned out wonderful! Thanks so much for the tutorial! We had so much fun making it. I just love it! I still have to distress the bottom a little bit more but overall, it’s done! Woo hoo!
Thanks so much for this idea! My husband and I made this together! We had so much fun and it turned out so well!! I’m so happy with it! Thanks so much!
Hi Ashley,
Just looking for the measurements/plans that you used to build the table as a square. Cant seem to find them on either post. Any chance you still have them lying around?? Heres hoping!!!
Ps: huge fan of your blog!!!!
I love this table!! We are decorating a new home and I want to make one of these for the living room.. I can’t seem to find your plans (wood sizes, directions, etc) Can you point me in the right direction? Thanks!
Great coffee table! My husband and I have been looking to make one ourselves but don’t know what wood to use. What do you think would be best?! Thanks so much.
Hi, i was wondering where you got your cute tin flower pot, i see that you have a couple of them. Love your blog, so many wonderful ideas. thanks, kim!
Which Grit sanding paper did you use on your sanding block? I love how it’s not too over distressed. I see sometimes you use your sanding block and other times 80-grit, is there is any difference between the two? =)
Fabulous…in love with it! I do have a question though…On the can of polyurethane you used, I didn’t see “non-yellowing”. Have you seen any yellow tinitng on any of the areas you painted white? I’m asking b/c it happened to me on furniture I refinished white with a brown glaze. It ended up turning yellow and from what I found it’s b/c the polyurethane I used wasn’t “non-yellowing”.
Brandi
I’ve put together a round up of great table redos on Craft Gossip today and included your post. 🙂 You can see it here
http://homeandgarden.craftgossip.com/6-cool-table-projects/
I would love it if you would share the Craft Gossip love and show your visitors you’ve been featured, you can grab a button here!
http://homeandgarden.craftgossip.com/grab-a-craft-gossip-button/
WOW!! This is exactly the coffee table I have been looking for. Thank you for posting how you created this treasure! I love the contrast of the light and dark and the wonderful chunkiness of the table. You did a fantastic job!!
Toni
As usual, another great project! Wish I could build!
Would love for you to share at Calling All Crafters, today!
http://allthingsfee.blogspot.com/2011/04/calling-all-crafters-4th-edition.html
Thanks so much Felicia! You can build! I just started about a year ago. I have no experience…. it is so addicting:)
Ashley,
Love this coffee table! I would LOVE to have this in my living room…just let me know when you are tired of it. 😉
Angie
I heart the last picture…because it’s shows the table is really WOW and so are you! LOVE LOVE LOVE from PC – Penang Malaysia, your new follower!
Your last picture make me “WOW”! because it not only tell that the table is good…it shows the it’s WOW and so are YOU! Love from PC – Penang, Malaysia. Your new fan!
Wow! That looks great! I really like the dark top with white legs…nice job! I would love for you to come link up to my Sew Crafty Party !
i love it with the shine added! It looks so polished and wonderful!
I love it, it looks like an piece of furniture you would spend a lot of money on! It looks great in your room!
I am in LOVE with this table!!! It’s beautiful! I’m so impressed you “Made it without my Hubby” (also LOVE that button! 🙂
I would LOVE for you to link up at DIY Thrifty Thursday @ http://www.thrifty101.blogspot.com
~Michelle
Awww thanks so much Michelle!!
Wow! This is beautiful 🙂 I may come to your house and steal this.
LOL! Thank you Lauren:)))
Oh my, it looks fabulous!
Thanks so much Wendy:))
TOTALLY LOVE IT!!!!!!!!!!! Way to go, and I LOVE that you’re bold enough to show it’s sturdiness by sitting on it! Great results and totally awesome idea to “knock-it-off” and get the size you want at a fraction of the cost! I’m new to your blog, but you’ve got a new follower!
Thank you Ashley!!! So happy to have you:))) And yes, it saved a TON of money:)
beautiful table!
Thanks so much Kimberly:)))
Wow! Can you imagine how much this would go for a Pottery Barn?!
Oh, your table is gorgeous! I love what you did and it’s so big too. You’re cute as a button! 🙂
Be a sweetie,
Shelia 😉
Thanks for your sweet comment Shelia! Hope you have a great week:)
Wow! I am impressed! You did a beautiful job, I love the colors you chose, I just did a similar color combo for a beverage cart that I painted but I like yours better!
Thank you Cathy:)
hi – visiting from Funky Junk Interiors. This is a great table! Love the stained top. Great job! 🙂
Thank you Stephanie:)
Super job! So much talent there!! You should be very proud of this!!
amber @ barbwired
the table looks great.. love it
Thanks so much:)
looks great-such satisfaction doing it youself-especially when it turns out so well-love it!
Thank you so much Tanya! You’re right, it is very rewarding;)
Great Table! I love it. Looks great in your room. Cath
Thanks so much Cath:))
beautiful. great job
Thank you Jennifer;)
That table turned out beautiful! Any idea on what color to stain the top if all my other wooden pieces are made out of pine? I love the two tone with the white base. Will definitely be building one very soon! 🙂
Thank you Minna! Hmm…would you mind giving me more info on the piece you are wanting to stain so I can be more helpful? Happy building and thanks so much for stopping by;)
Oh…it would be a similar coffee table to the one you just built. I haven’t decided it I want it to be square or rectangular based upon the placement of the furniture. Could I shoot over a picture to you so that you can give me your opinion?
For sure! [email protected] 🙂
It looks amazing!! I love the contrast of the colors! Awesome job 🙂
GREAT jOB
Chris Wooten
[email protected]
Thanks so much Chris!!!
That is gorgeous. Nice work. I myself have a backlogged list of KOW projects to get to.
Thank you June! Ana’s site is dangerous….I always find “one more thing” that I must have in my house;) Thanks for stopping by!
FABULOUS!!! (=
Thank you Jennifer:)
That is just what your sofa unit needed. I thought that your trunk looked so nice because I am sooo partial to trunks but this I love!!! Nice job!!
Thank you Paula! I did love the trunk but now that I have a more functional table I am in love with it. It’s so nice to have a flat surface to decorate and set my coffee cup;) Thanks for stopping by!
This looks awesome. A friend of mine has been looking for a coffee table just like this. I am wondering if you did anything before you put the stain on. ON the can it says to us some product to avoid streaking, just wondering if I can skip that step. Thanks
Thank you Katrina! I didn’t do anything to it before besides sanding down the wood putty and rough edges. It didn’t streak and I have never had streaking when I have stained. Now, I am not a professional and I’m sure the proper way is to treat it before hand but I’m impatient:) Definitely put some sort of varnish on top of it to keep it sealed and protected!
Thanks so much. I love your blog!! You rock!!
I luv this look, I plan on changing the finish on my kitchen table legs for this same feel. Great job!
Sounds awesome Tiffany! Thank you so much:)
I absolutely love it!!! You did a great job! Thanks for sharing!
Thank you Audrey! Happy to have you stop by:)
It is absolutely beautiful! Beautiful! Mind if I ask what the cost break down looked like? I really want to build a coffee table but am sure it will be more than I budget.
Kristen
Turning a House into a Home
Thank you Kristen! I did forget to mention the cost….I’m sorry. I went back and added it so hopefully others will be able to see it. I only spent $40 and I had to buy every piece of wood for it. This is not including the stain, polycrylic or spray paint… I would add another $30 for that if you don’t already have it:) Thanks so much for stopping by!
That is Fabulous! You are very talented!! I LoVe it!
Thank you Jan! You are too sweet:) I had great plans to follow and that made a HUGE difference. Couldn’t have done it without ’em:) Thanks so much for stopping by!
Nice job, it looks very similar to my farm house table I built and blogged. I too did the dark top and white base. Though I did a crackle coat and used 2 x 12’s for the top. It was so cold out I had to build it inside my living room. We still love it and it is just the right size for our small dining area. I have been wanting to start a coffee table, this post gives me even more incentive to get er done~
Thank you Pamela:) Your table sounds beautiful! Enjoying a piece you hand built is so rewarding not to mention the money you save in doing so! I rarely build outside now unless it is spring or fall:) Summer is way too hot here in DFW! Good luck on your coffee table:)
Love it!! It turned out so nice! I also like how you show that it is sturdy with you sitting on it!!
Thank you Jennifer! It really is sturdy! I had to get up and down off of it several times and it never even wobbled or creaked! Thanks for stopping by!
Wow, that looks amazing. I have to admit I was a teeny bit skeptical at the beginning, silly me. I want to tackle one for me now. Love it, love it, love it!!!
Thank you Elaine! I love that I only spent $40 on it and it took an afternoon to build! The finishing took a little longer but the end result is worth it:) Good luck on your build and thanks so much for stopping by!
So awesome! and you, what the heck…how do you look that good sittin’ a top a coffee table? fabulous 🙂
Haha thank you Sarah that’s so sweet! Hope you have a great Wednesday:)
I absolutely love it.. I’d love to try and build one. I like that its sturdy built too. Love that dark walnut stain.
Thank you Debbie! Dark Walnut is my favorite stain right now because it is so rich! It really was not a hard build. It would have been super easy had I not had to make the measurement changes and build it square vs. rectangle. Go for it:) Thanks for stopping by!
I love that. I made Ana’s coffee table with the flip up lid and that is what my feet are currently resting on. I am using it unfinished and have been for about a year but I know now how I will be finishing it. Thanks!!!
Did you know ( I’m sure that you do) that Rustoleum sells Heirloom white by the quart? It’s only about $9 @ Menards. I buy all my paint there since it is way less than Lowes or HD.
Thank you Jessica! I had no idea you could purchase Heirloom White by the quart!!! Ahh! We don’t have a Menards in DFW though:( I’ll be on the lookout though! Thanks so much for the tip!
love it! looks amazing! i’m curious how much it ended up costing you? thx! 🙂
Thank you Jen. I’m glad you asked because I forgot to add that to my post! It only cost me $40!!! Not even kiddding! I just went and added that to the post. Thanks again!
Love the top of this coffee table! It turned out great. It’s funny that you sat on it, haha, we use our coffee table for seating all the time!
That is too funny! Thanks so much for sharing:)))
That looks fantastic! You are inspiring me to build. My husband wants a wall of book cases and I am thinking I might could do it if I can find some plans. He wants them stained and about 3 sections wide. Any ideas on where to look for plans?
Thank you Lolly! Go to Ana White’s site. She has a TON of building plans and I know she has awesome book cases;)
LOVE LOVE LOVE! And I would TOTALLY do the work in the family room too…it’s been done too many times now…whoops!
You did a gorgeous job with this!!!! 🙂
Thank you Christina! Sometimes it’s more comfortable to work inside;) Thanks for stopping by!
Ashley from one Ana White lover to another your table turned out beautiful. It just goes to show we can make totally functional and custom furniture without paying retail.
Thank you Jaime! Ana has saved me a TON! and I like the furniture I have built more than the furniture I have paid a fortune for:) Thanks so much for stopping by!
Wow, that looks fantastic and goes so well in that space! You certainly have done a wonderful job.
Angex
Thank you so much:)))
Wow! That is awesome. Also, didn’t you just have a baby who resides in that beautiful nursery? Your energy (and legs!) are incredible.
Haha thank you Angela! You are too sweet! Thanks so much for stopping by:)
This looks great! One of these days I’m going to BUILD something, too! Thanks for the inspiration.
Thank you Korrie:) Start with something small like an end table. Warning: It is addicting:) Happy building and thanks so much for stopping by!
very nice. i can see you love what you’re doing.
kat
Thank you Kat! I’m so happy that you can see that because I so do:)) Thanks so much for stopping by!
GORGEOUS!!! You are so very talented!! Sometimes I wonder what your husband must think about all your fantastic talents 🙂 You would make a bundle selling your furniture!
Thank you Kara! You are so sweet! My husband is finally appreciative of my wood working but not the mess I leave behind in the garage;) Thanks for stopping by!
I love this. I need to get brave with some power tools 🙂
Thank you Lacie! Don’t be scared of them. I was at first too but the more you use them the less intimidating they become! You can get your wood cut at your hardware store and start with a drill:) Nothing is unfixable if you mess it up and believe me I have had my fair share of OOPS! Wood putty will be your best friend;) Thanks for stopping by!
I am so in love with this table. It makes the room so inviting and I would WANT to hang out there. Job well done!
Thank you Lyndee:) I am so comfortable in “my spot” now! Thanks for stopping by!
Wow, you did an awesome job! Love the contrast of the dark top w/ the lighter legs.. Nice work!
Thanks so much Bridget:)
Love it!! This is actually what I’m gonna do to my kitchen table:)
Thank you Michell! You will LOVE it! Send us a pic when you finish it:)))