Hey guys!
I hope you all had a great weekend! I spent mine getting ready for the kids’ first day of school, and finishing up some things in my bedroom.
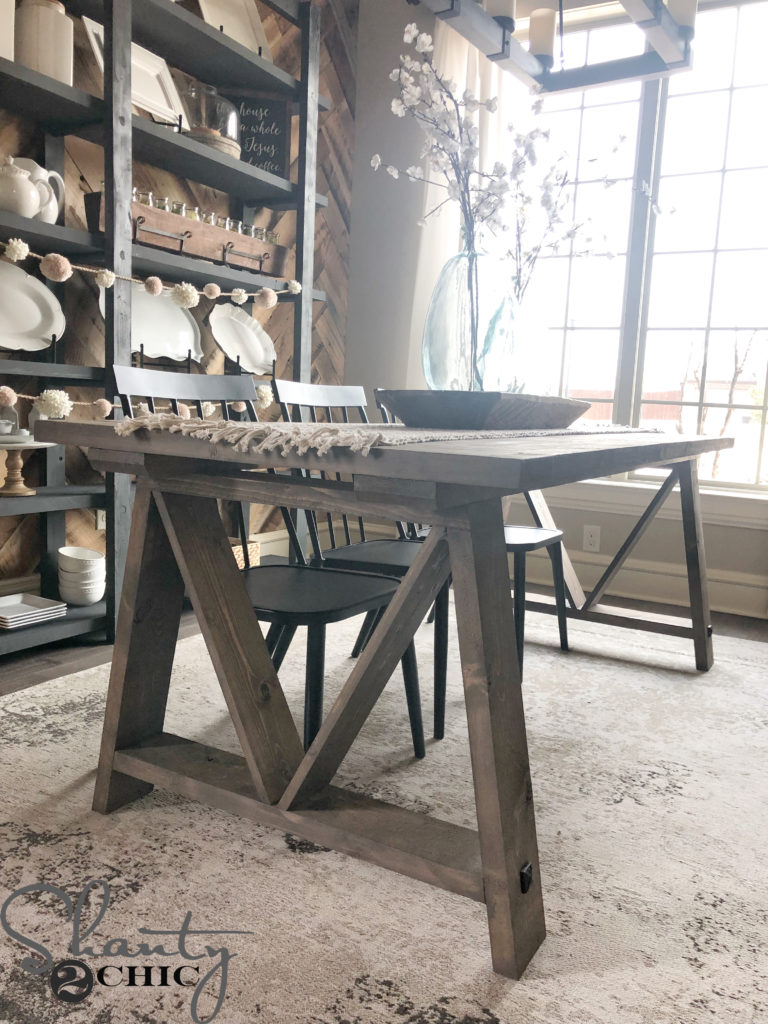
One thing I have been in need of is a new desk. I lost my old work space with the addition of a 5th baby last year, so I now use the sitting area in my bedroom as my office. I was wanting a desk that was functional, but also pretty. I love the look of my fancy farmhouse table I did with Ana White, so I asked her to help me draw up plans for a desk inspired by that style.
Want to see it? I am in LOVE.

This was really so easy to build! The base is made up of a few 2×4’s and all the angles are 45 degrees which really made it fast.
I will share a few pics and tips, and you can find the full set of plans over on Ana White’s site.
I started by making my bases…


For all of the steps above, I used finish nails and Gorilla Wood Glue. The legs were super sturdy.
I did choose to use my Kreg Jig to make the runners for under the table top. I knew I wanted that part extra strong, and the Kreg Jig also makes it so much easier. Plus, I was able to hide all of my pocket holes in the back.
Here is where I put my pocket holes on mine…
This is my board in the middle at the top of the desk.

And here is the back board on the top of the desk…

My bottom piece of wood…

For the table top I chose to use a 24×72″ pine project panel rather than planking with 2x’s. I wanted a flat writing surface, and knew this would work great. I just used finish nails from the top, and filled them with stainable wood putty before I stained it.
I used Rust-Oleum Ultimate Wood Stain in Kona. The finish matches perfect with the other pieces in my bedroom.

I also finished the table top with Rust-Oleum Polyurethane. This stuff is great! You can’t even see where you have applied it, and it protects the wood from water and kids 😉 !

I added a few accessories and I was done! What do you think??


I have done LOTS of new projects in my bedroom! I will be sharing more of them over the next couple of weeks! Thank you so much for stopping by!
Make sure to check out the full plans for this amazing desk over at Ana-White.com. Thanks so much for working with me on this one Ana! I love it!!
~Whitney


Hi Whitney!
I just completed this thanks to you and Ms. Ana White. Thank you so much! I wanted to share the finished product with you!
– Matt
Just finished making this last week. Let the poly cure for a week and brought it in yesterday. I stained the top panel and painted the legs(whole bottom) and off white.
Everyone loves it!
Gorgeous!!! Your desk looks amazing and I love this space so much 🙂
Great job!! Beautiful bedroom!! Makes me want redo mine!! Thanks for sharing!!
This is such a great idea that I thought I would attempt it for my 16 yr. old son. So materials are bought and we are ready to roll; however, quick question. The store only had 2″ PH screws, so I bought them. Can you tell me if these would work rather than the 2 1/2″ before I destroy something?! 🙂 BTW just love this table!
Could you tell me what carpet you have in this room?
Love this! It a gorgeous piece! Where is the chair from, it compliments the desk so perfectly but I noticed you have a lot of metal chairs in you home as well as accent pieces, I love this!
I got some exactly the same yesterday that are from target!
Is this chair comfortable? It is still at target, and I am thinking about getting it to go with this desk! I love the look in the photo 🙂 Any feedback would be great!
LOVE IT….GREAT JOB!!! Did you do anything special to the edges of the top of the desk…I think you refered to it as project plywood.
Any tips for getting the stain smell out of the wood? I made this desk with the same exact stain you used and we let it air out for a few days outside but everytime we bring it in the whole house smells of the fumes…ideas? Suggestions? Thanks!!
I haven’t had the stain smell problem but I bet a coat of poly would take care of it. If you don’t want the shine of the poly you can opt for a matte finish polyurethane instead.
Where did you get that metal chair? I love it!
I got some exactly the same from target yesterday 🙂
What a beautiful desk! I love that style too and it really looks great in your room. I’ve got this linked to my DIY desks post as well today, for inspiration!
Love it so much,,,I think this might just be my next project ; )… You explained it very well and the photos help tremendously ; )
Love it! I built it this weekend… The only issue with the original plan is that “4 – 2×4 @ 21” ¾” (long point to long point, both ends cut NOT parallel at 45 degrees off square)” needs to be 21″ not 21 3/4″
It came out great though!! Thanks!
i love this simple desk
Love it! Definitely going to build this one. Just wondering where you got the lamp and chair?