
I built this DIY farmhouse crib while I was pregnant with my son, and it was definitely a labor of love! I wanted a lower-profile crib that was easier for me to reach into, with the chunky farmhouse look I love and a price tag much lower than buying a similar crib.
I built the entire crib for under $300 at the time, finished it in Varathane Briarsmoke, and used it through my son’s toddler years before passing it along to a friend. You can download the free plans below with the measurements, cut list, and diagrams I used for the original build.
Safety Notes
I built this crib in 2017 and used it through my son’s toddler years, but crib safety standards are very specific and can change over time. Before building or using any DIY crib, review the current CPSC requirements and make sure your finished crib meets all applicable safety standards for dimensions, slat spacing, mattress fit, hardware, mattress support, openings, finishes, and structural performance.
These plans share how I built my crib and my experience with it, but they have not been independently tested or certified to the current federal crib standard.
Table of Contents
Read This Before You Start
- Skill level: Intermediate (comfortable with basic power tools)
- Tools required: ** Drill, miter saw, Kreg Jig, nailer, sander, and table saw for the ripped boards (optional)
- Approximate build time: 1–3 days
- Cost at time of build: Under $300
- What I’d do differently today: See notes below
- Who this project is (and isn’t) for: ** DIYers who are comfortable making precise cuts, using a Kreg Jig, and assembling furniture while carefully following the plans and current crib-safety requirements.
Would I Build This the Same Way Today?
I built this crib in 2017, and I loved both the design and the finished piece. It held up through my son’s toddler years and was still a solid piece when I passed it along to a friend.
If I were building it again today, I would probably choose a lighter stain to give it a more modern look. And I might build it a little earlier in my pregnancy 😂. This one was definitely a labor of love!
Because crib safety standards are very specific, I would also review the current CPSC requirements before starting the build rather than relying only on an older set of plans.
Best part? I was able to build the original crib for under $300, and we have the free printable plans below!
Why I Love This DIY Farmhouse Crib
I designed this one around what I wanted in a crib for my own nursery.
- Lower-profile design – I wanted a crib that didn’t require me to reach as far down to pick up my baby.
- Under $300 when I built it – I got the chunky farmhouse look I wanted without buying an expensive crib.
- Free printable plans – the original plans include the measurements, diagrams, shopping list, and cut list.
- Farmhouse details – the barn-door-style headboard and metal corner hardware give this crib so much character.
How to Build a DIY Farmhouse Crib
You can download the complete printable plans below with the measurements, diagrams, shopping list, and cut list. I’ll walk you through how I built mine step by step here.
Step 1: Download and Review the Free Crib Plans
Start by downloading the free printable farmhouse crib plans. I recommend looking through the entire plan and cut list before making your first cut so you know how all of the pieces come together.
Build the Headboard
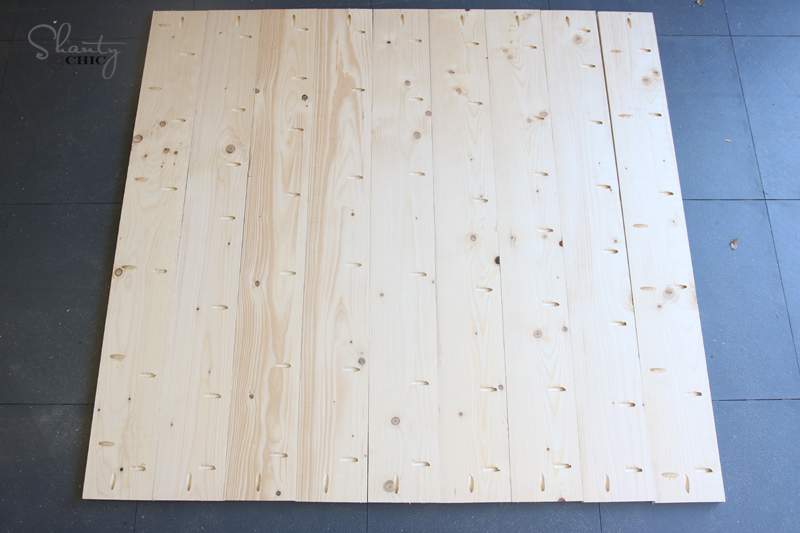
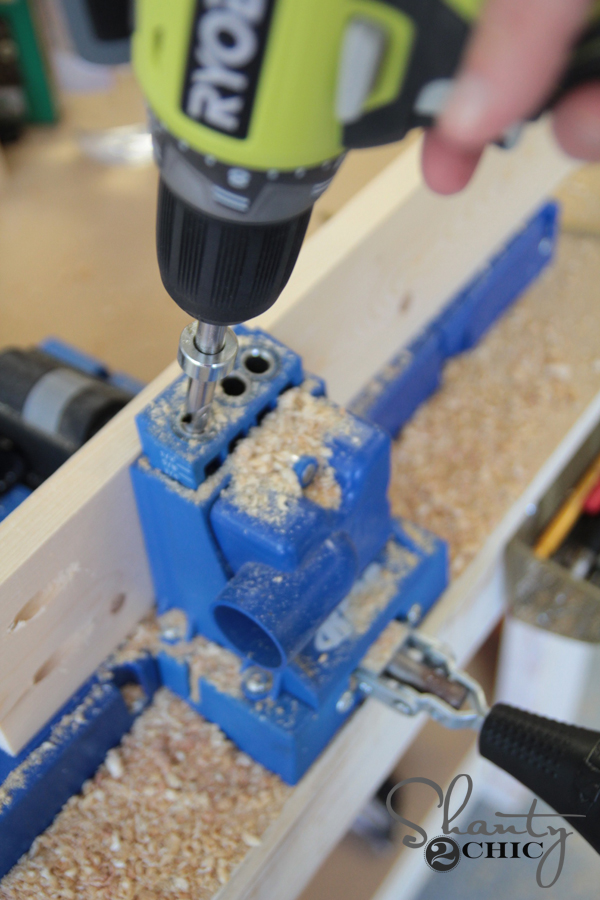
I started with the back of the crib. I used 1×6 boards for the planked headboard and joined the pieces with my Kreg Jig.
I also ripped the rounded edges from the 2×6 and 2×4 boards. This gives the boards straighter edges and creates cleaner joints when everything is assembled.
Follow the dimensions and layout in the printable plans when cutting and assembling these pieces.
Add the Barn Door Trim
Once the main headboard was assembled, I added the trim pieces to create the barn-door-style design.
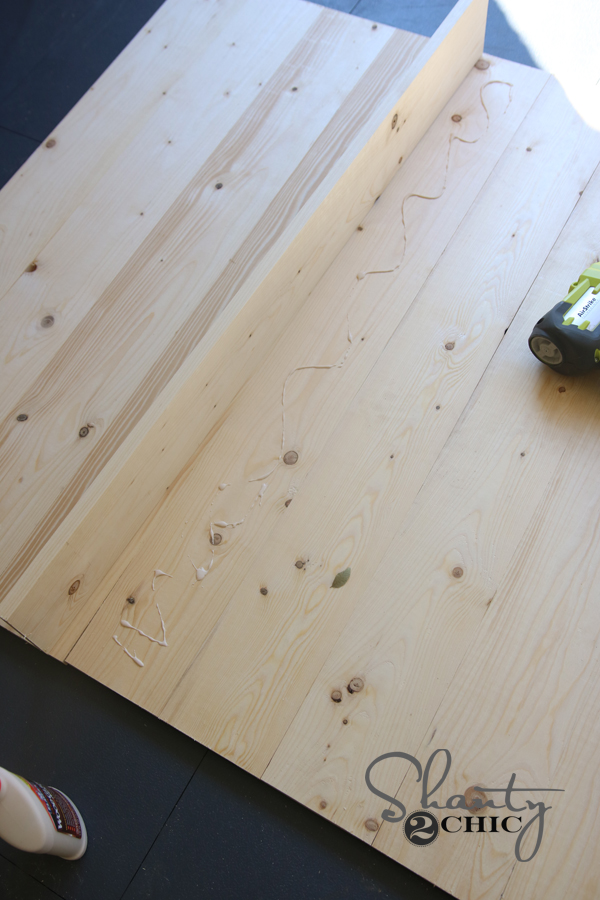
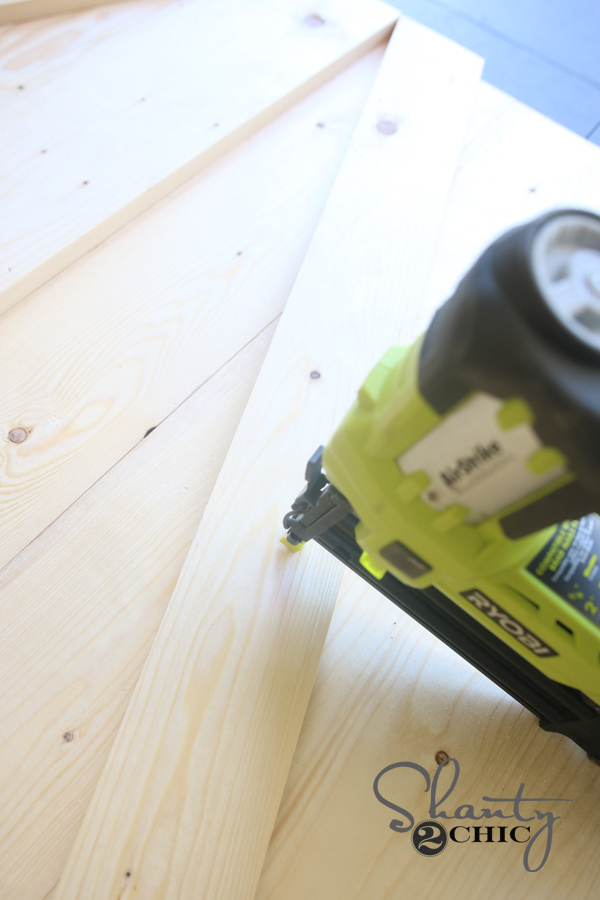
I attached these pieces with wood glue and finish nails.
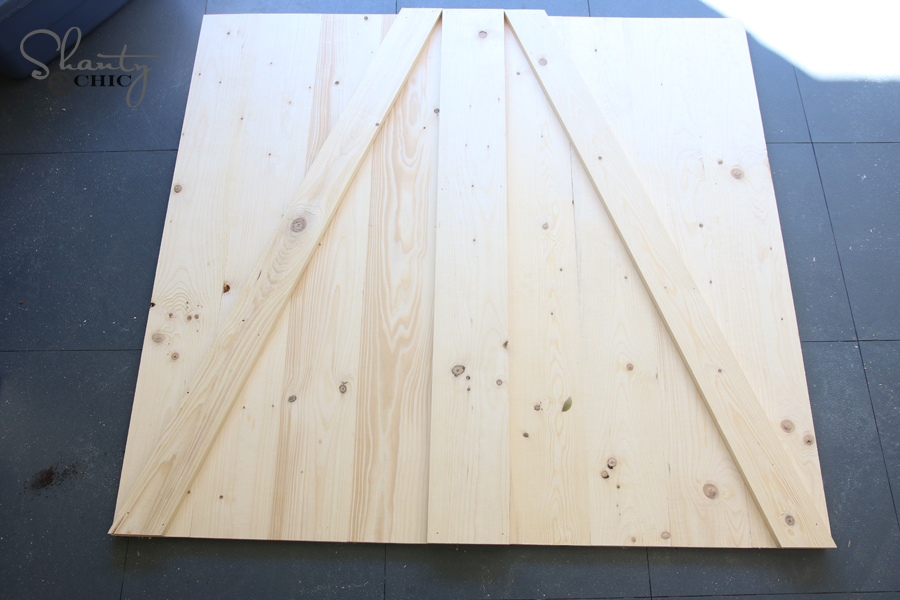
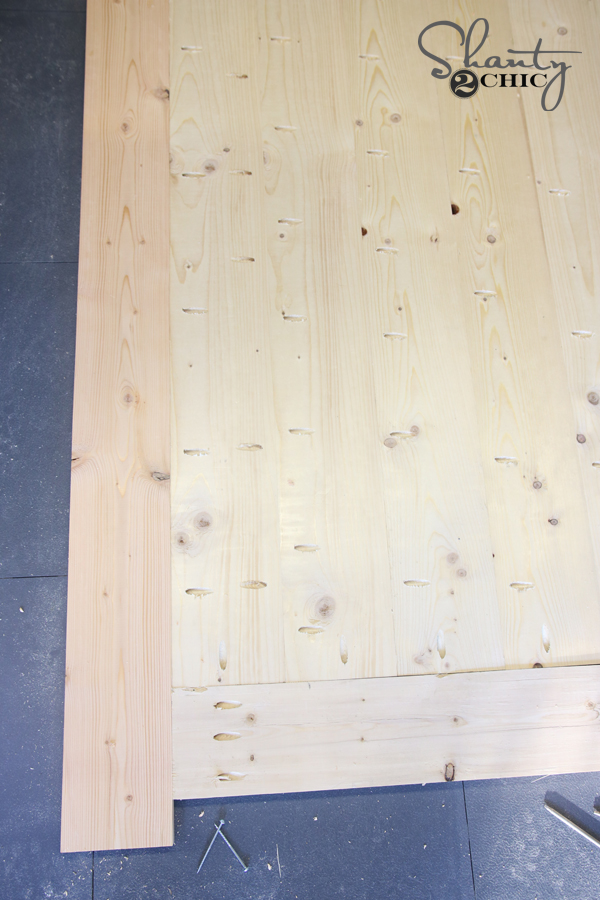
I love how much character these simple trim pieces add to the back of the crib!
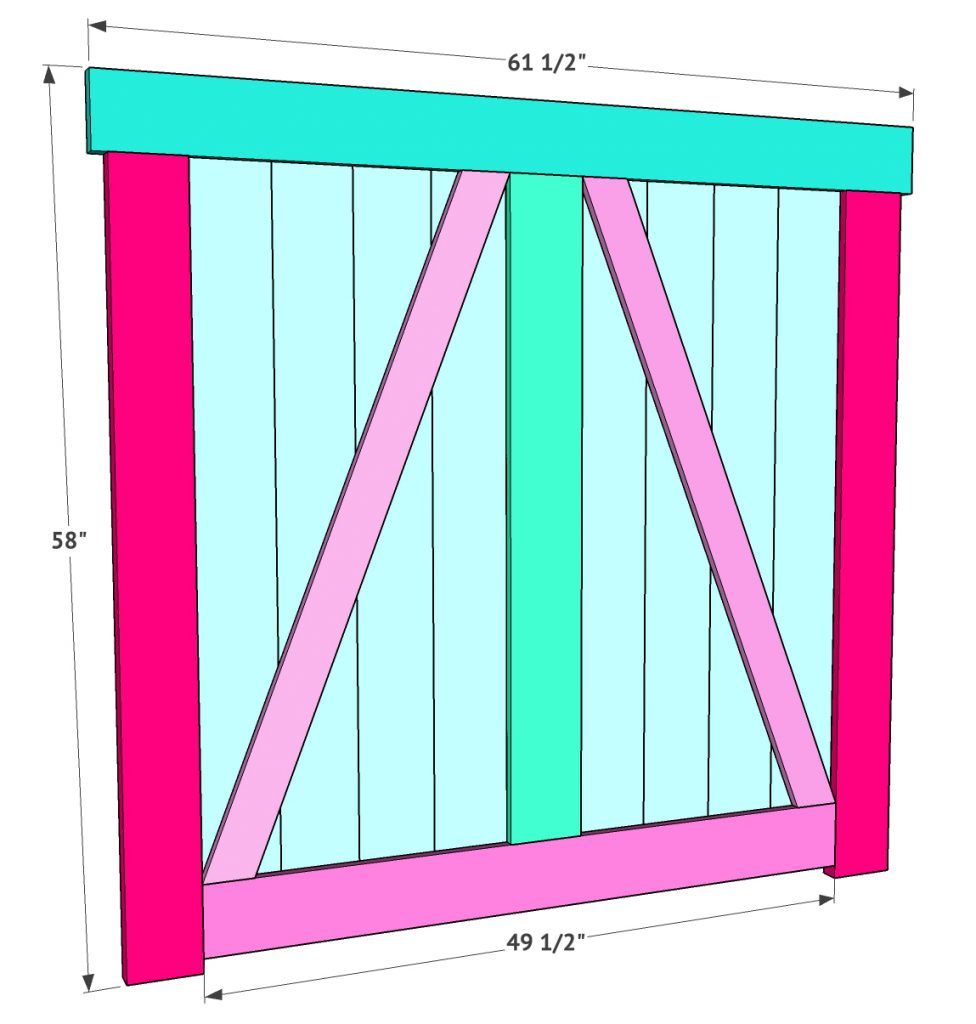
If you’re planning another bed build and want a larger-scale example, our DIY platform bed plans walk through similar measurement and structural decisions for a different mattress size.
Build the Side Panels
Next, I moved on to the two side panels.
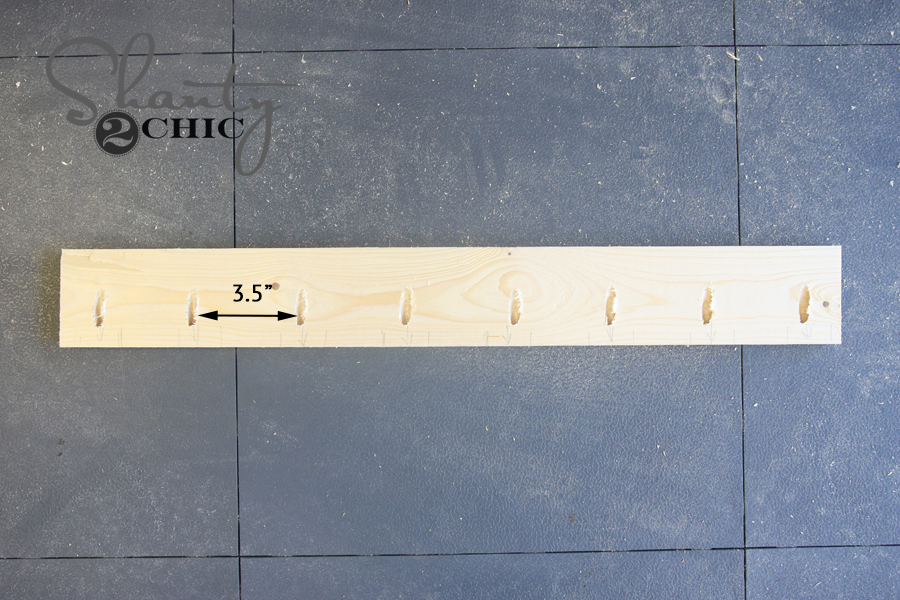
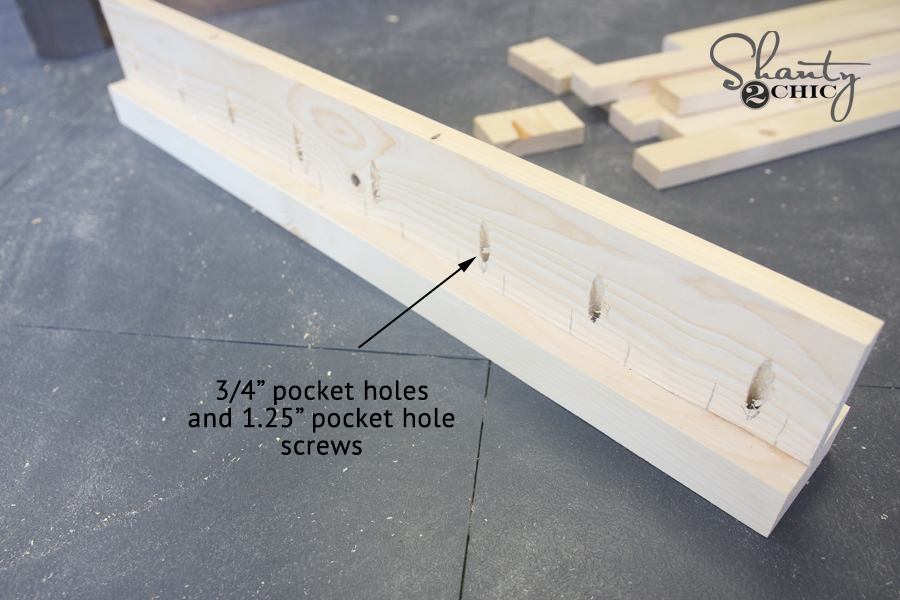
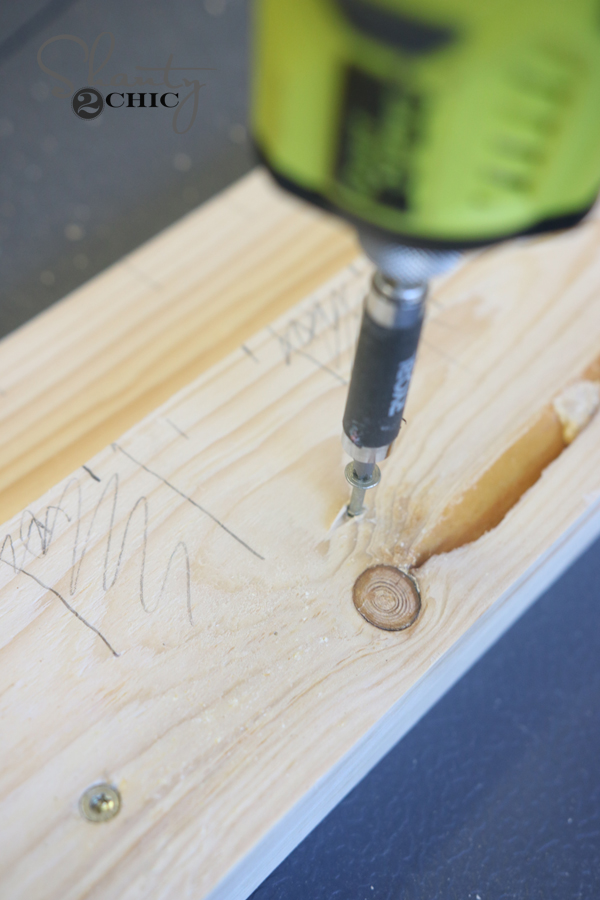
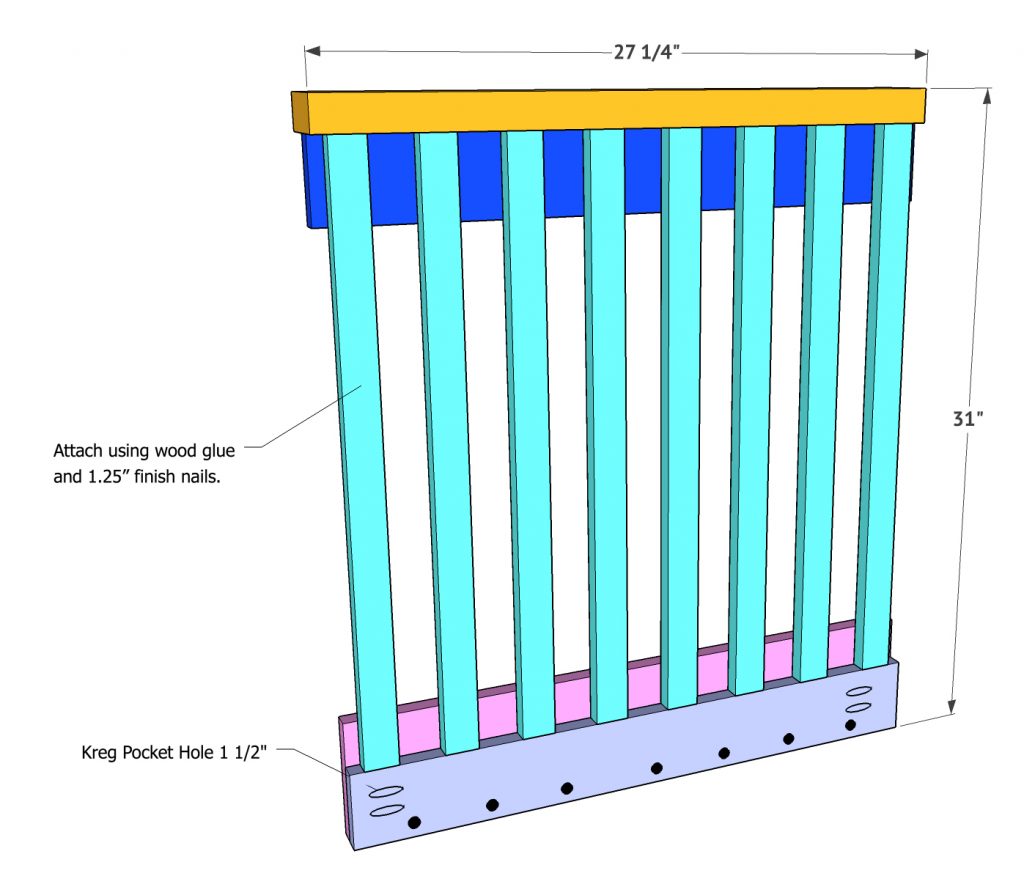
I drilled 3/4″ pocket holes where shown in the plans. Pay attention to where you place the pocket holes so they can be hidden once the remaining pieces are attached.
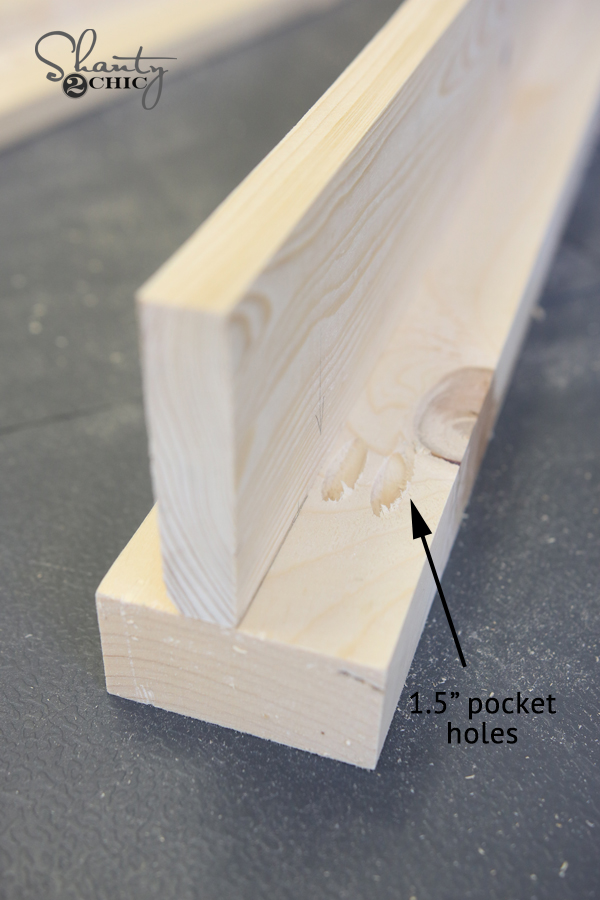
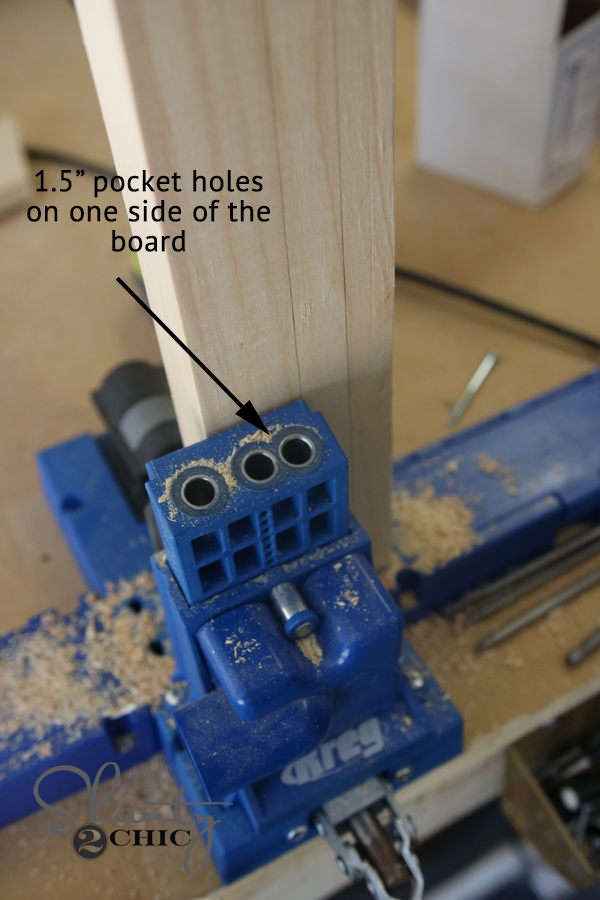
Here is the bottom board. I also marked where my slats would line up to help me keep everything straight when I nailed them in.
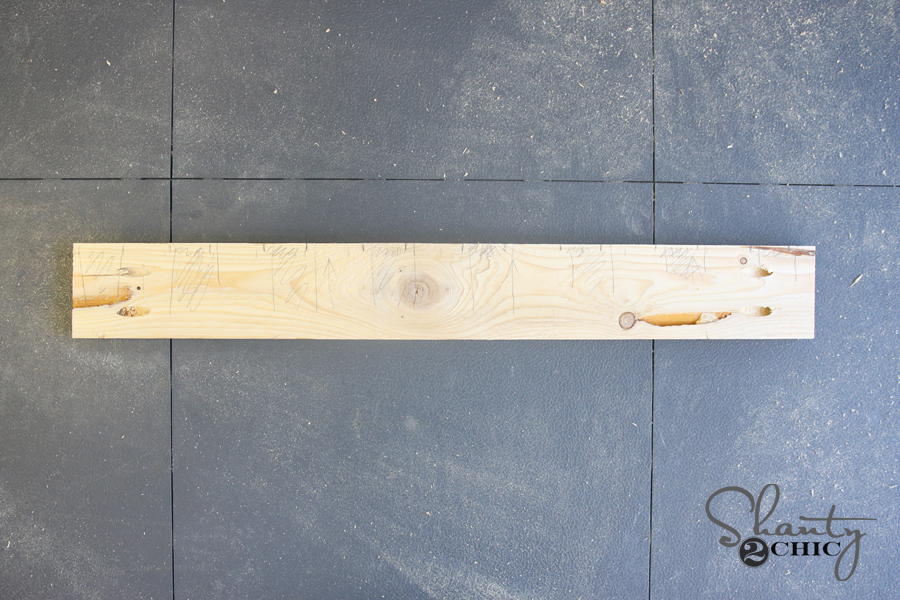
I attached this board to the outside bottom trim piece using wood glue and 1″ Spax screws.
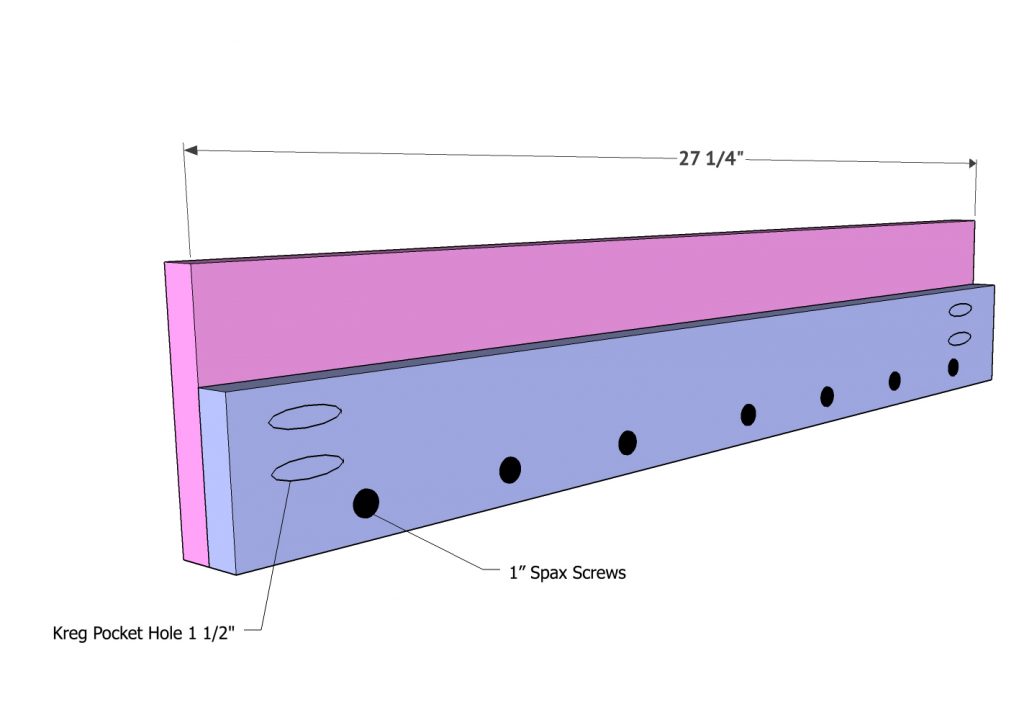
Next, I attached the 1×2 crib slats using wood glue and 1.25″ finish nails. You can see how these pieces cover the pocket holes once they are attached.
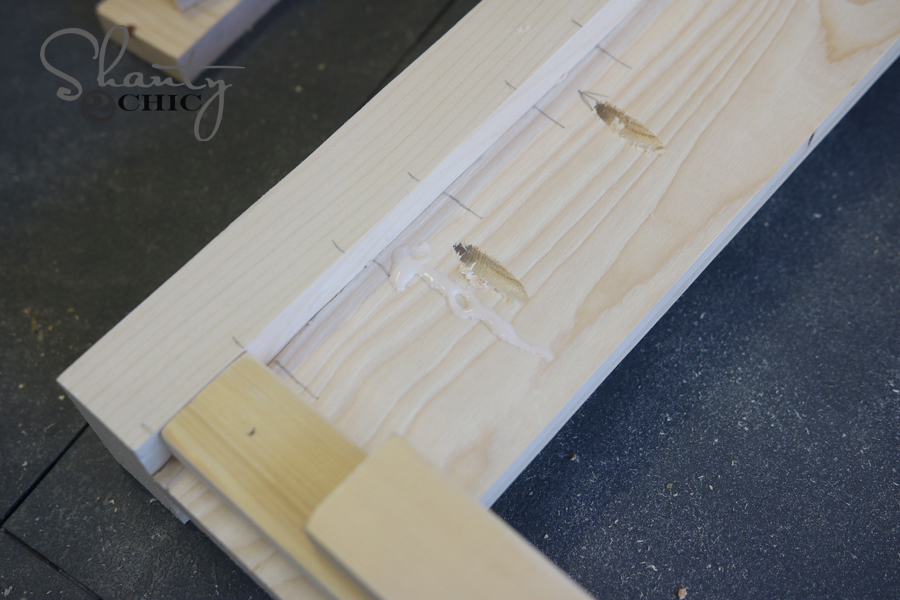
Here is one side finished up! You will need to make two of these.
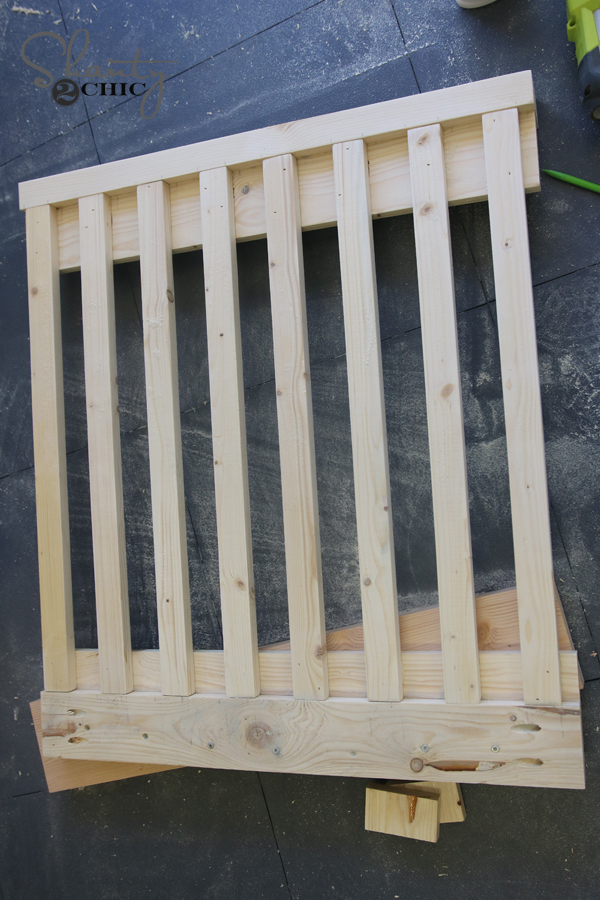
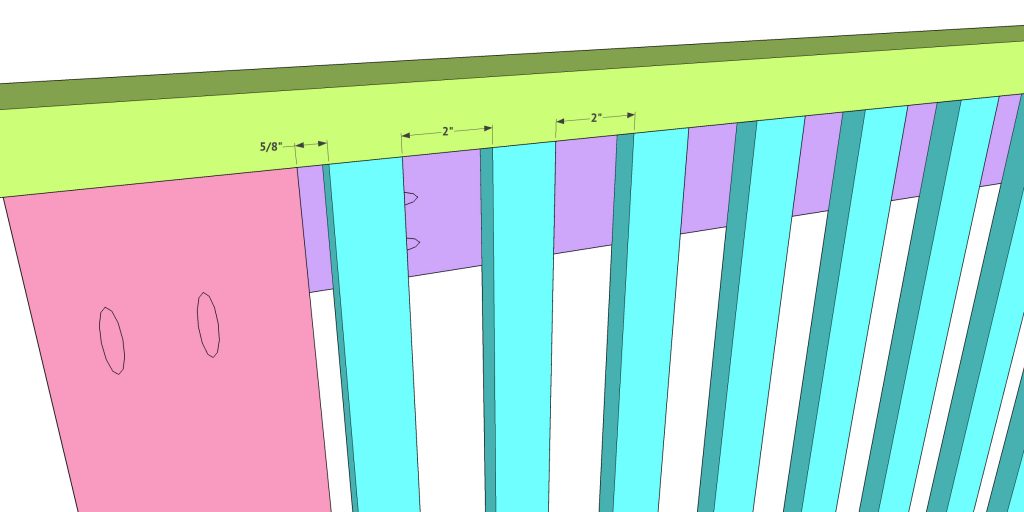
Take your time with the slat placement here. The spacing is an important part of crib construction, so follow the plans carefully and verify the finished crib against current safety requirements.
Build the Front Panel
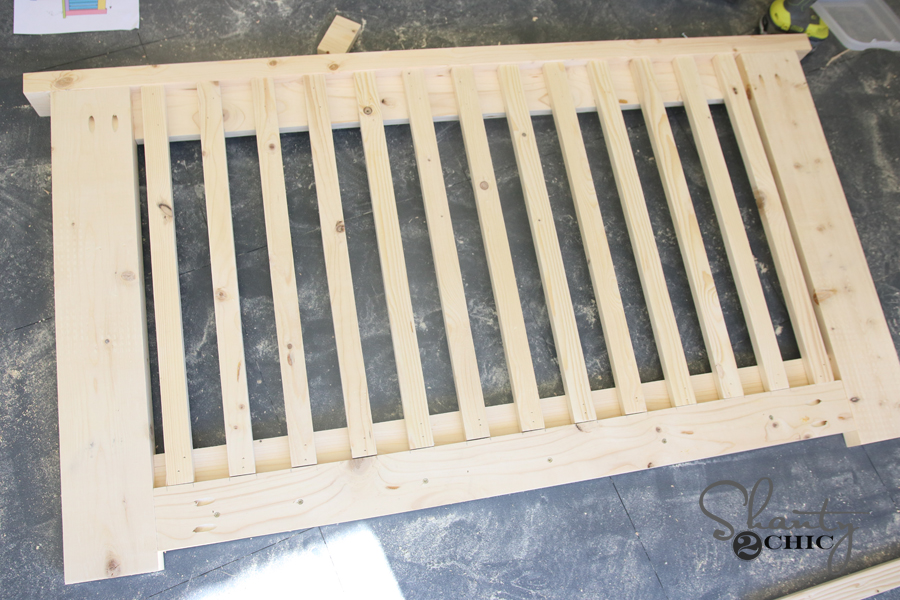
I built the front basically the same way as the sides, but it also has the frame pieces.
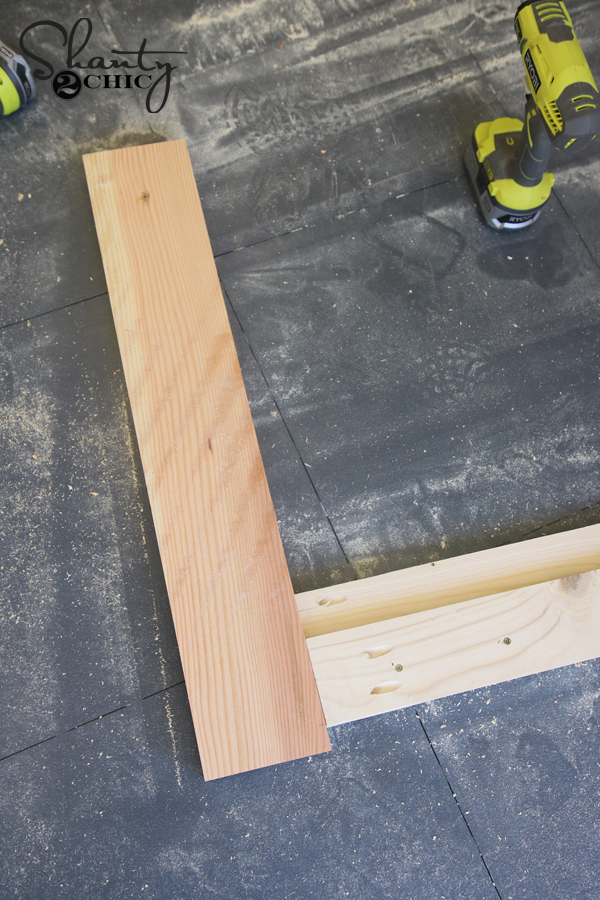
I built the bottom of the front by attaching the two boards just like I did on the sides. Then, I attached the front legs to the bottom boards using pocket-hole screws.
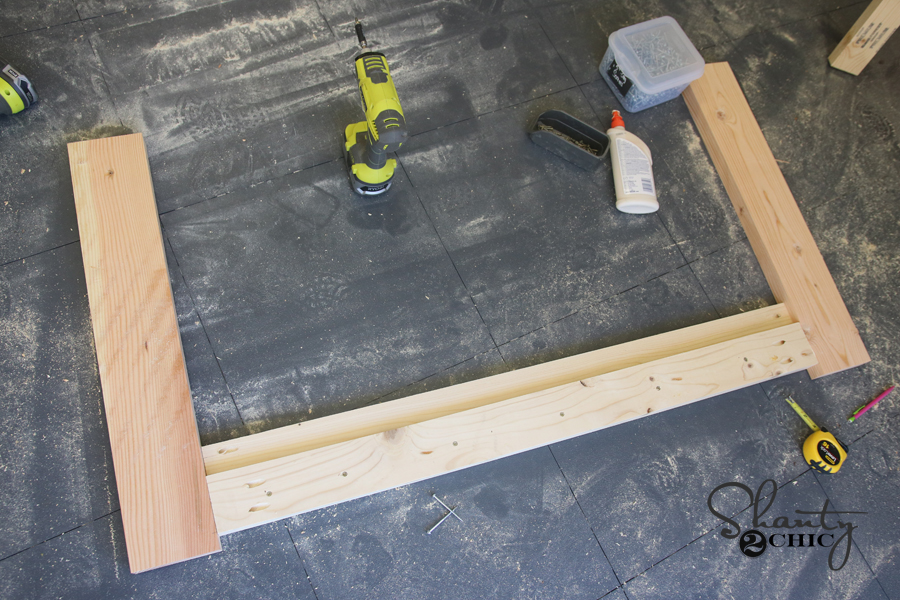
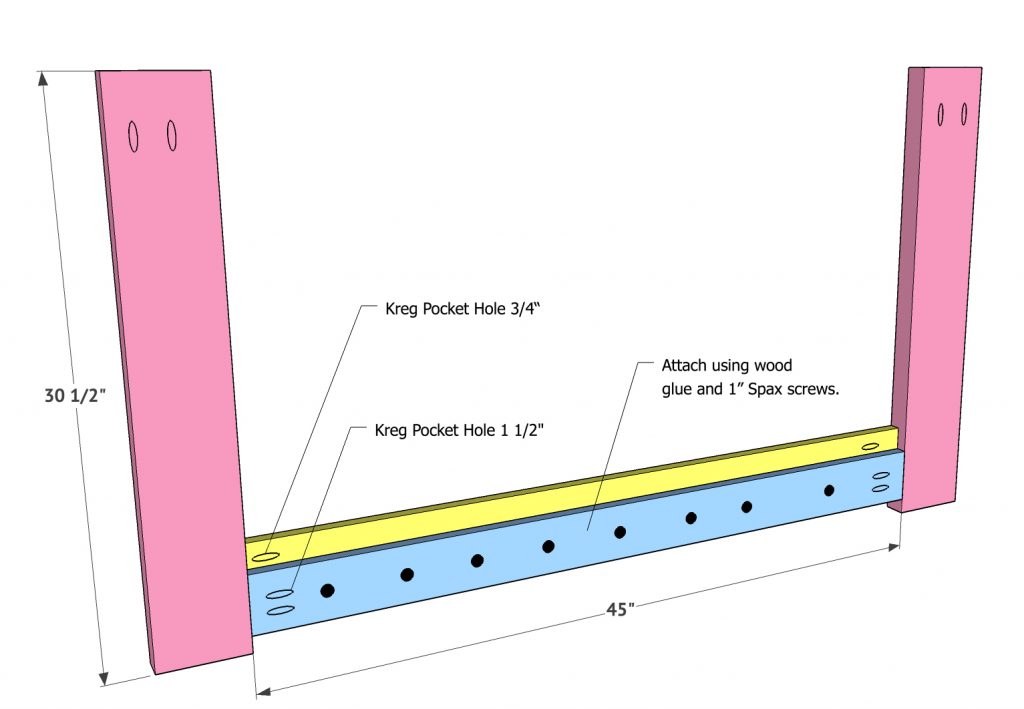
Next, I made the pocket holes in my top board. Again, watch your spacing on this part so the pocket holes will be covered when the remaining pieces are attached.
I attached the top board using 1.25″ pocket-hole screws into the top of each leg.
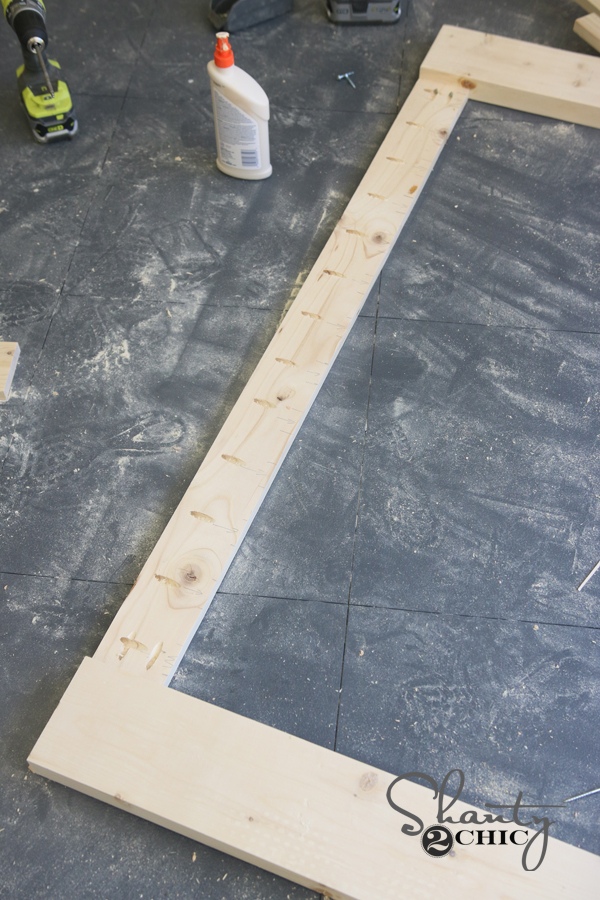
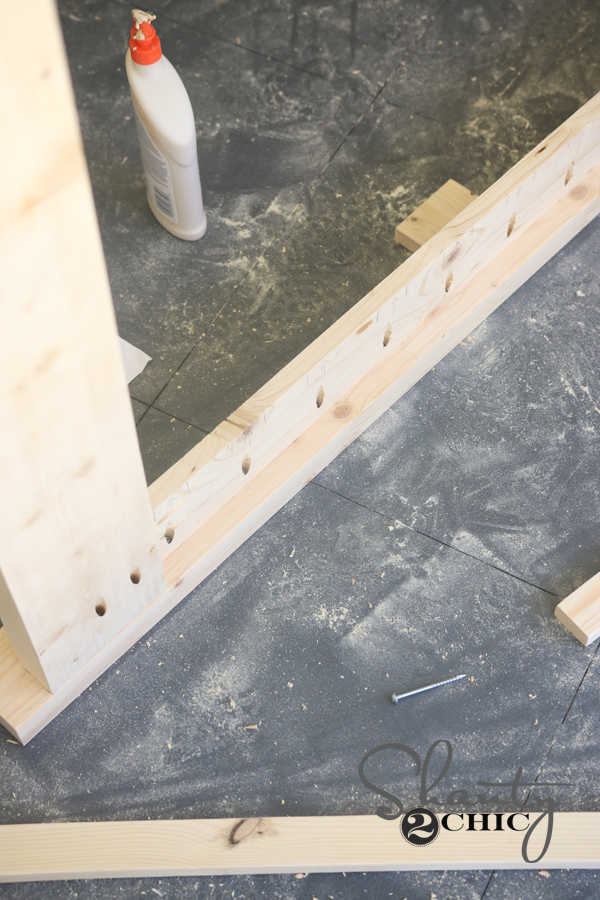
Next, I lined up the whole frame on top of the front rail piece and attached it using wood glue and 1.25″ pocket-hole screws.
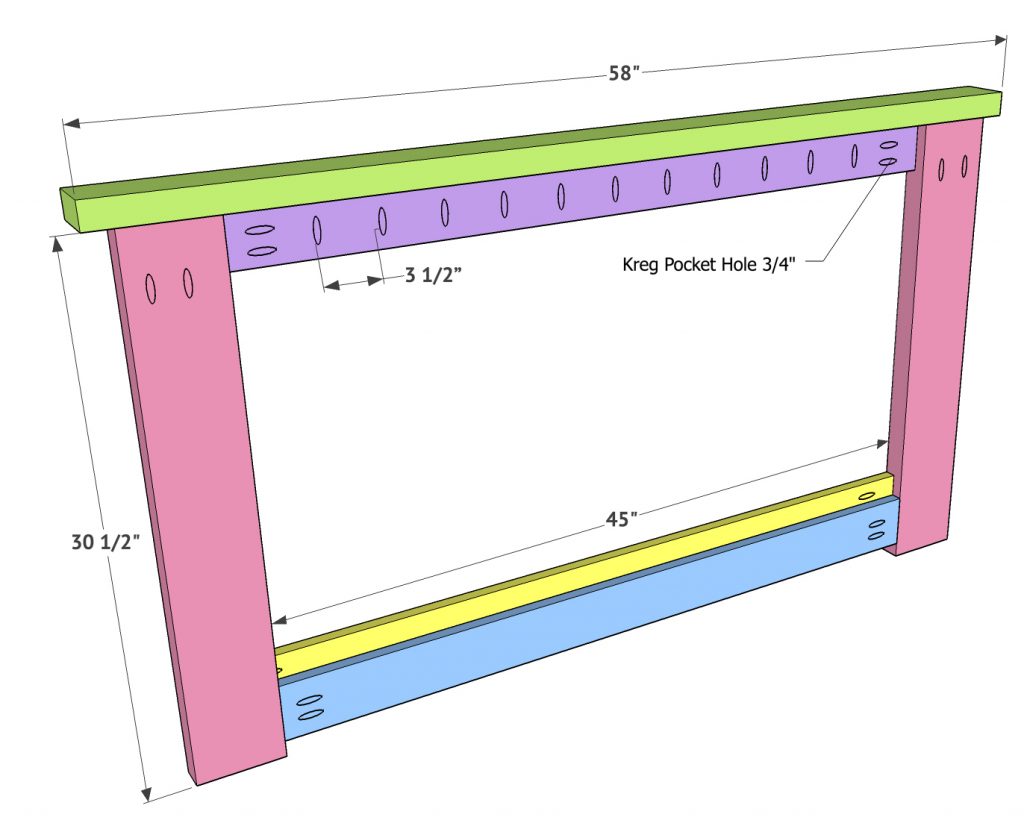
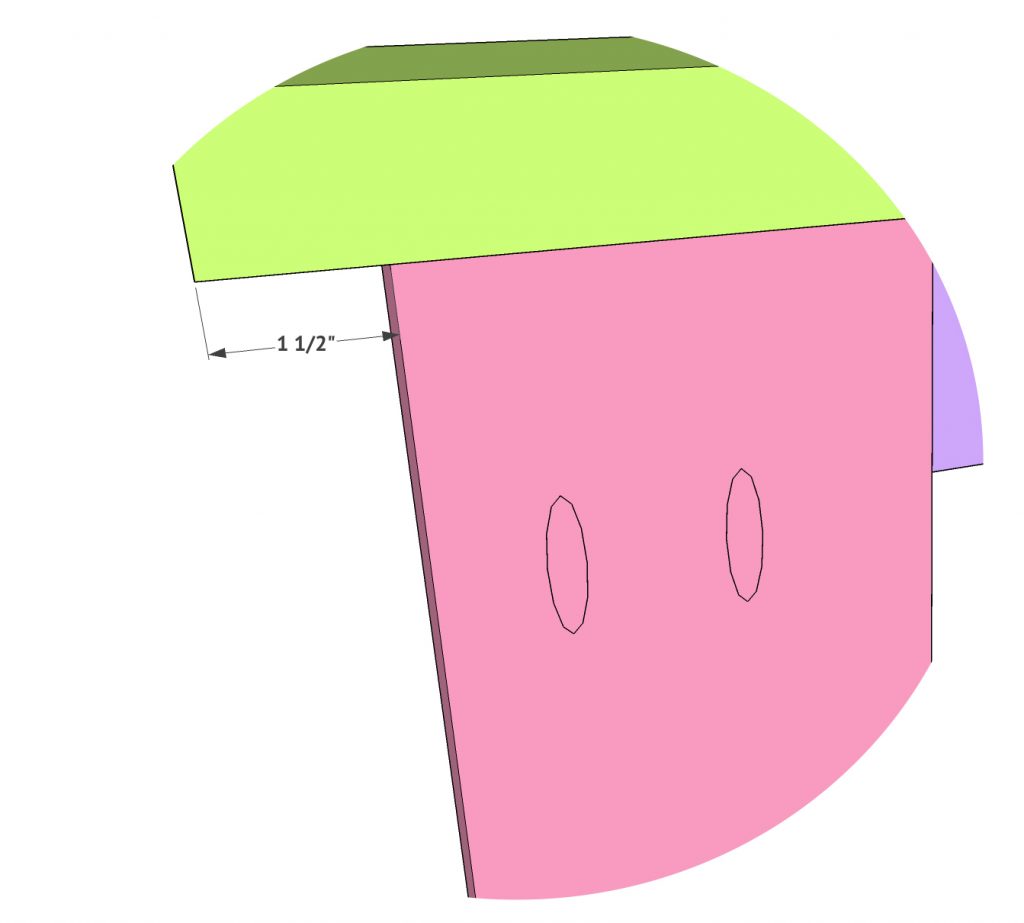
The top rail has a 1.5″ overhang on each side.
Next, I added the front slats using wood glue and 1.25″ finish nails. Watch your spacing on this part!
Install the Mattress Support
Next, it was time to add the mattress support.
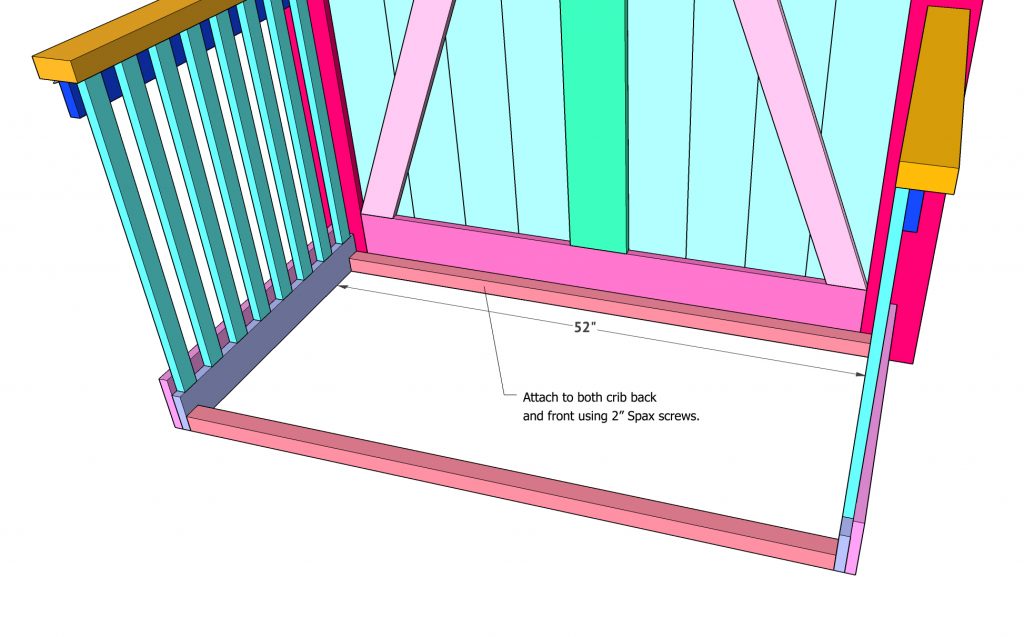
I attached the cleats to the front and back of the crib using 2″ Spax screws.
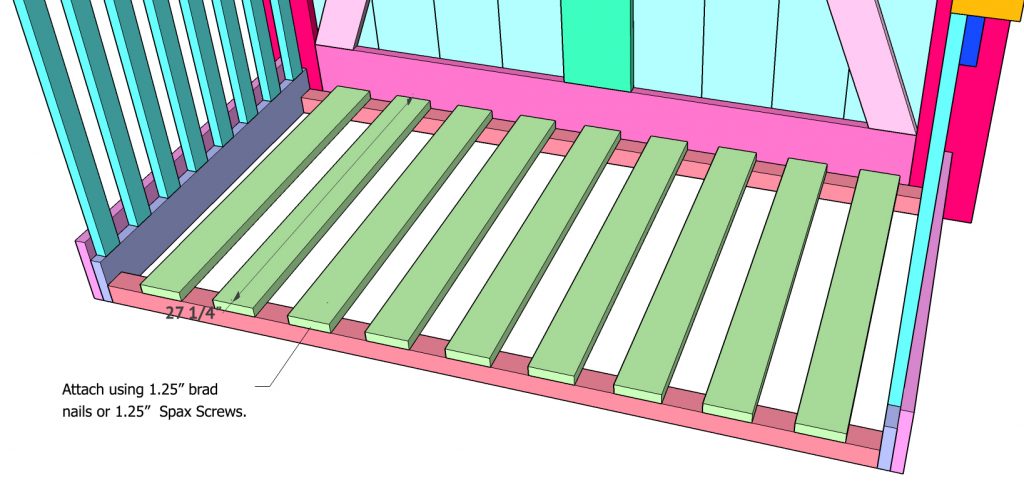
Then, I laid the 1×4 boards across the cleats to create the mattress support according to the layout in the plans.
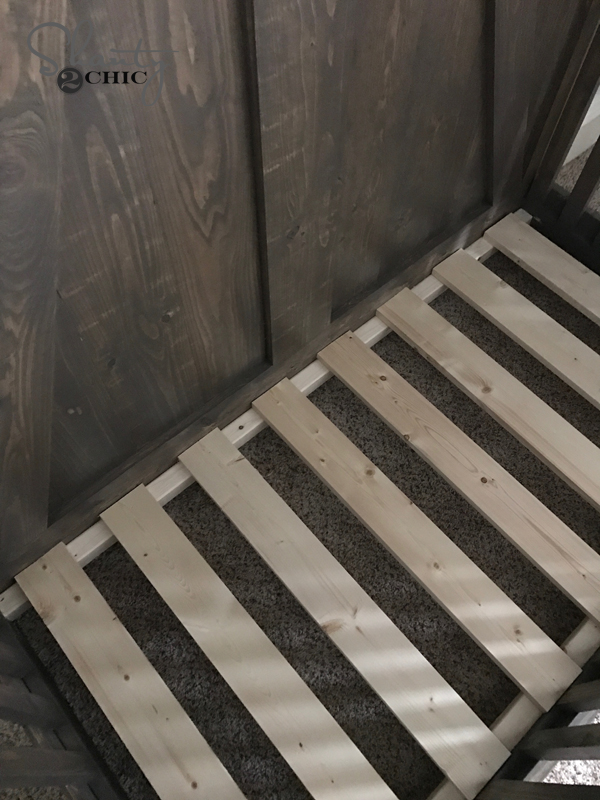
You can see here where the pocket holes attach the sides to the front and back of the crib.
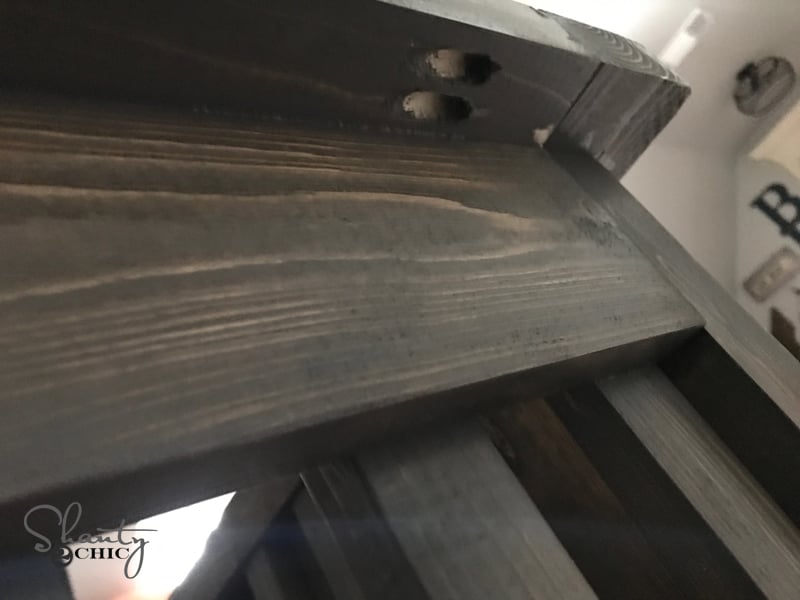
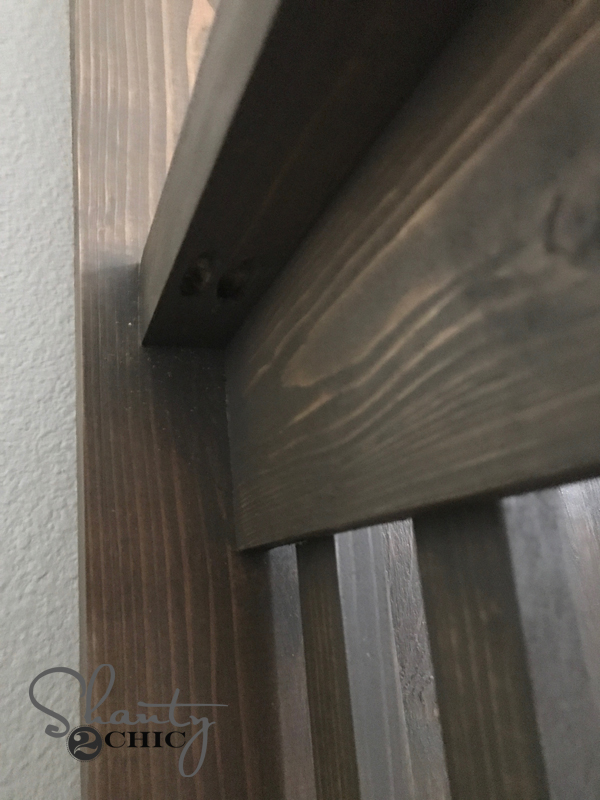
Before using the crib, make sure the mattress fits correctly and verify the mattress support, interior dimensions, openings, slat spacing, hardware, and complete assembly against the current crib-safety requirements.
Sand, Stain and Protect the Crib
After I finished building the crib, my amazing stepdad was kind enough to offer to stain it to keep me from having to do it. I gladly took him up on his offer!
I chose Varathane Briarsmoke, and I was so pleased with the results.
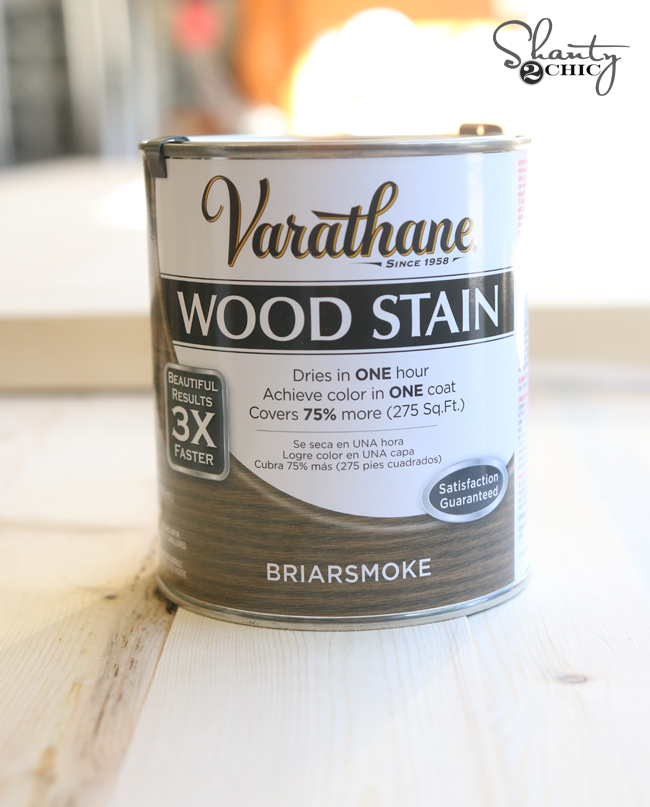
Speaking of stain… Did y’all catch our video on how to stain wood? Here it is!
After the stain dried, he also sprayed the entire crib with polyurethane.
Make sure everything is sanded very smooth before finishing, especially edges and areas little hands can reach. Follow the manufacturer’s directions for the stain and protective finish, including drying and curing times.
Add the Farmhouse Hardware
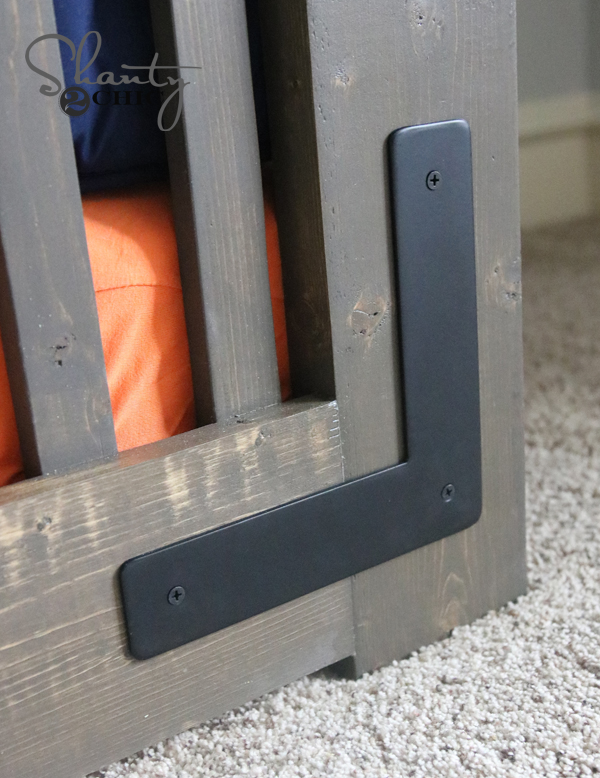
Now let’s talk about that hardware… I die. Love it so much.
I told our good friend Tyler of Wayne Works what I had in mind, and he did not disappoint. He even rounded the edges just a bit, giving them a softer look.
📥 Get the Free Plans
We’ve made it simple! Click below to grab your FREE printable crib plans. They include the shopping list, cut list, measurements, and diagrams you’ll need to follow along with the tutorial.
➡️ Download the Free Farmhouse Crib Plans
Remember that these plans document how I built my crib in 2017. Review the current crib-safety requirements before building or using a DIY crib.
Expert Tips
There are a lot of pieces in this build, so these are the areas where I would slow down and double-check my work.
- Sand everything really well. Pay extra attention to edges, corners, slats, and anywhere little hands could reach.
- Follow the measurements carefully. This isn’t a project where I would eyeball spacing or change structural dimensions as I go.
- Watch your pocket-hole placement. Several of the pocket holes are positioned so another board will cover them later.
- Mark the slat locations first. I marked mine directly on the boards before attaching the slats, which made it much easier to keep them lined up.
- Check the mattress fit and complete assembly. Before using the crib, verify the mattress, interior dimensions, slat spacing, openings, mattress support, hardware, and other applicable requirements against current crib-safety standards.
- Give the finish plenty of time to cure. Follow the manufacturer’s instructions for every stain, paint, or protective finish you use.
❤️ Final Thoughts
This crib isn’t just furniture—it’s a keepsake you’ll treasure for years 💕. Building your own crib means saving money, customizing it to your style, and creating something truly special for your little one.

You’ll probably need a baby gate soon! We have the perfect set of free plans to build your own! Check out our DIY Baby Gate plans!
Frequently Asked Questions
I spent under $300 when I built this crib in 2017. Current cost will depend on lumber, hardware, and finish prices in your area.
I consider this an intermediate woodworking project. There are quite a few pieces and precise measurements involved, so I would be comfortable with a miter saw, drill, Kreg Jig, and furniture assembly before tackling this one.
I wouldn’t change the interior dimensions, slat spacing, mattress support, rail configuration, or other structural dimensions without first checking the current crib-safety requirements. For this project, I recommend following the original plans and verifying the finished design against current standards before building or using the crib.
I used a miter saw, table saw, drill, Kreg Jig, nailer, and sander for this build. The table saw was used to rip some of the boards to the narrower dimensions shown in the plans. If you don’t have experience using these tools yet, I would get comfortable with them on a few simpler furniture builds before tackling a crib.
Full-size cribs are built around very specific interior and mattress dimensions. Use a mattress intended for a full-size crib and check its fit carefully before using the crib. Don’t substitute a different mattress size or change the crib’s interior dimensions without checking the current requirements.
More DIY Bed Plans to Try
If you love building your own furniture, we have plenty more DIY bed plans to keep you busy! Our DIY Platform Bed is a simple, beginner-friendly build that uses many of the same basic tools, or check out our DIY Modern Full Size Bed for a clean, simple design. I also love our DIY Bed Frame and Wood Headboard if you want something with a little more detail. You can find even more sizes and styles in our complete collection of DIY bed plans.
Building this crib while I was pregnant was definitely one of the bigger projects I took on, but I loved how it turned out. My son used it through his toddler years, and I was able to pass it along to a friend when we were finished with it, which made all that work worth it.
If you build one using our plans, we’d love to see it! Tag us on Instagram and use #shanty2chic so we can check out your build.
Happy Building!
🛠️ Printable Tutorial
DIY Farmhouse Crib (Free Plans)
Tools
- Miter Saw
- – Pocket-hole jig (Kreg)
- – Drill/driver
- Brad Nailer
- – Orbital sander + dust collection
- – Clamps, tape measure, square
Supplies
- – 1×6 boards headboard/back panel
- – 2×6 boards trim; rip to ~5″
- – 2×4 boards frame; rip to ~3″
- – 1×4 boards mattress support slats
- – 1×2 boards side/front slats
- – Pocket-hole screws 1¼″ and 2″
- – 2″ brad nails & wood glue
- – 2″ structural screws e.g., Spax for cleats
- – Stain e.g., Varathane Briarsmoke & polyurethane
- – Optional decorative hardware
Instructions
- Instructions:
- Download & review plans — Grab the free printable plans and study the cut list, layout, and pocket-hole locations.
- Build the headboard — Join 1×6s with pocket holes; frame with ripped 2×6 (≈5″) and 2×4 (≈3″).

- Add barn-door trim — Glue and brad-nail the trim pattern for that farmhouse look.

- Assemble side panels — Drill 3/4″ pocket holes; glue and screw frames; attach 1×2 slats with consistent spacing.

- Build the front panel — Construct the lower front frame using pocket holes; add evenly spaced 1×2 slats.

- Install mattress supports — Fasten cleats to side panels with 2″ structural screws; lay 1×4 slats across to form the platform.

- Finish — Sand smooth; stain (Briarsmoke recommended) and seal with polyurethane. Let finishes fully cure.
- Optional hardware — Add decorative hardware. Dry-fit panels, confirm mattress fit, then assemble in the nursery.


Notes

Hi! I love these plans, but there doesn’t seem to be any indication of the cut angle for the two trim boards that are cut on an angle… Any ideas?
Thanks!
In case anyone comes looking for this answer – it’s a 20 degree angle cut
I made this crib successfully 2 years ago before our baby was born. He’s ready to go into a toddler bed, any recommendations on how to take the front rail off & convert?
Only, then it can be given to the tiny kids, to provide freedom from varied forms
of diseases. From the simple plastic or wooden constructions that children can ride on, to pull or push toys that toddlers would enjoy
to ride on, to motor-driven riders and miniaturized versions of popular car brands and makes which can be favored by young children, ride-on toys would continually be a section of any child’s playtime menagerie.
Ask people around, do some research or ask elders before heading
shopping for your loved one.
So….I’m becoming a grandma! I’d love to make this crib for the new little peanut to come but one question I have that I don’t think was asked yet…is this brand of stain infant/kid friendly? I know babies like to chew on things and I remember my kids used to chew on the rails etc…so that’s my question and then another one…if I chose to paint it…is there a kids friendly paint???
We are not builders but would like to purchase one of these beautiful cribs. Do you sell them?
I too am curious how a standard crib mattress fits when the death of the sides are .25” shorter than all mattresses I’ve seen.
I’m also having a hard time locating where I can buy the corner bracing as the Etsy shop link states they are sold out.
The crib mattresses I am seeing are 52″ x 27.5″, but it looks like it will only fit a 52x 27.25″. Can anyone tell me what size mattress worked for them?
Did you ever get this figured out? I also can not find the appropriate size
Can you now verify the dimensions of the final result? I’m about to begin building this and I believe it’s going to be 52″x27.25″. Is that accurate? I too want to make sure I have a mattress that will fit before putting all the work in. Thanks!
Hi,
What kind of polyurethane spray did you use after staining?
My husband and I have been eyeing these plans for a few weeks now. My only question stems from my concern of the mattress being so low. Is there a way to build this to have the mattress height be adjustable as the baby grows? I was planning on making the legs taller, as it appears some others have done, just because I like that look just a little better. However, my concern is I would have a harder time putting the baby in the crib or getting him out.
Can anyone share a supplies list and cost?
I just bought all the supplies and it was around $140 (including a few smaller tools)
Do you have the list of supplies?
Regarding the metal decorations, I bought a sheet of aluminum for 15.00 at Menards and cut on table saw. Pretty easy, then a little sanding and some spray paint
I made this crib successfully 2 years ago before our baby was born. He’s ready to go into a toddler bed, any recommendations on how to take the front rail off & convert?
We are in the process of making this beautiful crib!! We can’t figure out why our measurements aren’t working! On the crib headboard there are 9 pieces of wood that have been ripped to 5″ wide. That’s equal to 45″. The bottom board is supposed to be cut at 49 1/2″. How does that fit? We cut 3 1/2″ off the bottom board, now we’re wondering if the crib mattress will fit!
Those boards werent supposed to be ripped to 5″ only the 2″ boards were supposed to be ripped down
Thanks for your reply Frank! But, the instructions say to rip all the 2xs. (2×6, and all 2x4s) “Next, I built the frame of the back part of the crib. I noted this in the plans… I chose to rip all of my 2x boards to give them straight edges. So, the 2×6 are all 5″ wide and the 2×4 are all 3″ wide. If you choose not to do this, it won’t mess with the dimensions of everything else, but it will give your crib a slightly different finished look.”
Only the top board, bottom board and 2 edge boards are 2″ boards, those make up the frame. The inside boards are 1×6 boards and DO NOT get ripped down. That is where your discrepancy comes from. Inside the frame is 49.5 inches
You’re right! Thank you for the clarification! ? I guess we were just in a ripping frenzy! I really hope the crib mattress fits!
I love this crib, but had one concern in regards to bow low it is. Wouldn’t want any creepy crawlers in there with the baby as well as is it comfortable for the parents in regards to bending down to lay baby to sleep?
I had a question. My friend absolutely loves this crib was gonna build it for her. However she asked if it was a convertible into toddler, day, and full bed. If it’s not do you think I could modify to make it into this? Any suggestions would be greatly appreciated! Again congrats on having a little boy!!!
You could make it one by taking off the front piece. Then add another 2×6 to the front of each sidebar peices, add another bottom horizontal support for mattress and stain to match.
I have a question on the mattress size. Based on your plans, the area that the mattress will drop into and rest on will be 52″ x 27.25″. It looks like this is the minimum size for crib mattresses based on what I’m seeing? Since I’m not familiar with the mattresses themselves, will any standard crib mattress be able to squeeze in?
Can you now verify the dimensions of the final result? I’m about to begin building this and I believe it’s going to be 52″x27.25″. Is that accurate? I too want to make sure I have a mattress that will fit before putting all the work in. Thanks!
How much in total do you think this cost you to make??
In Canada, it cost me $57 worth of wood.
Where did you buy your wood that you were able to get everything that cheap?
I have an airstrike brad nailer, do you think 1.25in brad nails would work for attaching the trim on the headboard instead of finish nails? I guess I could do the finish nails by hand (just takes longer).
Also, for mine, I’m going to make the bed height adjustable by using connector bolts and instert nuts. I’ll post a pick when I’m done.
hi! i love the crib but i do have one question. Are you able to convert this into a toddler bed with the headboard and footboard? if so how would you do that?
I think this could be converted fairly easily with a few modifications to how you construct the crib front. I’m actually a considering this as I build one right now.
My thoughts are to use threaded inserts and connector bolts vice pocket hole screws to connect the crib front to the side rails. This will allow the crib front to be removed as a solid piece to allow for future installation of a toddler rail.
For the toddler rail, it will need the stability of the legs that are designed into the crib front, so I think I can follow the directions for the crib front (steps 7-9), and modify it so instead of installing the upper rail 30in high, add a lower guard rail approx 20in high with an opening of approx 16in to allow the little guy to climb in and out of bed. Only downside I can see, is that this makes a large piece to store when not being used. Luckily I have some time to design and build this since I won’t need to convert this for another 18mo.