Hey friends!
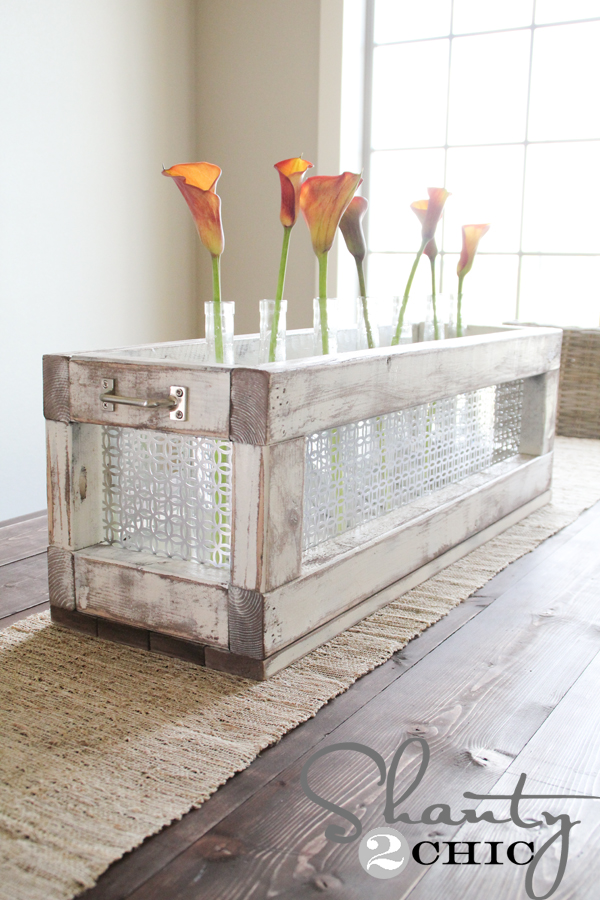
After finishing my mirrors in the dining room, my table started to look naked! So… I dressed her up today.
This is a super easy project and I LOVE the results!

This is the wood I used for the project…

2 – 1x6x4 whitewood boards
1- 2×4 stud
Total for wood was under $10… Yippee!
I also used Gorilla Wood glue to attach it all together.
I cut my 2×4 the same length as my other 2 boards (4ft)
I used wood glue and nails to attach the 1×6’s to the 2×4 like this…

Then I cut 2 small pieces of from my stud to finish off the sides. Mine were 3.75″ each. I know it looks shanty… But that was my goal here 😉


I made some dings all around the whole box, and I also used some furniture upholstery nails around the whole thing because I like the way they look. You can find these at Lowe’s by the screws and nails.

I decided to try a new product out to finish my box. I found this stain at Lowe’s.

It’s Rust-Oleum Ultimate Wood Stain.
I LOVED it. I was thinking there wouldn’t be much of a difference in this new stain and the one I was previously using, but I was shocked at the difference.
The Rust-Oleum stain dries in no time. I actually had the box on my table dry an hour after I stained it… Love that.
It’s also much less stinky and sticky than the others I have used. You will love it!
Once it dried I was all finished. I used some glass bottles I found HERE and filled them with some little flowers I found at Hobby Lobby. You can also use old glass coke bottles, Starbuck’s glass bottles or any old glass sauce bottle.
I used the 12 ounce sauce bottles from their site (SAU12)
Here is how it turned out…


What do you think??
If you like it, I would love for you to Pin it, Stumble it and Share it below 😉
Thanks so much for stopping by! You can see more of my dining room in these posts…
Have a great night!
~Whitney


I love this, and I’m going to try it. The finishing nails you used are fab. This would look pretty with lilacs lining the bottles in the spring.
This is really nice. I love the finishing nails you used. It really looks fab. I’m gonna try it. 🙂
This is a great tutorial, and it seems pretty easy to do! I love the way it turned out. I think I’ll go get bottles first, then fit my planter box around them. Thanks for the inspiration. It’s excellent!
wow another amazing project, this is great xxx
Thanks for the inspiration! I’ve been looking for the right centerpiece. This may be it.
I love this so much. It really would be perfect for a spring center piece.
Love this! One question before I get started on making this- In the list of materials you listed that you used 1 x 6 boards, but in the tutorial portion you said you attached the 1 x 4 to the 2 x 4 with glue and nails. So did you use 1 x 6’s or 1 x 4’s for the sides? Thanks
1×6… fixing it now! Thanks!
Thank you for this inspiration! I repinned this! Love it. I’m copying you 😉
I love this! I have some barnwood, that I need to use!
Debbie
which bottles did you use from that site??
12 ounce sauce jars
Which size sauce bottles did you use??
O I’m so happy to see this post! I saw a pin and wanted to copy the look, which I did, but I already had the box. So very happy to find your blog!!!
That turned out awesome! Wouldn’t even believe it was new wood! I’m your newest follower here, would love for you to link up at Handmade 52! http://raisingoranges.blogspot.com/2012/01/handmade-52-3.html
So cute. I love it. Thinking of making me one for my table 🙂
Whitney-
I love it! I am going to have to go and get my hands on some of those nails too…they are awesome! Thanks for sharing!
Heidi@HomemadeBeautiesByHeidi