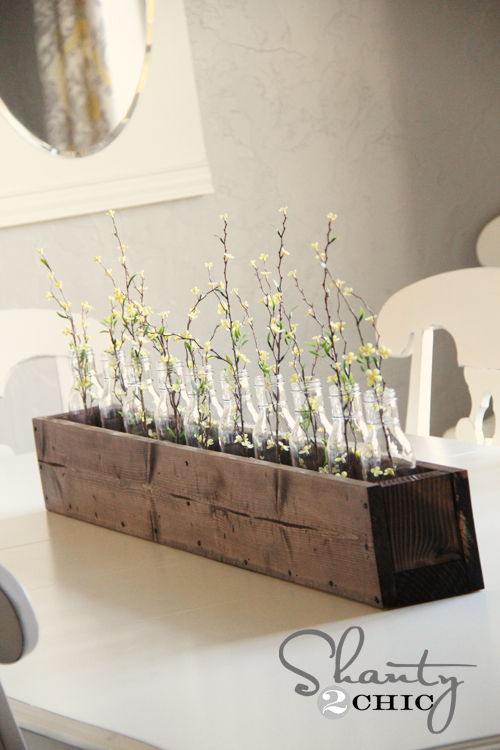
Hey there! I am so excited to share a fun, easy and cheap project with you all!

I love it so much that I want one for every room in my house;)
Here’s how I made it for $17!
 ~ I purchased 5 – 1×3 furring strips and 1 – 2×2 scrap from the scrap bin at Lowe’s (you only need about a 4″ piece)
~ I cut 8 pieces at 36″ and 8 pieces at 20″. I then cut 4 pieces of the 2×2 at 9.5″ (Lowe’s will cut your boards for you also).
~ I also bought one 1/4″ sheet of plywood at 36×20″.
 I finished my shopping trip with a package of 1/2″ wood screws and 8 metal angles. The angles are back with the roofing products. There is a huge shelf of metal pieces (fun:) and these are about $.60 each.
 I started by nailing the short furring strips to the 2×2’s (4 on each side). I used Gorilla Glue wood glue to secure.
 I then added the long furring strips to each end also using nails and Gorilla Glue wood glue and then finished the build by attaching the 1/4″ plywood to the bottom with wood glue and nails. (I just nailed it into the bottom of the furring strips).
 EASY! Before applying the finish, I beat the crate all over with a hammer, bolts, basically anything I could find to rough it up. I also used a flathead screwdriver and dragged it across the boards.
 I used my favorite Rust-Oleum Dark Walnut Stain to finish:)

To achieve the industrial look I was going for, I added 1 angle at the top and bottom of all four edges and secured them with the wood screws. Easy right:))


This was one of the quickest projects I have done and so cheap:)
If you love it, I would so appreciate pins:) Thanks so much for stopping by and have a great week!
~Ashley

I LOVE these & I LOVE your website! You guys are amazing and such an inspiration to me! I love all your DIY stuff! “Pinterest Rant”
I just made this storage crate this weekend – I LOVE it! I did find that the dimensions for the 1/4 plywood on the bottom are too small at 36X20 – mine was too narrow by about 1.5 inches – it needed to be more like 36X21.5. I added some scrap 1X2 along the inside bottom edge so I would have something for the plywood to nail into along the longer edges. Aside from that, it was super easy and SO cute! I also made your magazine tray and “FAMILY” wall sign. I am SO inspired to keep building!
Thanks so much, i’ve been looking EVERYWHERE for old crates, but never thought of just DIY… and these are SO PERFECT for what I want to use them for, thank you SO much for this and sharing….
~Carissa Danielle
Thank you! My husband built this as a toy box for my sons room. I had him build a lift off lid for it and added handles to the sides to make it look more like a wooden trunk. It’s perfect!
I found this post on pinterest. Absolutely love this piece and your blog! 🙂
I think this would be great in a nursery/playroom…but with some black wheels on the bottom and some sort of handle (like on a radio flyer wagon) to pull it from the playroom to the living room. Then maybe some big hobby lobby letters bolted to the side that says TOYS…..OR with rope handles on each side, then fill it with goodies for gifts…oh the fabulous & endless possibilities!! THANKS!!
~Heather
This crate is larger in reality than I expected! Also, our Lowe’s doesn’t have a scrap bin, so after buying all the wood and supplies, our total was more than $40. Still, I love it…but don’t know how many more I can make if I don’t find scrap wood somewhere! Thanks for the plans. Gonna do the sanding and staining today!
Love it! I might have to make one for blanket storage and one for dog toy storage in my living room!
Love this! And it was so simple to make, my husband and I made it this weekend and it looks great!!! Thank you for the inspiration!!
Love these! And love the ideas people are coming up with to add to it – under the bed storage, wheels, lids – fun! Quick question, do you use a nail gun or just a hammer and some muscles? 🙂
Thanks Danielle! I just used a battery powered nail gun. It could be done with finishing nails and a hammer pretty easily though:)
Whoa. Loving those crates!! I’ve been a follower for QUITE a while now and for some reason this is my first comment I believe. But, seriously I love ALL that you girls do! Incredible stuff.
Hey, I also tagged you in a fun little “get to know me” post on my blog. If you feel like participating, come visit my tiny corner of the blog world…and join the fun!
http://greg-shannon-mulder.blogspot.com/2012/03/ive-been-tagged-get-to-know-me.html
✨✨✨✨ Mine looks pretty amazing and I’m so excited! I used the plans at www. WoodworkPlans.info to build mine – I highly recommend you visit that website and check their plans out too. They are detailed and super easy to read and understand unlike several others I found online. The amount of plans there is mind-boggling… there’s like 16,000 plans or something like that for tons of different projects. Definitely enough to keep me busy with projects for many more years to come haha ???
Go to www. WoodworkPlans.info – click the pink link above for some more plans! Best of luck on your building adventures!
?????
Ohmygoodness! I was just telling my friend I want to find some wood crates! Now I know how to MAKE them! Thank you!!
I love it. I need to get me some wood and some tools. This would be nice in my home.
lexmallabooks.com
Thanks for the easy to follow instructions. I think I could actually make one of these! I will be subscribing to your blog . I am inspired every time I visit ! thanks
Love this! I have been looking for a second hand wood crate for a long time. I might just have to make my own!