Learn how to build this DIY Farmhouse Dining Table for only $65 and just a few hand tools and free plans by Shanty2Chic!
How to Build a DIY Farmhouse Dining Table
I am sooooo excited to share the newest Ana White plans with you guys today! This is my very favorite build yet!
I have been in serious need for a hardwood outdoor table to seat my family of 7. When we stumbled upon a beautiful, long farmhouse table from Anthropologie, I knew it was love at first sight.
Everything was perfect about this rustic dining table, except that $2,000 price tag. Ouch! That hurts to even write. But… I knew who to call to help me make my own at a very small fraction of that cost!
Here is our knock off version…

I will share a few pics from my dining room table build, and you can checkout the full set of plans for this table HERE on Ana’s site!
Let me start with price….
$65 and all built with pine framing lumber!
How great is that?? It was a super easy piece of furniture to build as well.


I used Gorilla Wood Glue and deck screws for most of the construction! 😉


I also used my Kreg Jig® on a few parts!
For those of you on the fence about finally purchasing one of these, go for it! This tool is AMAZING, and has been life changing for me! It has enabled me to furnish my entire home for very little cost. It’s a small investment with a HUGE return. You will thank us! I suggest getting them from Amazon! Ash and I are Amazon junkies… Best prices and free shipping… WIN WIN! Here is a link to the model Ash and I use below!
That kit is really everything you will ever need, other than screws as you run low!

I LOVE, LOVE the results and the price for this solid wood table!! This table can be modified to an outdoor table by just spacing your top boards a bit more apart.
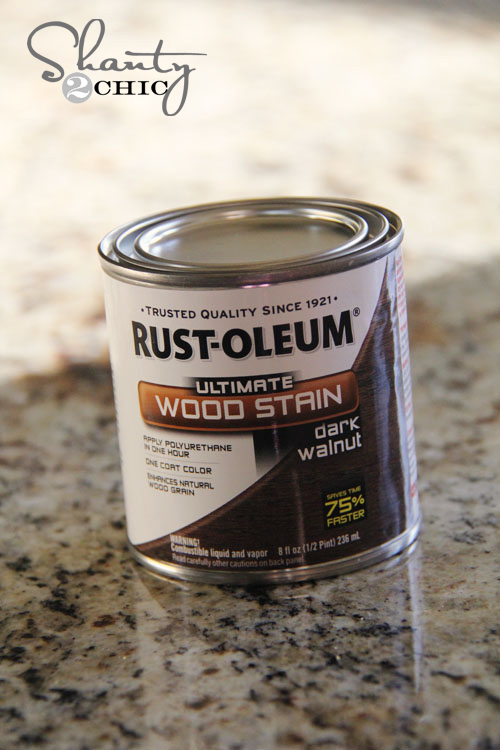
To finish it off, I stained the whole thing with Rust-Oleum Ultimate Wood Stain in Dark Walnut. This is definitely one of our top picks for stain! It adds a good warmth and rustic feel and compliments a wide variety of interior design style.
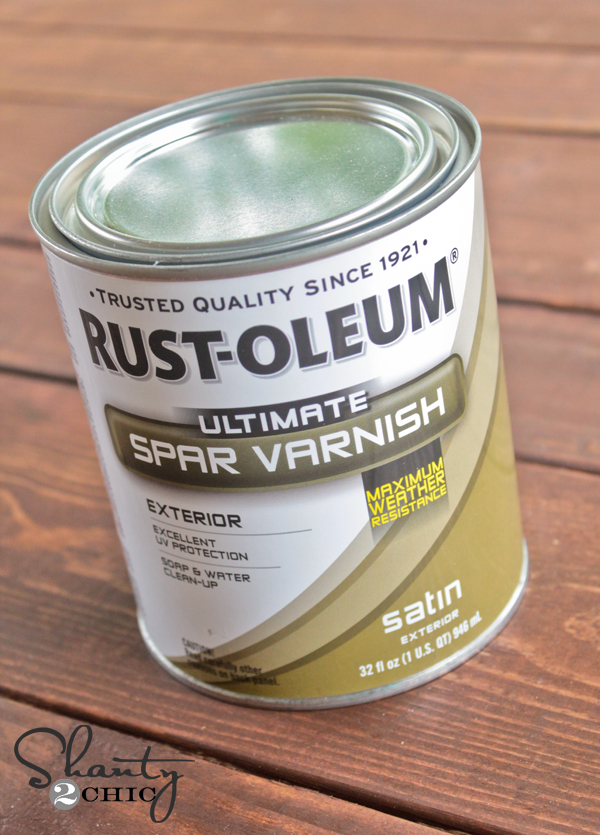
To protect that, I added two coats of Spar Varnish on the table top.
Want to see a few more pics?? Yah.. Me too! 😉


What do you think??
Did I mention $65???
Yah… I think the price makes me love it even more!
If you do love it, I would SO appreciate some PINS and shares below!
Make sure to check out the full plans for this $65 table on Ana’s site HERE! Thanks so much for stopping by!!!
~Whitney

What do you think? Did I mention it was $65? I think the price makes me love it even more!
Seating capacity will hold 6 dining chairs.
If you do love it, I would so appreciate some pins and shares below!
Make sure to check out the full plans for this $65 table on Ana’s site HERE!
Thanks so much for stopping by!!!
Free plans for the matching benches coming soon!

thank you for doing all the ‘dirty work’ in getting plans and such!! just made ours this weekend and i LOVE LOVE LOVE it. can’t wait to stain it today. thanks a bunch!
Looking for plans/ideas for an indoor dining table approx. 54 inches square.like the leg design on this table. Cannot justify paying $1,000 on a square table of these dimensions. These legs beat standard table legs. Anyone any ideas? Thank you
This is such a great project! So happy with the results so far, but I do have 1 question. How are the boards attached to form the table top? Just screw into from the top surface and putty over the screw heads? Or do you try to hide them dome how from underneath?
hi there, we built ours this weekend and chose to use huge nails through the top into the sides and leave them exposed to add character. i love how it turned out. hope this helps. good luck!
I would love to see pictures of your Johanna!! That sounds so cute! I did countersink mine through the top. Sorry for the late reply!!
I LOVE this table and the “easy” instructions. I plan to build a six foot table to use indoors (will have a piece of glass placed on top) and will send a photo when it is completed. Thanks!
How absolutely wonderful! I’ve been wanting to make a table, and was going to the construction myself, but you just saved me so much time! So in love with this table!! Thank you for sharing!!
What a great design!! I just might need to make a higher end version to live inside my cottage since I just bought new outdoor furniture. I need to price out some oak next time I am at the lumber yard. Thanks for the inspiration!
This is so very beautiful! Can you explain how you attached the big cross braces in the middle?
I absolutely LOVE LOVE LOVE!!! I am going to make this for sure this week! Thank you so much for sharing this with everyone. I can NOT wait to get started!
This is beautiful. I’ve been wanting to build a new kitchen table, and came across this on Pinterest, while looking or inspiration. So simple, yet looks so awesome.
It’s a totally GREAT table! However, I would’ve like to have seen you “bite the bullet”, so to speak, and use cedar or redwood for this specific project. The table would have cost more (still not anywhere near $2K) but those woods are much more appropriate for this table’s outdoor placement. It may not directly be exposed to driving rain, but it’s going to be subject to huge swings in temperature and humidity. I would be concerned that despite the waterproof finish, the pine will cup and twist.
I know what you mean Sue, but for $65 I can build a new one later 😉
Thanks!!
Great job! Thanks for sharing!
(ps ads are distracting)
you are so inspirational! I love your blog and everything you do! I have made several of your projects… the $20 wall shelves, the mason jar planter, and now I am going to tackle this table!!! I can’t wait. Thank you!
I am going to need to make my table shorter, either 6 or 7 feet long instead of the 8 feet. What kind of modifications will I need to make? Can I just do it shorter and everything at the base will be smooshed closer together?
Yes Danielle! Did you get it done? I would love to see pictures! I am so sorry for the late reply!
Hello, I have finished constructing the table. I am so thankful for the plans. Do I need to sand the pine wood before I stain it? It’s my first project. THANK YOU, Diana
Oh my….This is great it’s so awesome. I can’t get over the price. Thanks for sharing.
LOVVVVEEEEE!!!! I have wanted a farmhouse table forever and now I can have it! Just one quick clarification…Can you explain the “45 degree angle from square, NOT parallel”.
Thanks so much for building, sharing and motivating
I will try… You cut the boards at 45 degrees. And then make sure the two ends you cut aren’t parallel to each other, that way they sit the right way. Hope this helps!!
I am LOVING this table! Have you decided what you would use for seating? I’m curious to see what you feel would look fabulous and outdoorsy with this table. So beautiful. Amazing job. Love Shanty and Ana White! 🙂
I will be sharing that soon… Thanks Lisa!! 😉