Like Ashley, I too like to start decorating for Christmas in early November… we inherited this from our mother! I hope you all are not tired of seeing us create with candlesticks and finials because here we go again:)… This is what I did!!

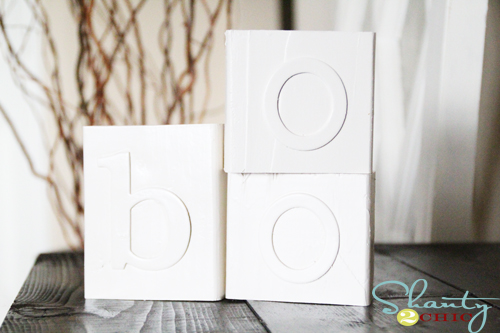
I decided to make wooden plaques that spelled JOY. My first step was to get my supplies…

Three unfinished candlesticks and 3 little wood circles ~ found the sticks at Michael’s and the circles at Hobby Lobby.

An 8ft 2 x 6 I purchased at Lowe’s. You can have Home Depot cut it down to buy less but at $3 I wanted all the extras!
I started by using my Gorilla Glue Epoxy to attach my candlesticks to the circles…

I want to again mention that the epoxy has the consistency of a hot glue, only it sets in about 5 minutes which gives you more play time and it is a very permanent hold… this has become a very favorite product of ours!

Just added a bit to the circle…

And added the candlestick.
While those were drying I went to cut my 2×6. I measured it off every 8 inches.

I then used my $12 Stanley hand saw I purchased at Lowe’s to cut the wood. This tool is a must for small jobs and if you do not own a power saw.

This is what my 3 pieces looked like…

Now it was time to attach my wood pieces to the sticks.
I used my Gorilla Glue Epoxy once again to attach them.

Just added some epoxy to the top of the stick and then placed the wood on top. I stole my next idea from the Gorilla Glue Girls who used Gorilla Tape to clamp things together until they dried.

So I did just that…


Not too shanty, right??!
After those dried I added my wood finials. I found these at Lowe’s.

Just added some GG Epoxy…

And put them on the top of my wood plaques.

Now it was time for paint… I used American Accents Canyon Black spray paint on these babies. Once it dried I used my 3M block sander with 80 grit paper to shanty my edges up a bit.


This is where I learned the importance of wearing safety gloves. This lovely ended up about an inch into my thumb while sanding…

So after getting a bandaid I started on my next step… I cut burlap into three 4×6 pieces…

I used my Elmer’s Spray Adhesive to attach them to the wood. I just sprayed some on one side of the burlap and placed it on the wood. I then used decorative furniture nails on each corner to give it an even cuter look…

They all looked like this at that point…

Stencil time… I used my Cricut Personal Cutter to cut out each letter. I used black acrylic paint and my stenciling brush to get the letter on the burlap.

Added a little twine and a few jingle bells because I could…

And now time for the reveal….


So… what do you think??! I love them!
I made all three for under $12. Now that is a thrifty gift!! These would make great teacher gifts and you can use any word which makes them decor you can use in any season… can’t beat that!
~Whitney

I am SOO making some of these! I love them! You guys are amazing and I love your blog!
You are too smart, shanty, & chic for your own good! Y'all should open up a shop & sell all your creations!
AWESOME job……and a fantastic idea!
Very cute idea. Looks great! 🙂
These are just adorable!!
I would love to know how you like the cricut. I saw the infomercial and would love to have one.
I enjoy keeping up with you two talented sisters!
Rhonda
This is such a cute idea! Thank you for showing it step by step! So cute!
They turned out great. What a cool idea. Do the fumes from Gorilla Glue make you more creative? LOL!
Sorry about the splinter. You won't believe it but early this year I helped Neil move a piece of treated plywood and got a splinter in my finger, two days later I was in the hospital for three days. I got cellulitus(however that's spelled). I nearly had blood poisoning. When I saw the red blood streak going all the way up my arm I knew something was wrong. I guess I'm lucky because we've been working on remodeling for years now.
I just love how detailed your tutorial is. Thanks for sharing.
Hugs…Tracy 🙂
too too cute!!
Nice job
blessings
barbara jean
I LOVE them! I'm all about homemade gifts, and this idea is way too perfect!
I know you get tired of my LOVE IT LOVE IT LOVE IT LOVE ITS, but I LOVE IT!
totally LOVE this project!!!! would never think of it myself and it looks so easy when you break down the steps!
You are very clever and I am getting me some Gorilla Glue! What easy to follow instructions – thank you!
sO FAR my fav. wood project you have done. I love the jingle bells hanging from twine too. SUPER CUTE! I need a HOBBY LOBBY HERE. Michaels doesn't carry the variety you all seem to get. ;(
ok girls! i love them! along with yesterdays post! you girls are just so crafty! i am so glad i am a follower so i can copy! thanks!
HOW do you come up with this stuff? I love it. Just for the record, you could have linked up every. single. post. from your blog! Thank you for joining!!