
Hey girls! So I have been “gettin’ her done” today! I spent most of yesterday playing musical chairs with my kids beds. The result… I was finally ready to tackle this project today. My kids rooms have been at the very, very back of my mind since we moved in a few months ago. I have learned that if I don’t wait until I WANT to do something that it usually ends up looking half done so I have been patiently waiting to get the itch to start theirs. I’m sure it was the blog and the endless amount of projects I could post that finally did it:)
I love these shanty shutters that Ashley found up for me about a month ago. I had 2 sets in the corner of my dining room on the floor and two sets that belonged to my mom out in the garage. I just left them laying around until I WANTED to do something with them… See how that works? When I moved the queen bed from my son’s room to my daughter’s room I was in need of a new headboard. As I was walking through the garage one day and staring at them I finally found their purpose… Here’s how I did it…
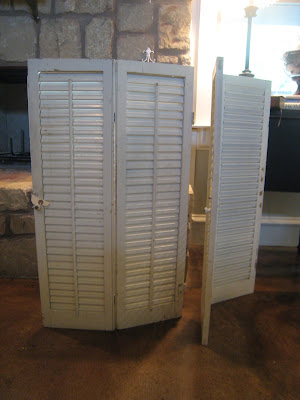 ~I removed all of the old hardware from the shutters and laid them face down on the ground, side-by-side
~I used a couple of 1×2’s and a 1×4 to brace all of the shutters together. I put a small line of gorilla glue under each piece and then used wood screws and my drill to secure them.

~I flipped the whole piece over and laid it face up. We had some spare crown in our garage so I cut a piece of that, angled at each end and attached it to the top of the shutters using gorilla glue, 2 wood screws and some finishing nails.
~I spray painted the cute scroll pink and let it dry while painting the headboard. I used Olympic Satin in Aloe Vera… love this color!
~After letting it dry I attached the scroll with gorilla glue and a few finishing nails. I then used my block sander on the entire thing. I scraped just about every edge.
~You can guess my next step… Ralph Lauren Smoke Glaze… Painted it on and wiped most of it off to give it a perfect aged look
~Final step… I used D-ring hangers on the back of the headboard and anchors and screws on the wall. I want to give props to Cobra Triple Grip anchors… I can’t tell you how many anchors I have used in the past that were cheap and flimsy and left a big mess on my wall… Not these! They are superb!
 So… You want to see it in her room??? Me too!! Here it is!! I will be posting this at Between Naps on the Porch for Metamorphosis Monday! Go check it out…great stuff there! http://betweennapsontheporch.blogspot.com/2009/09/welcome-to-34th-metamorphosis-monday.html I will also be posting this at Sanctuary Arts at Home “You Should Have Seen it Before” Party at http://sanctuaryart.blogspot.com/2009/09/you-should-have-seen-it-before.html Lot’s of great stuff…go check it out.



Could you please let me know what size your shutters were? Thanks
So cute! I knew I've been hanging onto those old shutters my grandmother gave me for a reason! Thanks for sharing your never ending good ideas with us.
So cute! I knew I've been hanging onto those old shutters my grandmother gave me for a reason! Thanks for sharing your never ending good ideas with us.
WOW, you just took shutter headboards to the next level! Congrats & God's blessings, Sarah 😀
LOVE it! I have thought of shutters for a headboard, but not with the molding on top. That really finishes it. Great job!
I love the shutters! I have been searching madly for shutters that I can use for some craft project- they have such an amazing charm to them! Beautiful work!
Love, love, love this! By the way, "Be Different, Act Normal" sent me here, she says hello!
Those are absolutely adorable! Great job.
This is INCREDIBLE!! I'll be featuring today.
OH, I love it!!!
I gasped out loud when I saw the finished headboard! Gorgeous! I am going to post a link to this on my blog!