Learn how to build this DIY Canned Food Storage with a free step-by-step tutorial by Shanty2Chic!
I hope you are all having a great week! Today I am here to share a storage space solution the 7-can stackable canned food organizers. I will also be sharing my tips and tricks in the pantry and letting you know where I found all of my storage goodies! For those of you that waited 6 months for this post… Bless you! As I mentioned in my DIY Spice Rack post, Ash and I are on a mission to use our love of wood and DIY projects to create solutions for our kitchens and our homes that help things run more smoothly and efficiently. For my pantry that means organizing my soups, spices and everything in between!
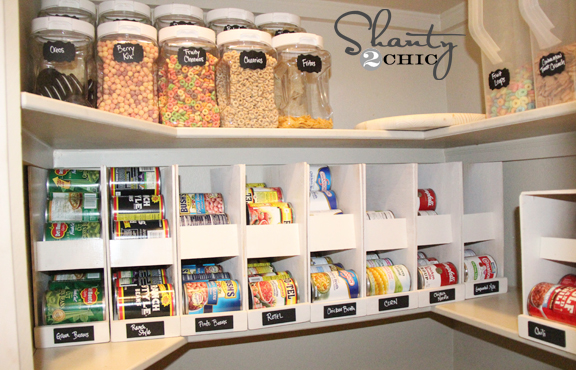
Several months ago I tackled my pantry storage. It is one of the best “kitchen” decisions I have ever made! With a family of 7, we always purchase a large variety of canned goods. What did I come up with?? These are individual canned food organizers thats store your cans, and rotate the cans to allow you to use the older dates first. Rather than making 1 single rack, I opted to make them individual so you can make as few or as many as you need for your canned food stash! Here is how my storage solution turned out.

Awwww… SO much better than how they used to be! The need for this system came along with the addition of my sweet baby. His very favorite thing to do is knock over my can stacks and roll them around the house…

I do think it’s cute, but I was going batty stacking my cans on an hourly basis! I won’t say these are ‘baby-proof’, but I will say they have helped!
I made these canned food organizers in 2 sizes. The larger size holds up to 12 cans, and I am sharing it today. You can stack them on top of each other, or use the top piece as a shelf like I did here! They are also designed to make the cans rotating so you can use the oldest cans first!
Here is a bigger shot of my canned food storage idea!
Now, let’s head out to my garage to build our can organizer! Check out my tutorial below!
Supplies to Build a Canned Food Storage Solution
For each organizer I used 1/4″ hardwood plywood. I bought mine in a 4’x8′ sheet and had the guys at Home Depot cut it down into 11.5″ strips. You can also buy smaller panels like a 2’x2′ or 2’x4′ if you don’t need as many!
I also used a 1×12 for my shelf pieces. These also come in different lengths. I bought and 8′ board because I was making several, but you can buy a smaller one if you are not making as many.
I also use a 1/2″x2″ pine board for my bottom shelf front piece. A 4′ piece will make 8 dividers.
When you break it down, these cost under $5 a piece to make.
Cuts!
For the sides you will need 2 pieces of 1/4″ plywood cut to this..

For the shelf piece I cut my 1×12 into 4.75″ pieces. Each divider will use 2 pieces like this…

There will be a small scrap from the middle shelf piece that I will use later on a different step.
Next, I marked both of my side pieces for my shelves! Marking them with a pencil makes lining your shelf pieces up really easy, and it keeps you from having to guess where to nail from the side.
Mark each side like this…

I found a really easy way to do this! I used some scrap pieces cut to the dimensions above to serve as a template for each piece. I would just lay them down, line up my middle shelf , and draw it out quick. No need to measure each time! This saves a ton of time!

Excuse my shanty handwriting on the blocks! 😉
Next I used Gorilla Wood Glue and finish nails to attach my shelves like this!


Easy! And because I drew my shelves on the other side, it makes this part simple! Just nail where the shelves are marked!
Next, I added some Gorilla Wood Glue to the shelf pieces, and attached my other side piece!


Now to finish off the front!
I used that scrap piece to cut my front piece.

This is for my middle shelf. I just added a little glue and nailed it in place!


I used a 1/2″ x 2″ pine board for my bottom shelf piece. Each one was 5.25″ long.


That’s it! How simple is that? No need to put a back on these… Once the canned food organizer is placed on the pantry shelves, the wall does the trick perfect! I painted mine with Rust-Oleum Painter’s Touch in Heirloom White. I also couldn’t resist the urge to add some labels. I will be sharing those soon!
My favorite part about each can dispenser is how they rotate my cans! You load the cans through the top, and it allows your older dates to rotate out from the bottom first! LOVE. I will also be sharing my 7-can dividers that are stackable soon!
For now, here are a few more shots!


Thanks so much for stopping by! I would love for you to share and pin my can storage project below! I will be sharing my entire pantry makeover over the next few weeks, so stay tuned! Also, be sure to check out my Pantry Door Spice Rack!
Thanks so much guys!!
You can stay up to date with the Shanty Sisters by joining our Facebook Community!

Great idea and so much much better than the plastic ones you see in the stores.
Thanks!! And I agree! 🙂
Brilliant DYI, thanks for posting – Tweeted and Pinned for our readers to enjoy!
Thanks so much!! I appreciate it!! 🙂
These are awesome! Pinning!
Thanks so much Mindi!!
I am so going to show this to my hubby! Thanks
Great!! Glad to help 😉
Fantastic idea!
Thanks so much Jan!!
Very cleaver! I am amazed that you have that many of ranch styled beans! Lol. Love how organized they all are and so much easier to store.
Thanks Dede! Haha… We are from Texas, and my hubby eats them on everything! ;-))
Wow. My hubby and I were just discussing how to store our food storage/cans and I couldn’t stomach the price to buy them. Maybe I could convince him to make some for me for Christmas??? They’ve GOT to be cheaper than buying. We need them in the basement too for bigger cans. If you have a stack-able version, please post a link or tutorial!
It’s coming Rachael! I haven’t quite finished up the plans for larger cans, but the stackable holders are coming! Thanks! 😉
Have you got the stackable holders yet?
I’m LOVIN this series!!!! Both are on my list already… & i can’t wait to see what else you have in store!
Thanks so much Juanita!! I am addicted… Want to organize everything now ;-))
I have the bug too… i just don’t know how you you find the time for everything … i only have 4 kids, i dont blog or constantly diy & yet i run out of time!!! Maybe that can be a future post… How you managed it ALL (or “How you too can be supermums like us!”;-) )
blows my mind. SO awesome!
Thank you Kristen!! 🙂
Love these. I guess I need to see if I could incorporate these into my space. Just pinned it.
Yes you do Angie! Thanks for the pin and sweet comment!
Thank you for this post! I saw it on Pinterest. I have always thought these could be made and not purchased. I am excited to get more organized and rotate my canned goods better. I love how much they hold, too!!!
Thank you Holly! Glad to help!! I love them and I am sure you will love yours too!
What a Super Smarty Pants Idea!!! Thanks for sharing….. I am Pinning NOW!!! Making Later! ;’D
Haha thank you Jill! I appreciate it so much!!
Love these ~ hope to convince DH to make some for me (I’m dangerous with a hammer). Thanks so much for the tutorial!!!
Yes you do! Just wink at him! Good luck and thanks!;-)
Wonderful idea! And adorable little guy you got there!
Aww thanks Hannah! I appreciate it!! 🙂
Looks Great! Thanks for the tutorial…now if only I had actual shelves in my pantry to put these on 😉
Oh bummer Kristi!! Maybe you could build both… 🙂