I got an itch to tackle some projects in my boys rooms last week and I am so excited about the way my 11-year-old’s room is shaping up!
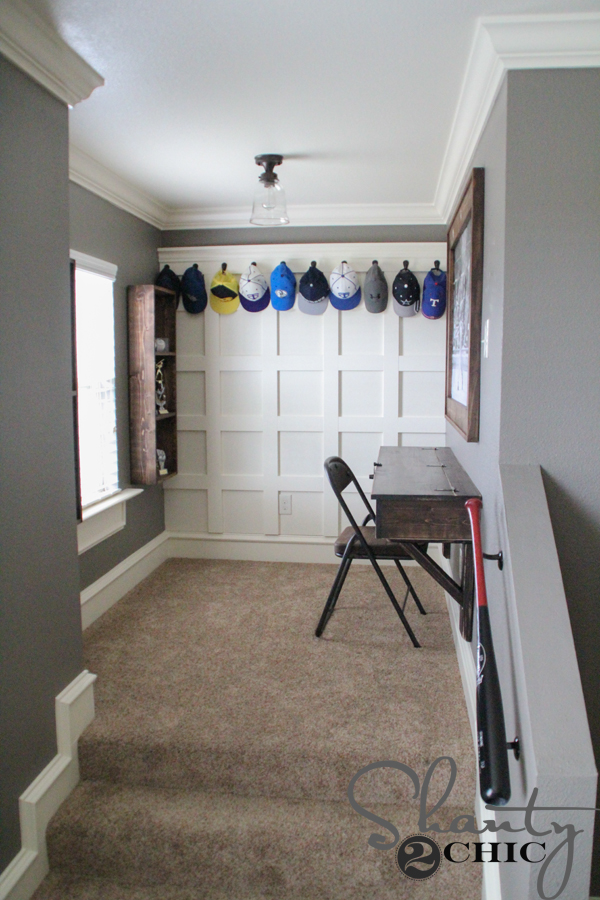
Our stepdad, Tim (a.k.a. Bapa), built my home a little over a year ago (you can check out the build process HERE). My 11-year-old was going to have a room that was not functional and a little on the small side. He discovered a way to add space in the plans and give him this really cool study. This is the space over our front porch and it was going to be wasted space. Unfortunately, due to the building codes, we had to have a few steps leading to the study but it is TOTALLY worth it.
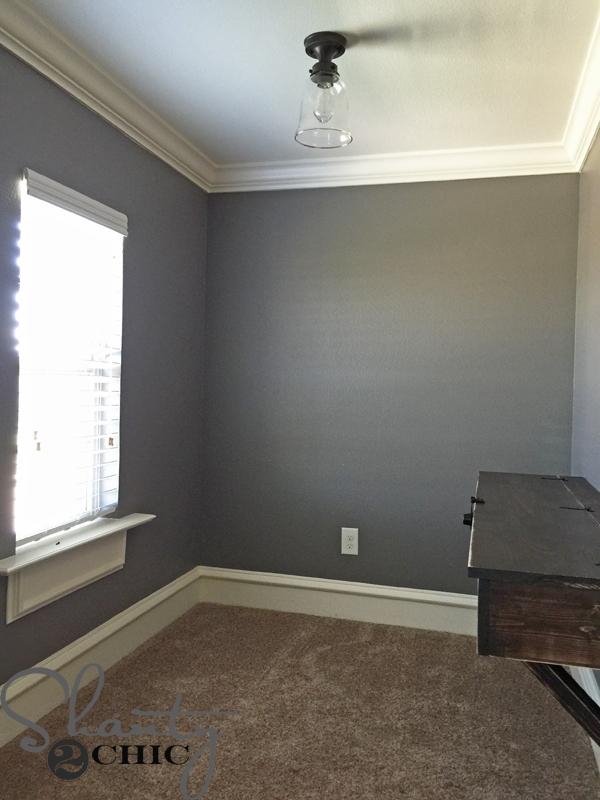
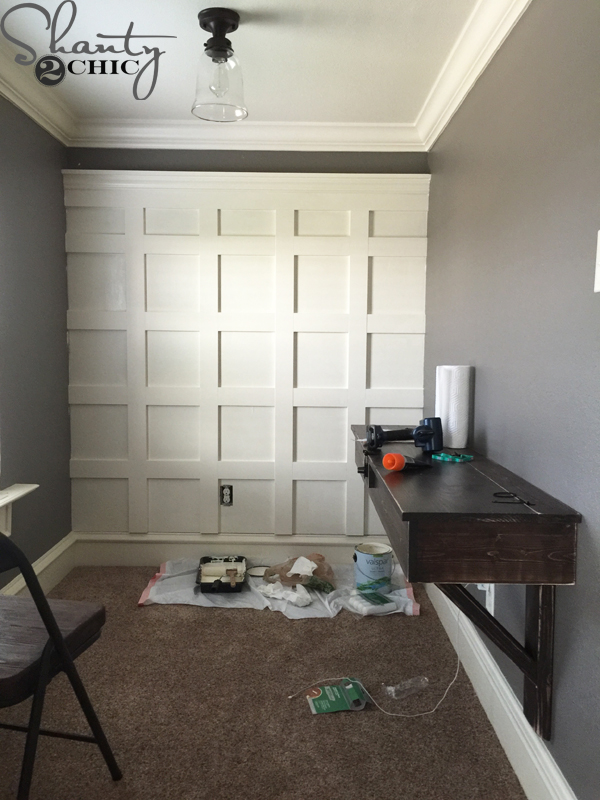
Here is a pic of the space before I finally decided to tackle it 🙂
I DIY’d the entire space and I’m going to share the plans for everything you see soon. Today, I’m sharing the wall treatment that I made for only $110! And, as you can see, it also doubles as a hat rack – which I have been trying to incorporate into my boys rooms for a LONG time!
Here’s how I did it. Keep in mind that the supplies and tutorial are based on my wall space. It is about 5′ wide.
Supplies:
One sheet of 4×8 1/4″ Purebond Plywood
5 – 1×4 primed MDF boards @8ft. (I had my first cut made at Home Depot and made the rest at home)
1 – 6′ piece of primed casing
1 – 1×6 primed MDF board @8ft.
1 – 1×3 primed MDF board @8ft.
2 1/2″ and 1 1/4″ wood screws (I like Spax with a T-star head)
finish nails or staples
Liquid Nails for panelling
Multi-purpose caulk
Wood filler
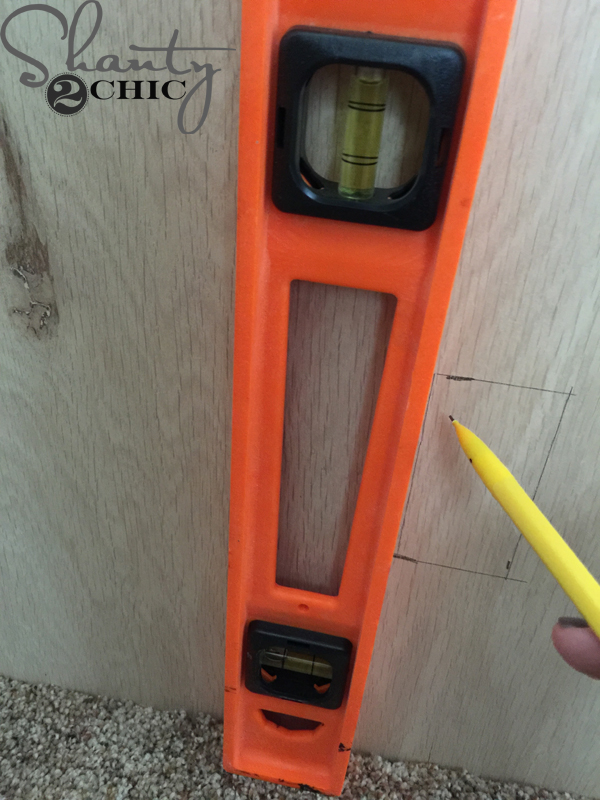
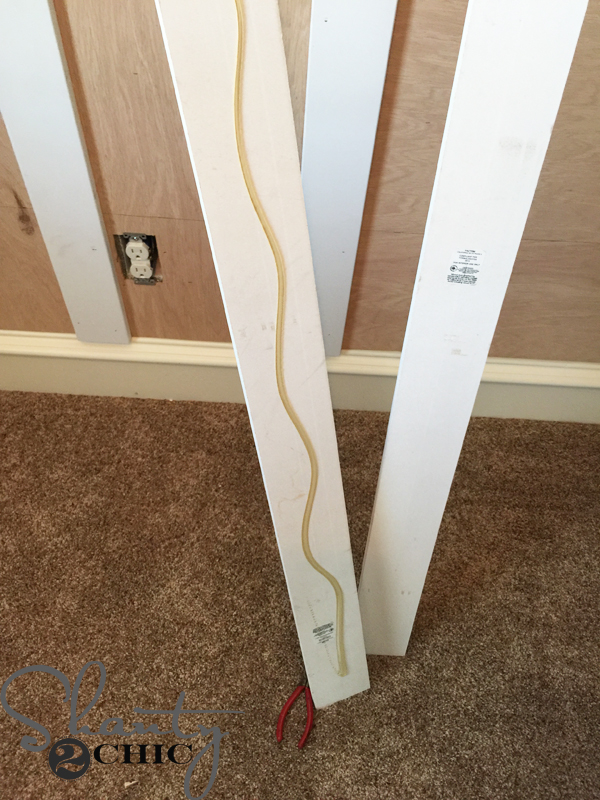
To start, you need to plan your wall out. I decided to go 5′ wide x 5′ tall. I wanted at least 5 squares across which would call for 4 vertical boards. My boards are 3.5″ wide so I subtracted the total width of all 4 boards from the width of the wall then divided that number by 5. Draw this out on your wall and make sure no boards land on an electric outlet because it’s a little more difficult. If they do, just adjust your space between the boards.
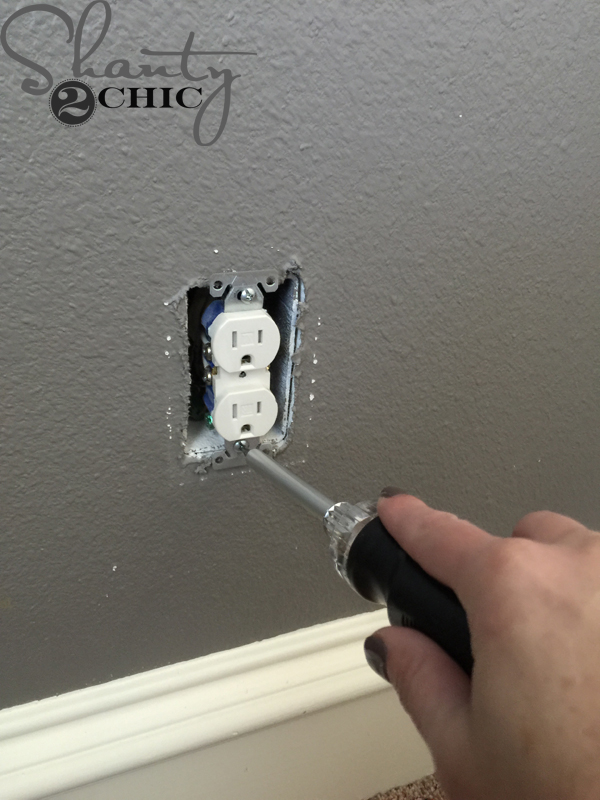
Before you remove the electrical cover and the socket, turn off all power to the room. You don’t need to take the socket out just loosen it enough to fit the plywood behind it.

Then measure the width of the box as well as where it is on the wall.
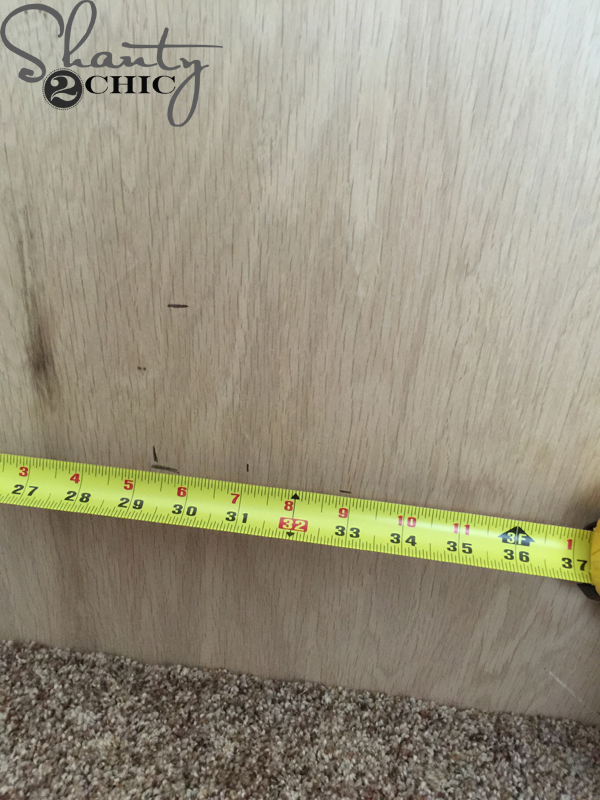
Mark where the box falls on your piece of plywood
Draw the box
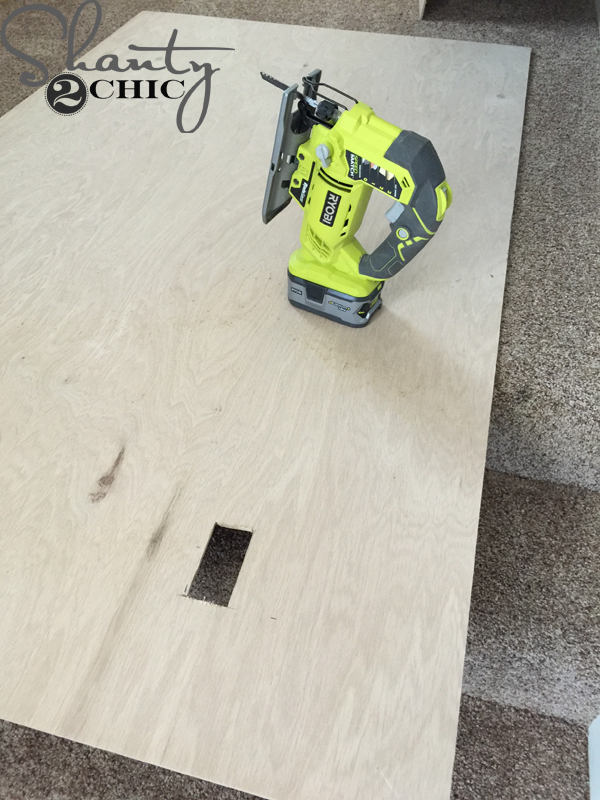
and cut out the box with a jig saw.
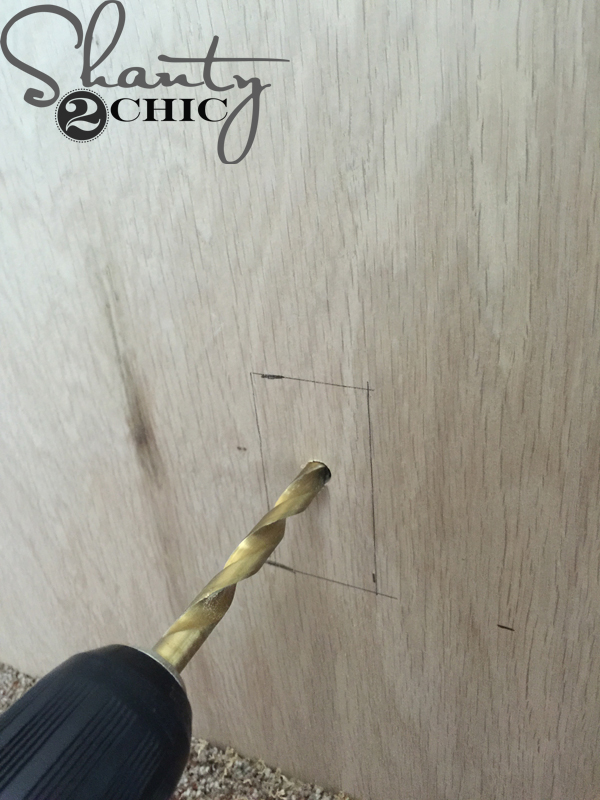
I like to drill a pilot hole in my wood before I cut with the jigsaw.
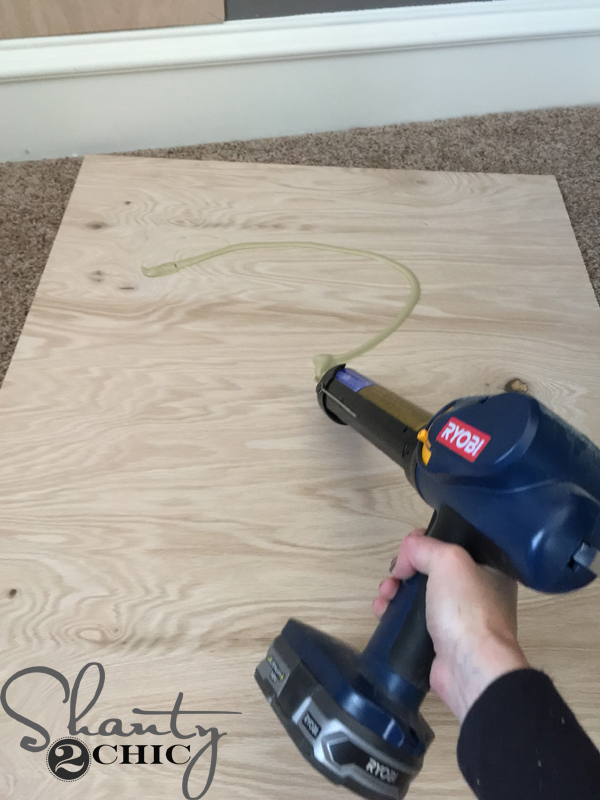
Next, I applied Liquid Nails all over the back of the plywood.

Then, I stuck it to the wall (make sure to mark your studs before this)
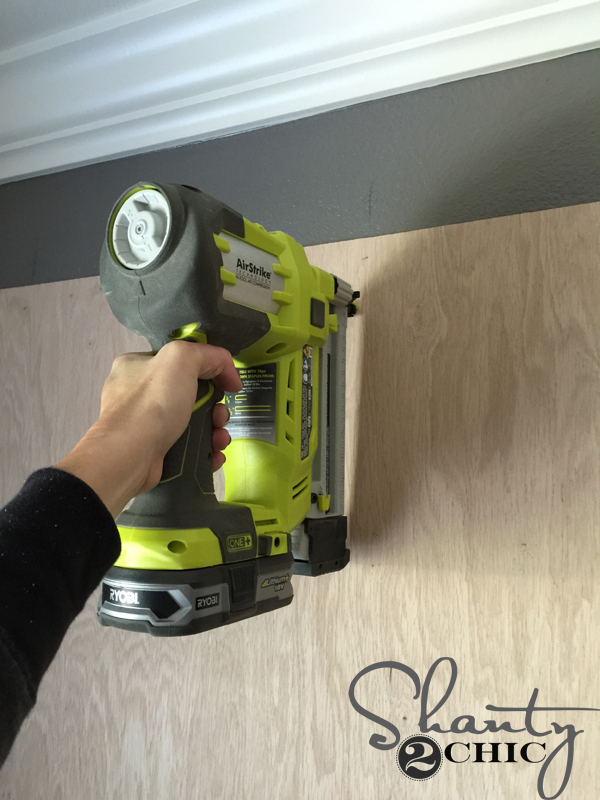
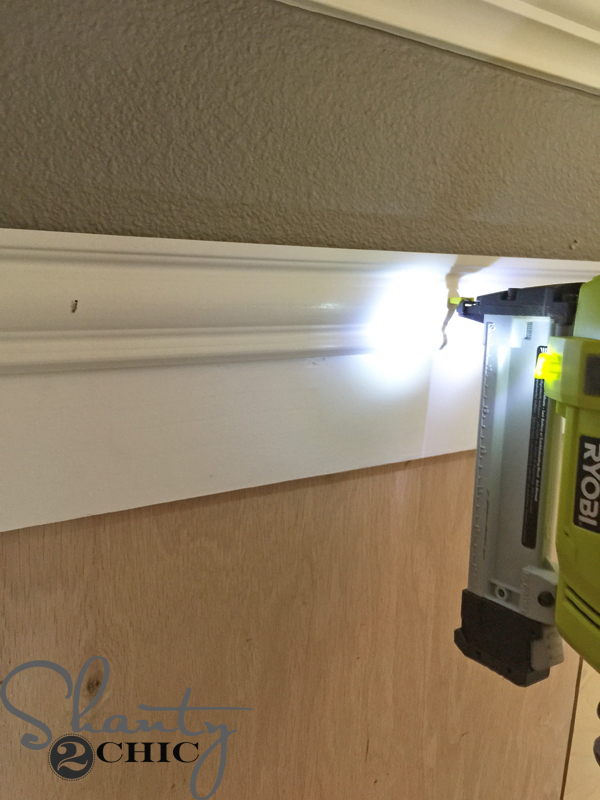
and secured it with my stapler (1 1/4″ staples) into the studs. If you don’t have a stapler, a finish nailer will work too, I just prefer the stapler for paneling.
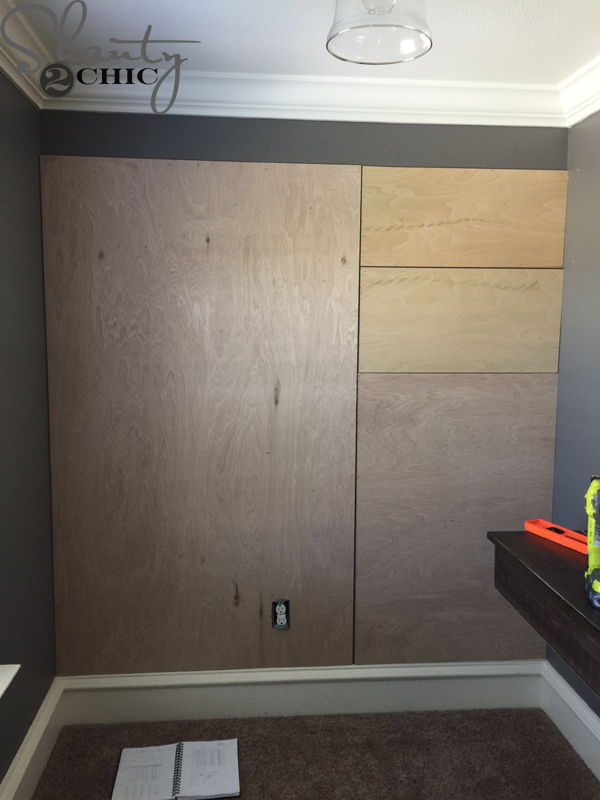
I did the same for the rest of the wall. The great thing about the square pattern is that you can get the most coverage with one sheet of plywood. Just make sure that you know where your 1×4’s will be so that they will cover up the seams. Now is a good time to mark where your 1×4 boards will go 😉
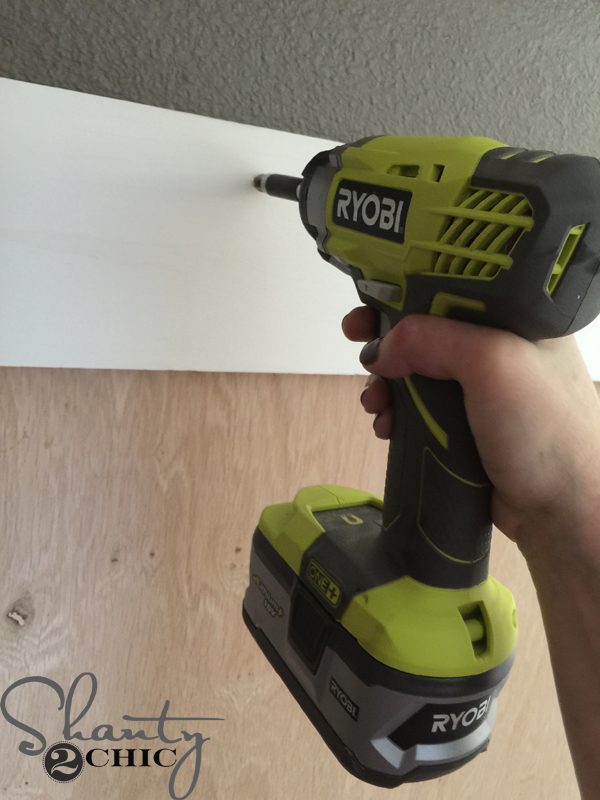
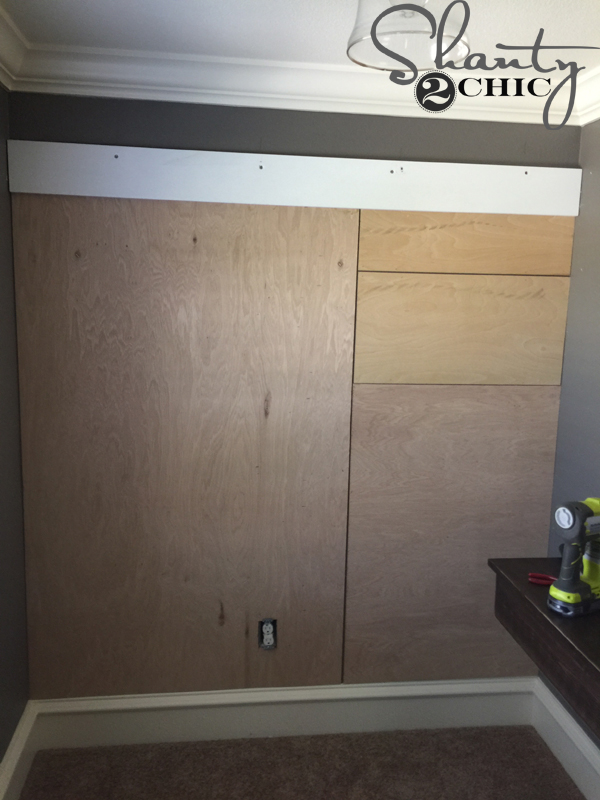
Once the panels were up, I attached a 1×6 primed MDF board at the very top of the paneling. Secure the board with 2 1/2″ wood screws into the studs. Keep the screws high enough that the casing will cover them so you don’t have to putty the holes. I used my impact driver for this part but a drill will work too. The impact driver just does the work for you 😉
Now for the casing.
I attached the casing on top of the 1×6 so that the top of the casing and the top of the 1×6 were flush. Use finish nails or staples to attach the casing.
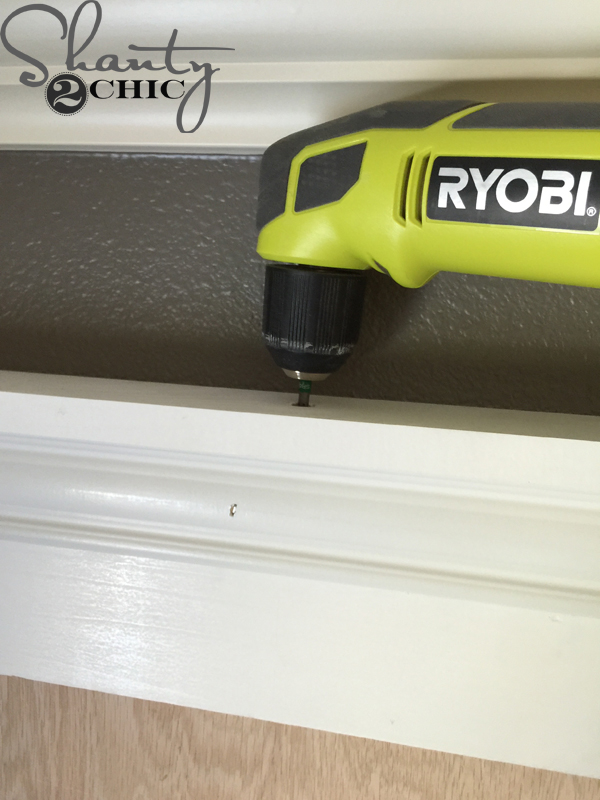
To give the treatment a ledge and make it look more finished, I added a 1×3 primed MDF to the top of the casing and 1×6. I had to use my right angle drill for this part because I forgot to anticipate the low ceilings in this area. Luckily it worked! I attached the 1×3 with 1 1/4″ wood screws and Liquid Nails. (If I had thought about the low ceilings, I would have attached the 1×3 to the 1×6 with pocket hole screws, before attaching to the wall, then added the casing).
To attach the 1×4 boards, I ran a line of Liquid Nails on the back and stuck them in their spots.
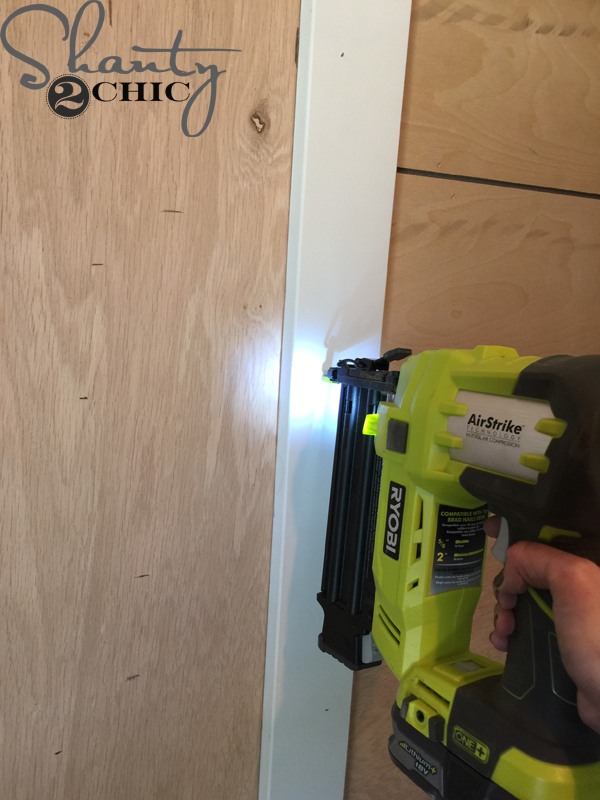
Then I secured them with 1 1/4″ brad nails. I switched from the stapler because I wanted smaller holes to fill.
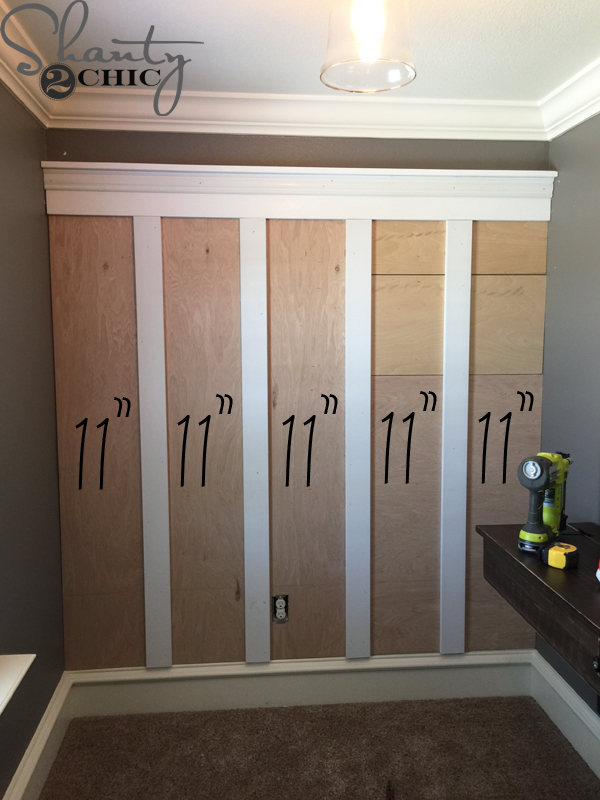
I spaced my boards 11″ apart. (this worked best for my wall). Now for the short horizontal pieces.
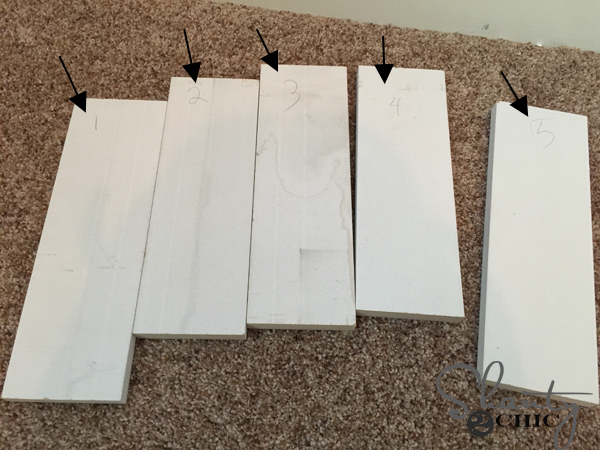
Because there are so many short pieces, I measured all of the pieces and wrote them down on a sheet of paper. Then I took them to my shop to cut all at once. If you do this, make sure to label each piece so you know where they go on the wall. Most of mine were a good fit but I did have to run back out to my shop to sure a couple up – it’s exercise right 😉 Attach the little boards with Liquid Nails and brad nails too.
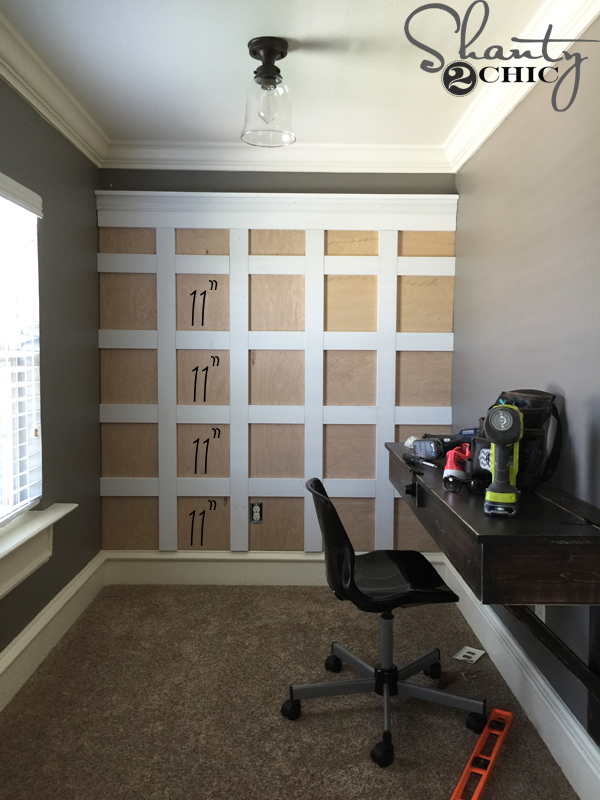
I spaced the horizontal boards 11″ apart too, to make the square pattern. I started at the bottom – you can see that the top squares are shorter but the trim at the top makes it balance out.

Fun’s over – time to fill the nail holes and caulk 🙁 I used paintable wood filler to fill all of the 1×4 joints and nail holes. Make sure to look on the plywood for any holes from the stapler too! I just use a little on each hole and smooth it out with my finger.
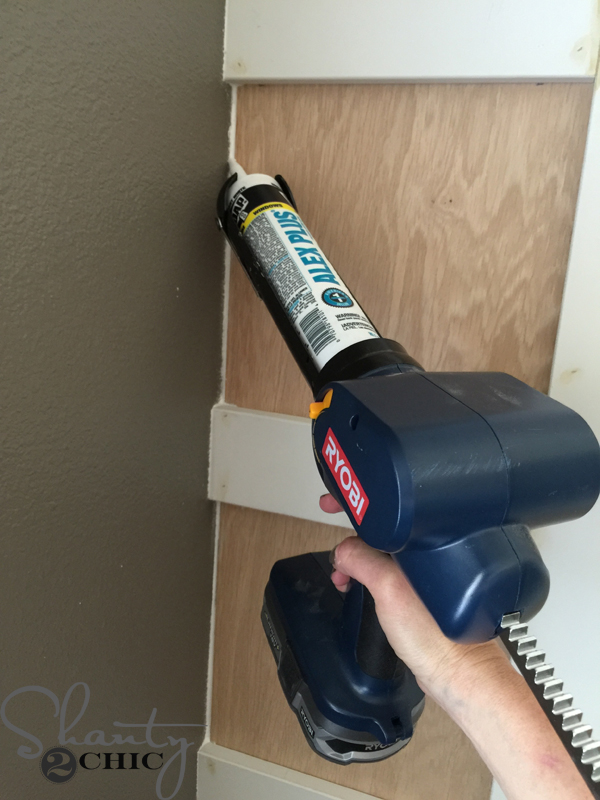
Then, I used all purpose caulk in my 18-volt Ryobi Caulk Gun. I don’t use this tool very often but it really comes in handy for projects like this!
Once the caulk and wood filler dried, I applied two coats of paint. I used Ivory Lace by Valspar (matches my trim).
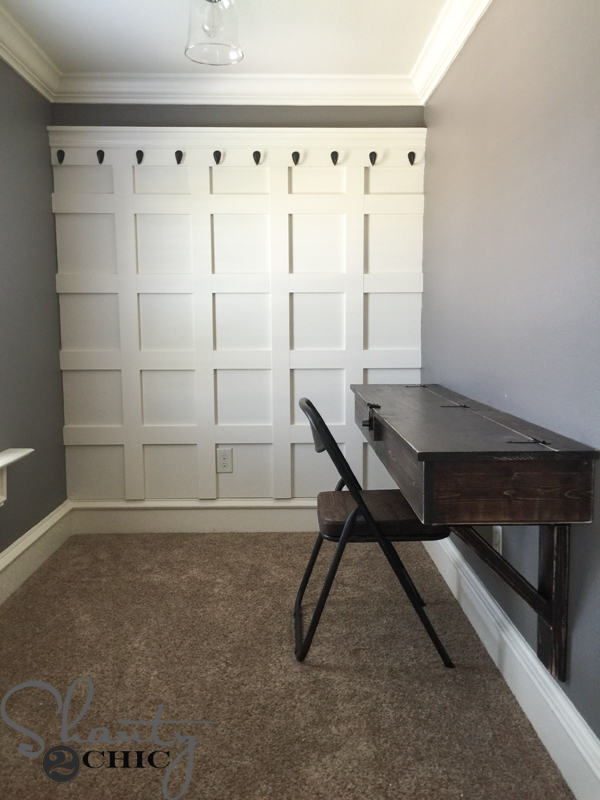
Here is the part I’m MOST excited about! I added 10 hooks for his hats!
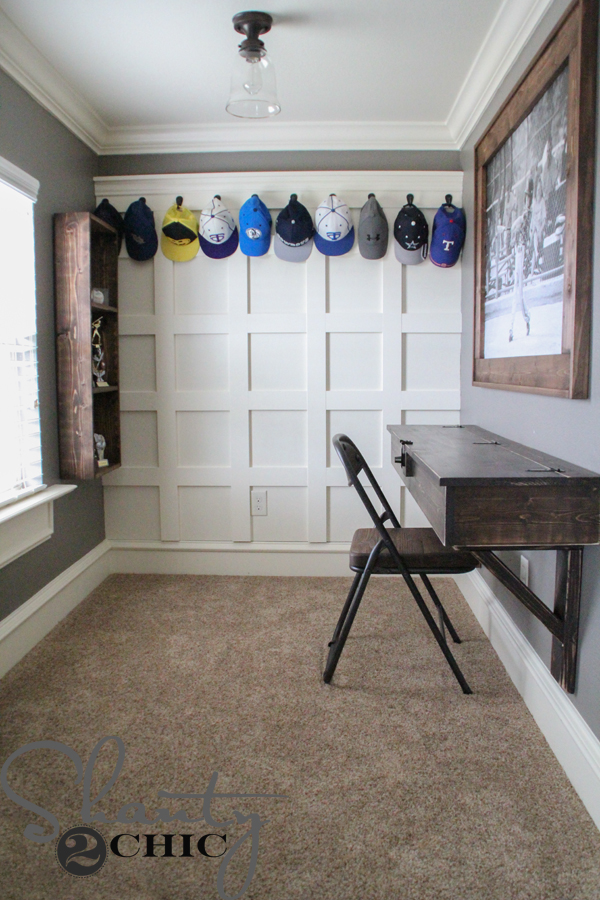
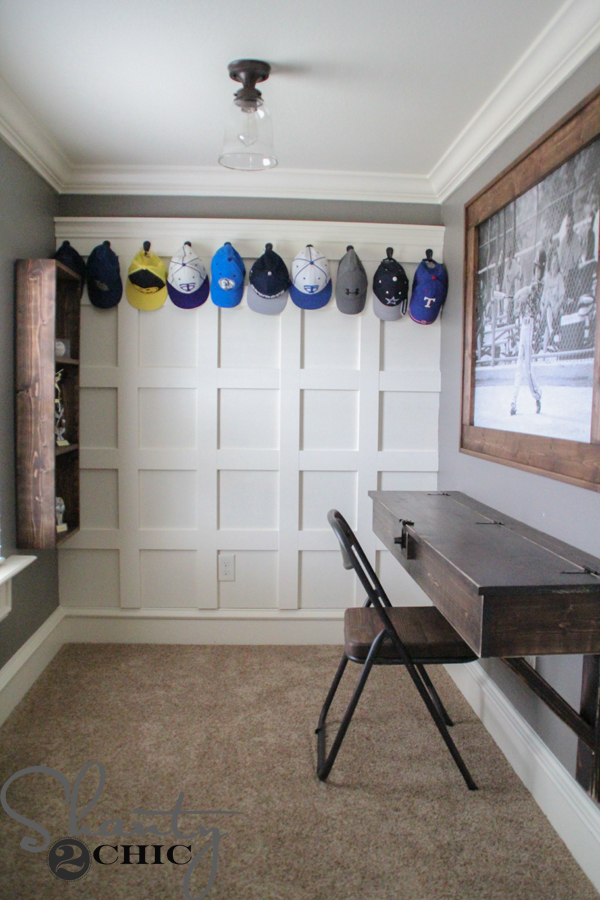
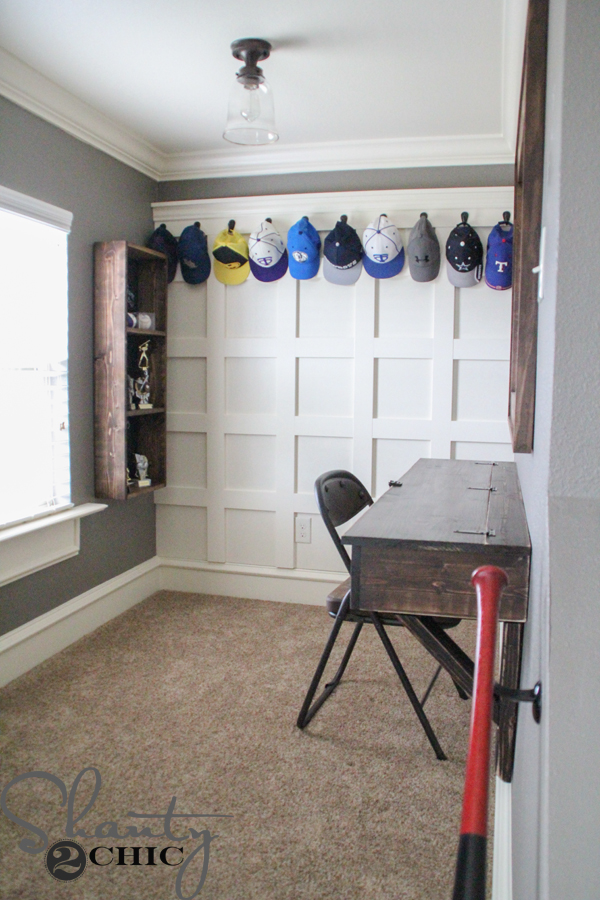
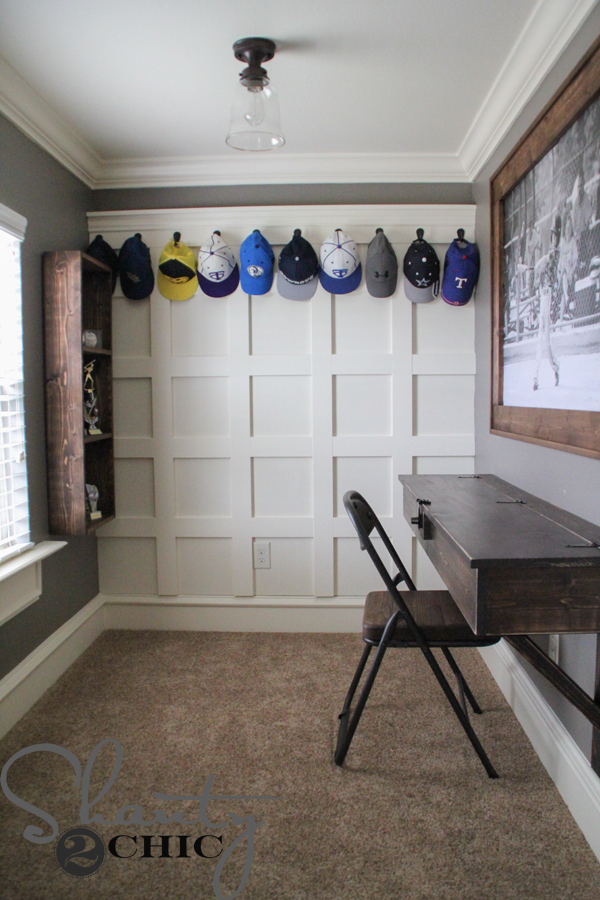
I am thrilled to finally have a cute a functional hat rack for him – not to mention a really cool study 🙂 He loves it! I’ll be back soon to share the rest of the projects in this space!
Here is the bed that I built for his room too! You can get the plans for the platform bed and the headboard HERE 🙂

Thanks so much for stopping by!
~Ashley
Paint color on the walls: Seine by Valspar
Paint color on trim: Matched Ivory Lace by Valspar for an oil-based paint
Folding chair: World Market (got on sale for $44)

Love This! This can also be used to hang your jackets and coats below the hats.
Wow, what a lucky young man to have a parent like you. So talented and I also love the bed but most of all, i really love the baseball picture above his desk. I’m assuming that picture is of him ? It’s adorable. Would love to see the tutorial on that too <3
I love what you did, however it saddens me to see you pick and chose what questions you answer, I really do believe that everyone is equal and that includes having there questions answered. GOD bless you and your family
Thanks Penny,
Not sure what you are referring to. We try to answer all questions that are not answered in the post. However we are human and do miss them. What question do you have! I posted this 24 hours ago and am in the process of answering the questions as quickly as possible. We do answer questions via social media as well. Thanks so much.
It might be my mistake, I see all the?? asked and only one answered so I most likely jumped the gun, I am real sensitive in the area of things like this do to a mother that never loved me and now I am dying and she lives the next town over and goes to the same church and wont say a word, just ignore me, GOD bless you, your son will remember forever the things you do for him now.
Three questions were asked. One yesterday which I answered, another about paint color which is referenced in the post and one this morning that I have not gotten to yet. I don’t appreciate the manner in which you addresses your concern. We treat everyone equal and accusing us like that is a personal attack on our character. We like to give people the benefit of the doubt and appreciate that in return.
Penny you may want to seek some mental help to grasp your feelings opposed to learning new DIY skills!!
These girls go above and beyond on a daily basis to assist each and everyone of us!!! Also please keep in mind this is their skillful gift they share with us!!! Volunteer…..
Penny, you are hurting. That is evident. I’m praying for you today. I’m sure these two sweet girls will understand that you spoke too quickly. May God bring healing and forgiveness between you and your mother in the coming days.
Love it! I also love the desk. My grand daughter has a perfect spot for a desk like that. Do you have the plans on your site for that desk? I looked but have not seen it?
Hi Laura,
Thanks so much! The plans for the desk are coming soon 😉
Yayyyyy. I am super excited ?
This added so much character to the space! I love how it turned out!
I LOVE that gray! Do you know what color it is, and where you got it?
Out of curiosity, why did you put the down plywood first?
So that I could cover the texture on the wall. We have done faux board and batten treatments without the plywood but I wanted a true board and batten.
Makes total sense! Thanks!
What an awesome space! Love the new wall and the desk is amazing!
Very cool! I also LOVE the huge framed pic of (whom I assume is) your son playing baseball! THAT is awesome!