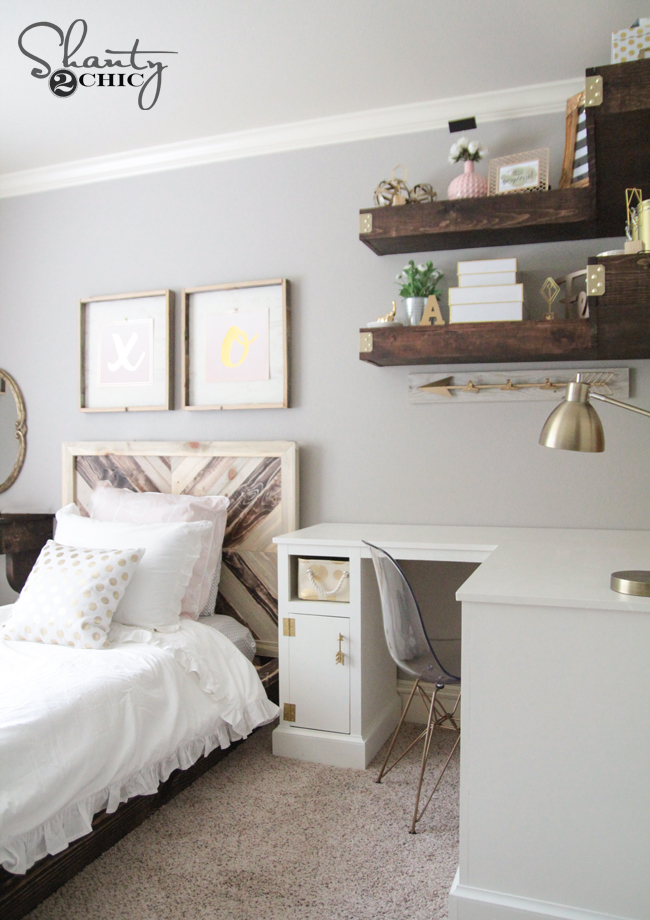
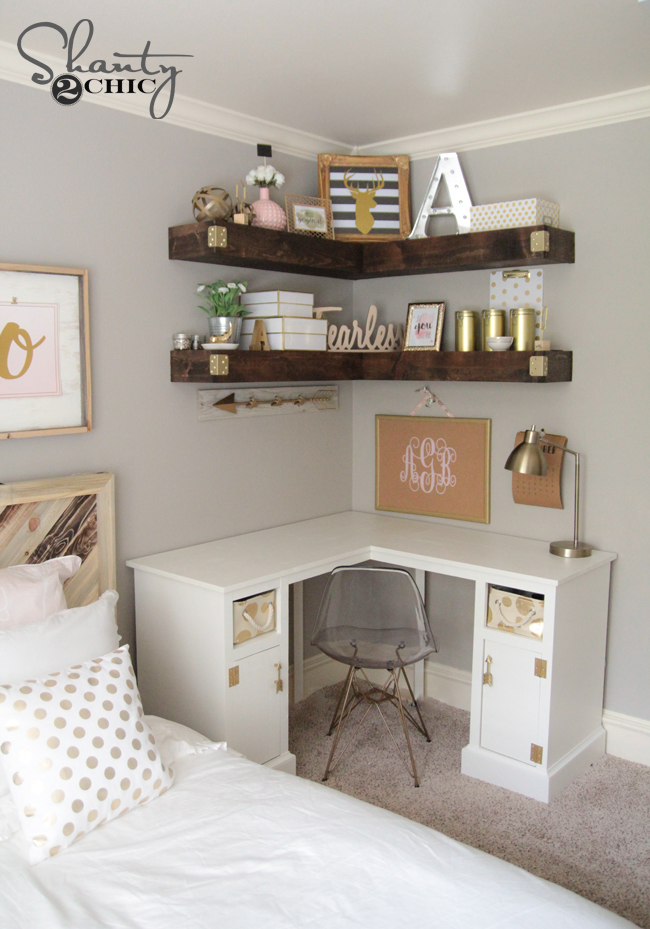
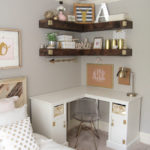
Come build these simple and inexpensive DIY Floating Corner shelves with easy to follow instructions by Shanty2Chic! Floating shelves are a perfect storage space solution. I have built them before for the bathroom and living room. When my daughter wanted open shelving in her room, I knew these would be a perfect solution. Floating shelves are one of my favorite woodworking projects!
So excited about how these DIY Floating Corner Shelves turned out! I seriously now want a set of corner shelves in every room. I am in the middle of revamping my daughter’s room, and just finished up one big corner. Let’s build these!
This is a variation of our original DIY floating shelves, and so simple to build! The best part? Each shelf cost under $40 in lumber. I will share the full tutorial with step by step instructions below!
I used my miter saw to cut the frames for my shelves first. This part uses 2×4 lumber.
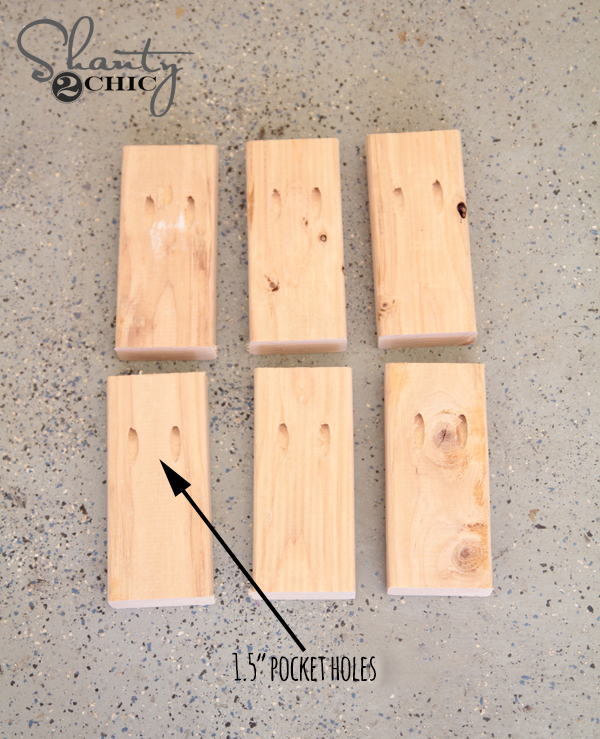
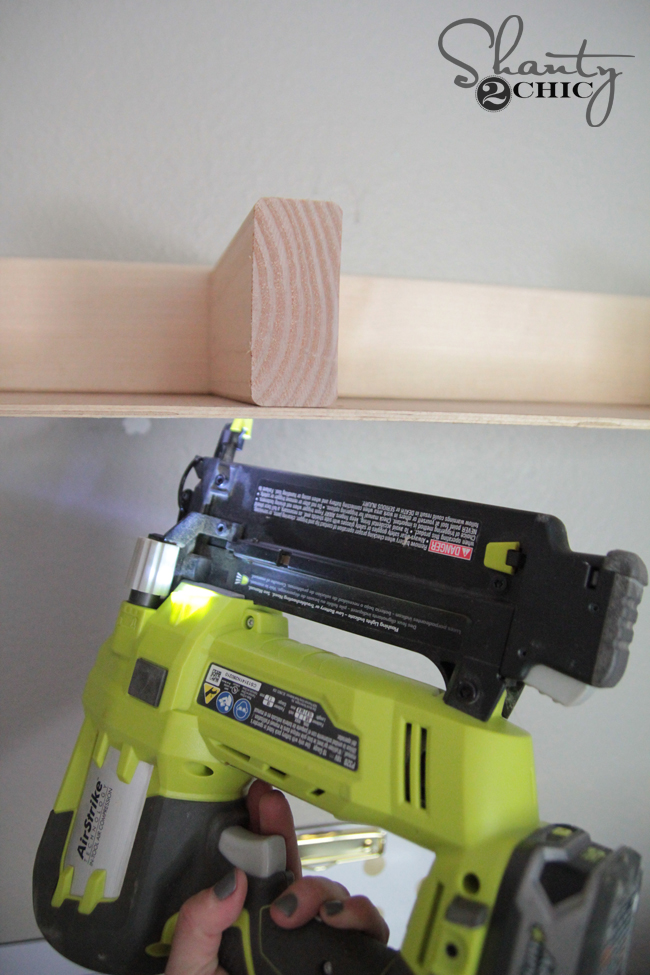
Once those were cut, I used my K5 Kreg Jig pocket hole jig
to create 1.5″ pocket holes into each of my small pieces.
Table of Contents
Building the Corner Shelves

Cut wood for cleats and add pocket holes
Each short piece will have two pocket holes like below…
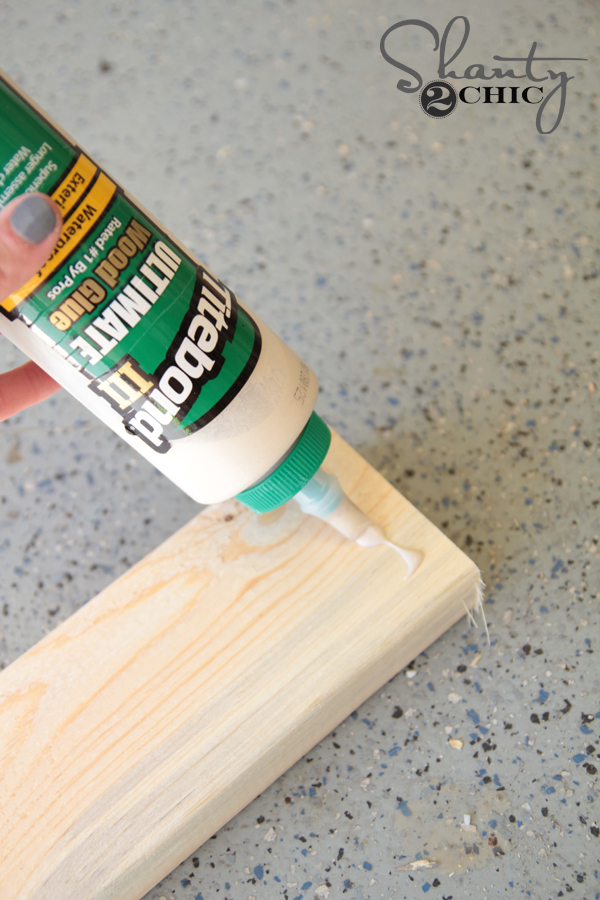
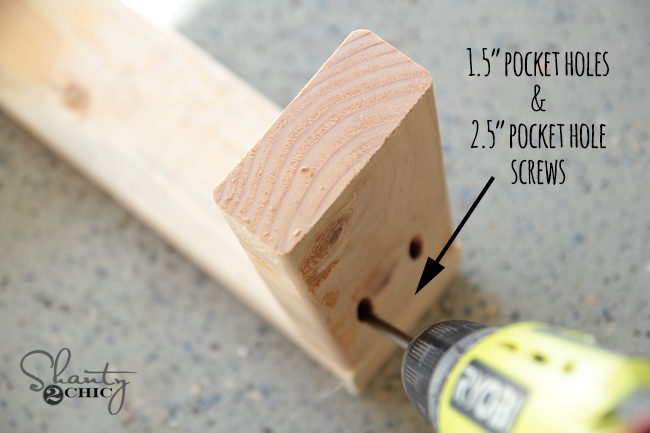
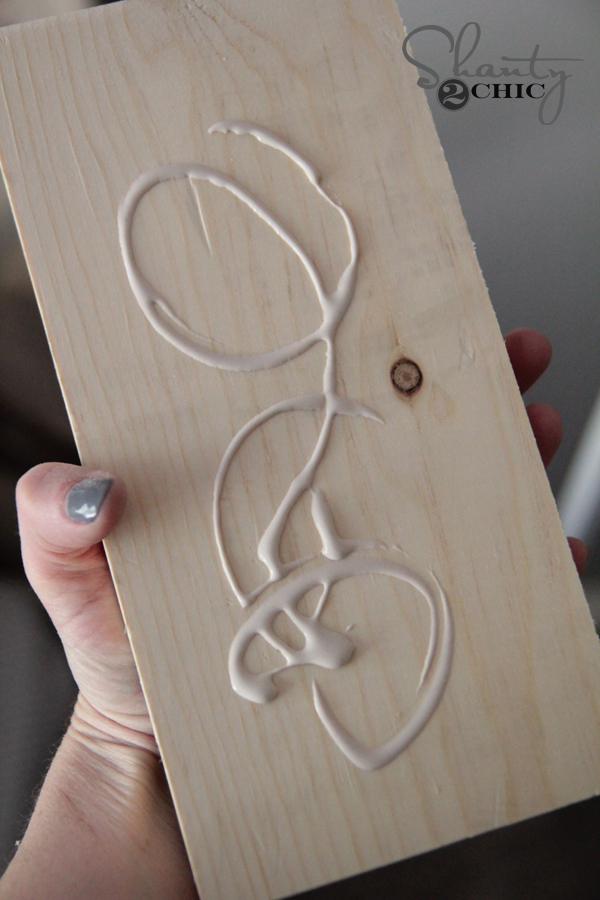
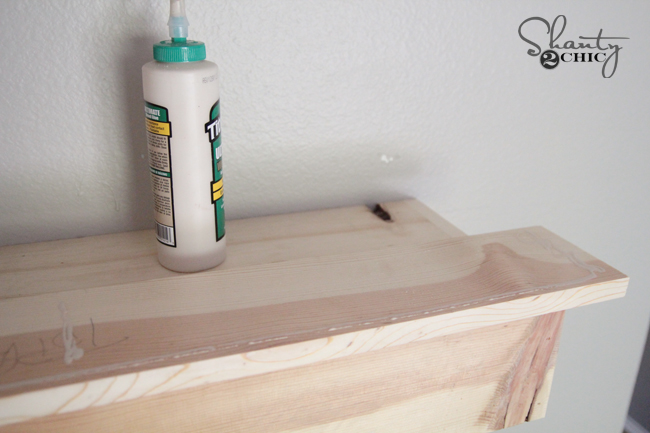
Next, I used my Ryobi 18V drill to connect the small pieces to the longer wall cleats with 2.5″ pocket hole screws. I added a line of Titebond wood glue under each small piece before connecting…
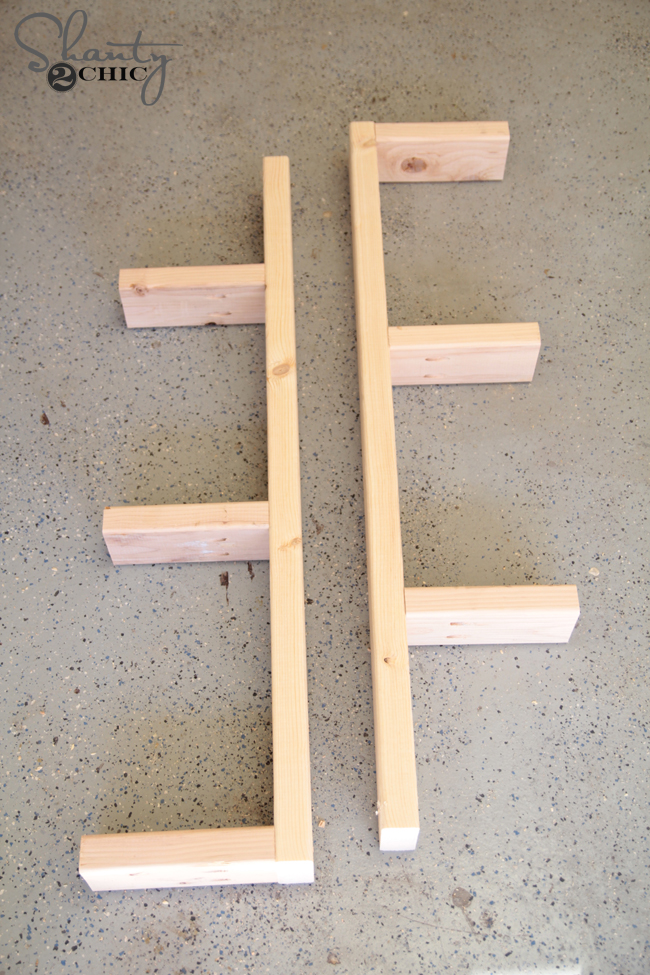
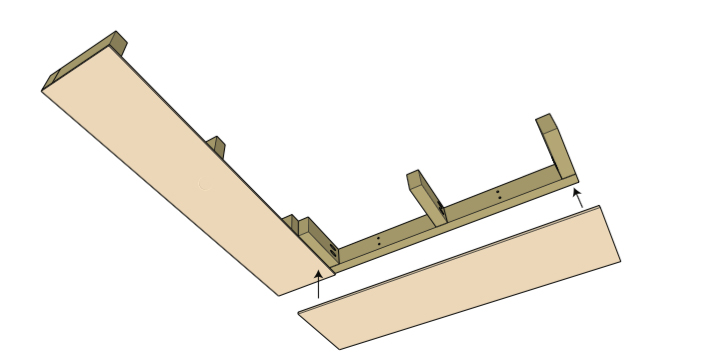
Build Cleats for Floating Shelves
Each cleat will have 3 small boards connected like this.
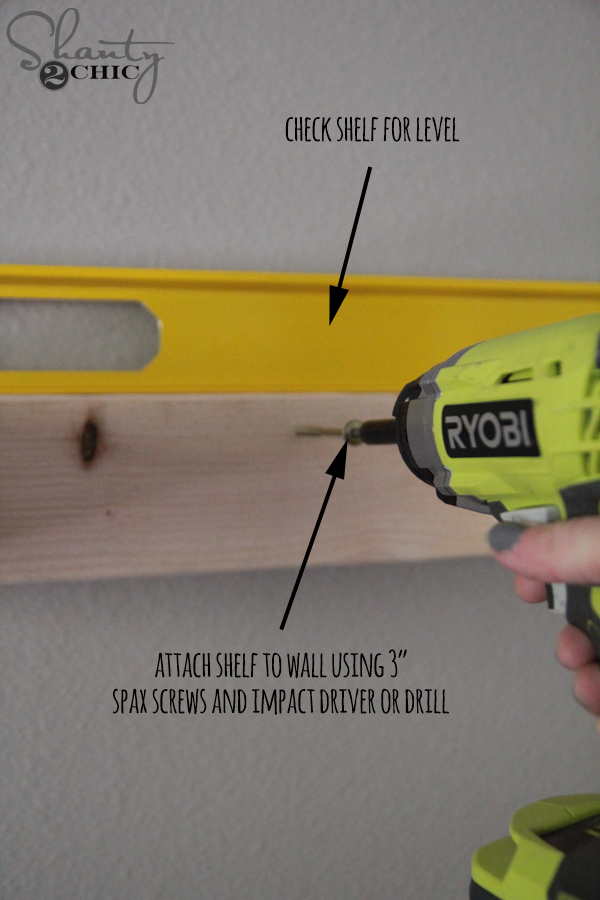
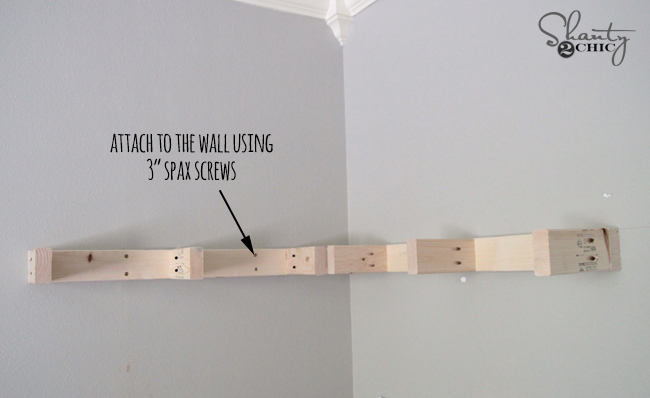
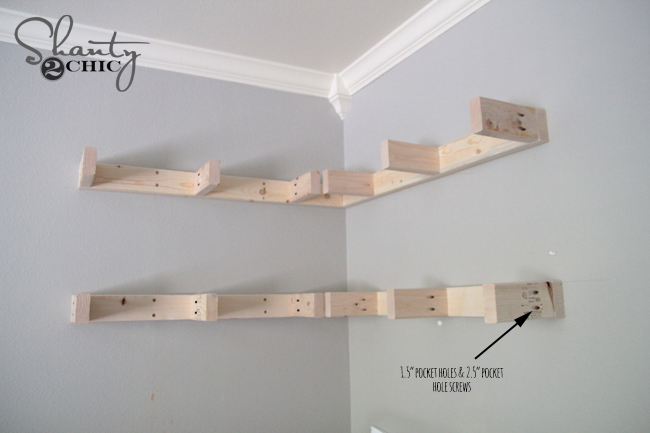
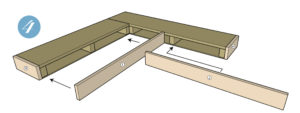
Once I had all my braces built, I attached them to the wall. Every wall is different, but this is the method I have used on every floating shelf in my house.
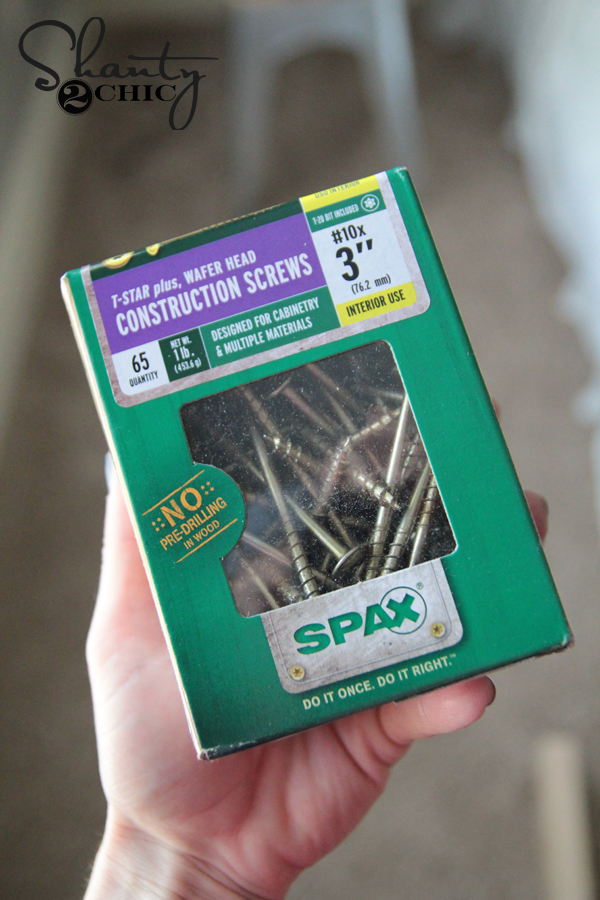
These are the Spax screws I used to attach the braces to the wall. These are self-tapping and 3″ long. 3.5″ is a great length too.
Wood screws to attach to wall
I marked lines on the wall where I wanted my shelves to sit. I used a stud finder to mark my studs on the wall. These are the 2×4 that are under the sheetrock. Anytime you are mounting to the wall, it is best to try to screw into these studs for support. I used my Ryobi Impact driver to go through the braces and into the studs in the wall. Make sure to check for level so your shelf doesn’t sit wonky. This is the level I use… Cheap and works like a charm!
I attached the first two braces and it looked a bit like this… I attached the top shelf first, and then attached the bottom shelves.
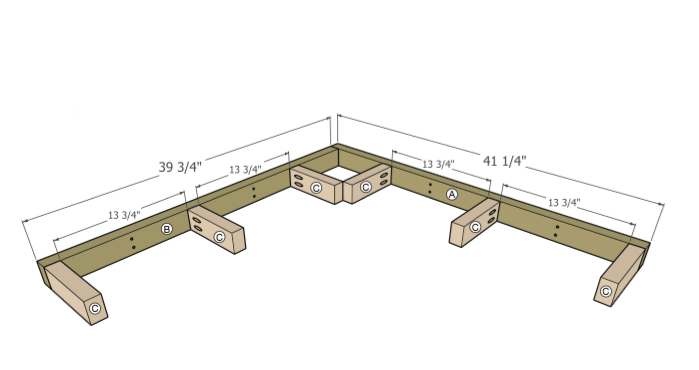
I measured 13″ up from this brace to attach my next brace pieces using the same method.
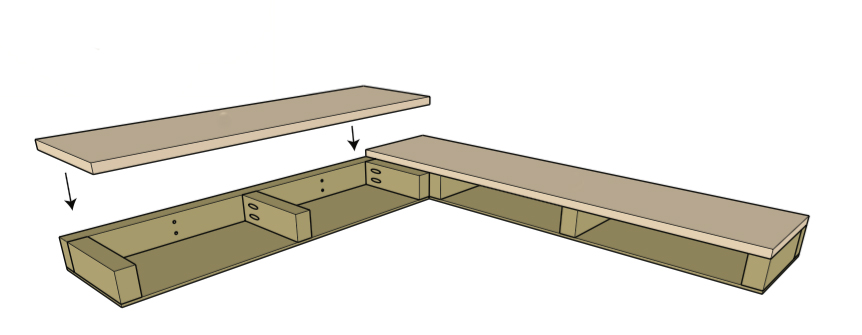
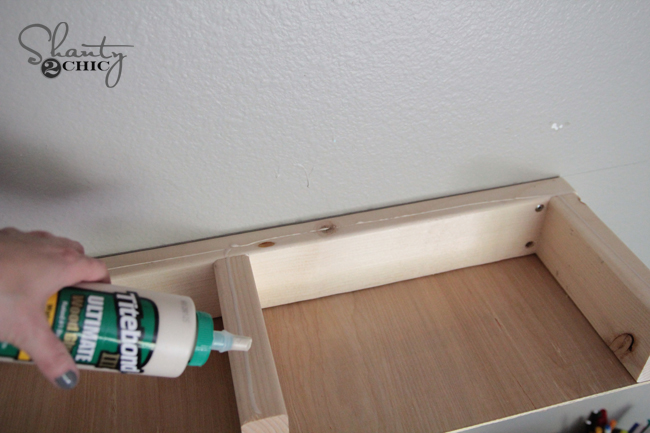
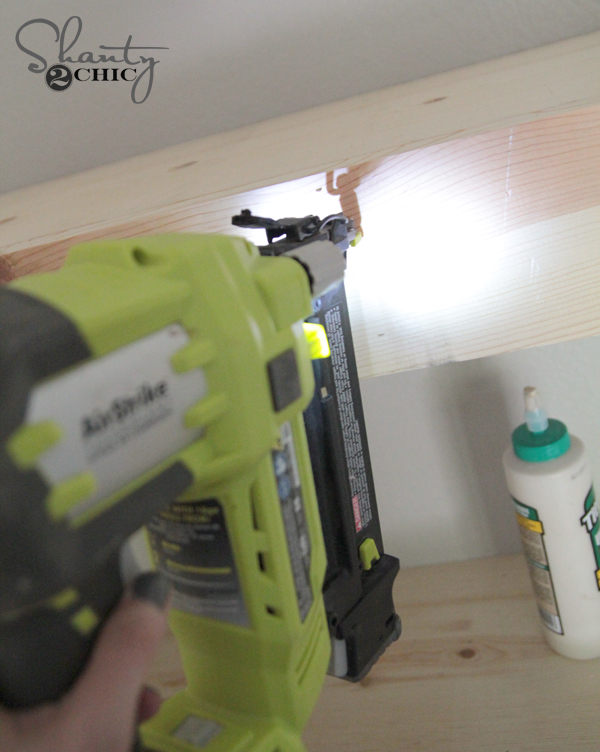
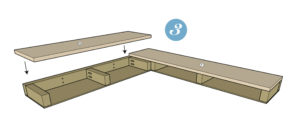
Next, I basically wrapped the brace pieces. I started with the 1/4″ plywood for the bottoms of each shelf. I used my Ryobi AirStrike nailer to attach these bottom pieces into the braces using wood glue and 1.25″ finish nails. A stapler will also work on this part. I used my table saw to rip down the 1/4″ wood for this part, but you can also have Home Depot rip it down for you.
Cover cleats with plywood
Now I attached my top 3/4″ boards. These are 1×10 common boards I found at Home Depot. I cut them to size using my miter saw, and attached them using wood glue and 1.25″ finish nails.

I added my side pieces next using the same method… This is 1×4 common pine boards from Home Depot.
Add trim to corner floating shelves
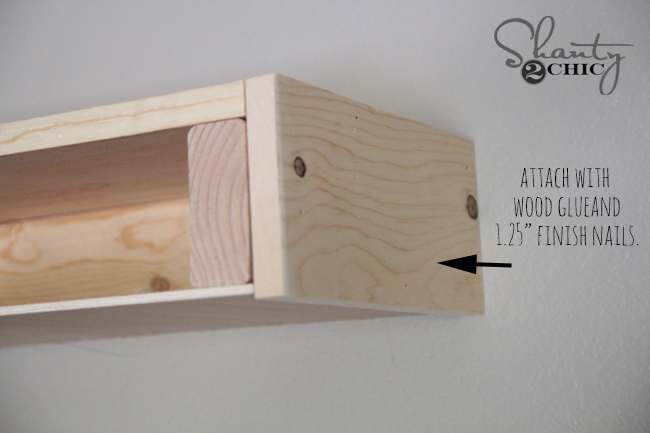
At this point I added my front pieces. I used wood glue and 1.25″ finish nails for this part as well.
Finish your DIY Shelves
My favorite part is always adding a finish to my woodworking projects! I stained these shelves using Varathane Kona stain. You can find it on Amazon HERE! I also found some Simpson Strong-Tie metal corners that I spray painted gold and attached using gold furniture tacks to each corner to dress each shelf up. I LOVE the outcome! Adding all the accessories and home decor is always fun too! 😊
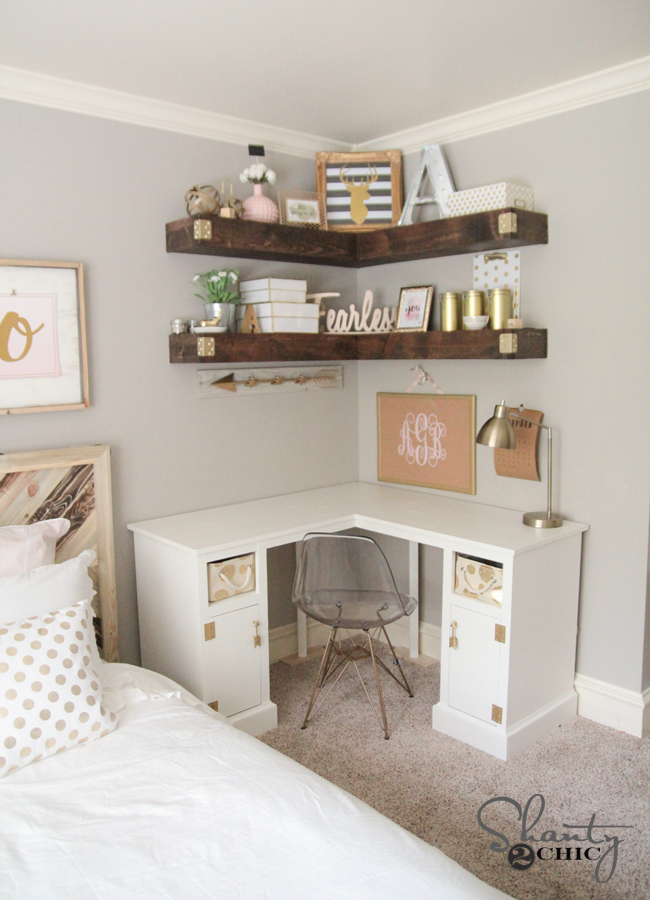
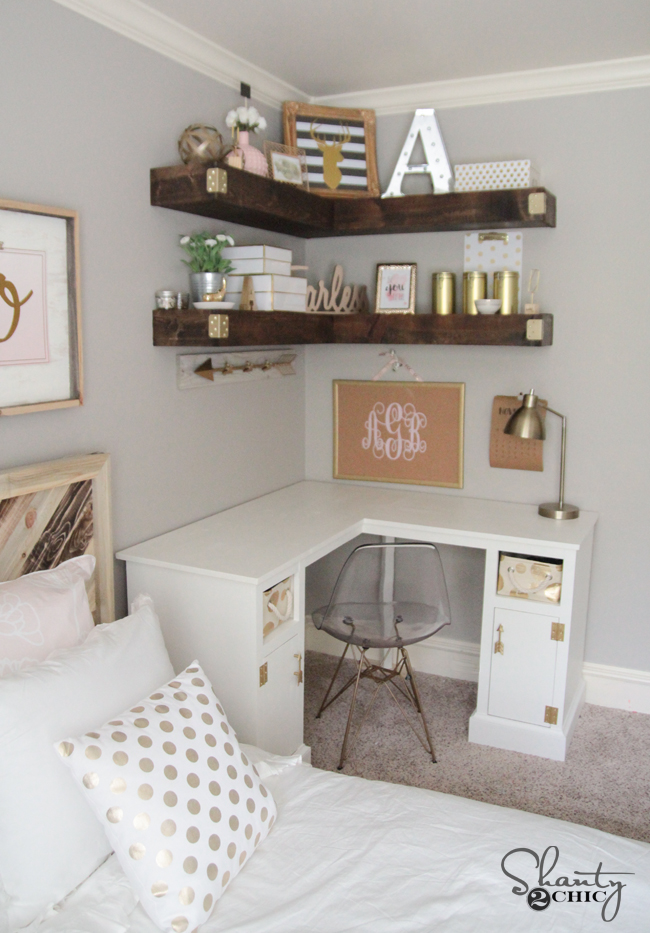
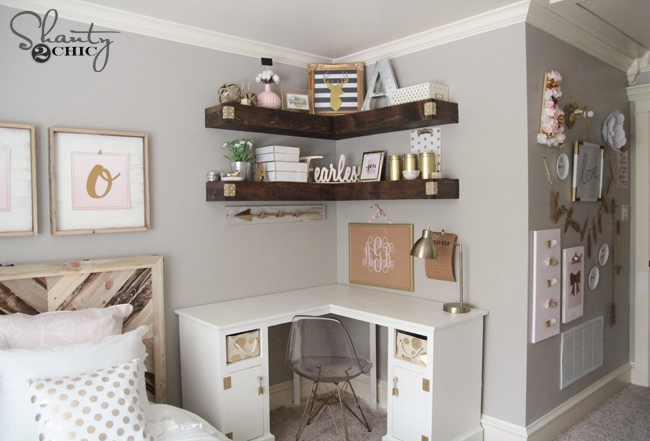

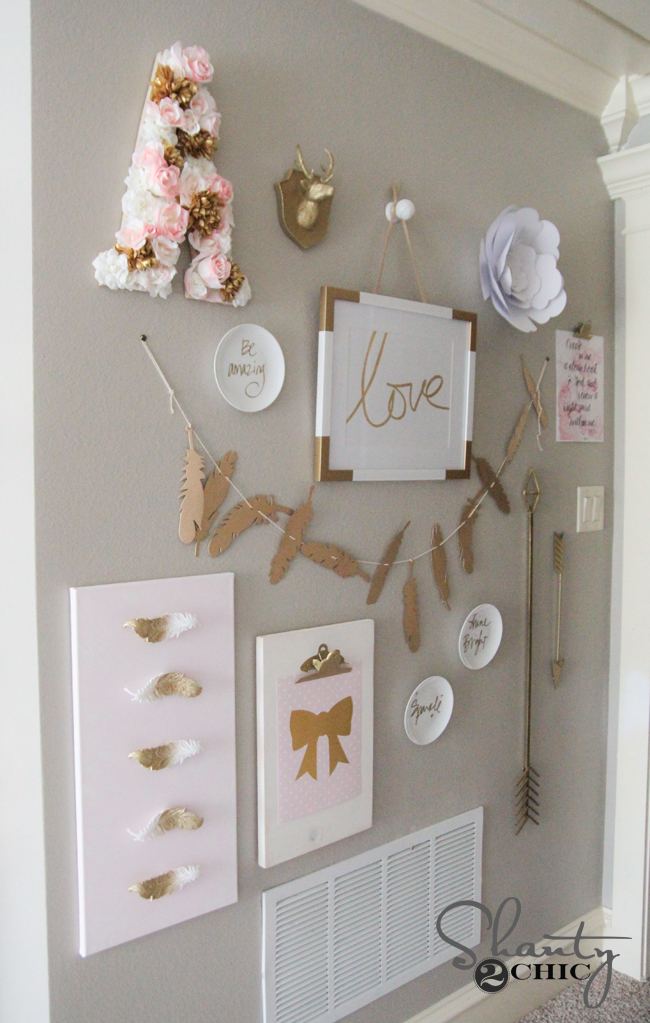
How cute is this wall too? I kind of love it!
Hope that covers it!
Thanks so much for stopping by!! Let me know if you have any questions at all!
DIY Corner Floating Shelves
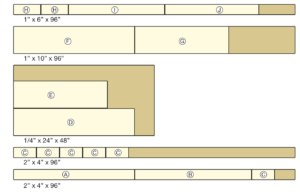
Supply List
- 2 2x4x8 pine or whitewood
- 1 1/4” X 24” X 48” plywood
- 1 1” x 10” x 8’
- 1 1” x 6” x 8’
- 1-1/2” pocket screws
- 1-1/4” brad nails
- 3” Spax screws
- Wood Glue
Instructions
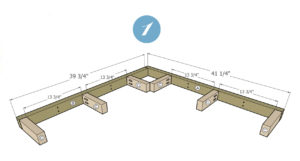
- Cut List

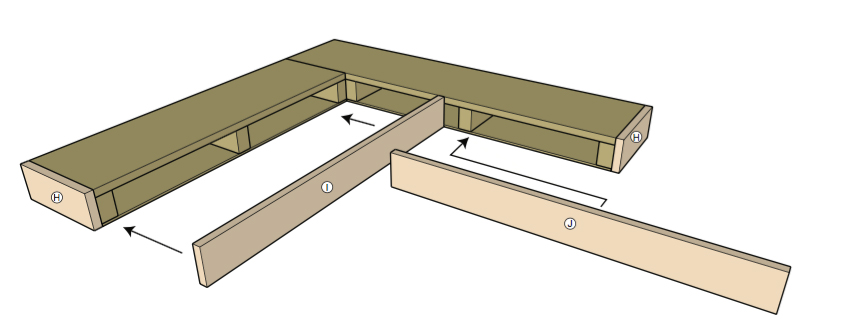
- Begin by constructing the wall cleats. Drill for 2-1/2” pocket screws in the cleat braces and attach to the wall cleats as shown. First hold up the longer wall cleat and mark where your studs are. Repeat with your shorter wall cleat, making sure you start 1-1/2” out from the wall to compensate where the first cleat will be. Drill two pilot holes for the torx screws. Using a level hold the longer cleat up to the wall and drive 3” torx screws at the marked locations (above illustrations are rough estimates, your locations may very). Repeat with shorter cleat, making sure both are level.

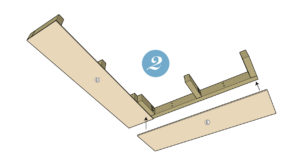
- Using 1-1/4” brad nails and wood glue attach the bottom plywood panels, starting with the longer panel first and making sure you are flush on the outside edges.

- Next attach the top of the shelf with 1-1/4” brad nails and wood glue. Again, make sure outside edges are flush.

- Finally, add the trim. It is best to cut the remaining pieces to fit.PLEASE SEE NOTE ON THE CUT LIST PAGE ABOUT USING 2X3 MATERIAL FOR THE CLEATS. THIS WILL ALLOW YOU USE 1X4 WOOD FOR THE TRIM WITHOUT HAVING TO DO ANY RIPPING.First you will measure the height of your shelves, from the bottom of the plywood to the top of the 1×10 material. It should be about 4-1⁄2”. Rip your 1×6 material down to this measurement. Then begin with the sides and attach with 1/4” brad nails and wood glue. Next attach the long front trim. Finally the short front trim. Now, tape off the wall and apply the finish of your choice.

- Click HERE to get a printable version of these plans!

I would love plans for the corner desk as well!
Where did you get the desk?
Did Shanty2Chic ever get back to you about where to get the desk? It’s exactly what I’ve been looking for
I made one of your deals and have been looking for a chair like this to finish my office space. Help please and thanks with some ideas of where I can find one?! 🙂
Brilliant work. The corners of any room are usually unused or jammed up with a lamp or table, but you have used the high elevation to your advantage…rethinking display shelves now myself. Thanks!
Would you share (if you haven’t already) where you got that chair??
Would it be possible to add hinges to the facial board to create a little bit of storage? I love the shelves and am going to try and talk my hubby into helping me make them. Thank you for the plans!
Hey girls! Want to make sure I’m not missing something… Is this 1×4 on the shopping list supposed to be a 1×6?
Agreed! I did the plans and that typo messed me up. I think my shelves are too fat, and I got the 1×6. I had to add a 1/4 inch plywood and another inch of wood to fill the bottom.
1×6! Thanks for finding that… I am just now seeing this message!
Any plans on the desk? Love it!
I love this idea! My daughter wants to use these colors in her room now that we can paint. LOVE the desk!! Where are the plans for it??
I’m building this right now. Should J possibly need to be 31 1/2″ long instead of 32″ or am I doing something wrong? I don’t want to cut what I think and then it be too short when I go to hang, but it’s not lining up right as I’m laying it out. Thanks! 🙂
I definitely need that cute desk to go with the shelves! Are there plans for that?
I am sure you already posted this, but are the plans for the desk on the site somewhere?
We love this project! Thanks for sharing.
Thanks so much guys!
Great shelves, great tutorial. Thanks! I do have a question. I gathered from your steps you stained these AFTER they were on the wall and not before? I’m just trying to think through which would work best so I’m curious.
Thanks Trudi! It is totally optional! It is much easier to stain before, but I was in a hurry on this project. It kind of depends on your space and timing. Either way works great!
The floating corner shelves is really a good diy craft. I always change the looks of my room at least thrice a year and on my next activity, I will surely add a floating corner shelves. With the instructions given, I know that by making this one is not that complicated at all.
So happy to hear it Kristy!! 🙂