Learn how to build this DIY Round Coffee Table with just a few basic tools, inexpensive framing lumber, free plans and a how-to video by Shanty2Chic!
I have built so many DIY coffee tables for my living room and others in my years of DIY projects! They’re easy to build, change the look of a room and they’re pretty inexpensive to build yourself – having kids also takes it’s toll on the longevity of coffee table 😉 This DIY Round Coffee Table is no exception! I built this guy with just 2 2×4 boards and a round project panel. Total cost in lumber was right under $65! Check out the how-to video below!
This is a great build for beginners and we’ve got a how-to video to guide you through the process! Just lick the video below to build it with us! You can grab the FREE printable plans at the bottom of this post!
Jump to Recipe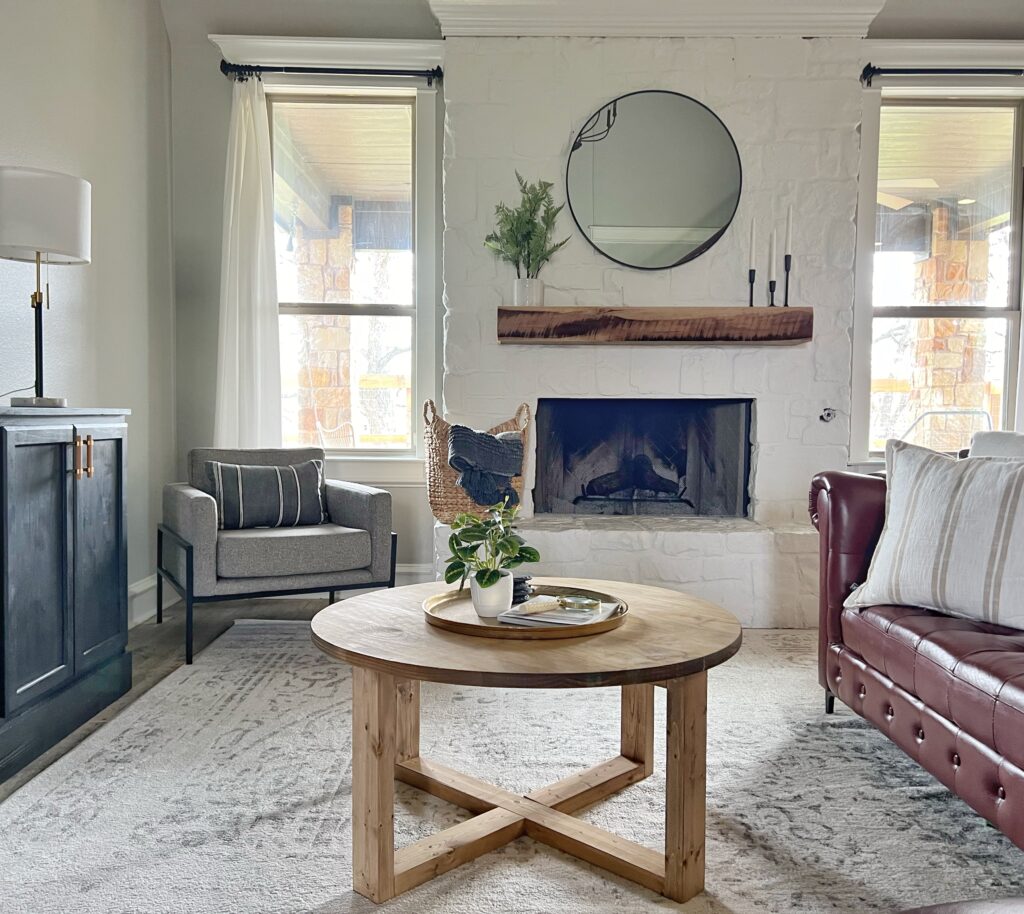
Table of Contents
Kreg Jig
One question we get asked consistently is… “What is a Kreg Jig?” A Kreg Jig is a pocket hole jig that helps create pocket holes, allowing you to build with super strong joints. It makes joining two boards faster and gives you stronger and cleaner joints than countersinking a wood screw. We discovered them shortly after we started building furniture and it was a HUGE game changer for our furniture building! We were so impressed with how user-friendly they are and the strong joints it gave our builds! For this coffee table, I used my Kreg Jig 720 PRO and I LOVE IT! You guys will love it too… definitely worth the upgrade for those of you that already own a different model. You can see it HERE on Amazon! You can also check out our video on how to use it HERE!

Ripping the boards
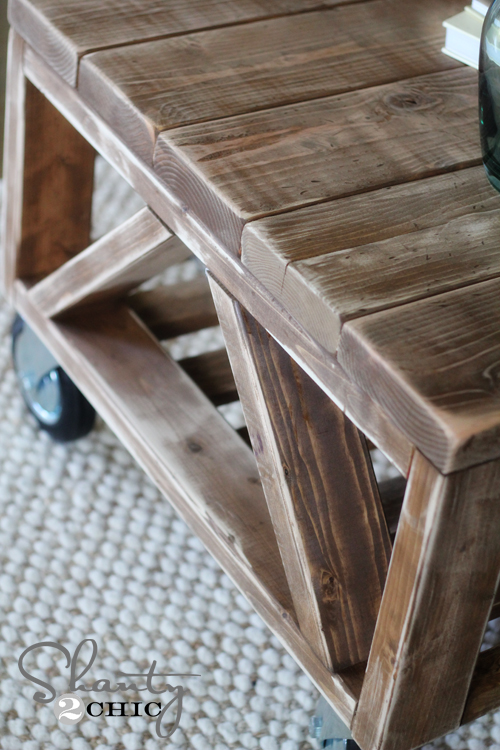
Before adding any pocket holes, I ripped my 2×4 boards down to 3″ wide each. I like to make my cross cuts first with my miter saw, and then rip those smaller cuts with the table saw. We use our table saw to rip the round edges off of the framing boards we build with. This is an optional step but we like to do it to make the pieces of furniture look more expensive and not built with framing lumber. It really helps on a build like this table. Ripping them down gives the stacked boards a solid clean look, like it’s one piece. You can see how we rip our boards HERE!
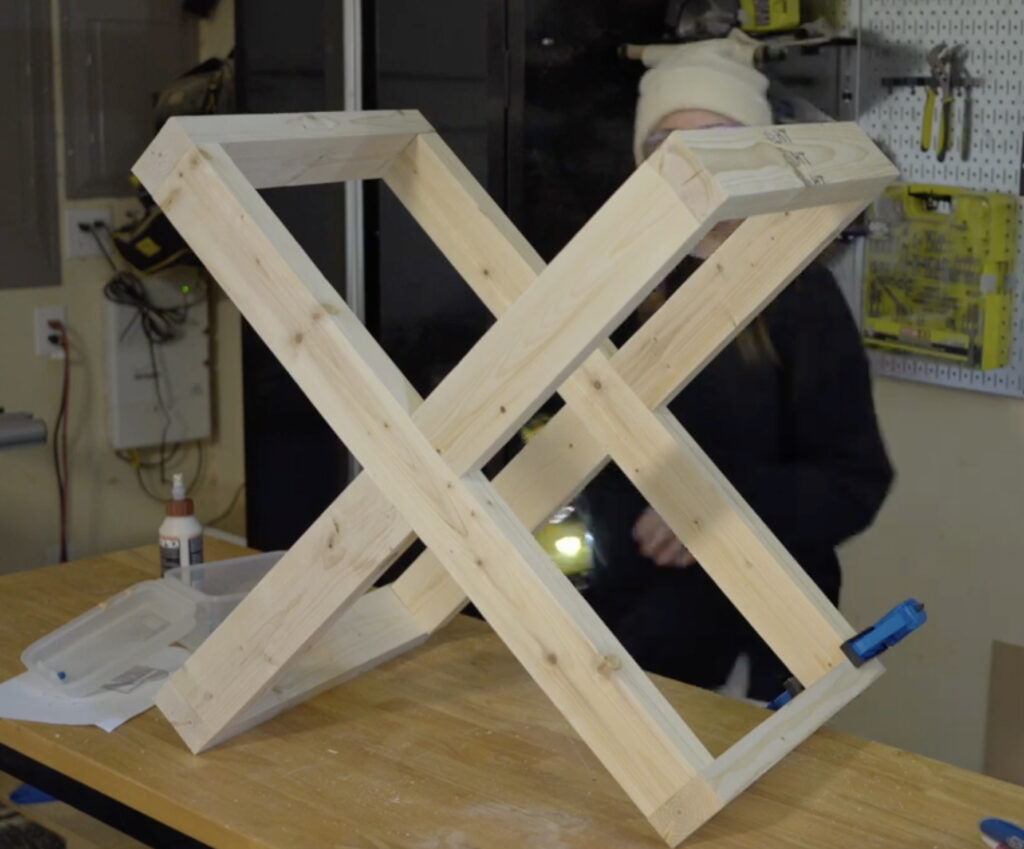
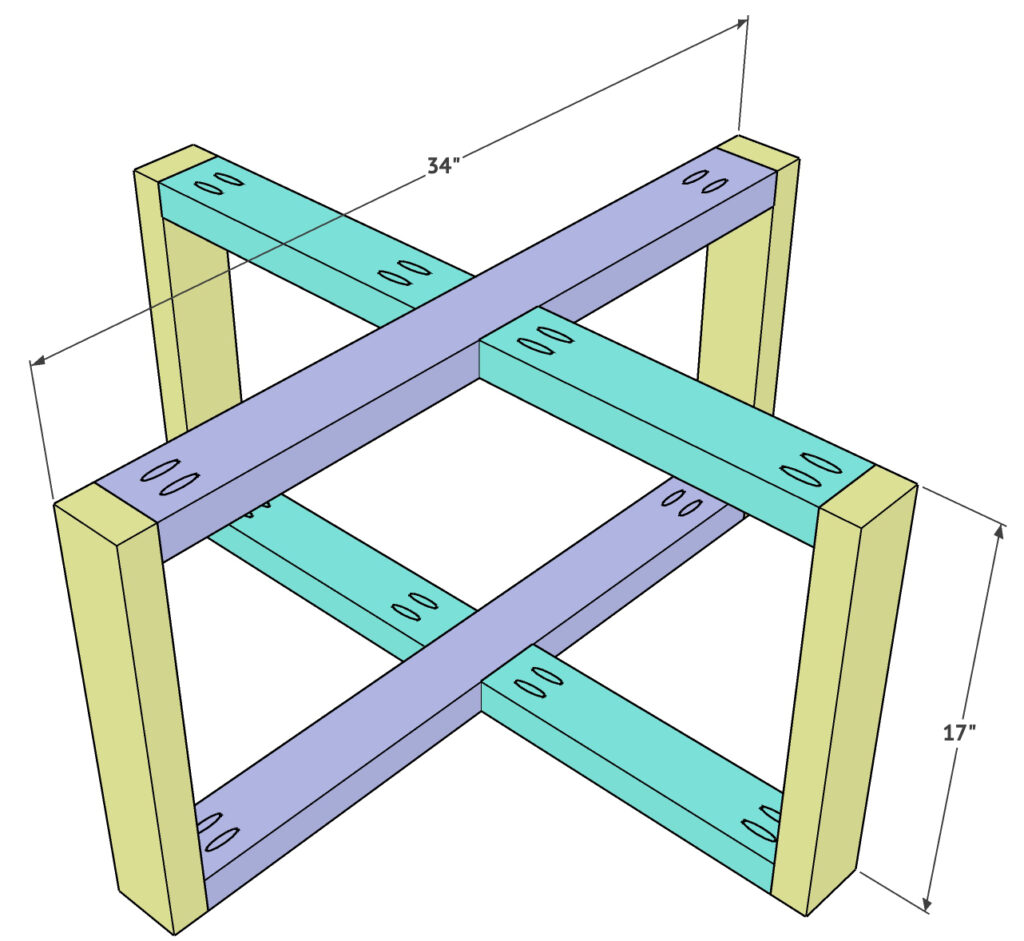
Build the Base
The base of this table is built using the 2×4’s I ripped to 3″.
Add 1.5” pocket holes to the ends of each board and attach using 2.5” pocket hole screws and wood glue. You will make 2 of these X pieces that will be identical.


Attach the 4 table legs to the ends of one X piece using 2.5” pocket hole screws and wood glue. The ends of the leg pieces will be flush with the X piece and pocket holes facing up as shown.

Kreg VersaGrip™ Clamps
We used our new Kreg VersaGrip clamps to help hold the boards in place while we attached on this part. WE LOVE THESE THINGS! The adaptable clamp head is repositionable along the bar and is also reversible, so it can be used in so many clamping applications! You can see them HERE on Amazon!

Attach the other X piece to the ends of the leg pieces using wood glue and 2.5” pocket hole screws. The X will be flush with the ends of the leg pieces with pocket holes facing as shown.

Round Laminated Pine Project Panel
I was so excited to find the laminated project panel for this coffee table. I ran across them at Lowe’s. Previously they only carried rectangular panels, but now they carry round in a variety of sizes. I bought the 36″ round panel that is 1″ thick for $50. That is a great price! I love how these stain as well, and I love that the panels are 1″ thick instead of 3/4″. You can find it HERE on Lowe’s website!
Kreg Quick-Flip
Once the base was complete, we used the Kreg Quick-Flip to attach the base to the table top. This is such a fun tool! I use it all the time for different purchases. Drill a pilot hole and counterbore with one side, then drive a Kreg Screw with the #2 square-drive bit on the other side. You just quickly flip it and you are ready to insert the screw. It gives the joinery a very professional and hidden finish. You can see it HERE on Amazon!

Attach the table top
Now attach the coffee table base assembly to the bottom of the table top. Use 2” Kreg pocket hole screws through the base and into the table top. We used the Kreg Quick-Flip to make this part even easier. There will be about a 1” overhang from the legs to the table top edge.

Staining the Coffee Table
Before staining the coffee table, I used my sander to lightly sand the entire table. I like to start with 120 grit sandpaper and then move to 220 grit to get a smooth finish.
I used three different Varathane stain colors to create this. I started with an empty tub from the hardware store. These are super inexpensive. You can also use any empty container you have at home! I mixed two parts of Natural stain, one part of Golden Oak, and a splash of Weathered Gray. This gave me the perfect finish that I was looking for. You just put all of that into the bucket and stir it up just a bit and you’re ready to go!
Make sure to sand all the surfaces with medium and fine sandpaper to get an even, beautiful finish. I like to use my Ryobi Corner Cat for this! An orbital sander also works great!
I often get asked what protective coat I like to use on top. My favorite polyurethane is THIS ONE!


DIY Round Coffee Table
Supply List
- 1 36" Round Laminated Pine Project Panel
- 2 2×4 framing lumber ripped to 3" wide each
Instructions
- Add 1.5” pocket holes to the ends of each board and attach using 2.5” pocket hole screws and wood glue. You will make 2 of these X pieces that will be identical.

- Attach the 4 leg pieces to the ends of one X piece using 2.5” pocket hole screws and wood glue. The ends of the leg pieces will be flush with the X piece and pocket holes facing up as shown.

- Attach the other X piece to the ends of the leg pieces using wood glue and 2.5” pocket hole screws. The X will be flush with the ends of the leg pieces with pocket holes facing as shown.

- Now attach the base assembly to the bottom of the table top. Use 2” Kreg pocket hole screws through the base and into the table top. We used the Kreg Quick-Flip to make this part even easier. There will be about a 1” overhang from the legs to the table top edge.


Video
Other Shanty Woodworking Projects!
Check Out Our Other DIY Coffee Table Ideas with Free Plans!
Coffee Table with Hairpin Legs


Follow us!
Be sure to follow us on YouTube, Instagram, Pinterest and Facebook!
DIY Round Coffee Table
Supply List
- 1 36" Round Laminated Pine Project Panel
- 2 2×4 framing lumber ripped to 3" wide each
Instructions
- Add 1.5” pocket holes to the ends of each board and attach using 2.5” pocket hole screws and wood glue. You will make 2 of these X pieces that will be identical.
- Attach the 4 leg pieces to the ends of one X piece using 2.5” pocket hole screws and wood glue. The ends of the leg pieces will be flush with the X piece and pocket holes facing up as shown.
- Attach the other X piece to the ends of the leg pieces using wood glue and 2.5” pocket hole screws. The X will be flush with the ends of the leg pieces with pocket holes facing as shown.
- Now attach the base assembly to the bottom of the table top. Use 2” Kreg pocket hole screws through the base and into the table top. We used the Kreg Quick-Flip to make this part even easier. There will be about a 1” overhang from the legs to the table top edge.
Video
Stop by and check our our complete collection of DIY Coffee Table Plans – we have over 15 free plans to choose from!

This round coffee table design is a great example of how simple geometry can create a strong visual presence in a living space. The circular form softens the layout of a room and works especially well in seating areas where flow and accessibility matter. The build process also seems very approachable with the clear step-by-step plans.
From an interior industry perspective, round coffee tables continue to be a popular choice in both residential and hospitality interiors because they balance functionality with a clean, modern aesthetic. It’s interesting to see how DIY builds like this reflect broader furniture trends focused on simplicity and durable materials. We’ve also been following similar material and furniture developments across interior projects here: https://plywoodbazar.com/