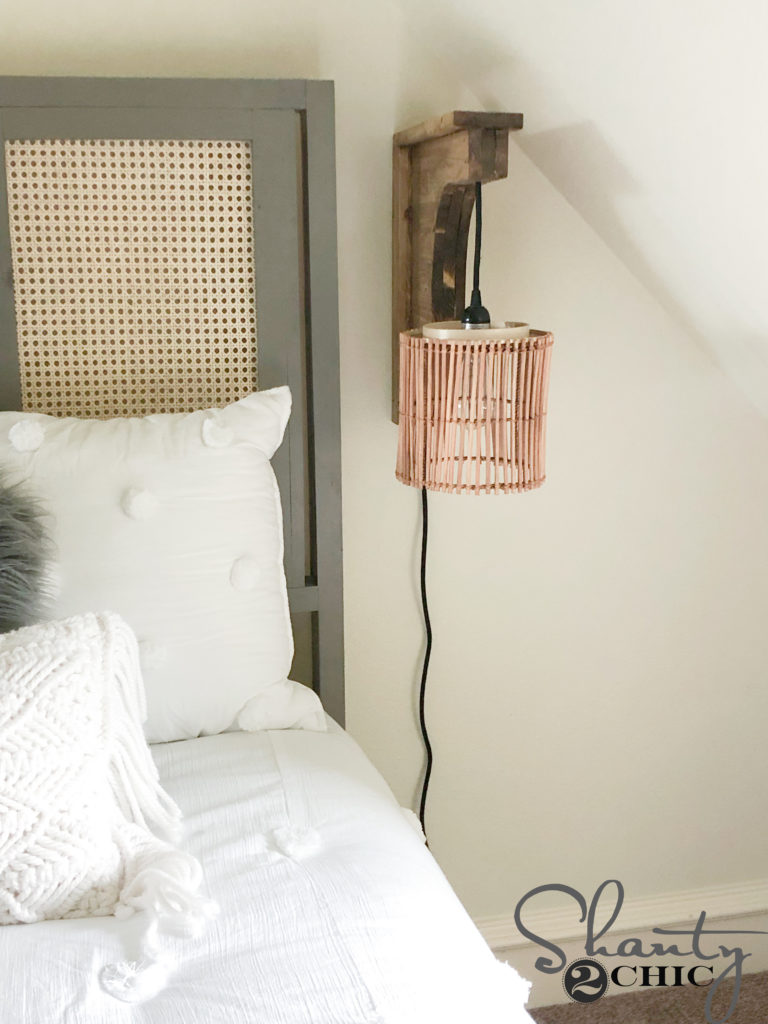
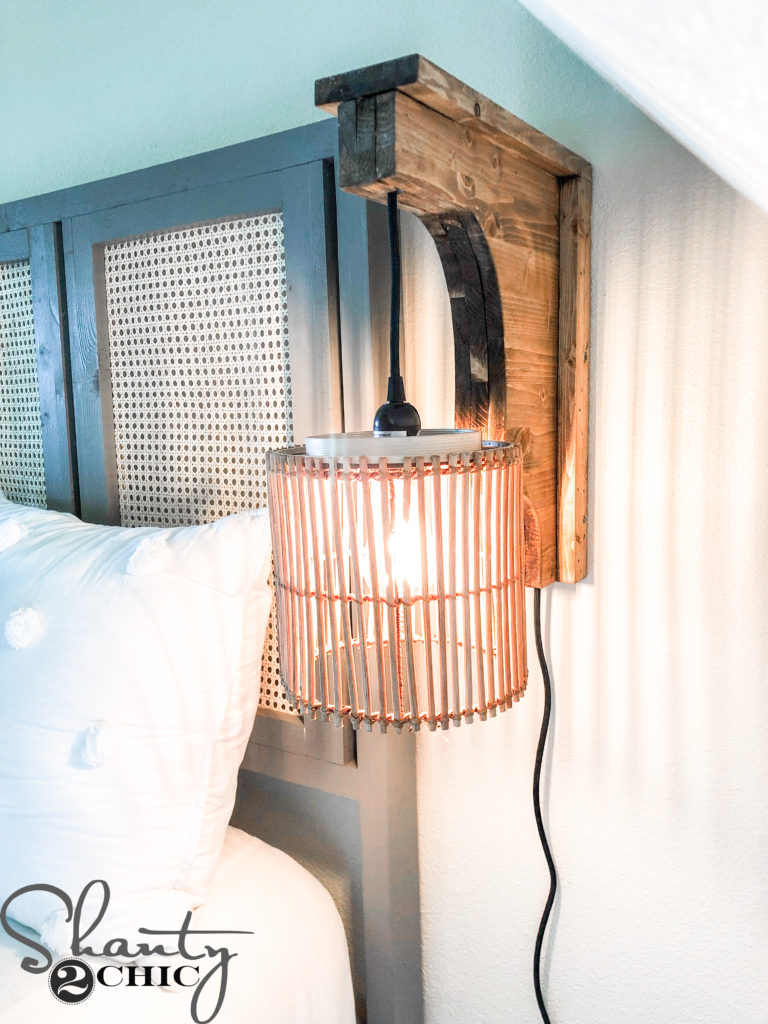
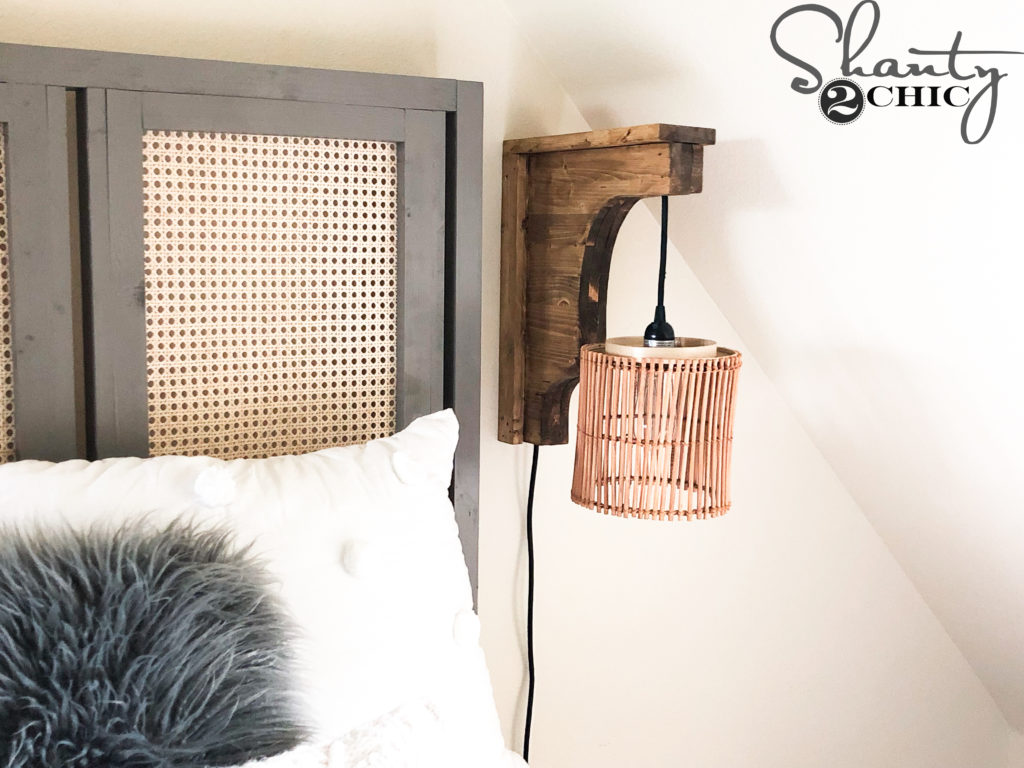
Learn how to build this DIY Corbel Sconce Light and Lamp Shade Hack with free plans by Shanty2Chic.
I went shopping to find my daughter the perfect lamp for her new bedroom makeover. Her room is a little rustic, a little modern and a little bohemian style. I was picturing a cane, wicker or rattan style shade but they are so expensive. I was about to give up my search when I came across this $12 rattan hurricane!
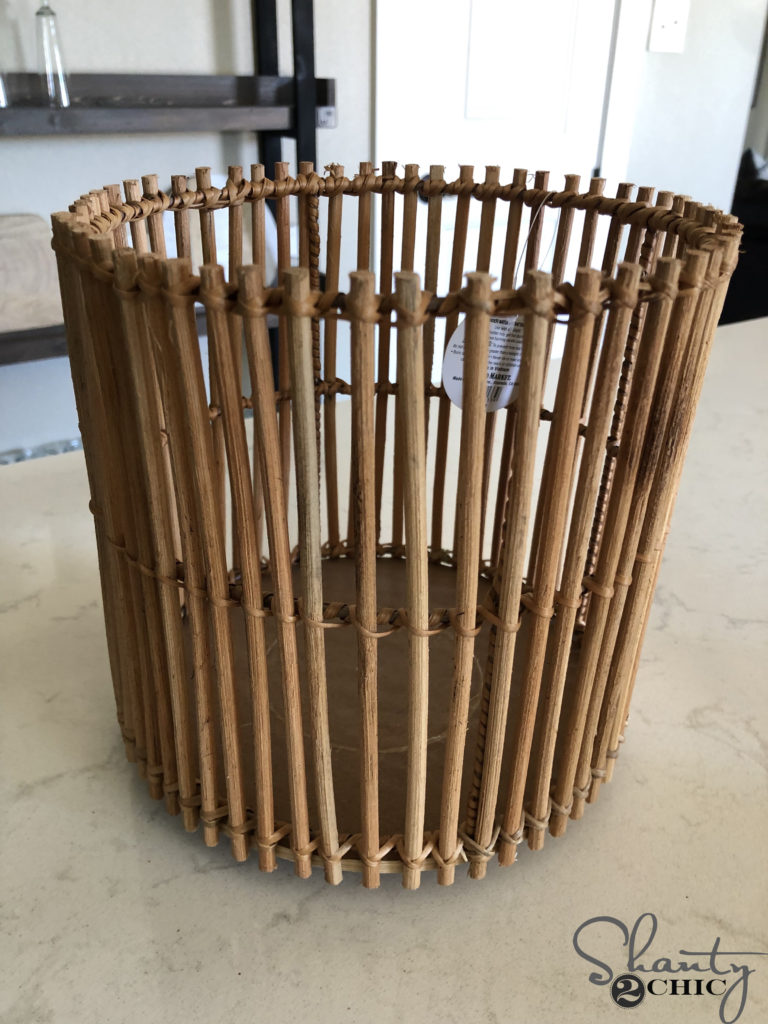
It is the perfect size for a single light pendant and at only $12 it’s a steal! This was all I needed to get my creative juices flowing! For under $50 and in one afternoon, I was able to create a unique lamp shade with a beautiful wood corbel to match! This is a super easy build and you only need a few supplies, one board and two tools! Let’s build this DIY Corbel Sconce Light!
Supplies
- 1 Hurricane or Basket with a hard bottom
- 1 Fabric Cord Hanging Pendant
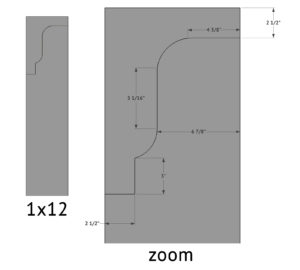
- 1 1x12x6 White Wood or Common Board
- Stain
- Wood Glue
- Drywall Anchors
Tools
Lamp Shade Hack
CLICK HERE TO JUMP DOWN TO THE FREE PRINTABLE PLANS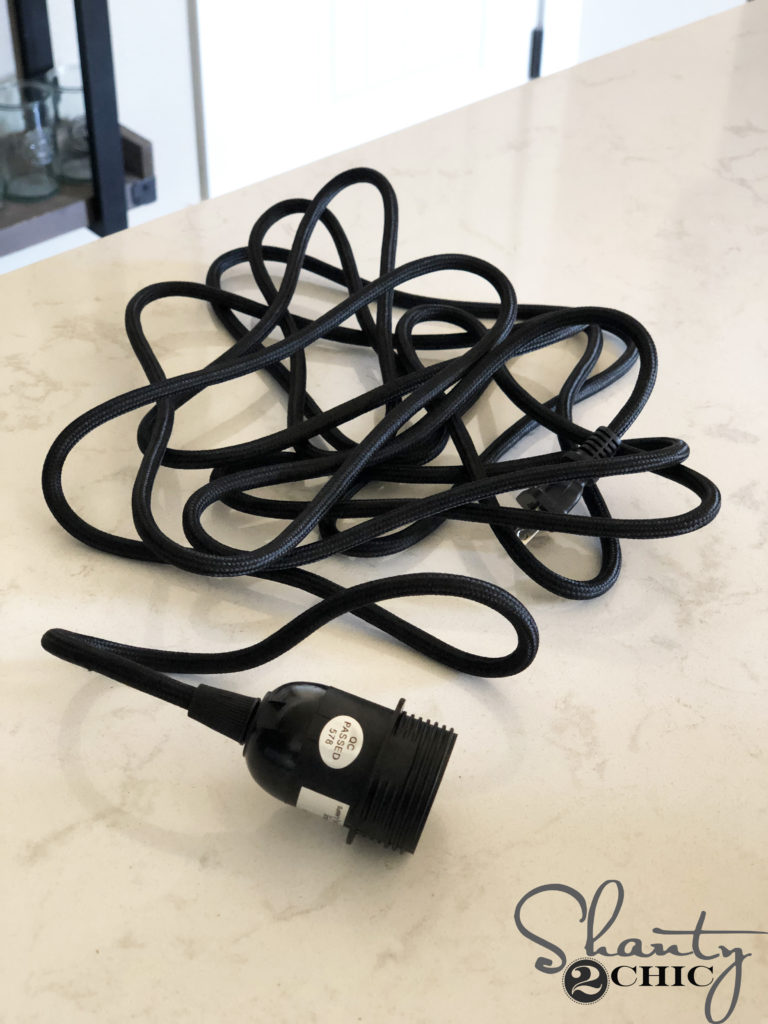
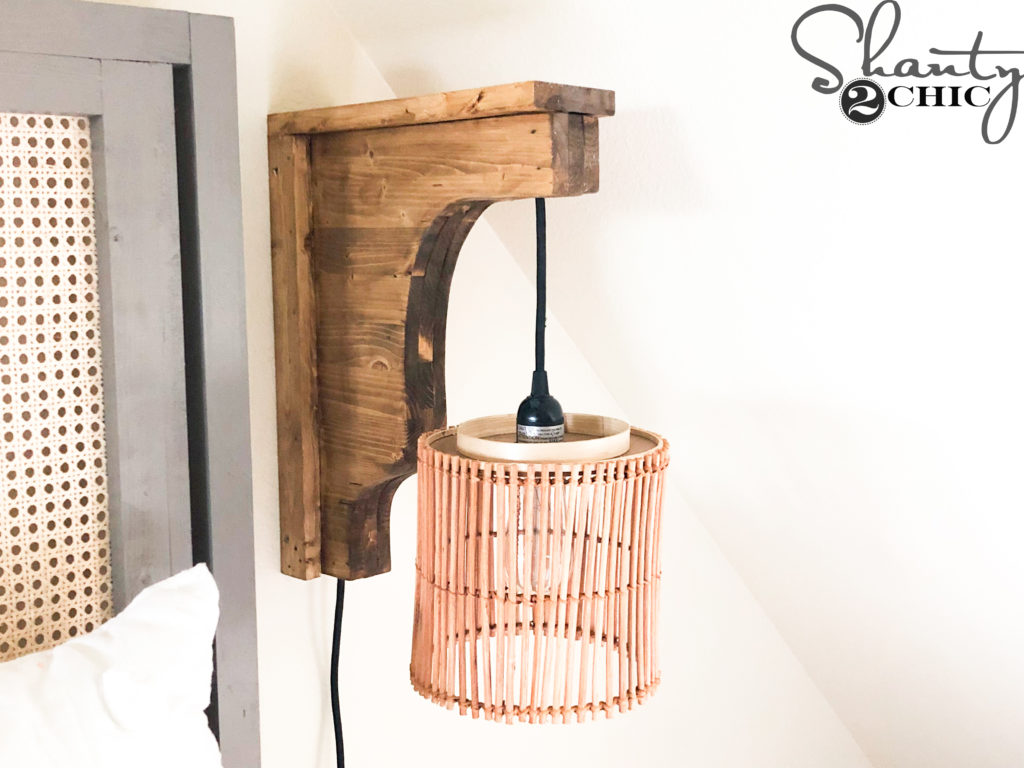
I found this pendant light on Amazon. It’s important to get this style because it has a ring that screws over the socket to hold the lamp shade in place.
Step 1 – Cutting the Hole
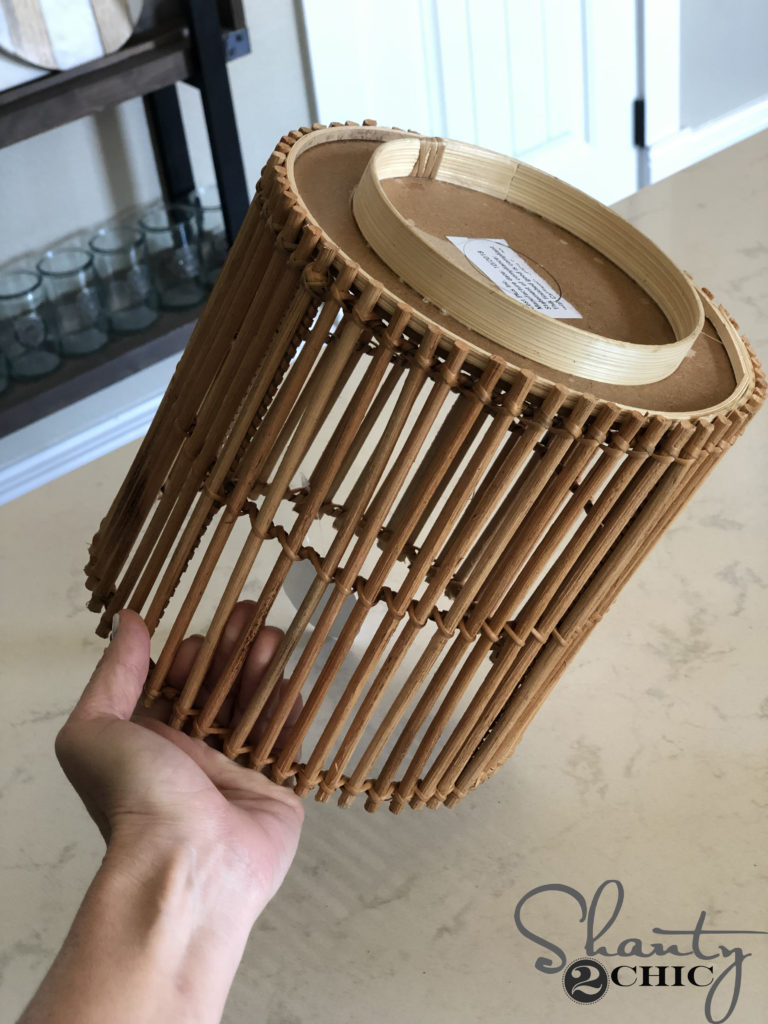
I flipped the hurricane upside down and traced a circle around the end of the socket on the pendant light.
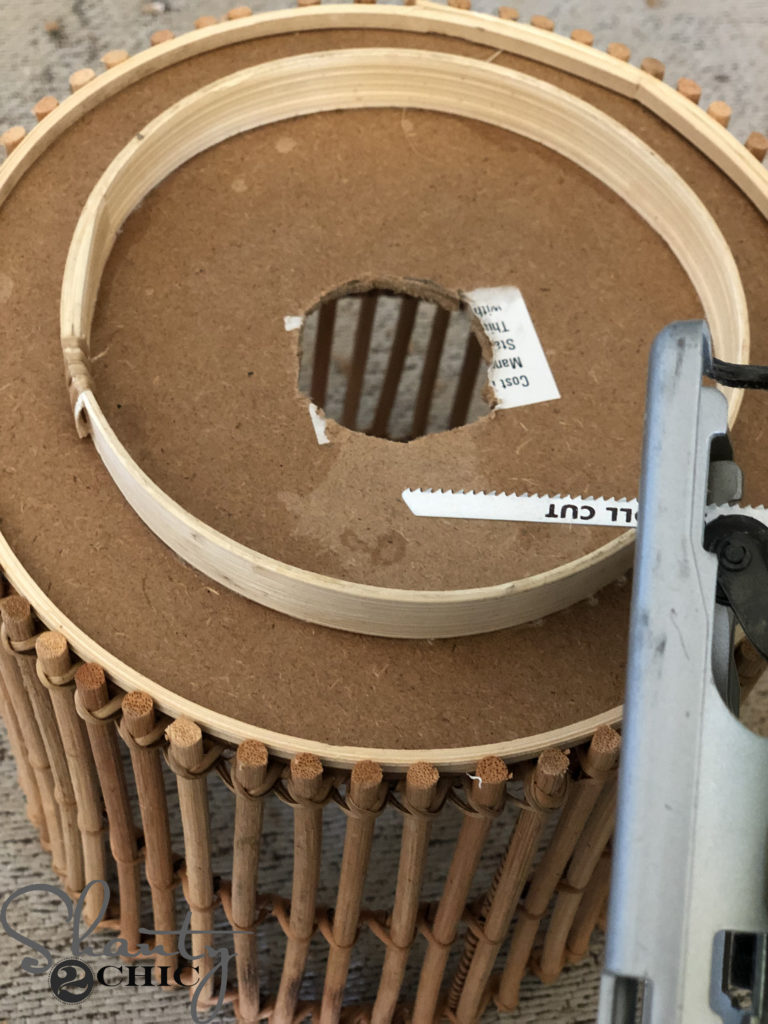
Then, I drilled a pilot hole large enough to fit my jigsaw blade in and cut the circle out with my jigsaw. It’s okay if your circle is not perfect. The light socket will cover it!
Step 2 – Attaching the Pendant
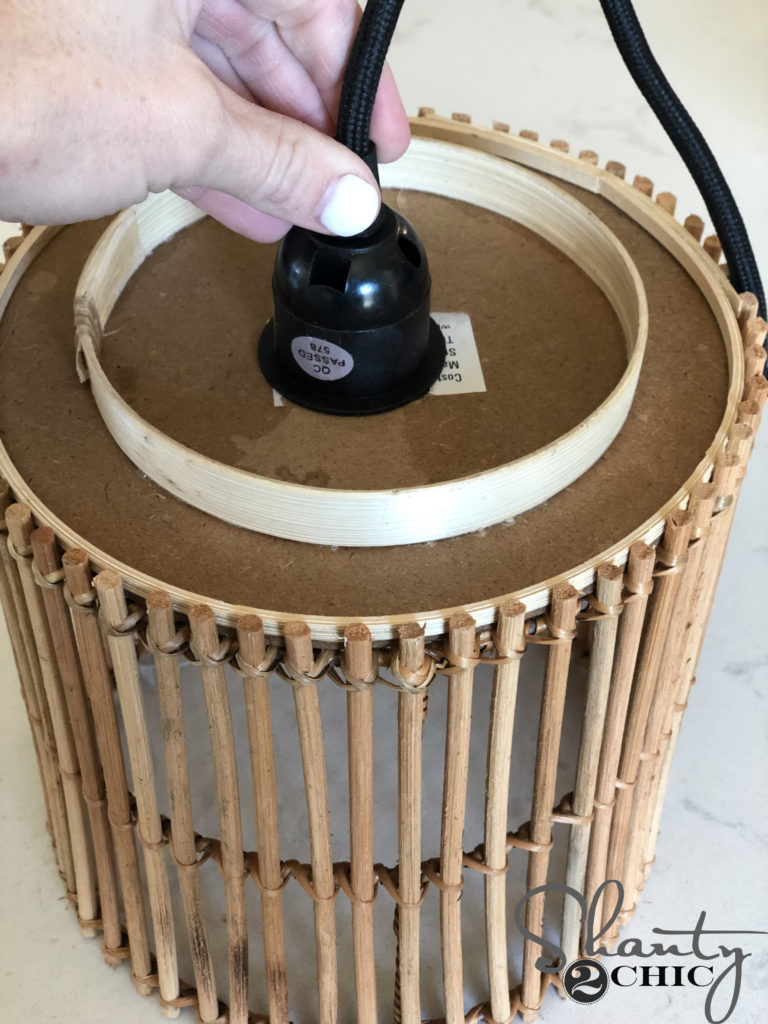
Once the circle was cut, I fit the pendant socket in the hole.
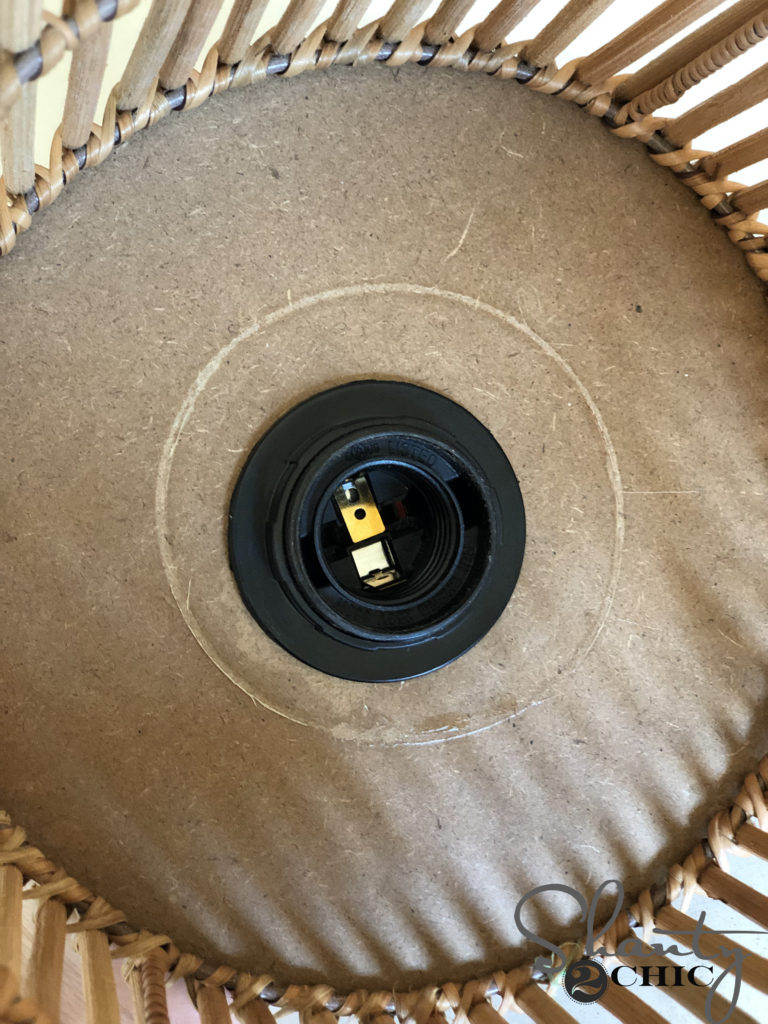
Then, I screwed the ring over the socket from the inside of the lamp shade.
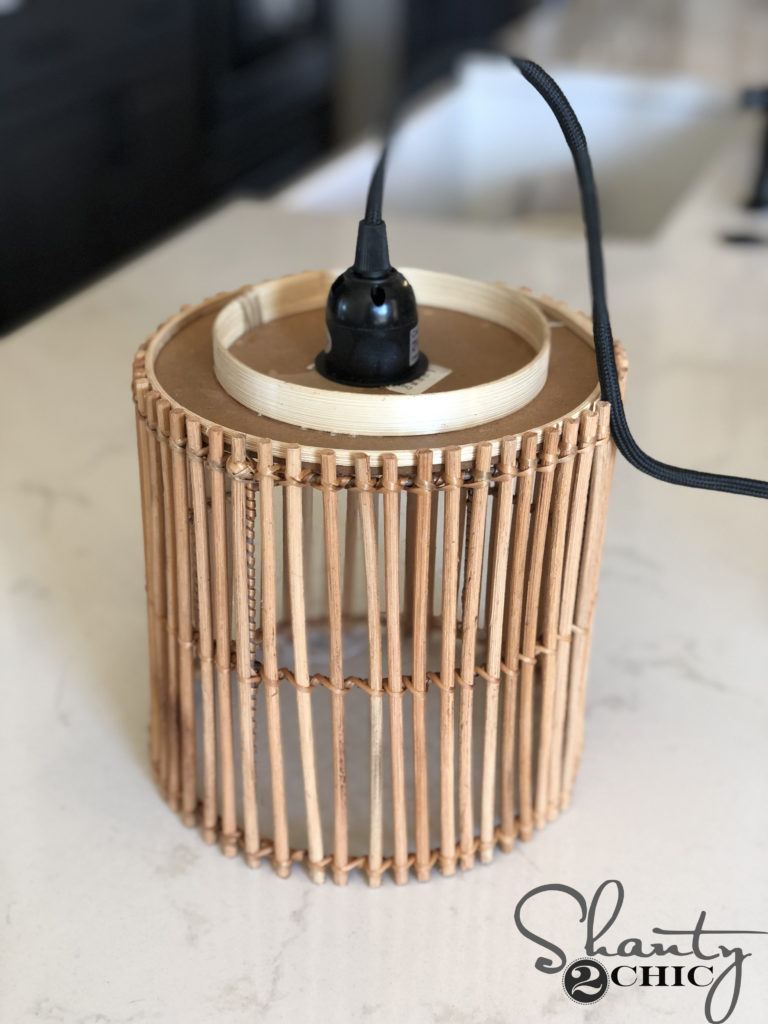
Once the lamp shade was done, I set it aside to work on the corbel!
Building the Corbel
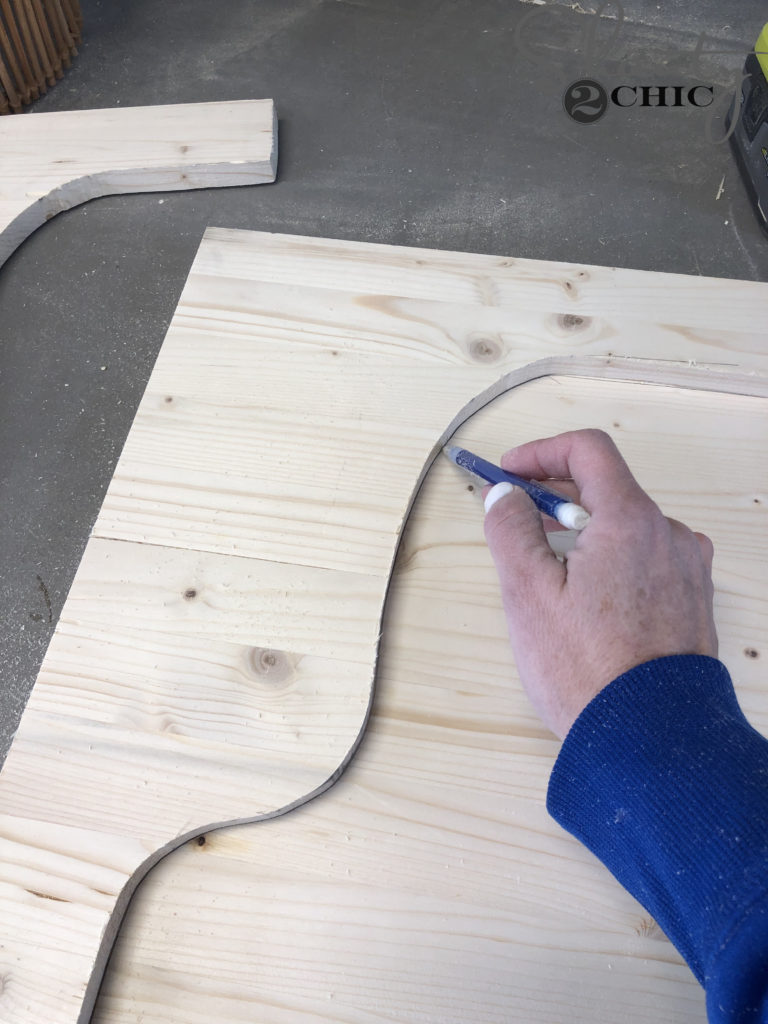
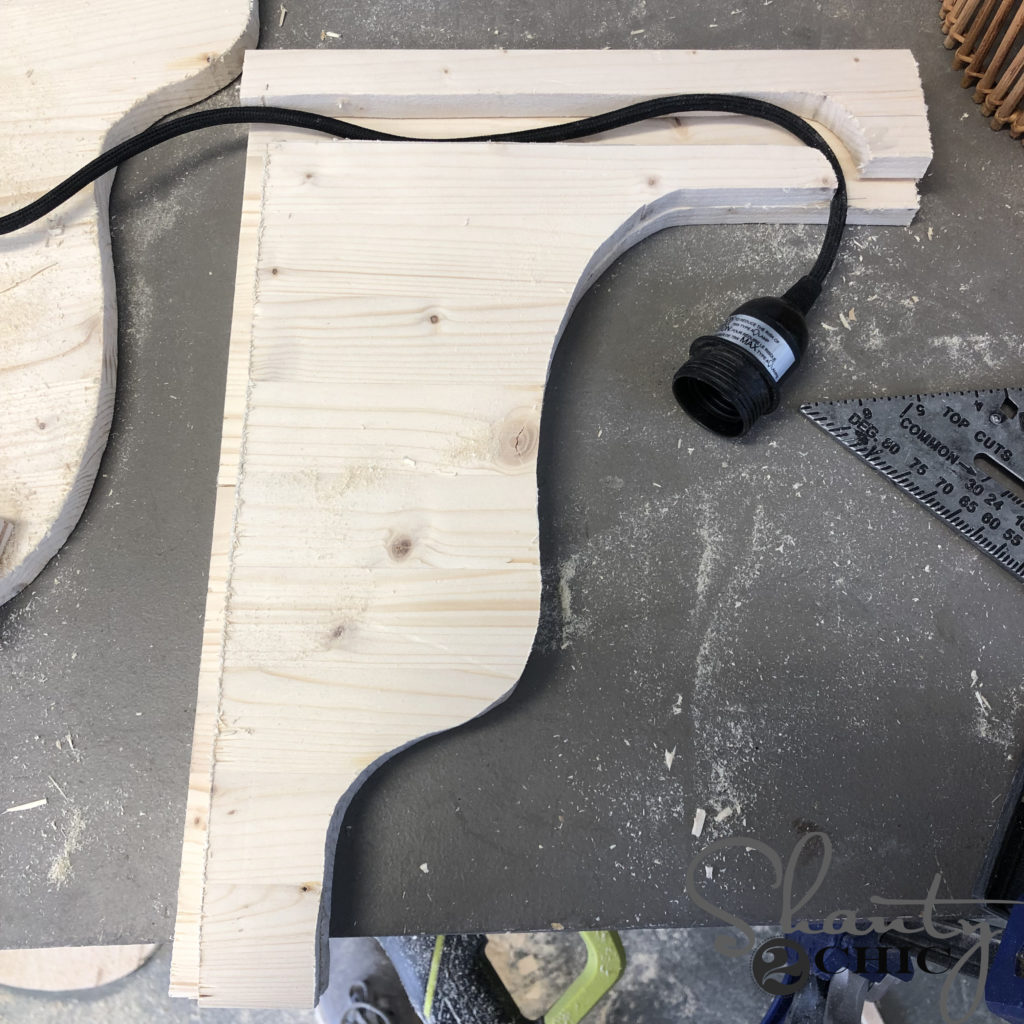
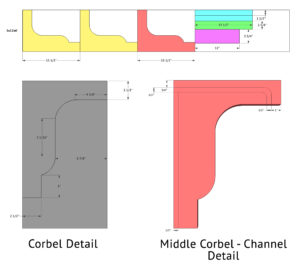
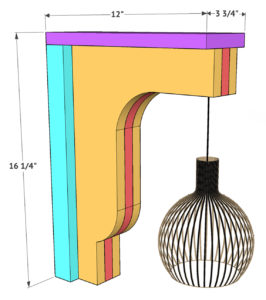
Step 1 – Drawing the Corbel
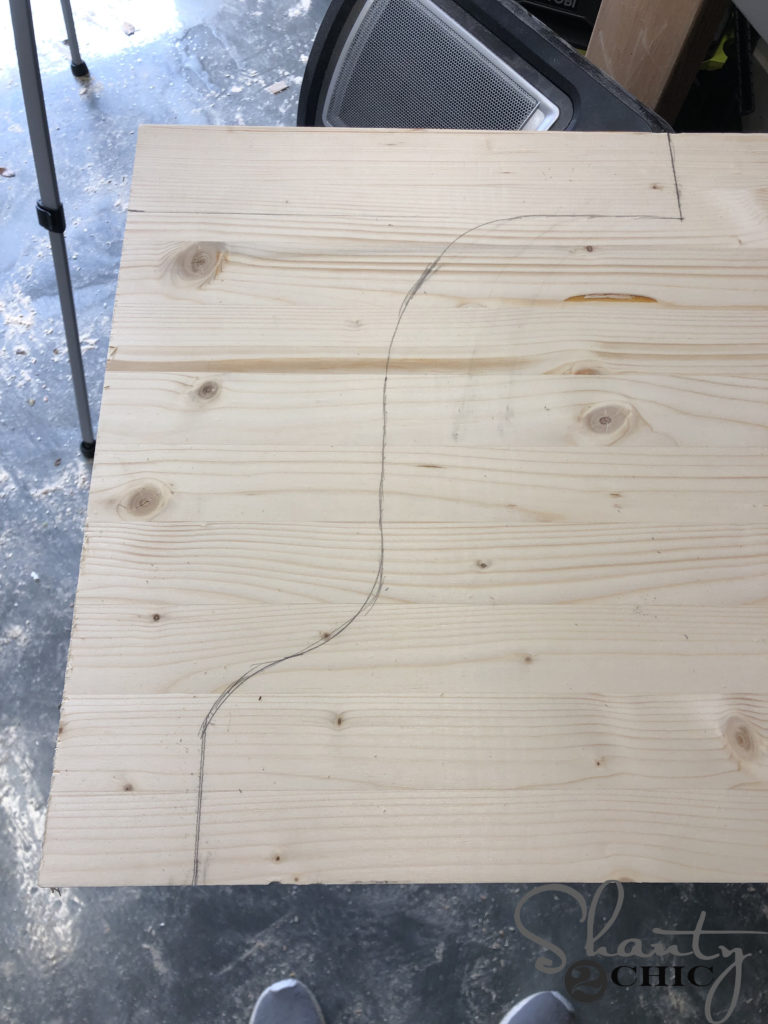
I used my miter saw to rip off the edge of the 1×12 to give me a square edge. These boards are often not square at the ends so this is our first step for any piece of wood we use in a project. If you don’t have a miter saw, you can use a jigsaw with a scrap piece of wood clamped down for your guide. Once I had a square edge, I free-handed a corbel design. You can refer to the free plans to see the measurements I used for my design.
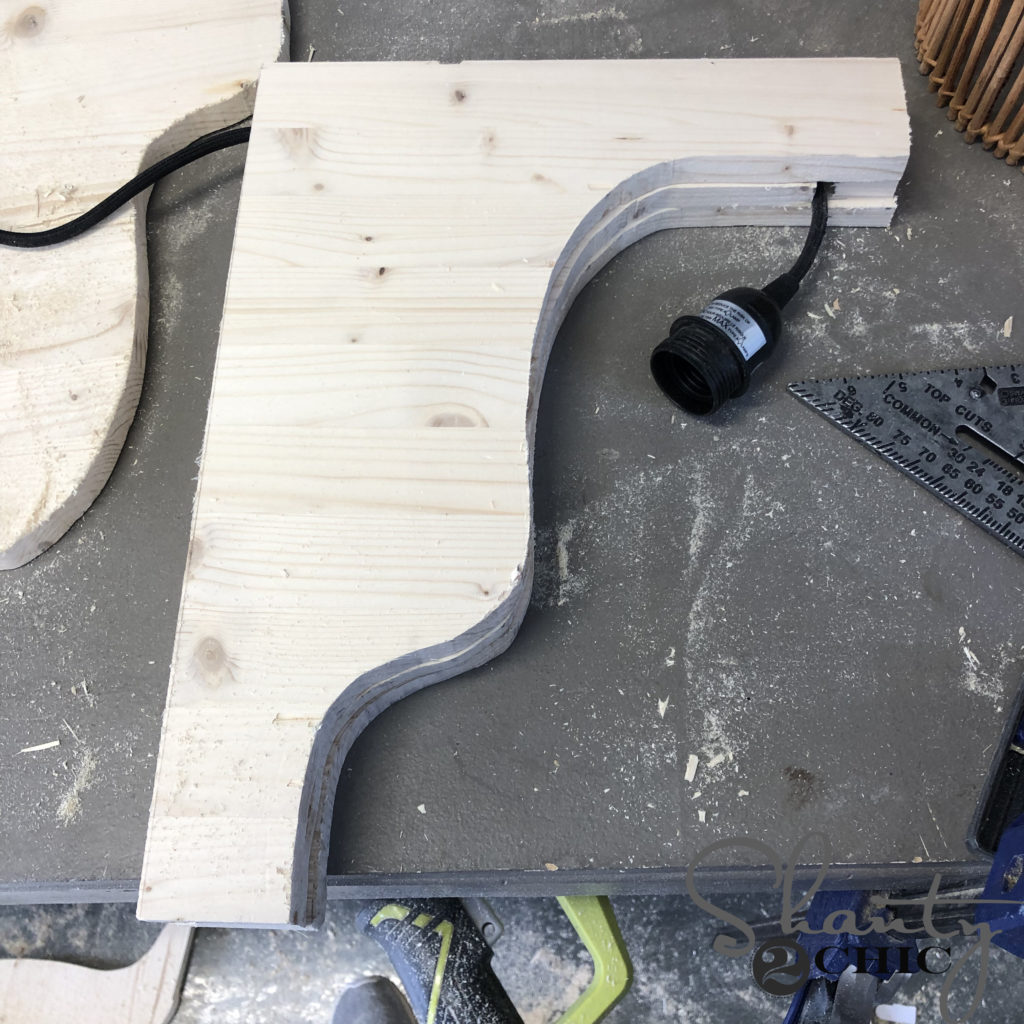
Step 2 – Cutting the Corbel
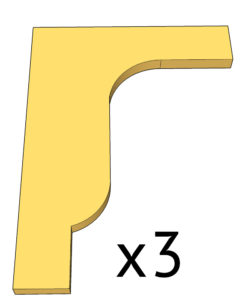
I cut the first corbel out with my jigsaw and used it to trace for the second corbel. I did this for all three corbels. Note: Use the first corbel as the template for the other two to keep them all as similar as possible.
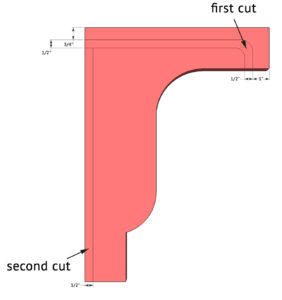
Step 3 – Creating a Cord Channel
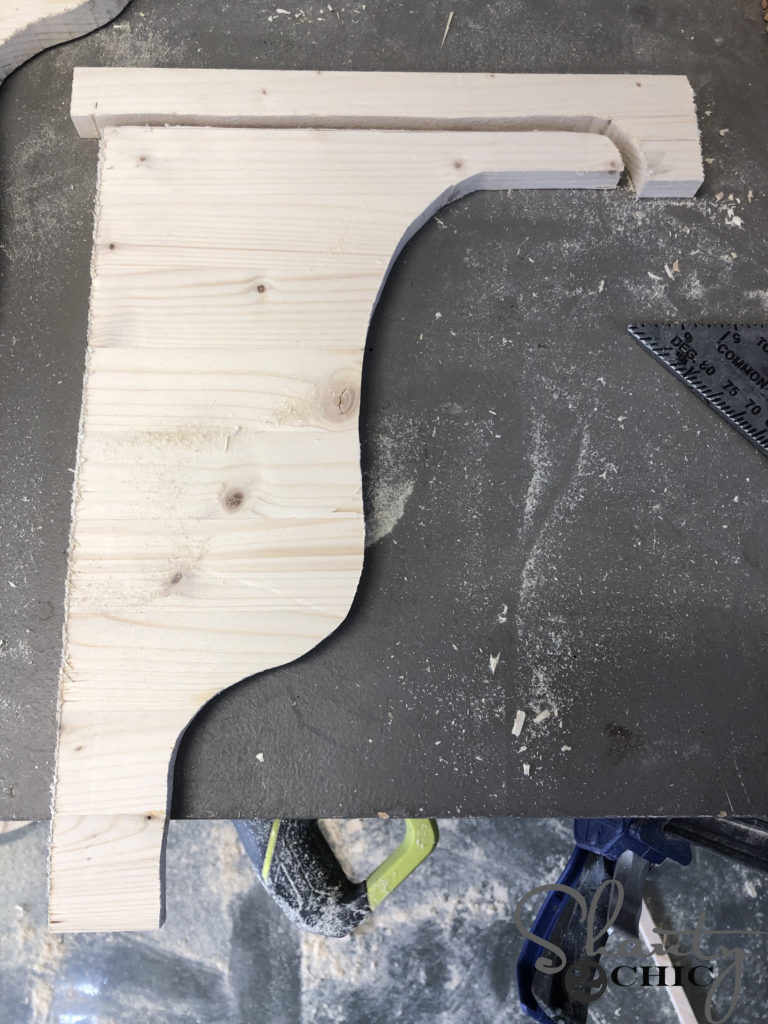
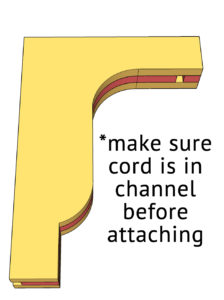
I used my jigsaw to cut a channel, in the middle corbel, for the cord to run though. Refer to the free plans for the exact measurements of my cuts. The middle corbel will now be two pieces.
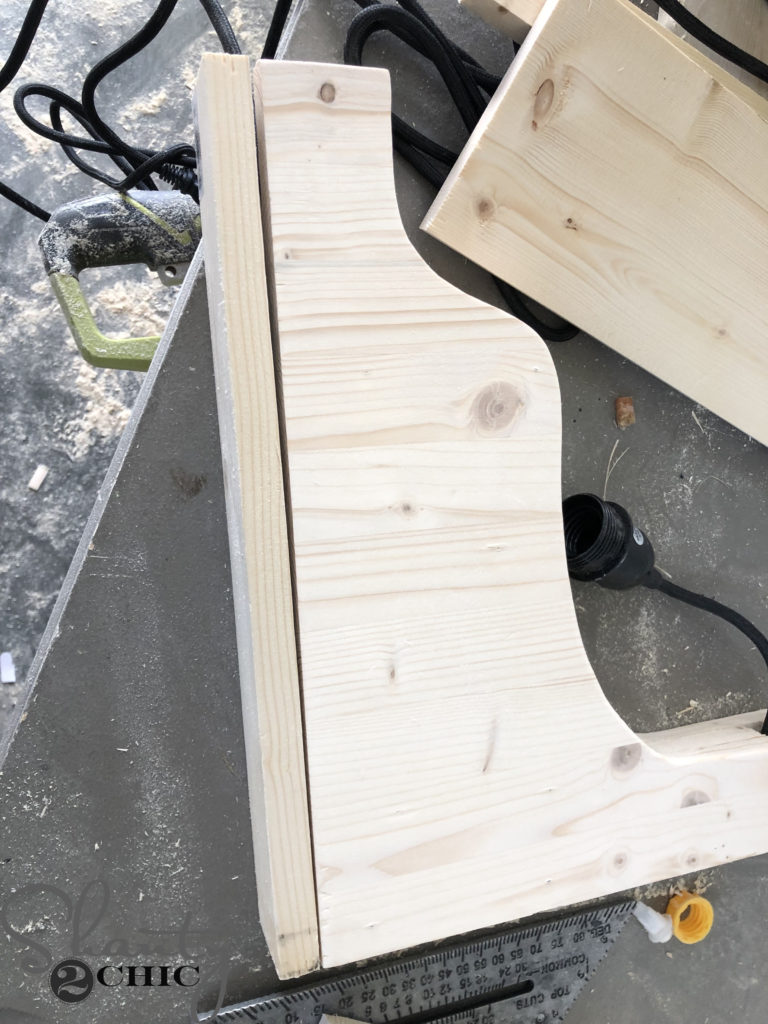
Step 4 – Attaching the Corbels Together
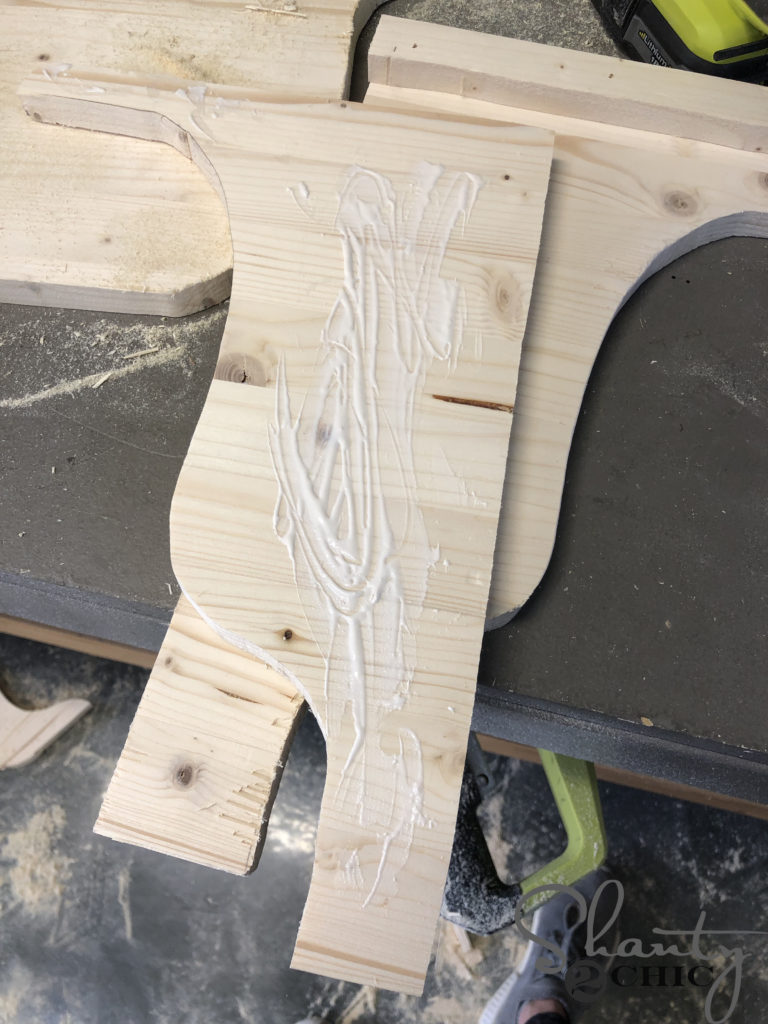
I applied wood glue to the back of the middle corbel pieces.
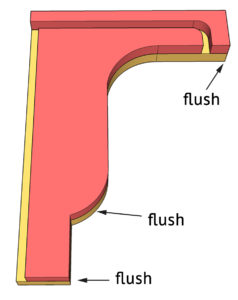
Then, I placed it on top of one of the other corbels and attached them together with 1 1/4″ brad nails. The front edges of the corbels should be flush with each other.
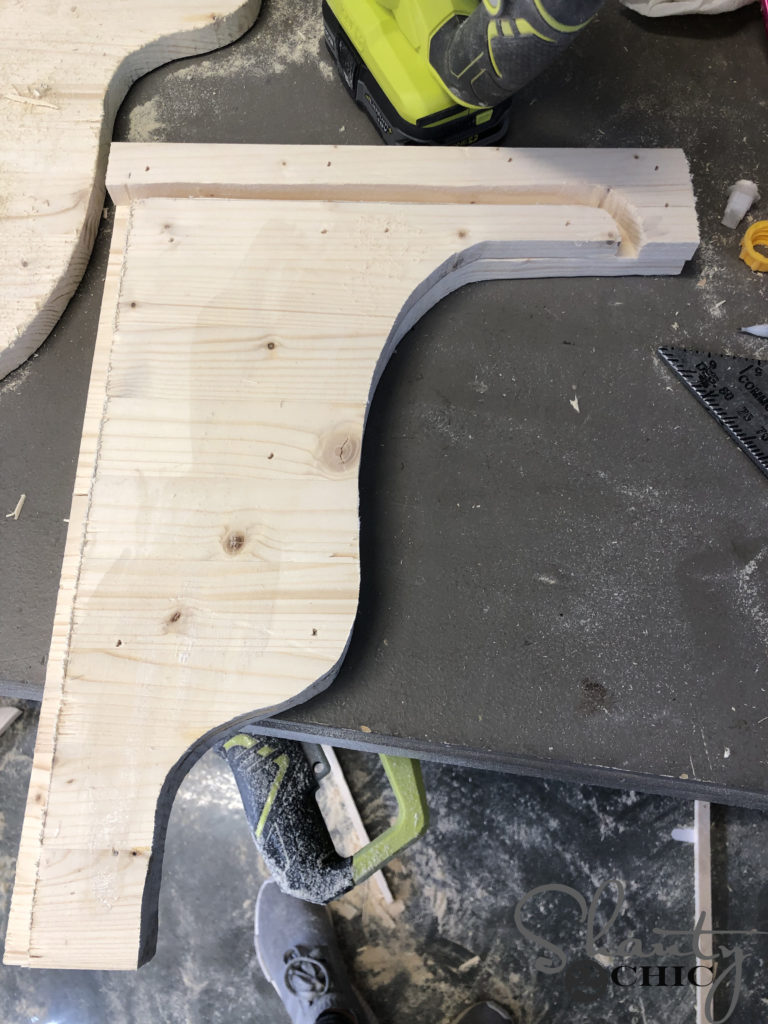
I placed the cord inside the channel.
With the cord still inside the channel, I attached the remaining corbel on top of the middle corbel with 1 1/4″ brad nails and wood glue. The edges should be flush with each other.
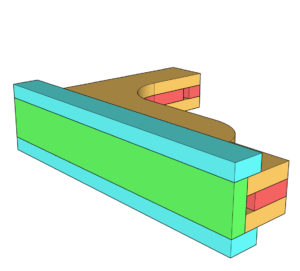
Step 5 – Adding Trim to the Corbel
I measured and cut the back, cleat and side trim pieces to size.
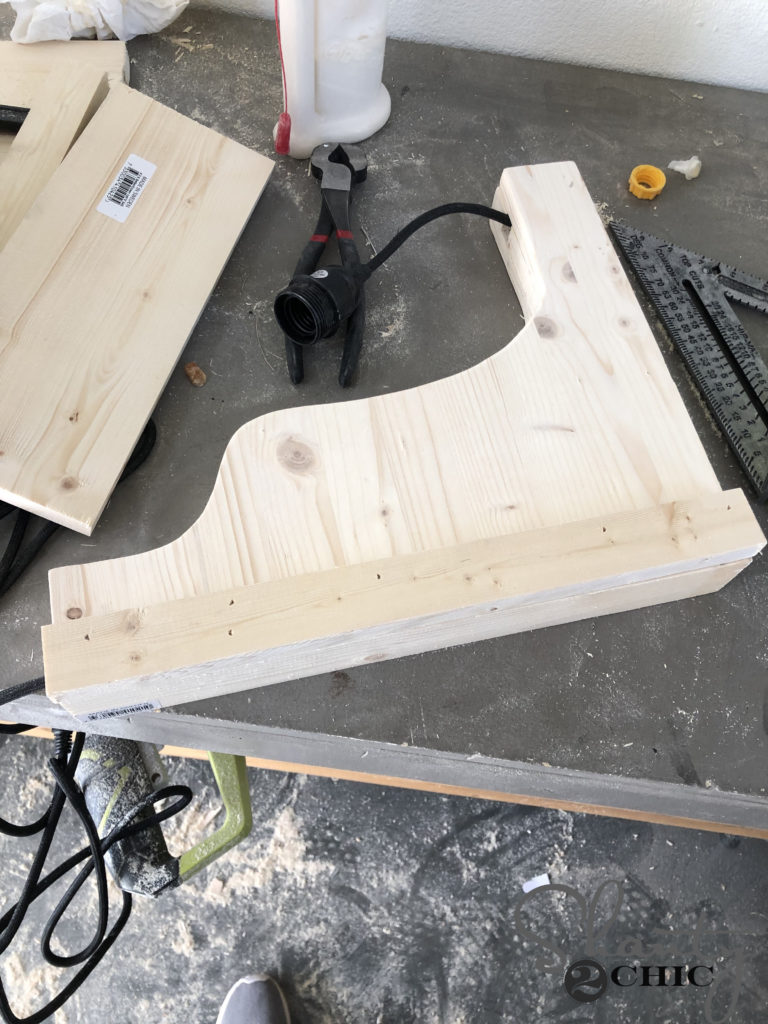
Using the back cleat as a spacer, I attached the 1×2 side, trim pieces with 1 1/4″ brad nails and wood glue. The side trim should be flush with the back of the cleat. DO NOT ATTACH THE BACK CLEAT.
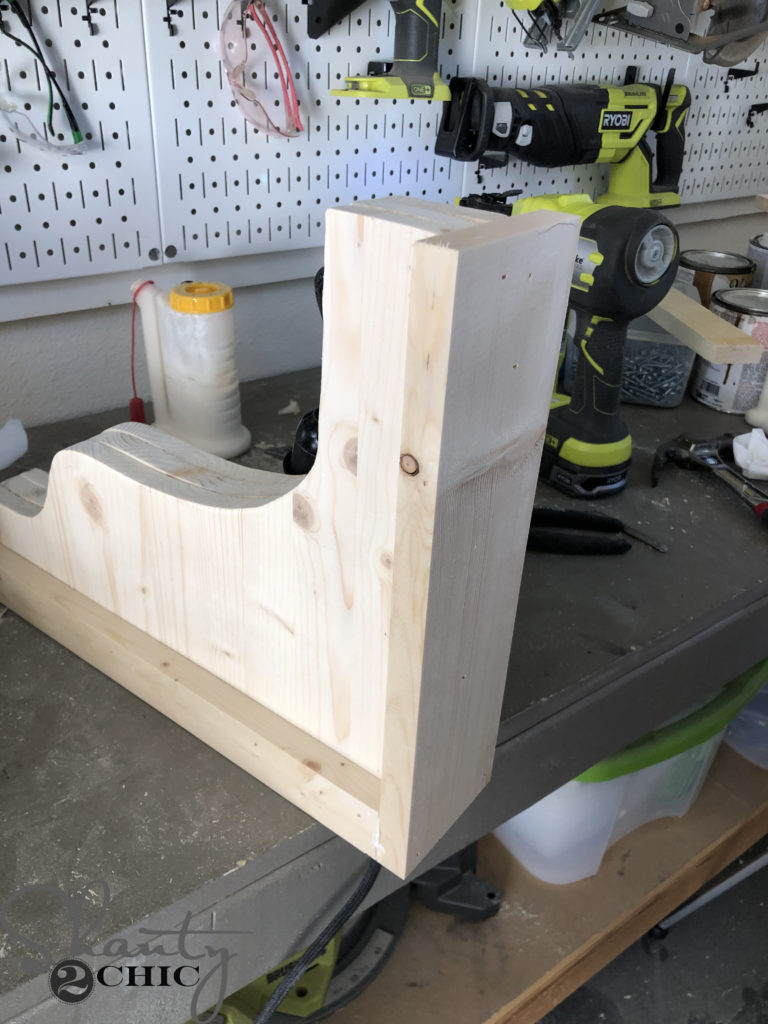
I measured and cut the top trim piece to size. Then, I attached it tot he top of the corbel with 1 1/4″ brad nails and wood glue. Make sure to attach your nails into the outside corbels and the side trim pieces to avoid hitting the cord.
Hanging the Corbel on the Wall
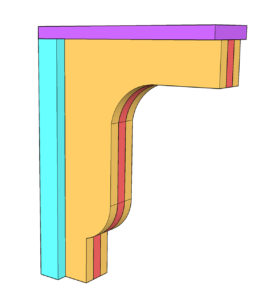
I applied my finish before I hung the corbel on the wall.
Step 1 – Attaching the Cleat to the Wall
Note: There was no stud where I decided to hang my corbel. If you are lucky enough to have a stud, you can attach the cleat to the stud with wood screws and skip step 1.
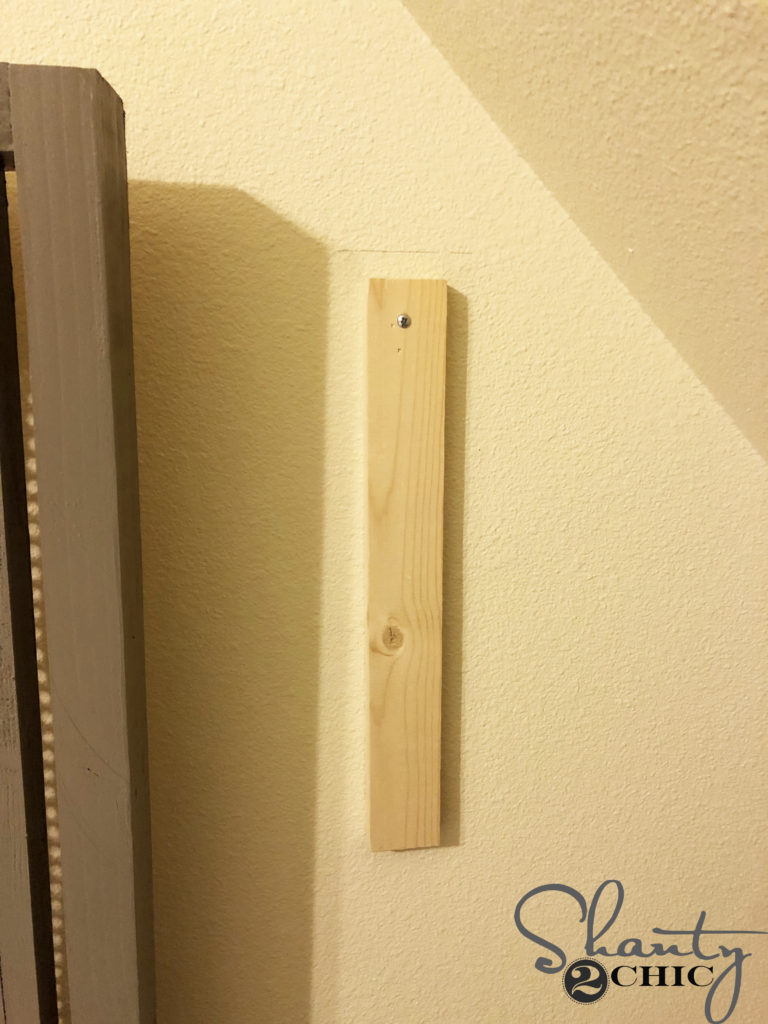
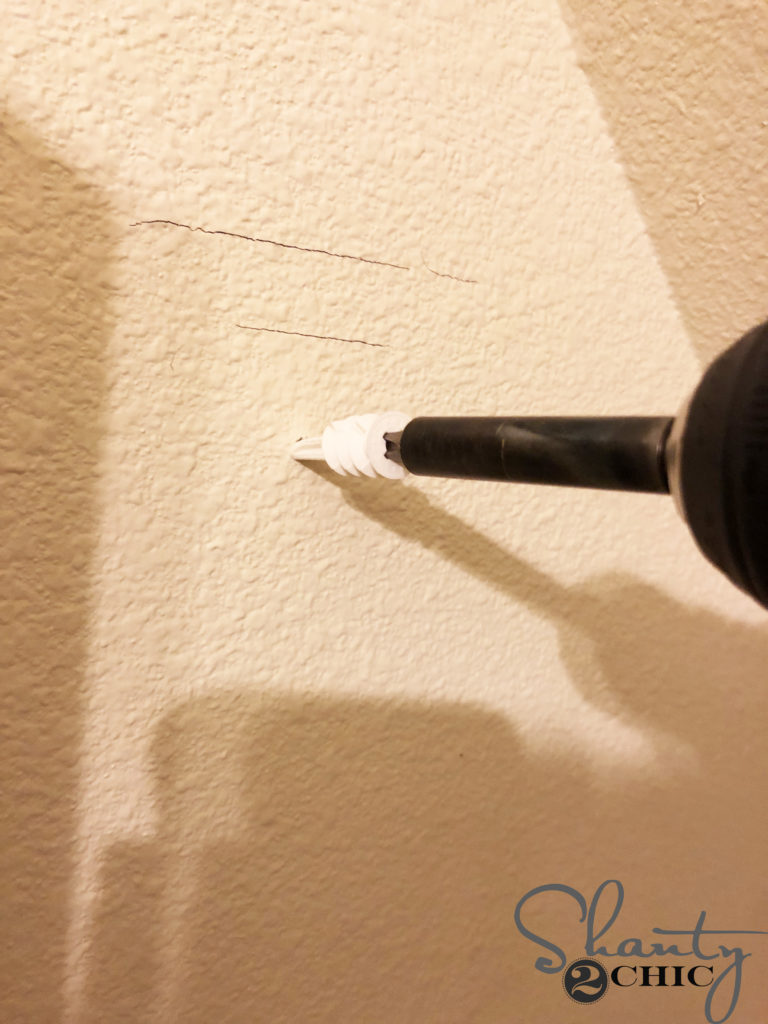
I decided where I wanted to hang the corbel and attached the back cleat to the wall with one screw (I used the screw that came with the anchors).
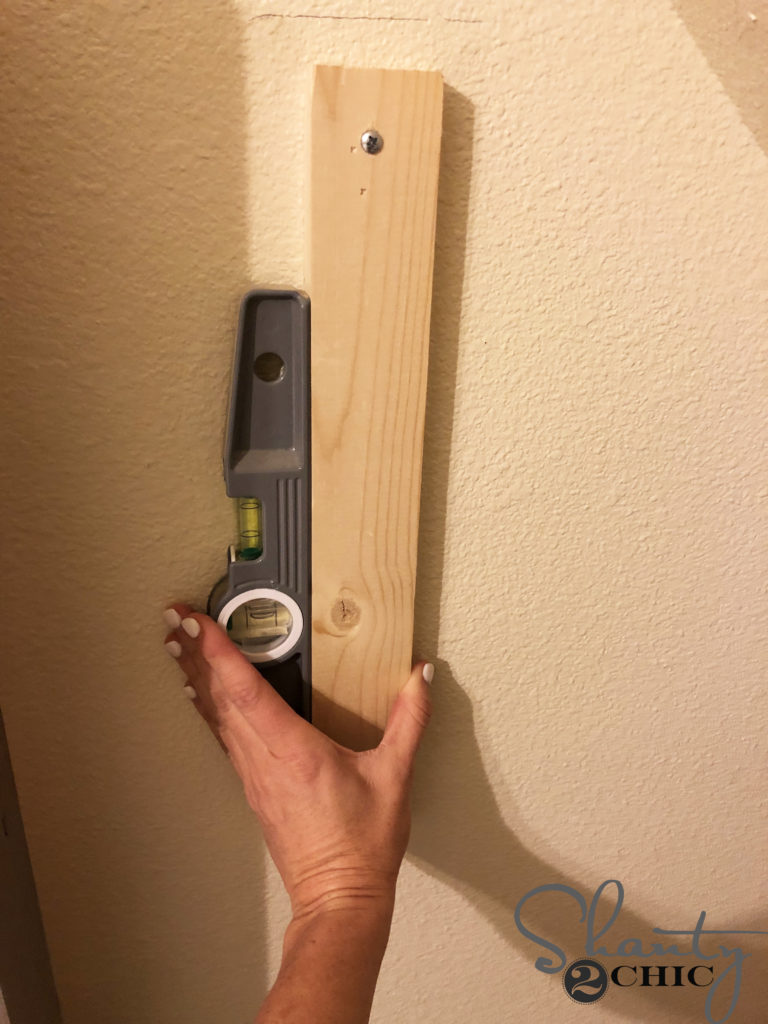
Next, I used my level to make sure the cleat was straight.
Once the cleat was level, I attached another screw at the end of the cleat. Then, I took the cleat back off of the wall to reveal the holes the screws left behind in the wall.
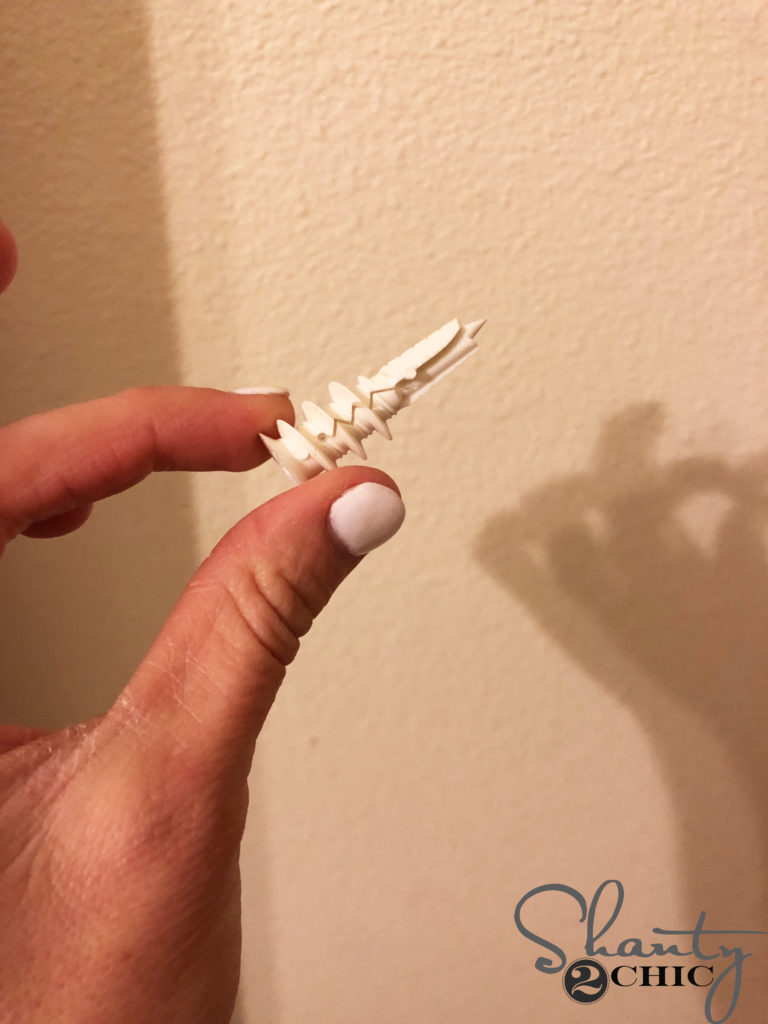
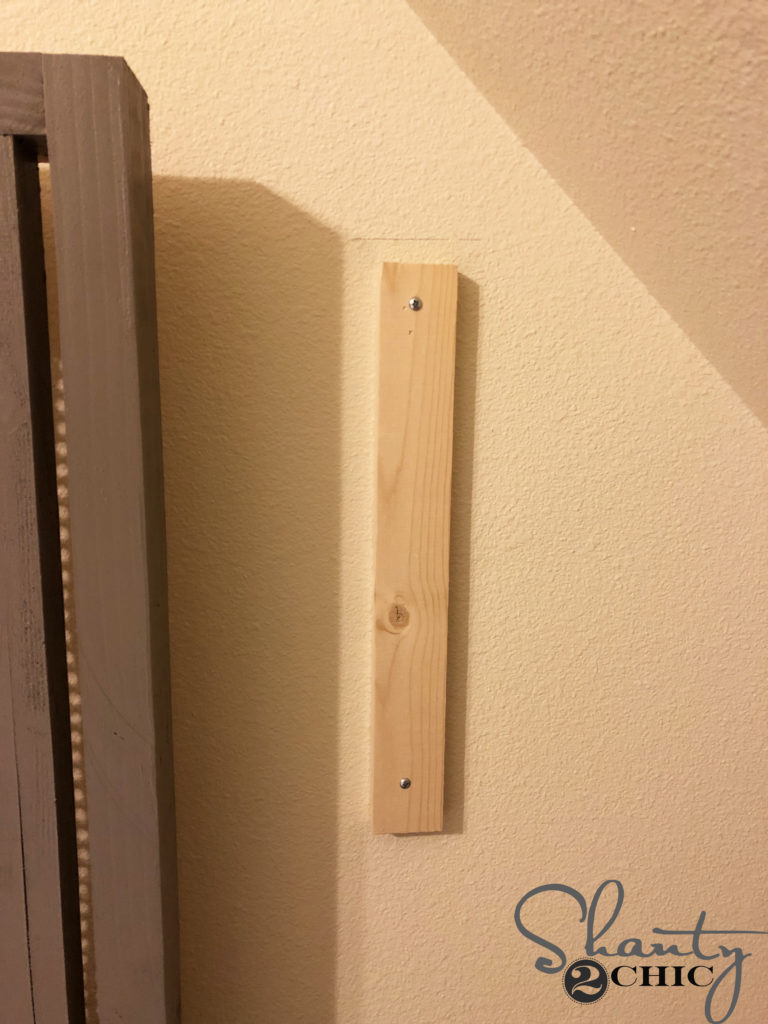
These are my favorite anchors EVER! They are so strong and so easy to use.
I screwed an anchor in each hole that the screws left behind.
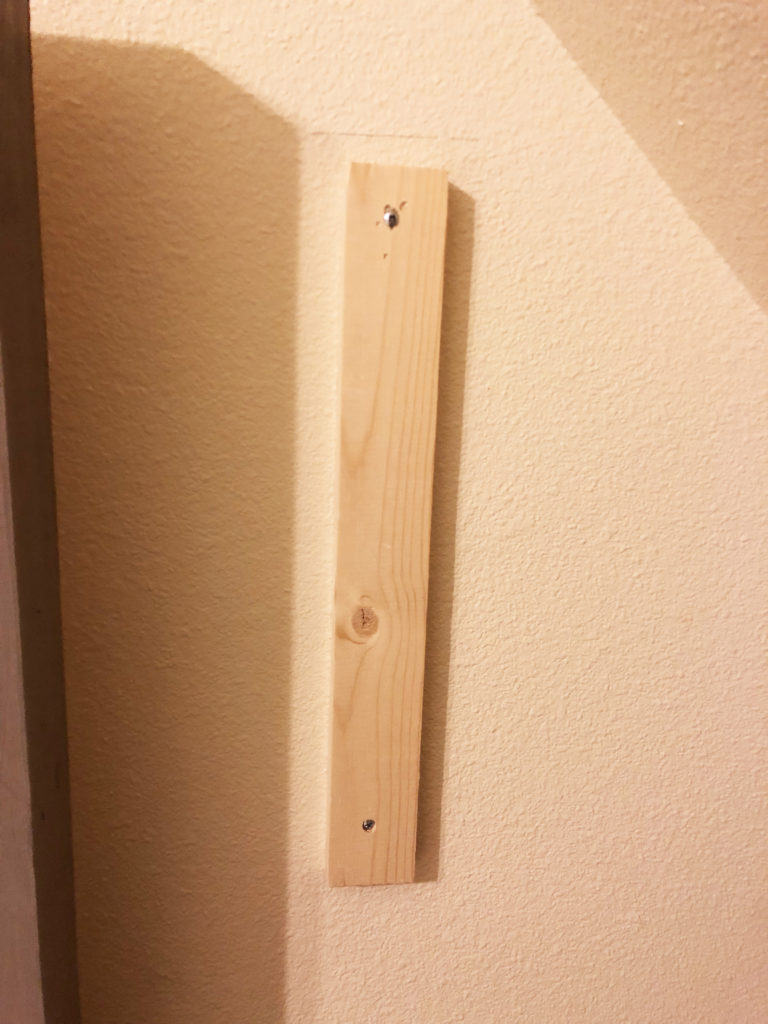
Then I put the screws through the existing holes in the cleat and into the anchors in the wall. Piece of cake!
Step 2 – Attaching the Corbel to the Cleat
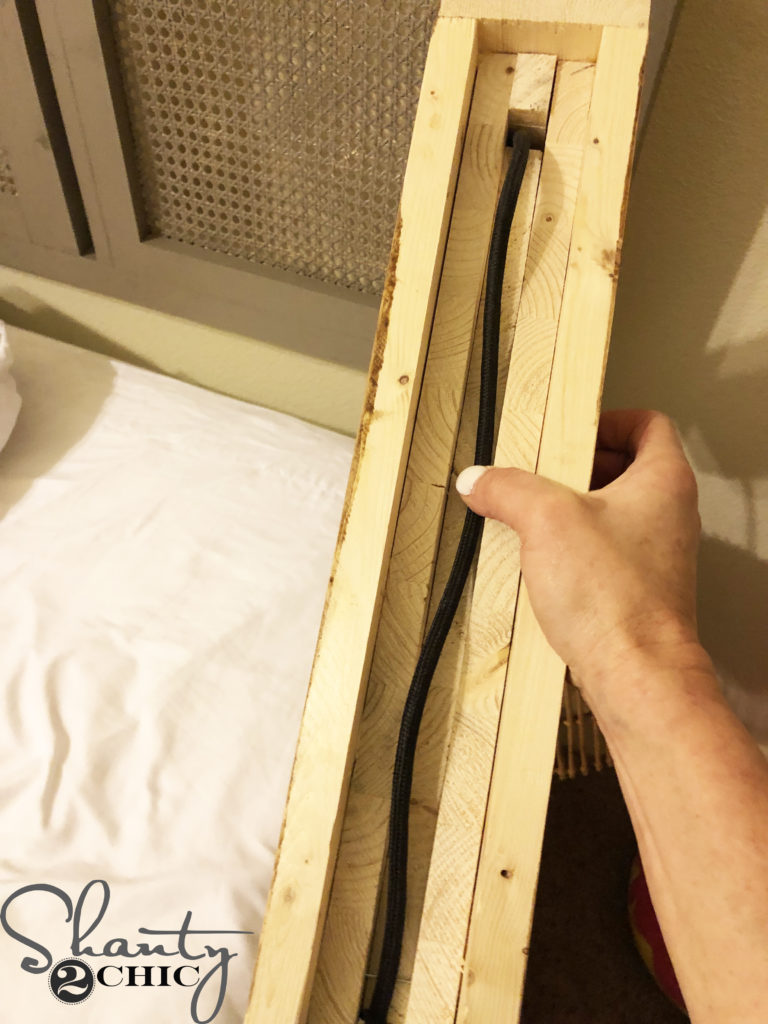
I made sure that the cord was tucked inside the channel on the back of the corbel.
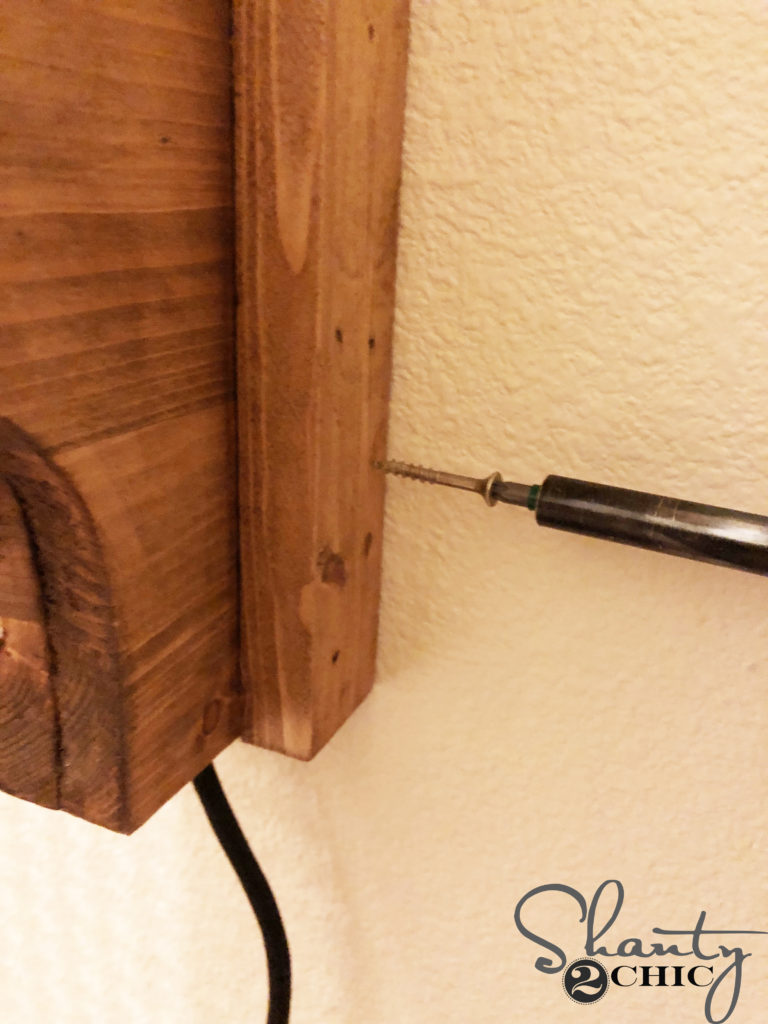
Then, I slid the corbel over the cleat and secured it in place with 1 1/4″ wood screws from the side trim and into the cleat. I put a screw on the top and bottom of each side.
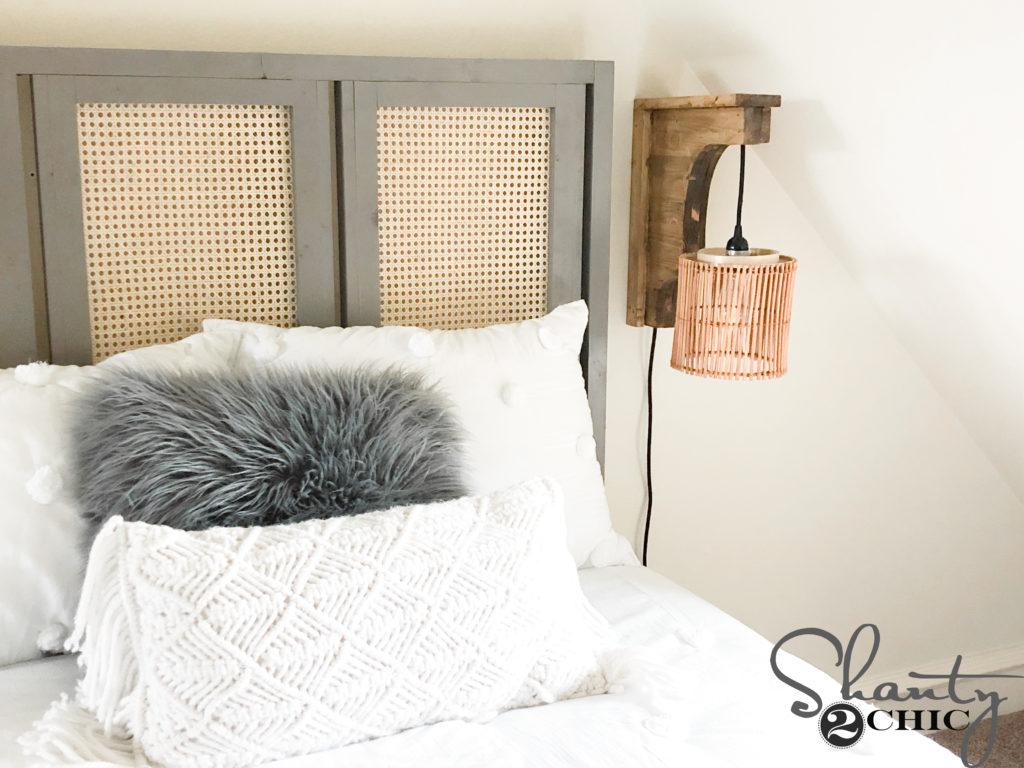
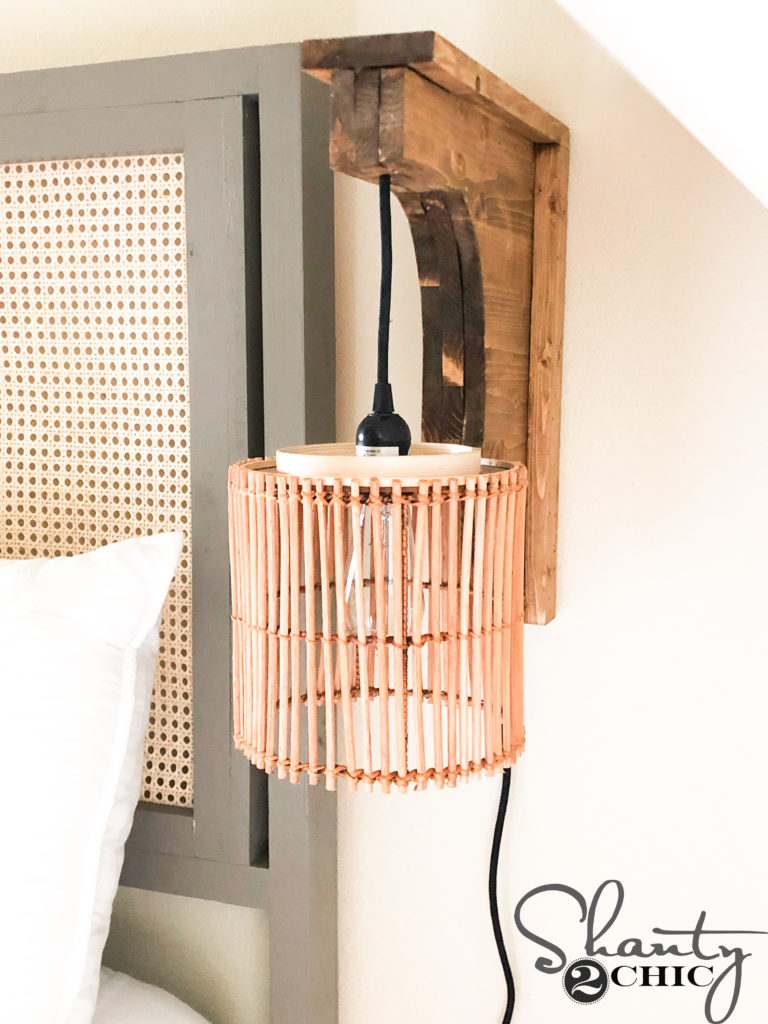
That’s it! For under $50 and a couple of hours, I was able to create a unique DIY Corbel Sconce Light that adds character and functionality to my daughter’s room!
Thanks so much for stopping by!
Happy Building!
DIY Corbel Sconce Light
Supply List
- 1 1x12x72 Pine or Common Board
- 1 Corded Light – Link in Post
- 1 Lamp Shade
- 1 1/4" Brad Nails
- 1 1/4" Wood Screws
- Wood Glue
Instructions
- Cut List

- Cut one end of the 1×12 board off to make the edge square. Mark for the corbel cut out and trace the corbel design at the top of the 1×12.

- Use a jigsaw to cut the corbel. Once the first is cut, lay the corbel on top of the 1×12, trace it and cut a second corbel. Do this for all three corbels.

- Mark the cuts for the middle corbel and use a jigsaw to cut. Cut the top, curved piece out first. Then, cut the end, straight piece. This will create a 1/2" channel for the cord to run through.

- Lay the middle corbel on top of one of the other corbels and attach them together with 1 1/4" brad nails and wood glue. The front edges of the corbels should be flush with each other.

- With the cord in the channel, lay the remaining corbel on top of the middle corbel and attach it to the middle corbel with 1 1/4" brad nails and wood glue. The front edges should be flush with each other.

- Measure and cut the back cleat and the side pieces to size. Use the back cleat as a spacer to attach the 1×2 side trim pieces. The side trim should be flush with the back of the back cleat. Attach the side trim to the corbel with 1 1/4" brad nails and wood glue.

- Measure and cut the top trim piece to size. Attach it to the top of the corbel with 1 1/4" brad nails and wood glue. Make sure to attach your nails into the outside corbels and the side trim pieces to avoid hitting the cord.

- Add a finish! Finally, secure the cleat to the wall, slide the corbel over it and attch the corbel to the cleat with 1 1/4" wood screws. You can get more details on how we hung ours in the post! Make sure to share your builds with us on social media and use #shanty2chic so we can share them too!


Would look really nice with the cord in a metal tube (I have a Pottery Barn wall mount like that). You might even consider bamboo or something with a hollow center. Gives a nice finished, neat and tidy appearance.
Interestingly simple and cute. I wish I had a way of getting Hurricane or Basket with a hard bottom, I would try it this weekend