Hi Friends! I HAVE to blog about the thrifty find I made yesterday! I really don’t like the mirrors in our bathrooms but I have been patient in changing them out because I wanted to replace them with framed mirrors (for a more custom look) and that can be costly! Well, I said it CAN be costly but as I found out yesterday my patience paid off BIG! I went to Lowe’s to buy some curtain rods when I stumbled upon a rack full of Mirr-Edge mirror trim in several different colors. I stared at the Cherry Walnut for a while and wasn’t sure how it would look but I couldn’t leave the store without it so I bought just enough for the boys bathroom upstairs.
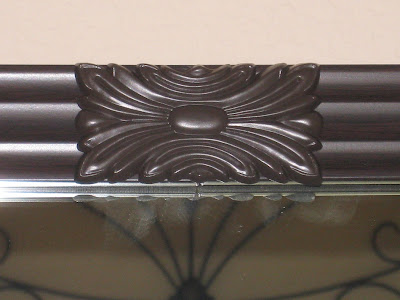
These came in sets of two so I bought 2 sets ~ one set for the horizontal trim and one for the vertical trim. I then bought 1 set of 4 corner plates. They cover the seams and add a nice aesthetic touch.
Whitney just happened to be coming over that afternoon (how convenient for me) so she assisted me in this venture. The trim is 59.5” long, so roughly 5’. The instructions say to measure each piece on the mirror, score and then crisply snap the trim to get the right fit. This did not work (circular saw is so much more efficient – learned how to use one with this project). Measure the vertical strips first and then the horizontal. After you cut them down to size there are double-sided adhesive pads that come with the trim – just peel and stick (we put 4 to 5 on each strip).

Then press the trim on the mirror and Voila!
 Once you have all of the trim up it’s time for the corner plates. No cutting here – just peel and stick the double sided, adhesive, strips and fit to each corner!
 I just love how custom my boys mirror looks now and it completely transformed their whole bathroom! Total time invested – 30 minutes! I highly recommend this product to anyone that wants a chic look in minutes!
 Okay, so I loved this product so much that I went back to Lowe’s that night to get more trim for my master bathroom.
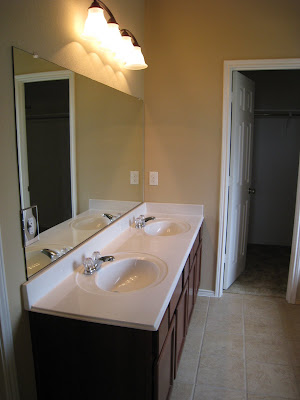
This line also carries seam plates that cover seams when you need more than 5’ of trim. My master mirror needed about 6 ft. on the horizontal pieces so I bought 1 set of 2 seam plates.
 You want the seams in the center of the mirror for aesthetic purposes so I had to buy 1 set of trim for the top and 1 for the bottom and then 1 set for the vertical sides. I measured the horizontal pieces so that they met in the center and followed up with the same steps we used for the boys bathroom. When I was done I added the seam plates to cover the seams in the center with the double sided, adhesive, pads and that was it. I LOVE MY MASTER BATH SO MUCH MORE NOW! Total time invested – 30 minutes!
I had so much trim left over that I decided to do my half bath also! I will eventually buy a framed mirror for my half bath but for now this is perfect! The only purchase I made for this mirror was the corner plates!


At the end of the day I had customized three bathroom mirrors / which in turn transformed all three bathrooms (in about 1.5 hours) ~ it just doesn’t get any better than that folks! As always ~ Enjoy!
UPDATE:
You can purchase this product in a variety of colors and styles HERE!
You can also purchase at HOME DEPOT online or in store!

I've been wanting to do this for our bathroom. I wanted to replace the mirror, but my husband said HECK NO! He was not going mess with taking that monster mirror off the wall. He's fairly certain the lazy contractor that installed it just glued it up there and he said it will rip the sheetrock. We are in the middle of a bathroom redo, so I am doing to be linking my husband to this blog post! I think even he will agree that this is perfect for what I want!
Thank you for this product find! I saw your post at thriftydecorchick and went right out and bought Mirr-Edge. OF course it took a week or two to get the project done but I love it!
You can see it here http://alittlebitofus-funkymom.blogspot.com/2009/09/love-my-new-mirror.html
Thanks again!
Oh wow! Great job. These turned out beautiful. I am sure its exciting to walk into those rooms now. 🙂
wow – great find, thanks!
I love it, too! I think Lowes is going to have a rush on mirror trim! Lol!
That is such a simple fix but it really transforms the room. Great job!
Awesome! So in what department did you find this mirr edge trim. I must have! Great job!
These look fantastic! My mom was telling me she saw this product a few weeks ago at HD. I definitely need to check it out!
Amazing! I didn't know they made this product. Now I'm wanting to try this on mine. Thanks for sharing… this is great!
Debra
Thank you for the nice comment on my blog! I love seeing people who can decorate on a budget! These mirror trims are fantastic! I'm gonna have to check it out at my local hardware!
Blessings!
Talk about bang for your buck! They all look awesome!
No way! I had no idea such a thing existed. Makes such a difference. Hope those boys know they'd best not be spitting toothpaste on that lovely frame. 🙂
I love that idea! What a huge difference it makes! I wish I had known about that before I took my door mirror down! Thanks so much for joining in on the party! jen
Absolutely love it! I have mirrors like that in my house and this would be a great solution. Thanks for the inspiration!
I had no idea that you could buy precut pieces for the mirror – I want to do the same thing but thought I'd have to make it myself. {{off to Lowes to find my own set!}}