 I painted the red stripes with Spa Blue acrylic and glazed it all over with Ralph Lauren Smoke Glaze. I was satisfied with the way she turned out….
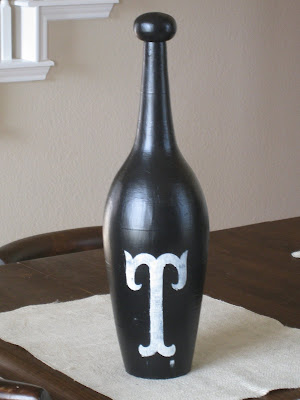
 Until our Shanty Shopping Spree to Waco. We visited a place called Spice. This is a wonderful store with very creative knick knacks although they come with a hefty price tag…needless to say I bought nothing there but we came away with MANY great ideas. We fell in love with these black vintage-looking bowling pins so I decided to transform my transformation once again. I painted her in 2 coats of Behr Forever Black Satin.

She was a little boring all black so I decided to personalize her a bit with my Cricut. I dry brushed with a “T” stencil (initial of our last name) using Antique White acrylic and a stencil paint brush.

Ahh….that’s much better…I wonder how she’d look with some twine….
I have a quick confession to make ~ I have never owned a glue gun in my life ~ I always wing it with super glue or whatever adhesive I find around the house but I found this cheap-o glue gun at Hobby Lobby for $2.50 with my coupon so I caved and bought it. Whit made fun of my new “tool” but she works like a charm! Ha!
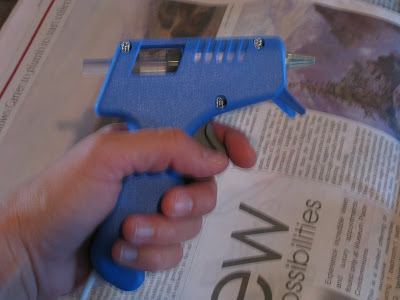
I put a dab of glue at the top of the pin and started to wrap the twine tightly around the top. I repeated this step every full wrap around to the back.

Now for a little extra ~ I have had 3 of these decorative balls for years and wasn’t really sure what to do with them….
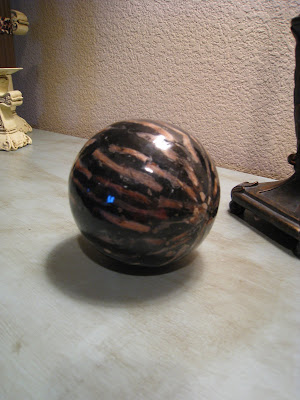 I decided to make them a part of my bowling pin project. I started by painting them with 2 coats of Behr Cozy Cottage Satin.

 To add the twine I repeated the steps I used on the pin.
 My finished vintage looking bowling set!


I will be posting this on Between Naps on the Porch for Met Monday! Go check it out!
http://betweennapsontheporch.blogspot.com/2009/09/welcome-to-36th-metamorphosis-monday.html


Very cute idea!
I would never have thought to paint the balls, but they look great and tie in perfectly.
Kimberly 🙂
Hey… It turned out so cute…
xoxo
Julie
awesome!!
barbara jean
I would have never thought that was a bowling set! It looks amazing! Great job!
Hello cute girls!Just blog hopping and found your adorable site!Just fell in love with your latest project!
I'll be back for a little blog browsing!
All my best,
Becca
Blue Cricket Design
Well, this is the cutest thing I've ever seen and now, don't cha know, I am looking for a bowling pin…this is waaaay cute.
These turned out so great, I love them!
How creative! Who would have thought to do something like this! I love them all.
Be a sweetie,
Shelia 😉
Is there anything you girls can't do? I love both projects…and yea, that twine is a perfect addition. Thanks for all the neat ideas you share!
Nancy
That's really unique and COOL! LIKE IT!
Very cool – I have never seen a vintage set before !
Kammy
ok, that SERIOUSLY looks like something we'll be seeing in a PB catalog or something. Too Cute!
Oh so lovely!!!
Oh, I LOVE them!! I would have never thought to paint the decorative balls..Thanks for the inspiration!!
Very cute. Not sure which one of you did the cute dice but I saw some this weekend at Garden Ridge & let's just say they were way more expensive than your cute set.
Not sure if you can use this info or not but if you want to shorten your link to Naps on the Porch (or any other blog) just type in the blog name & then highlight it, go up to the hyperlink box & put the blog address in box.
When it publishes it will just be the words that you highlighted & not the long address.
Sorry for the long comment:)