 I painted the red stripes with Spa Blue acrylic and glazed it all over with Ralph Lauren Smoke Glaze. I was satisfied with the way she turned out….
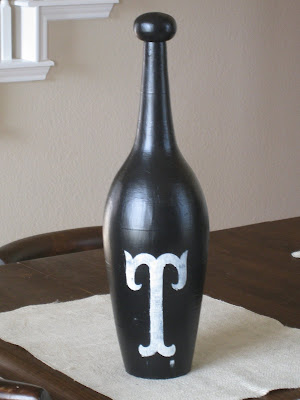
 Until our Shanty Shopping Spree to Waco. We visited a place called Spice. This is a wonderful store with very creative knick knacks although they come with a hefty price tag…needless to say I bought nothing there but we came away with MANY great ideas. We fell in love with these black vintage-looking bowling pins so I decided to transform my transformation once again. I painted her in 2 coats of Behr Forever Black Satin.

She was a little boring all black so I decided to personalize her a bit with my Cricut. I dry brushed with a “T” stencil (initial of our last name) using Antique White acrylic and a stencil paint brush.

Ahh….that’s much better…I wonder how she’d look with some twine….
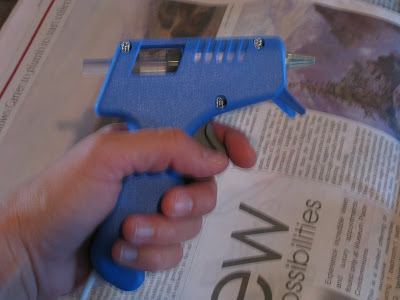
I have a quick confession to make ~ I have never owned a glue gun in my life ~ I always wing it with super glue or whatever adhesive I find around the house but I found this cheap-o glue gun at Hobby Lobby for $2.50 with my coupon so I caved and bought it. Whit made fun of my new “tool” but she works like a charm! Ha!
I put a dab of glue at the top of the pin and started to wrap the twine tightly around the top. I repeated this step every full wrap around to the back.

Now for a little extra ~ I have had 3 of these decorative balls for years and wasn’t really sure what to do with them….
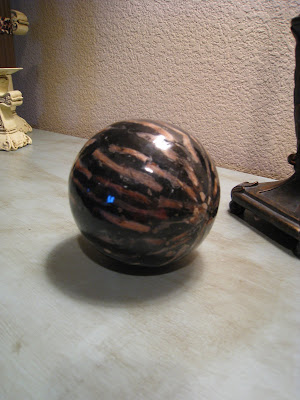 I decided to make them a part of my bowling pin project. I started by painting them with 2 coats of Behr Cozy Cottage Satin.

 To add the twine I repeated the steps I used on the pin.
 My finished vintage looking bowling set!


I will be posting this on Between Naps on the Porch for Met Monday! Go check it out!
http://betweennapsontheporch.blogspot.com/2009/09/welcome-to-36th-metamorphosis-monday.html


very cool! I love black and white!
Smiles!
Michelle
Clever, clever! Love it and I especially like the little jute twine addition.
Very Cool!
Very neat idea! I would have never thought to do that…I just love the vintage feel of it and the lettering on the front. Great job!
How neat! Love the T!
They look great! Very creative! Thanks for sharing.
Too cute! I love the pin after your last transformation the best! Love the twine! You two are super talented! I love visiting!
Okay, so I was at Marshalls today and I saw these pins, I had them in my hand and then thought "self, what are you going to do with these?" and of course I put them back. But Aha! You have come up with a great idea – I think I am back to Marshalls tomorrow!
Chelsea
Oh wow, I love it! I'd never have seen such possibilities for a bowling pin! The monogram display is ingenious!
What a great transformation! The stripes were cool, but now the set is amazing. Thanks for commenting on my blog and I just signed up to follow you. I can't wait to see what new creations you come up with! Thanks for the inspiration.
What an interesting find and a cool transformation. You've got some really unique accessories now, great job!
Amazing transformation. Love your sense of style. Marla
That's awesome… T for Tammy ! 😉
Thanks for stopping by.
Oh what a cute idea!! I just love your blog. Always full of fun ideas.
http://theshadesofpink.blogspot.com/2009/09/room-month-is-back.html
The two of you are soooooo creative! Love your blog and all you do. I'm defintely a fan.
Gail
P.S. I want a Cricut!