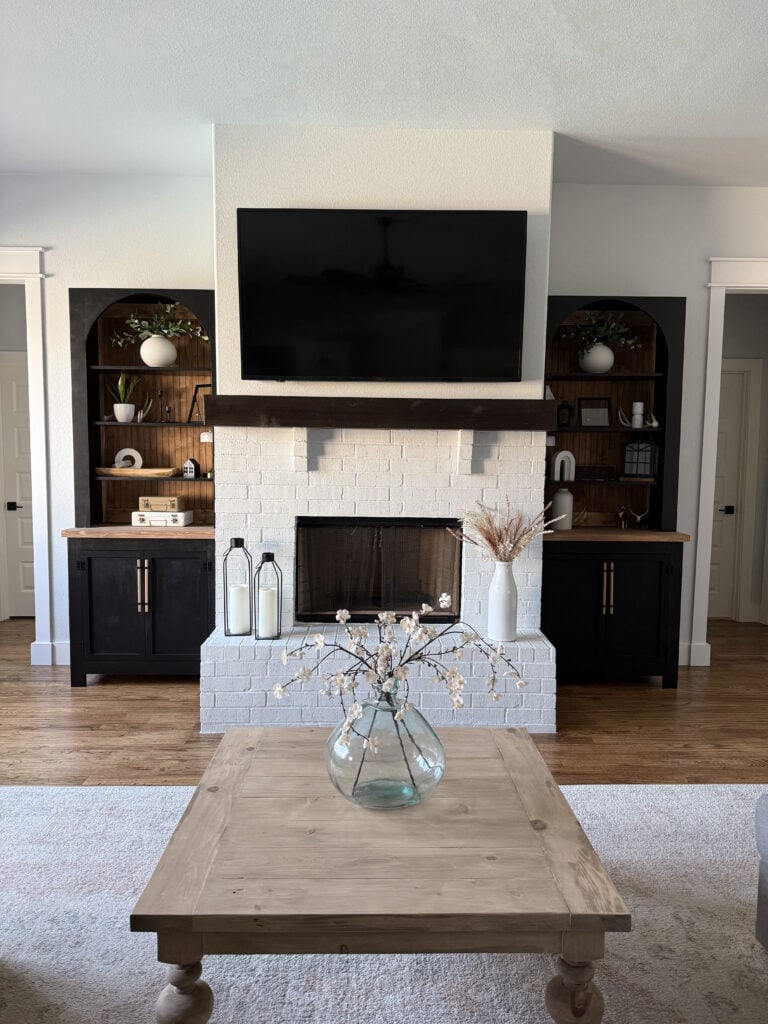
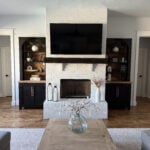
If you’ve been wanting to build an arched bookcase, this tutorial walks you through every step, from the cabinet base all the way up to the arched hutch. These are the exact bookcases I built for both sides of my fireplace in my current home. I’ve been here for 2 1/2 years now, and when I moved in, I had almost no furniture because my plan from the beginning was to build custom pieces for the entire house. I’ve slowly been working room by room, building things that make this place feel more like home.
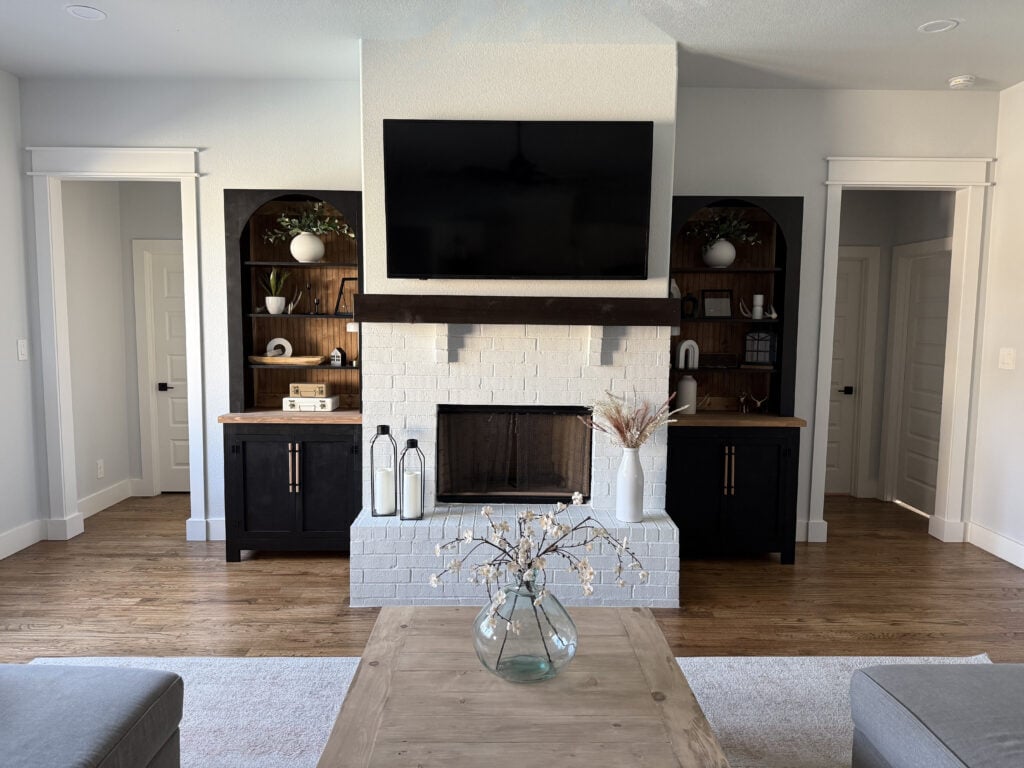
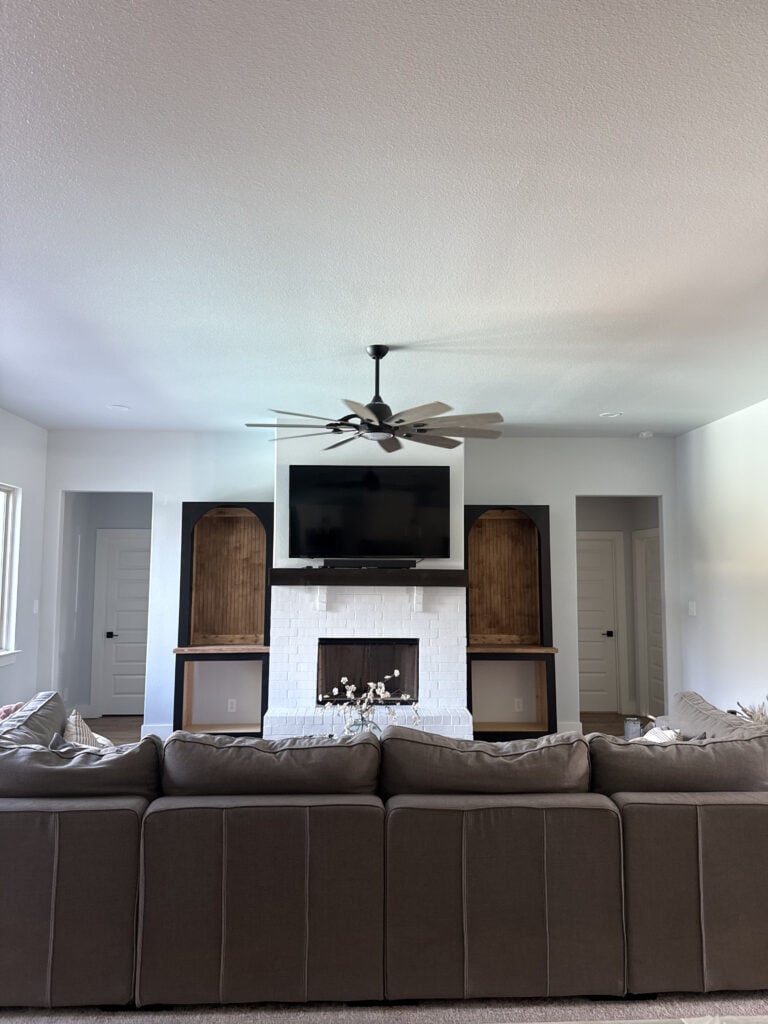
The space next to my fireplace has stayed empty this whole time because I could never quite picture what I wanted there. I’ve done built-ins around fireplaces in previous houses, but this time I wanted something different, something free-standing, modular, and easy for anyone to customize to fit their own space. Once the idea for arched bookcases finally clicked, everything fell into place. And the best part is that building them myself saved me so much money compared to buying anything similar in retail, while still giving me the exact size and style I envisioned.
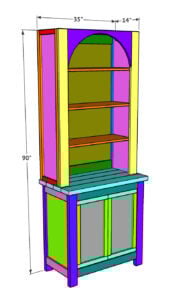
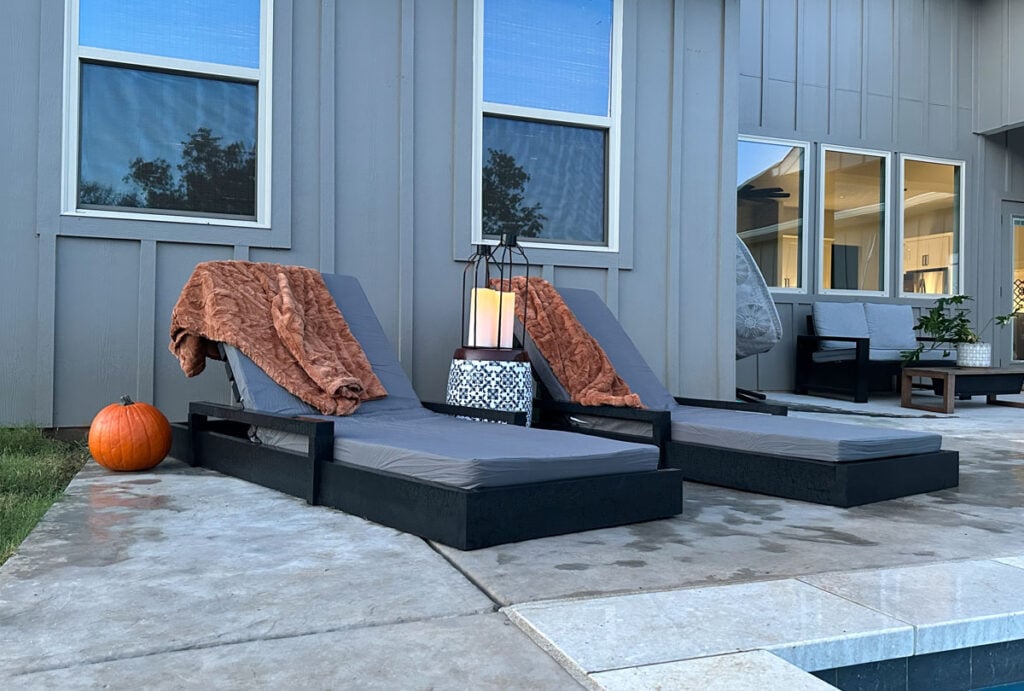
These bad boys are 7 1/2 feet tall and cost so much less than anything I could find in retail, especially in this size. They filled the space perfectly and finally made the room feel finished.
Now, let’s get to building!
Click here to jump to the free printable plans!Table of Contents
How to Build a DIY Arched Bookshelf
Tools Used
- Miter Saw
- Drill
- Kreg Jig
- Jigsaw
- Brad Nailer
- Orbital Sander
- Kreg Rip Cut w/ Circular Saw or Table Saw
- Kreg Shelf Pin Jig (optional)
Materials
- 4 –1×4×8 Primed MDF
- 1 – 1×12×8 Primed MDF
- 2 – 1×4×8 Pine or Common Boards
- 4 – 2×4×8 Framing Boards
- 2 – 2×6×8 Framing Boards
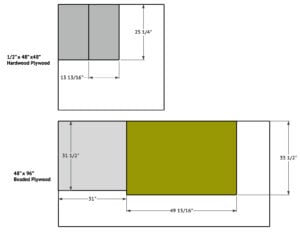
- 1 – 3/4″ × 48″ × 96″ MDF
- 1 – 1/2″ × 48″ × 48″ Hardwood Plywood
- 1 – 48″ × 96″ Beaded Plywood (only need one sheet if building 2 bookcases)
- 2 – Cabinet Pulls
- Shelf Pins (optional)
- 4 – Cabinet Hinges
- 4 – Magnetic Door Catch
- Wood Glue
- Finish
Building the Cabinet Base
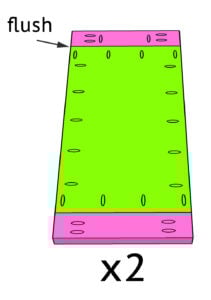
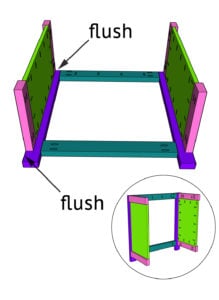
Step 1: Build the Side Panels
Cut your side aprons and panels to size. I used my Kreg Rip Cut to rip all of my boards. This is so much easier than fighting the heavy sheets of MDF onto my table saw.
- You can find the new Kreg Rip Cut here.
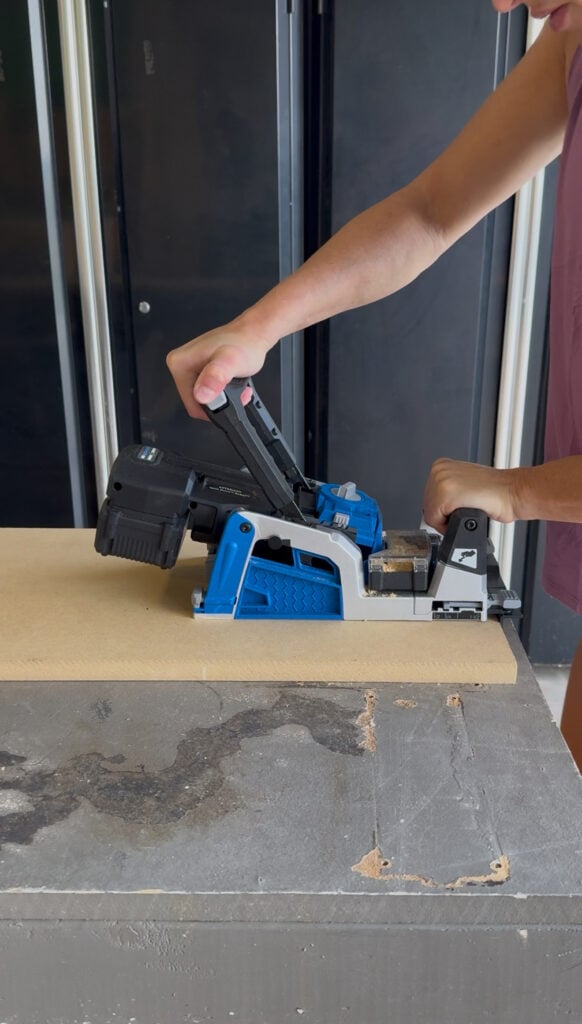
Drill 3/4 inch pocket holes around all sides of the panels. I used the new Kreg Rebel Pocket Hole Joiner. This is one of our favorite new Kreg tools! It’s like a portable Foreman and makes drilling pocket holes into panels so easy. No moving the panel, just set the Rebel on the board and drill!
- You can find the Kreg Rebel here.
Drill 1 1/2″ inch pocket holes on both ends of the apron pieces plus one edge of the top piece. You can use the Kreg Rebel for these pocket holes too but I like to use our favorite Kreg Jig 720Pro for boards.
- Find the Kreg Jig 720Pro here.
- Find the new Kreg 20V Drill here.
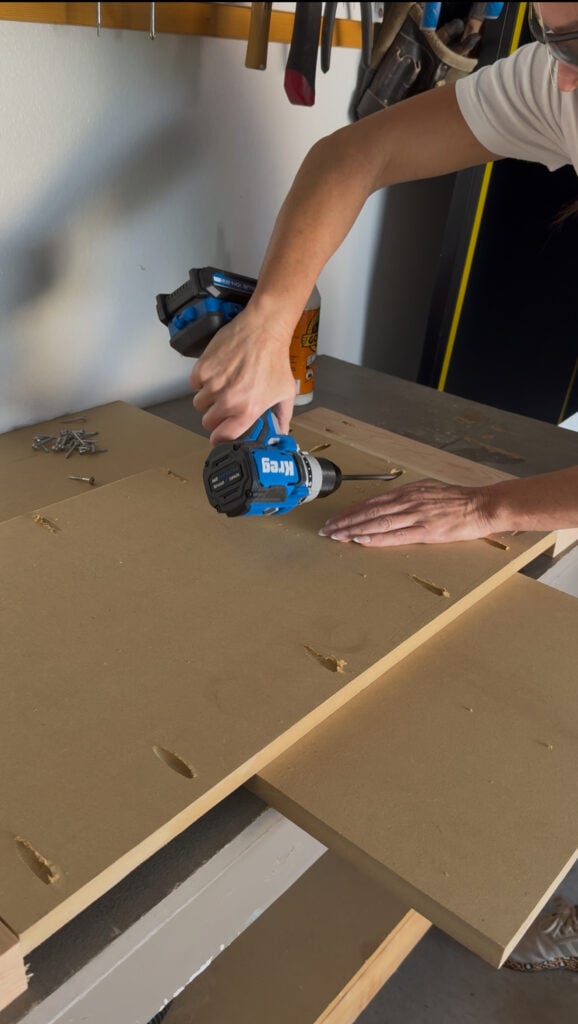
When you attach the panels to the 2×4 pieces with 1 1/4″ pocket hole screws and wood glue, make sure the back of the panel is perfectly flush with the aprons.
I built two identical side assemblies.
Personal note: I wanted adjustable shelves inside the cabinet, so this is where I used my Kreg Shelf Pin Jig. If you don’t need adjustable shelves, you can simply drill 3/4″ pocket holes at both ends of any fixed shelf board and attach it between the panels with 1 1/4″ pocket hole screws and wood glue.
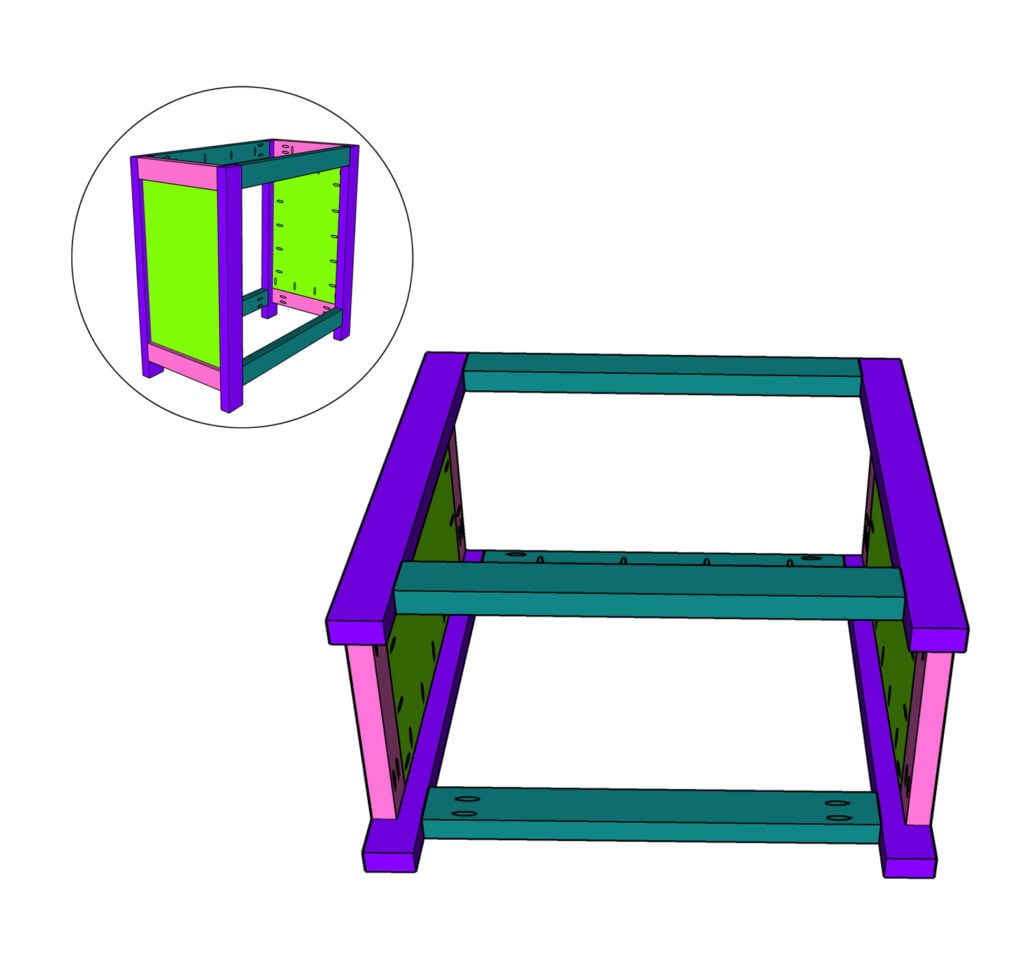
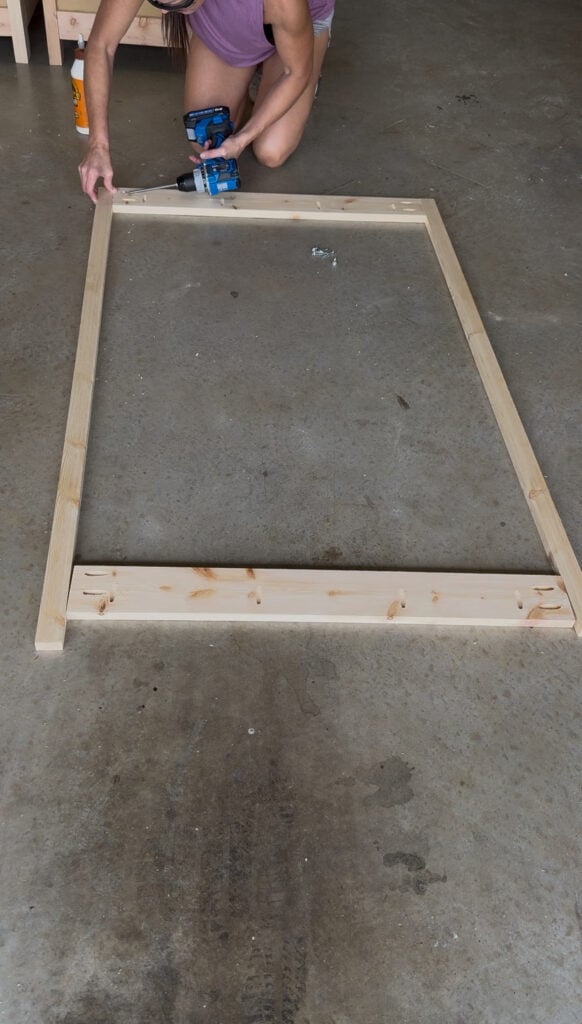
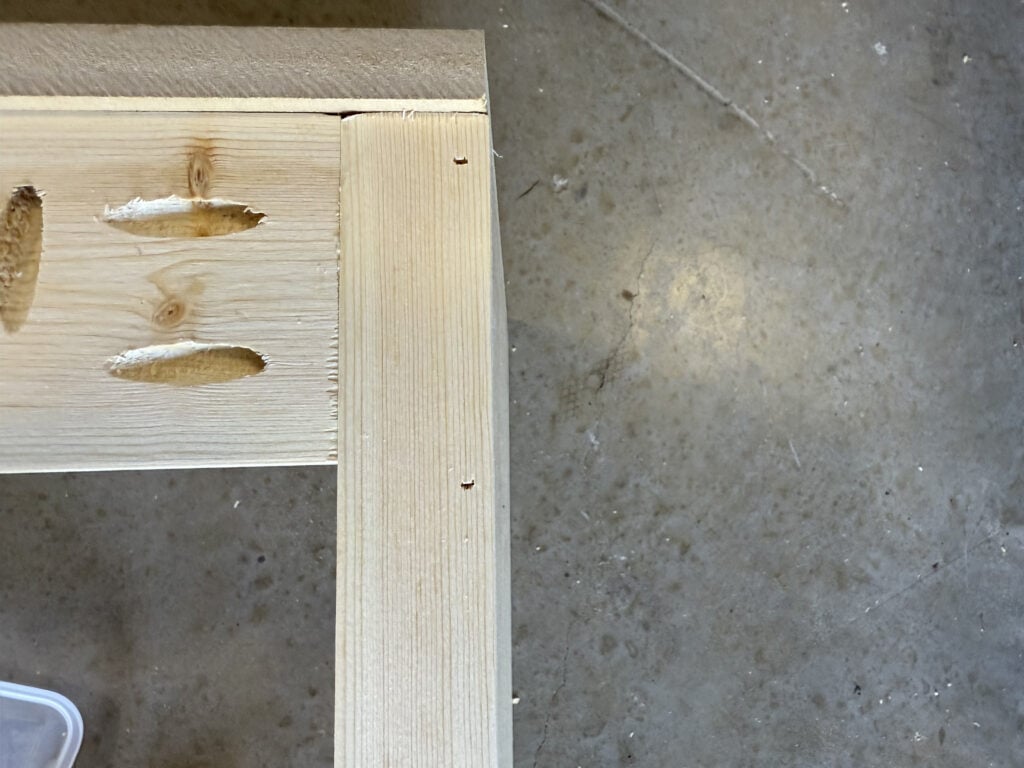
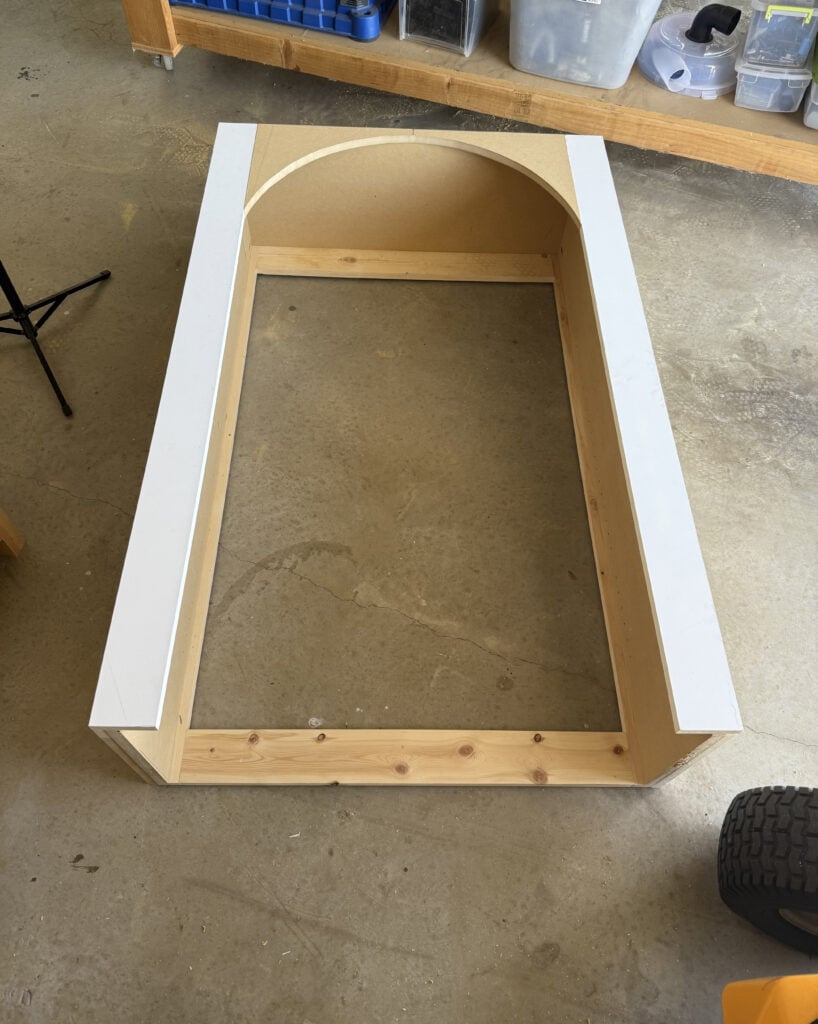
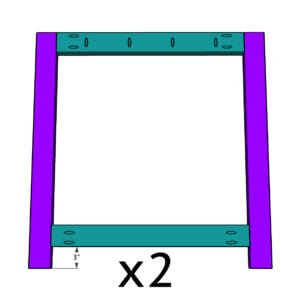
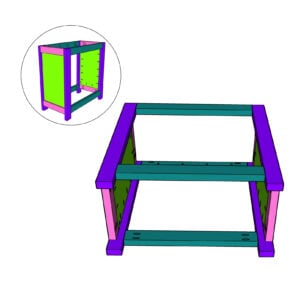
Step 2: Build the Cabinet Frame
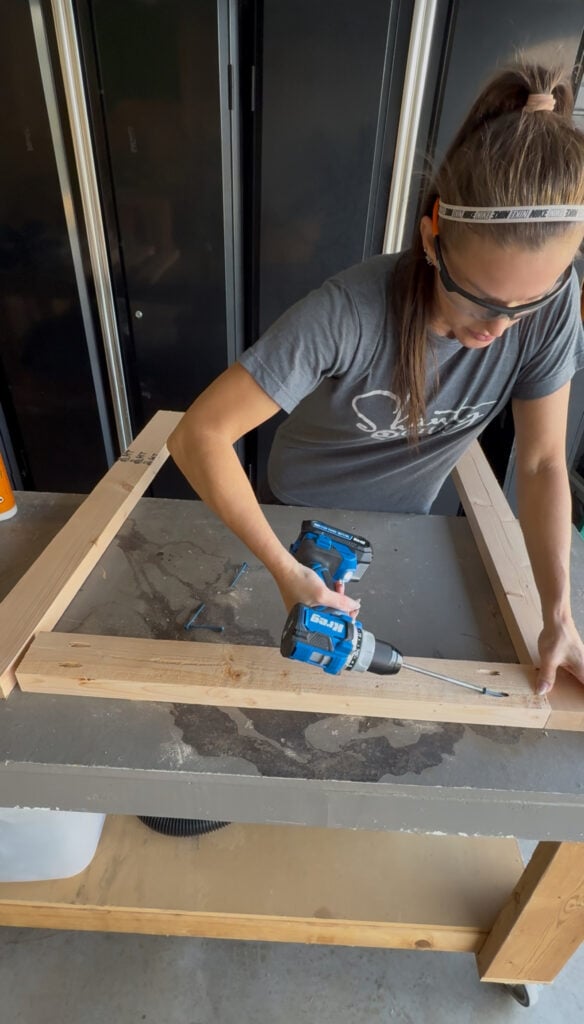
Cut all the cabinet frame pieces. Drill 1 1/2 pocket holes at the ends of the horizontal pieces and along one edge of the top board. Assemble everything using 2 1/2″ pocket hole screws and wood glue.
Your bottom horizontal board should sit 3″ up from the bottom of the legs.
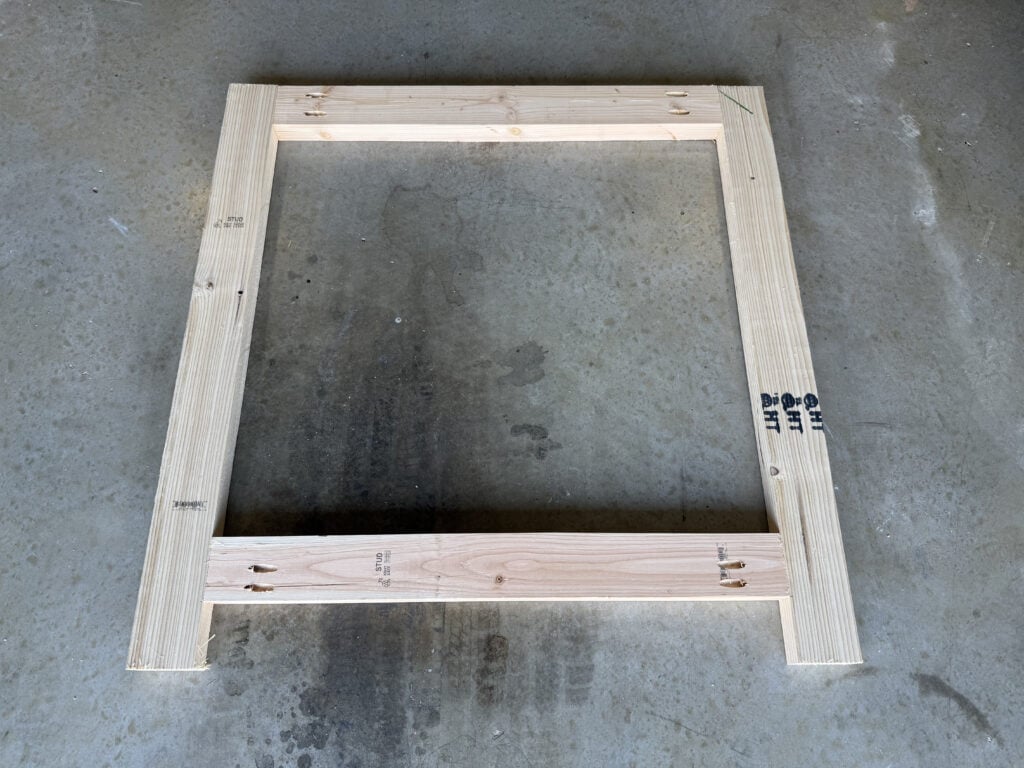
Make two matching frames.
Step 3: Attach Side Panels to the Frames
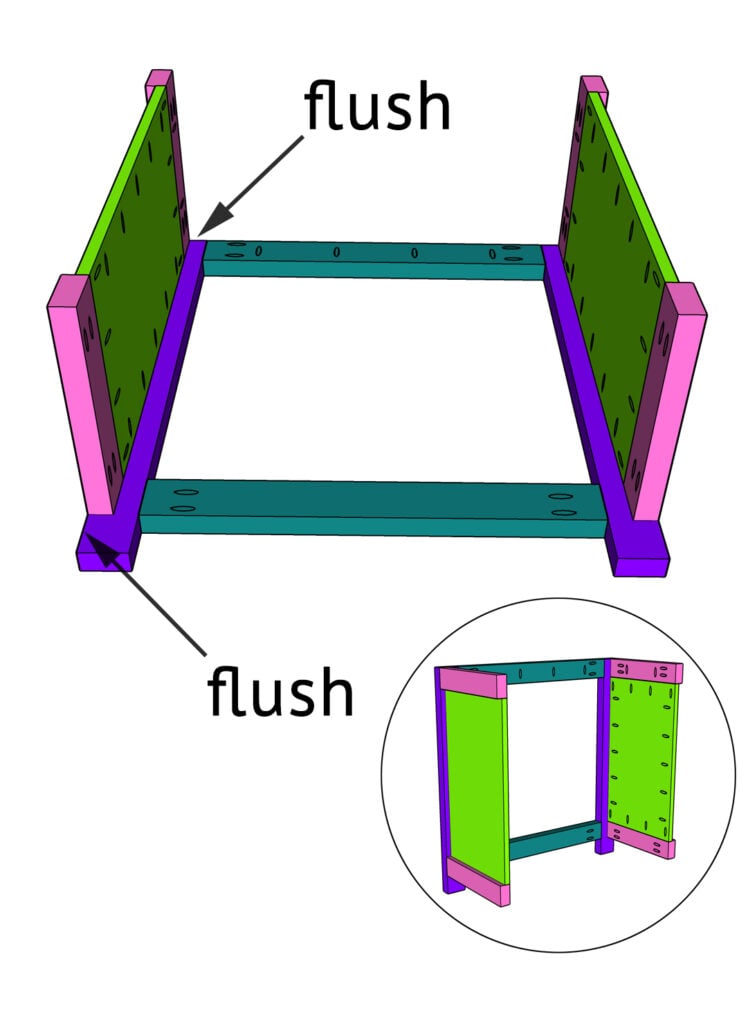
Attach a side panel to each side of the cabinet frame. Attach with 1 1/4” pocket hole screws through the panels and 2 1/2” pocket holes through the aprons. Use wood glue. The side aprons should be flush with the frame legs and the top aprons should be flush.
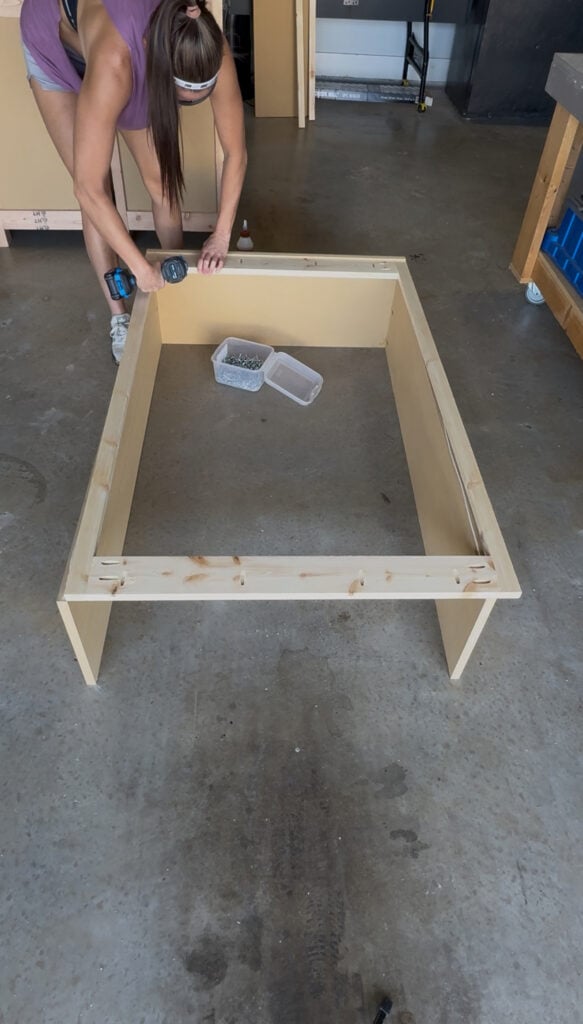
Step 4: Connect the Frames
Attach the second frame to the side panels using 1 1/4″ pocket hole screws, 2 1/2″ pocket hole screws and wood glue. This creates the full cabinet box. Once this part was assembled, it finally started looking like a piece of furniture instead of a pile of boards.
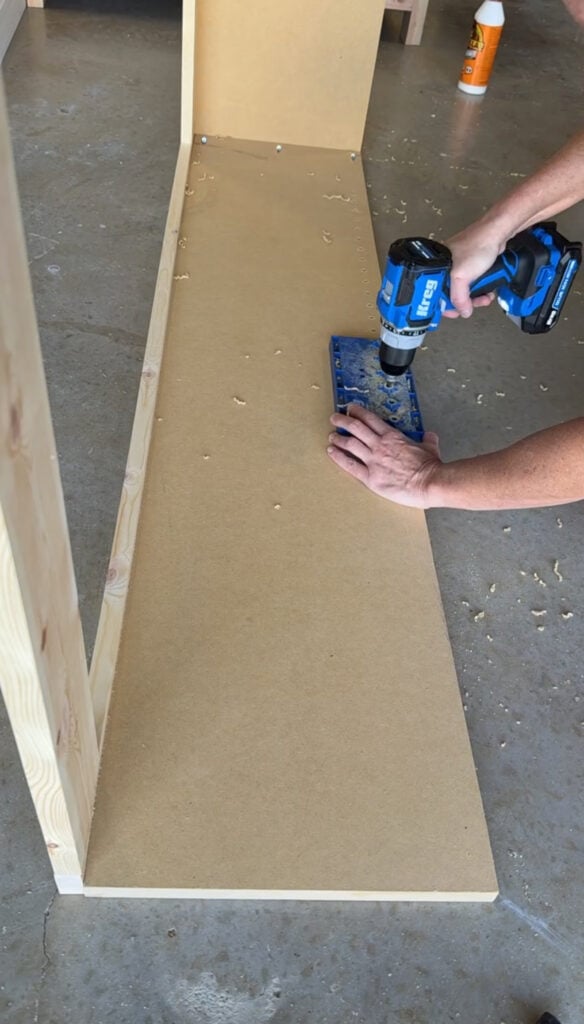
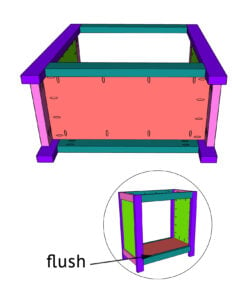
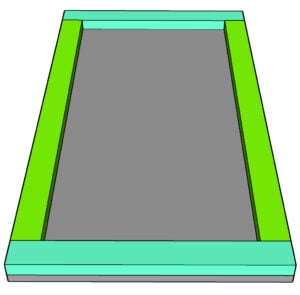
Step 5: Install the Bottom Panel
Measure and cut your bottom panel. Drill 3/4″ pocket holes along all edges, then attach it inside the cabinet using 1 1/4″ pocket hole screws and wood glue. The panel should sit flush with the top edge of the bottom apron. I like to use my Kreg VersaGrip clamps to hold pieces in place while attaching!
- Find the Kreg VersaGrip Clamp here.
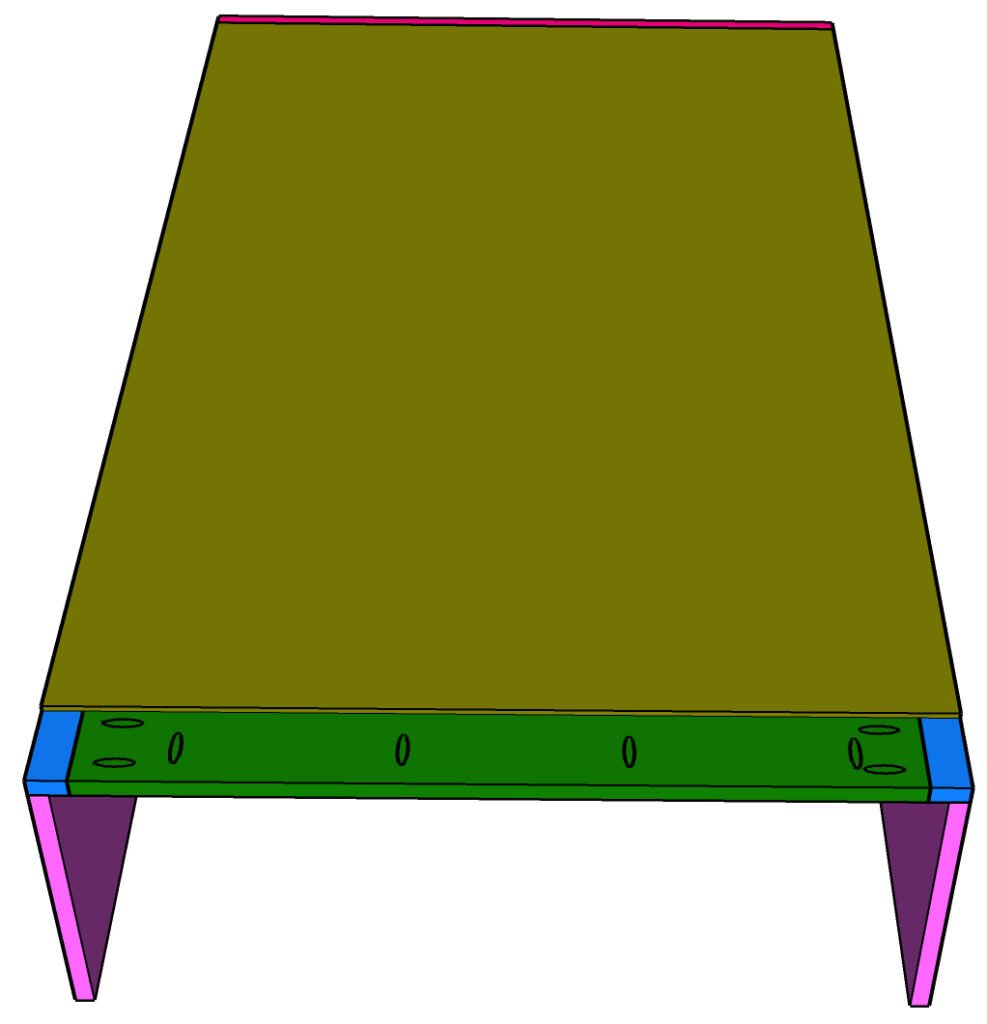
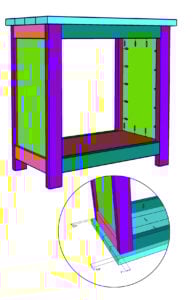
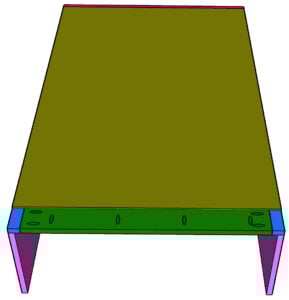
Step 6: Build the Planked Top
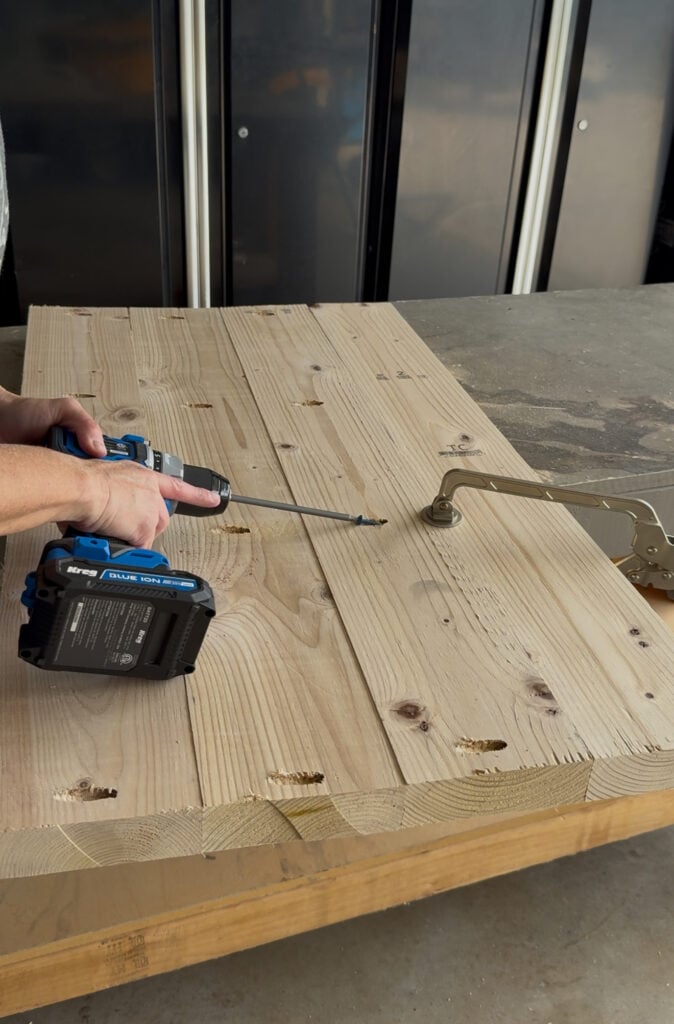
Cut the planks for the top. Drill 1½-inch pocket holes on one edge of three of the boards, then attach them together with 2 1/2″ pocket hole screws. This created that thick, solid look I wanted for the top. We always get asked if we use a jointer or a planer to get our table tops planks so smooth. We just use a Kreg Face Clamp at each pocket hole for a nice smooth finish on our planked top!
- Find the Kreg 6″ Face Clamp here.
Step 7: Attach the Top
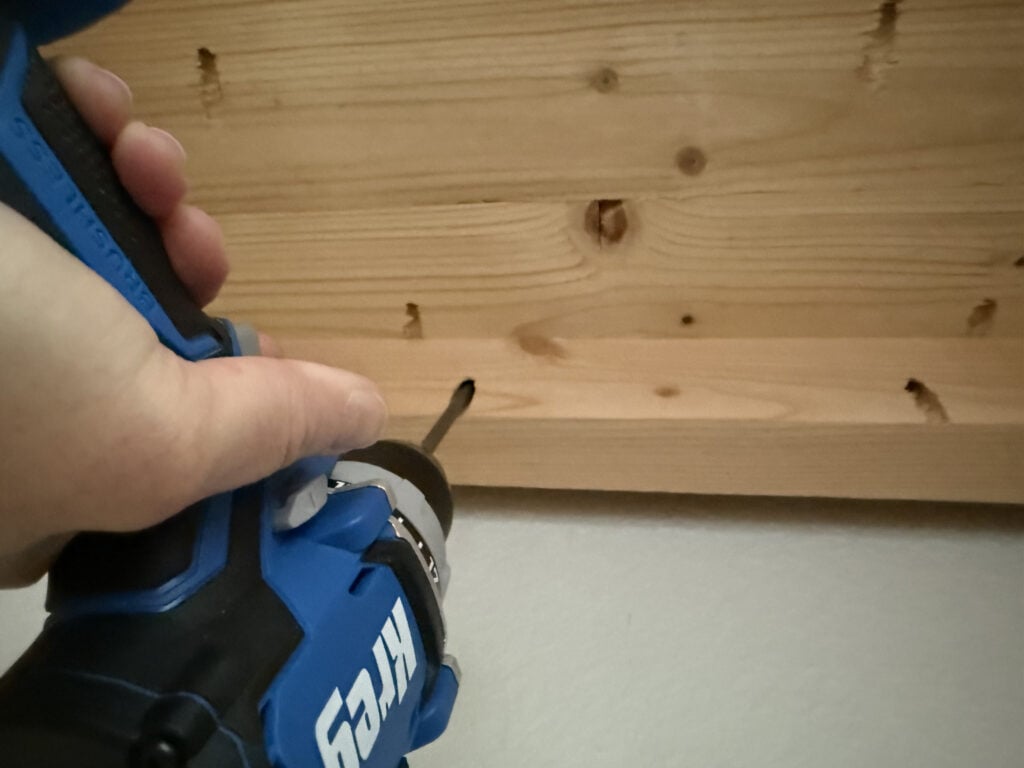
Attach the top from inside the cabinet aprons using 2 1/2″ pocket hole screws. I left a 1-inch overhang on both sides, 1 1/4″ on the front, and 3/4″ inch at the back.
I opted for no back on the cabinet base but if you choose to include the backing, cut it to size and attach it to the inside of the cabinet with wood glue and 1″ staples.
Building the Hutch
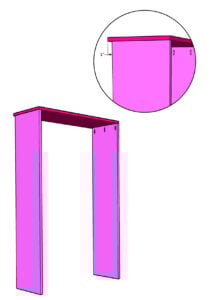
Step 8: Assemble the Hutch Top and Sides

Cut the hutch sides and top. Drill 3/4″ pocket holes on one end of each side piece and attach them to the top using 1 1/4″ pocket hole screws and wood glue. The front sits flush; the back has a 1″ overhang.
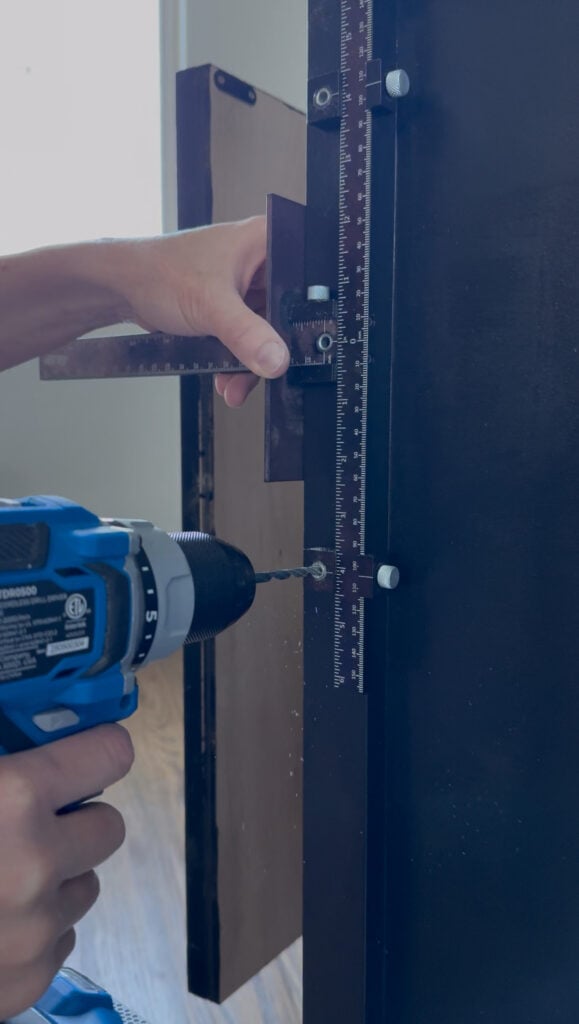
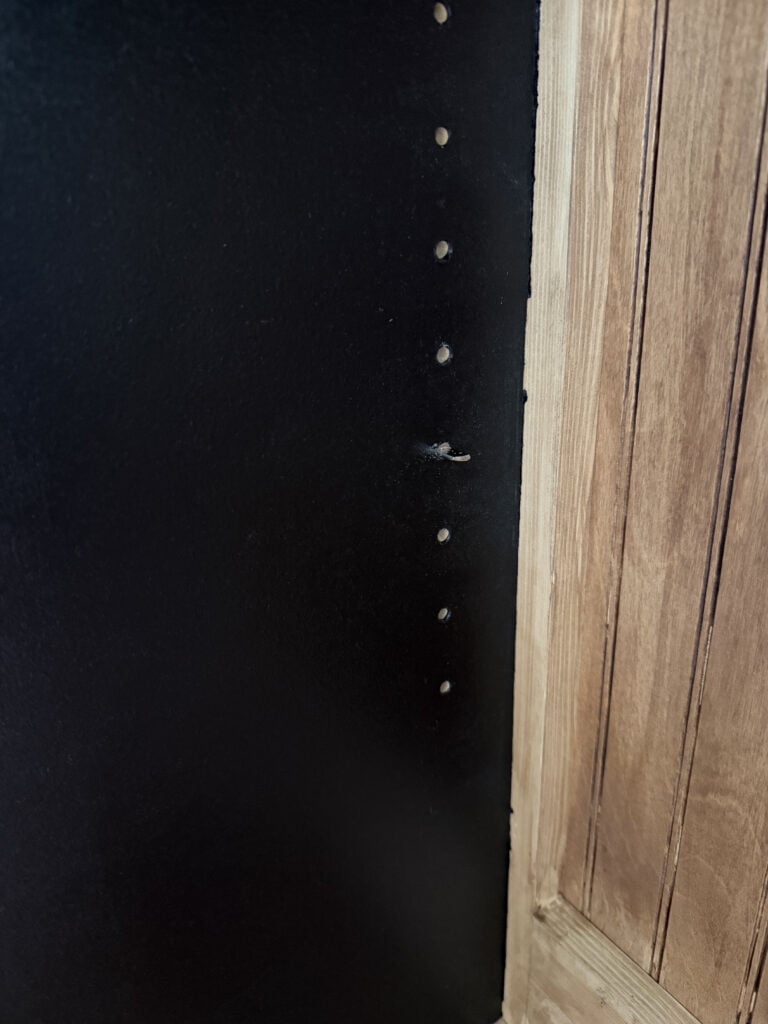
This is also where I drilled my shelf pin holes for adjustable shelves inside the hutch. If you prefer fixed shelves, you can attach them with 3/4″ pocket holes and 1 1/4″ pocket hole screws like we did in the base.
You can find the Kreg Shelf Pin Jig here.
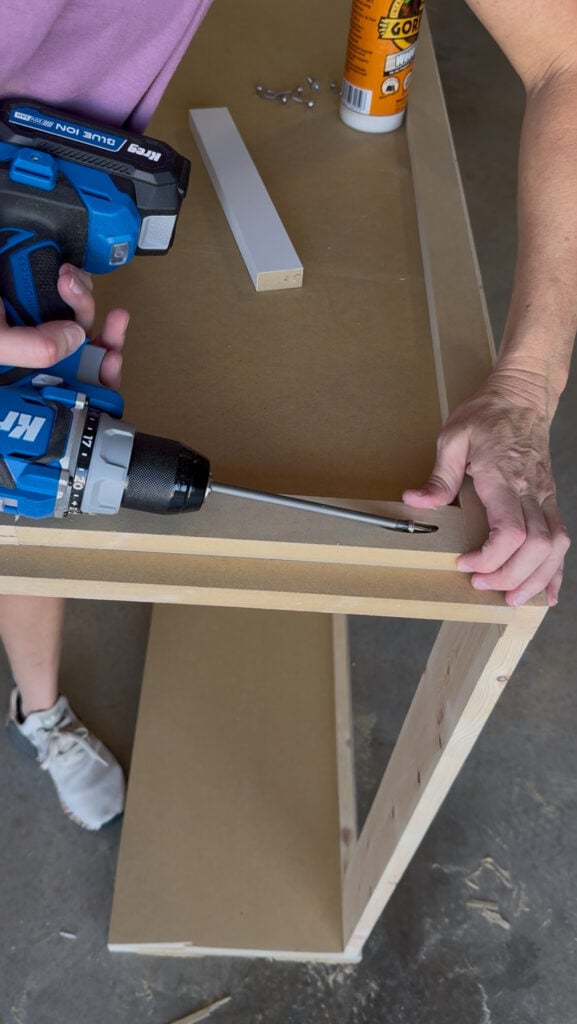
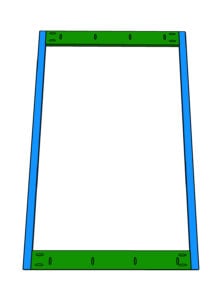
Step 9: Build the Back Frame
Cut all the back frame pieces. Drill 3/4″ pocket holes at both ends of each horizontal piece, and along one edge of the top horizontal board. Assemble using 1 1/4″ pocket hole screws and wood glue.
Step 10: Attach the Back Frame
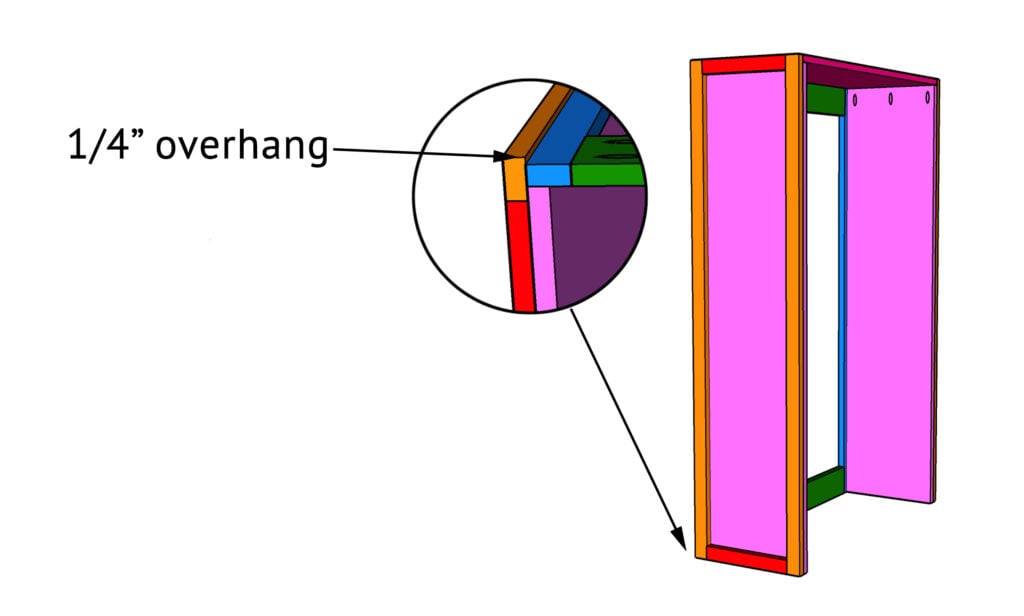
Flip the hutch over so the top overhang faces up. Attach the back frame using 1 1/4″ pocket hole screws at the top and 1 1/4″ brad nails down the sides.
Keep everything flush with the hutch panels.. There should be a 1/4″ overhang on the top.
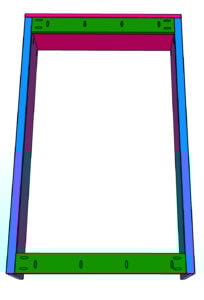
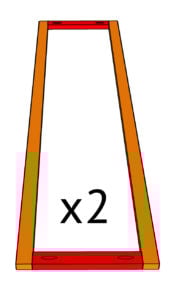
Step 11: Add the Side Trim
Cut and assemble the trim pieces. Drill 3/4″ pocket holes at both ends of the smaller trim pieces, attach them to the longer pieces.
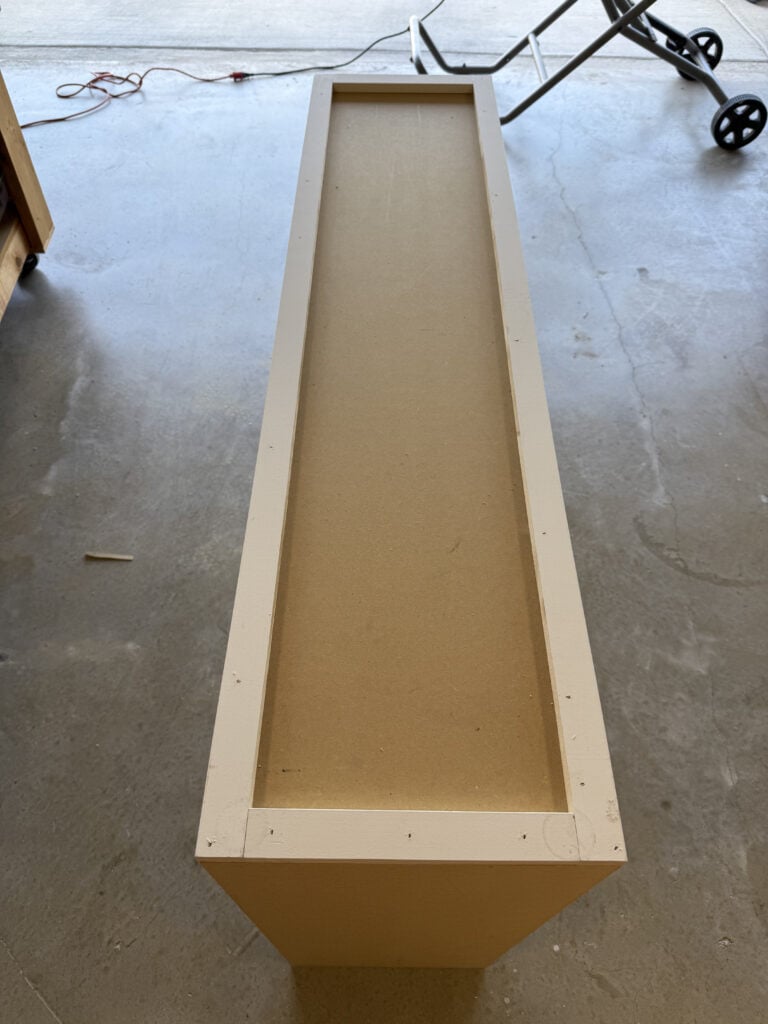
Secure the trim to the hutch with 1 1/4″ brad nails and wood glue.
The side trim should overhang the hutch back frame by 1/4″. This will help cover the hutch backing and make the piece look finished.
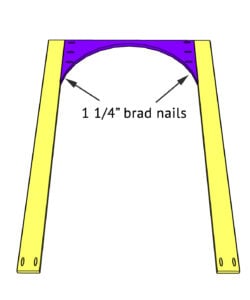
Step 12: Build the Arched Face Frame
Cut the MDF panel for the arched top of the face frame to size (I gave myself plenty of extra board on the sides and bottom of this MDF piece). Trace a 28″ radius half circle and use a jigsaw to cut out the arch. I used the new Kreg Jigsaw to cut my arch and this is hands-down my favorite jigsaw I’ve ever used. It has a built-in blower that blows the sawdust away from your cut line so you can see exactly where you are cutting!
Find the new Kreg Jigsaw here.
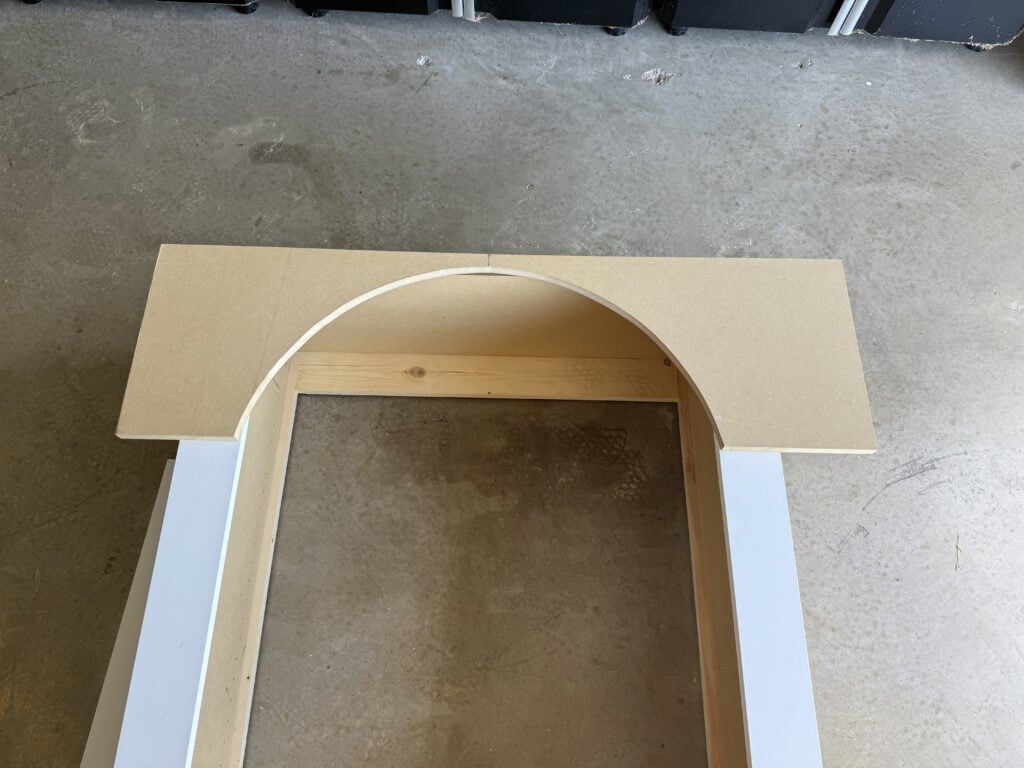
I placed the side face frame pieces on top of the hutch and laid the cut arch piece on top of the face frame pieces to mark for the next cut.
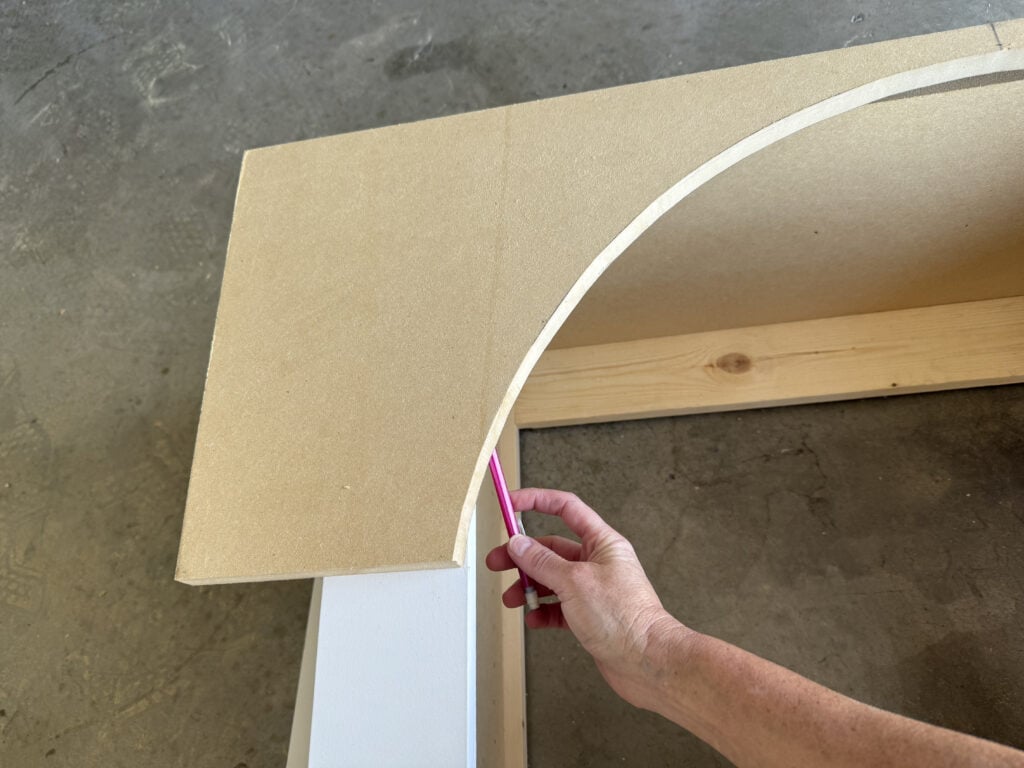
I marked on the back of the arched piece where it hit the face frame pieces. This is where you will make your cut to cut the arch piece to fit.
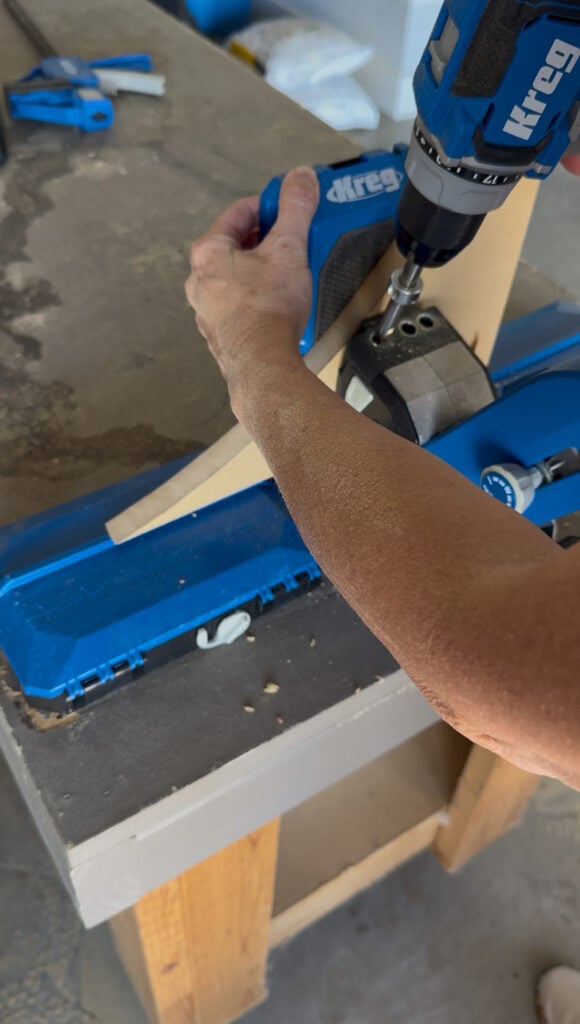
Once the arch was cut to size, I drilled 3/4″ pocket holes at both ends of the arch and the back bottom ends of both side face frame pieces. (The pocket holes on the bottom of the side face frame pieces will help attach the hutch to the cabinet base).
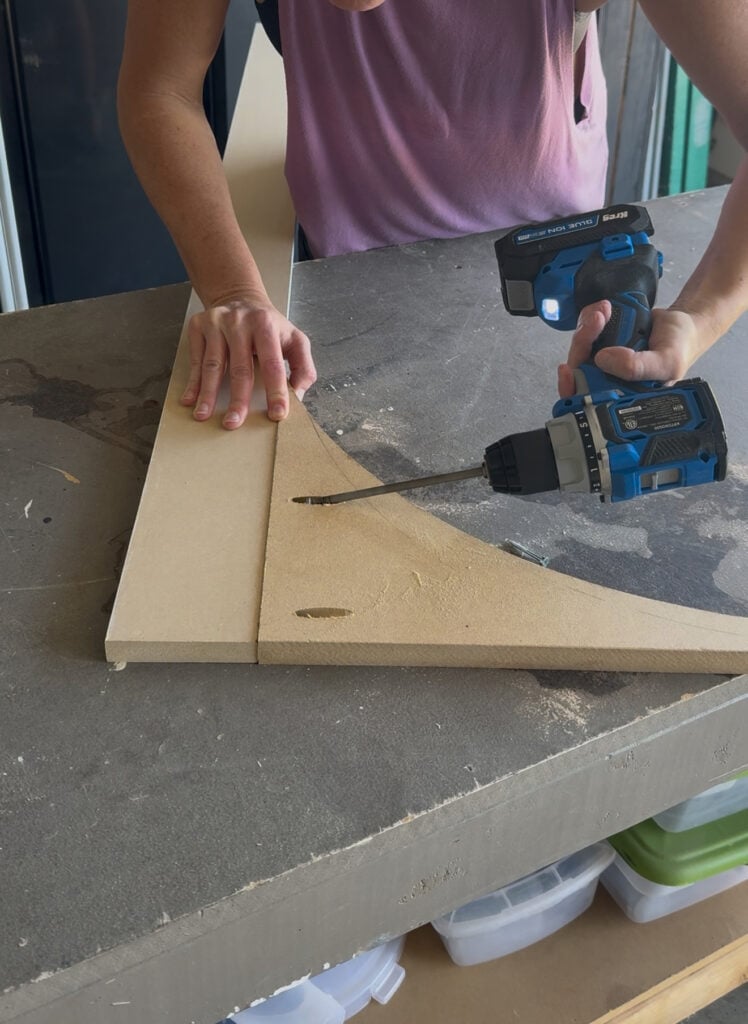
Next, I attached the arched piece to each side face frame board with 1 1/4″ pocket hole screws and wood glue.
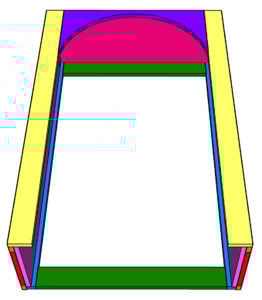
Step 13: Install the Face Frame
Attach the completed face frame to the hutch using 1 1/4″ brad nails and wood glue. This is the moment it officially becomes an arched bookcase instead of just a box.
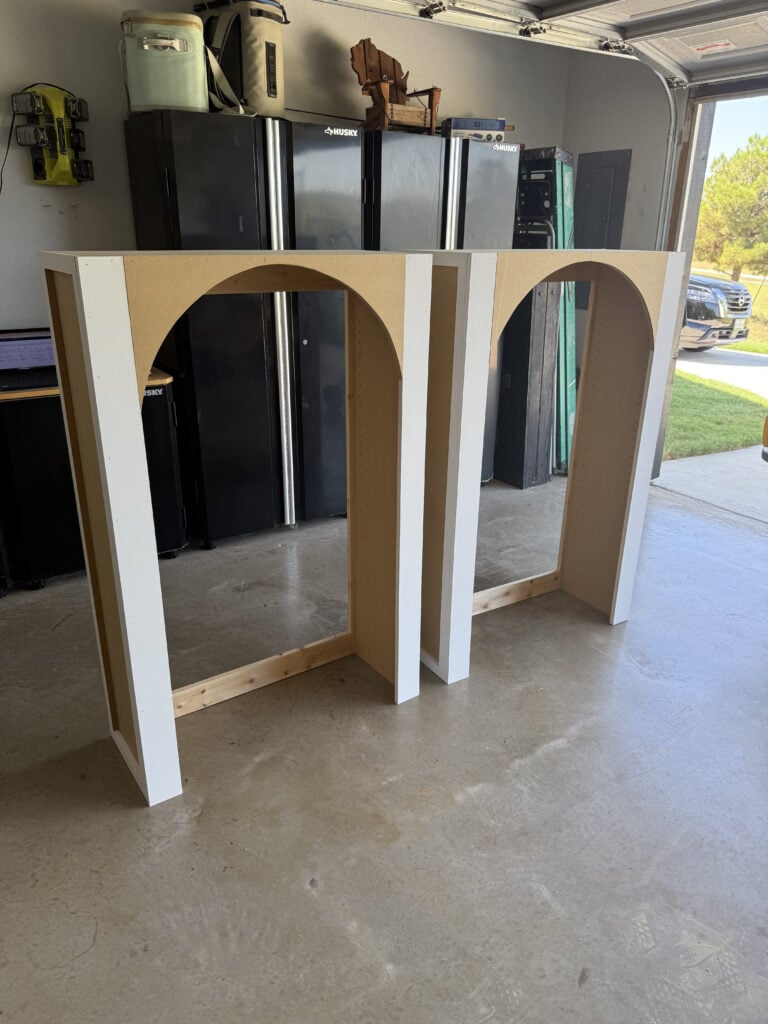
Here is a finish shot of both hutches completely done (minus the backing).
Step 14: Attach the Hutch Backing
Cut the beaded plywood to size and attach it to the back of the hutch with 1″ staples and wood glue. I stained the beaded plywood before attaching it.
Creating the Cabinet Doors
Step 15: Building the Doors

Cut the door panels to size then measure and cut the door trim size. The doors should have a 1/8″ gap around all sides. Attach the door trim to the door panels with 1 1/4″brad nails and wood glue.
Attach the doors to the cabinet with the cabinet hinges.
Note: I waited until after painting the cabinet to attach.
The Finish
Step 16: Prepping for The Finish
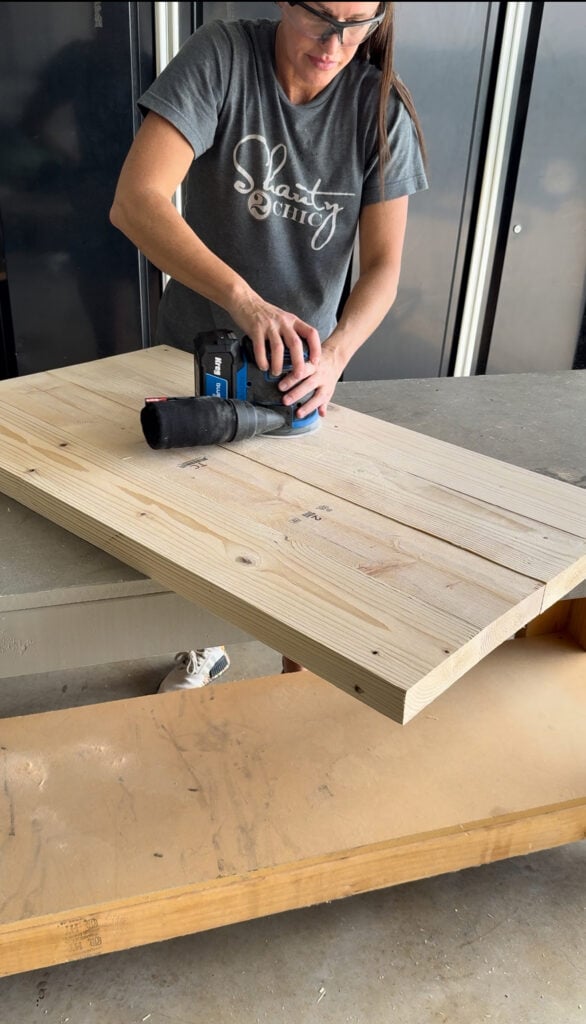
Fill all nail holes, sand everything smooth. I used the new Kreg Orbital Sander and LOVE it!
Find the Kreg Orbital Sander here.
Step 17: Painting
As I mentioned, I stained the beaded plywood before attaching it to the back of the hutches. After I taped off the beaded plywood and gave the cabinets 2 coats of Tricorn Black paint in a satin finish.

I went with one of my all-time favorite finishes, Sherwin Williams Door and Trim paint. I grabbed it from Lowe’s and had it tinted to Tricorn Black, and honestly, this stuff is amazing. It’s formulated for both interior and exterior use and grips beautifully over either oil or water-based paint – no sanding, no priming, no fuss.
- Find the Door and Trim paint here.
Step 18: Attach the Hutch to the Cabinet Base
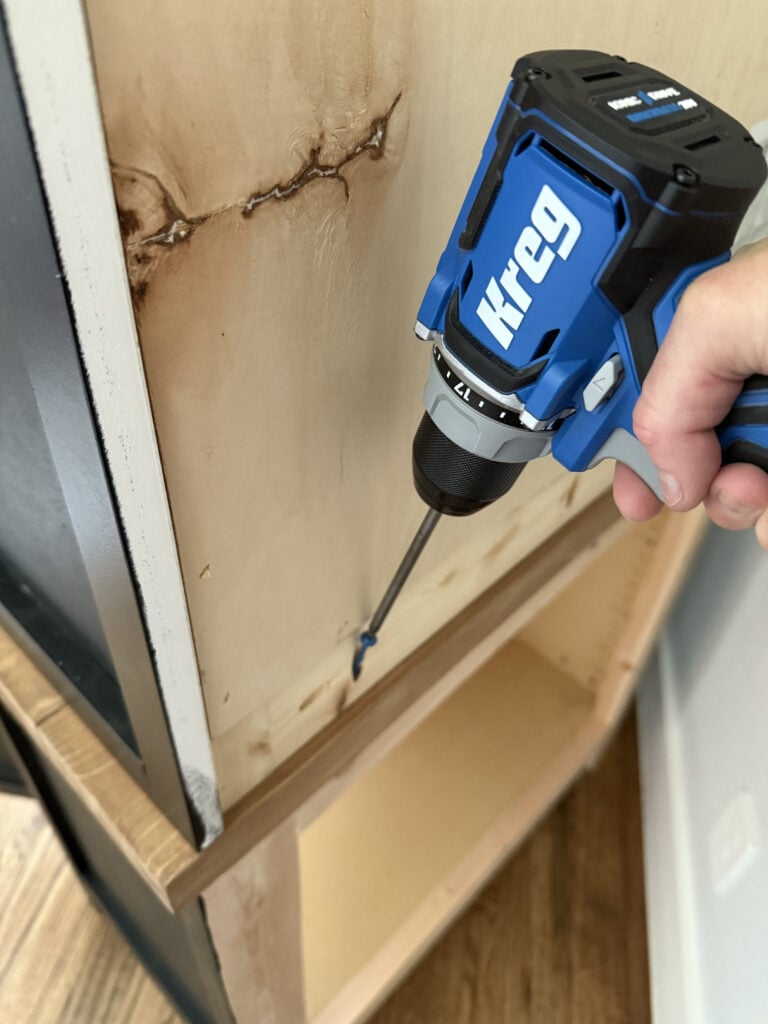
Secure the hutch to the cabinet using 1 1/4″ pocket hole screws through the back frame and into the cabinet top. Then attach behind the front face frames with 1 1/4″ pocket hole screws.
Step 19: Attaching the Doors
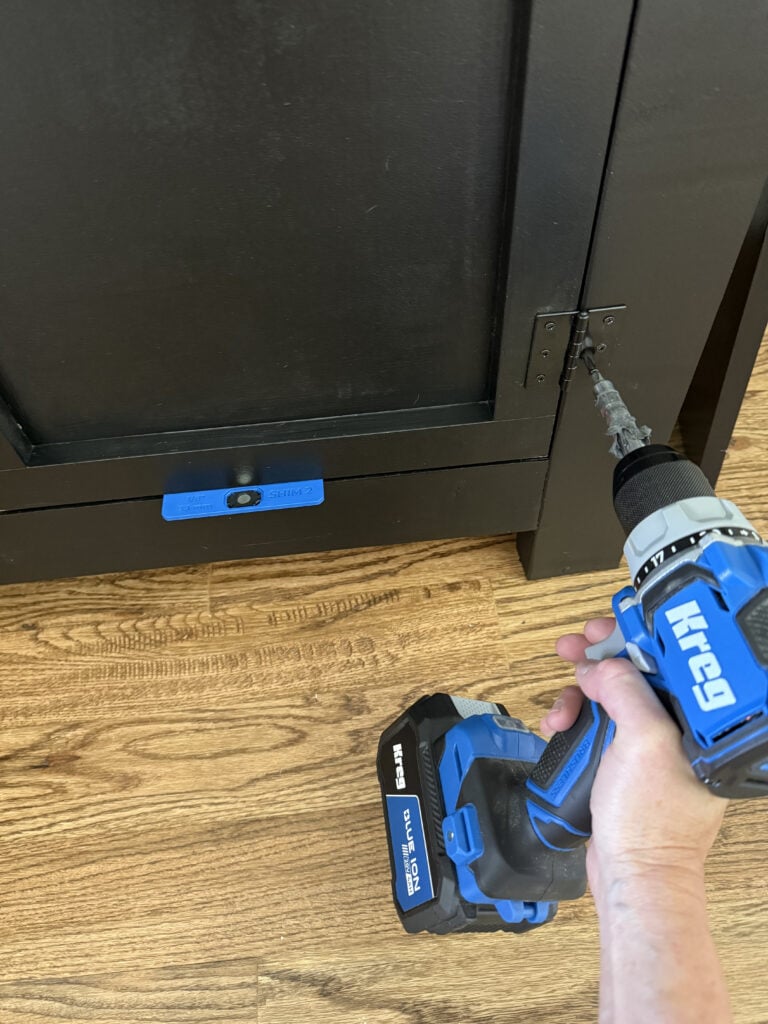
If you haven’t attached the doors yet, this is the time. I used my Kreg Drawer Front Mounting Jig plates for the 1/8″ gap on all sides of the doors and attached each door with 2 cabinet hinges.
To keep the doors closed, I installed 1 magnetic door catch at the top of each door.
- Find the cabinet door hinges here.
- Find the Kreg Drawer Front Mounting Jig here.
- Fine the magnetic door catch here.
Step 20: The Hardware
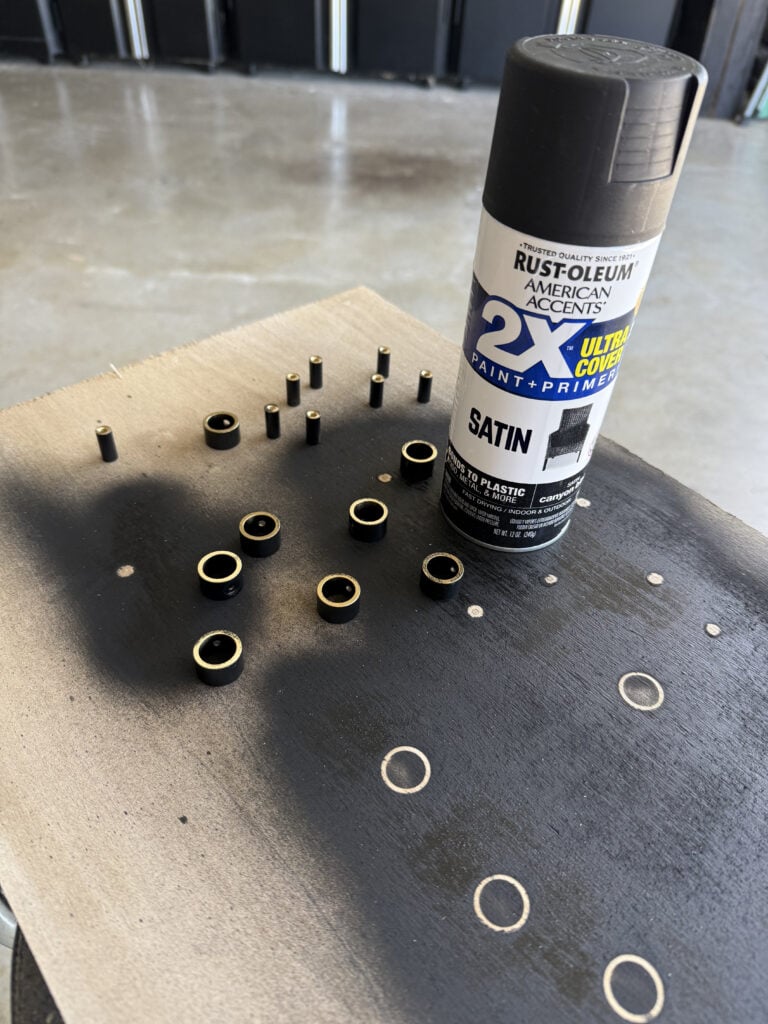
I used the same pulls that I used on my 8 drawer dresser because I love them so much! They only come in gold and I wanted black so, I sprayed all of the hardware pieces with 2 coats of black spray paint.
Once the spray paint was dry, I used my Kreg Cabinet Hardware Jig to drill pilot holes for the pulls on each door. I love this little guy, he does the thinking for you and gives you consistently placed pulls every time!
- Find the Kreg Cabinet Hardware Jig here.
- Find the cabinet pulls I used here.
Step 21: Shelves
If you are using adjustable shelves, you can install the shelf pins where you prefer and install the shelves.
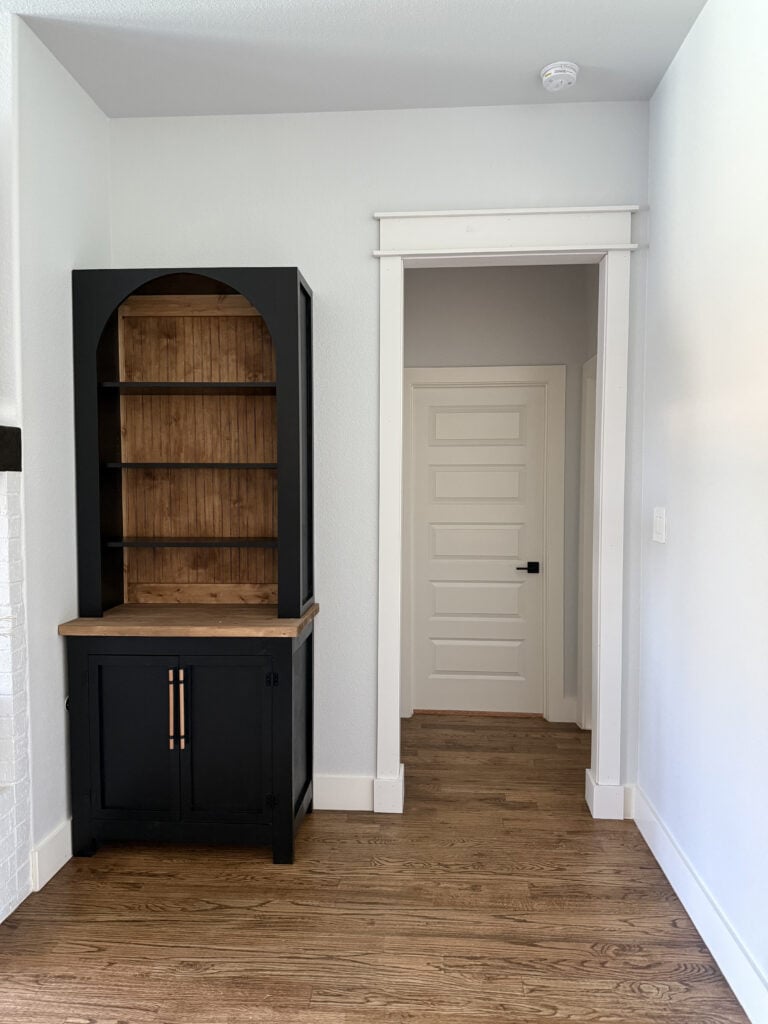
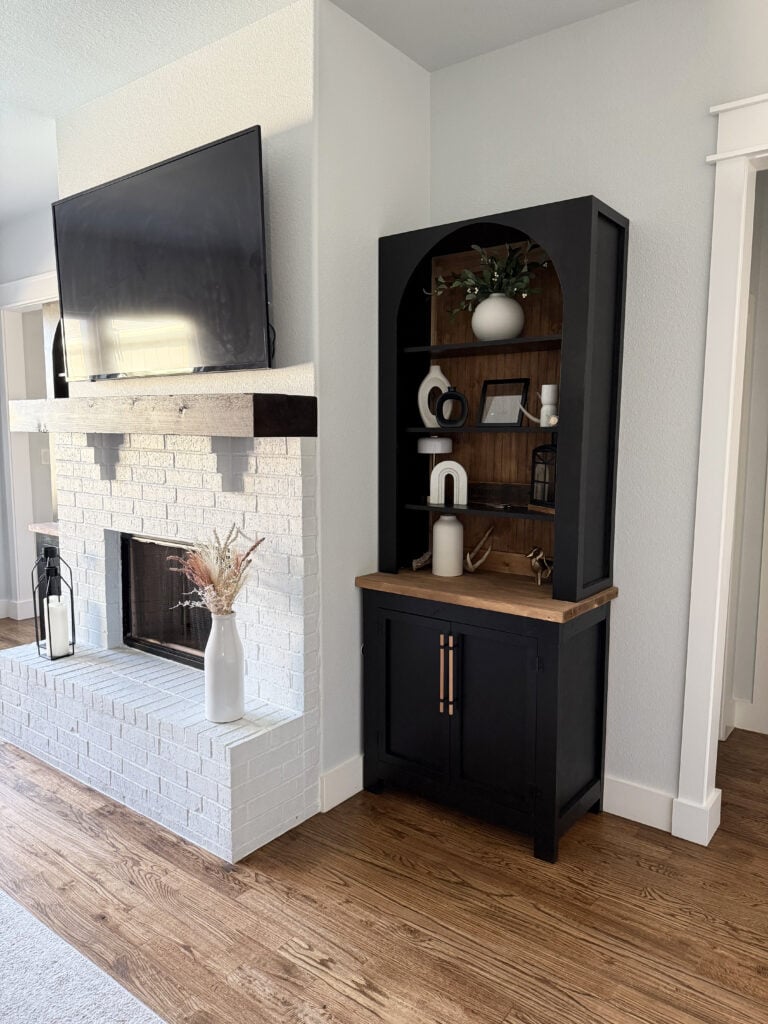

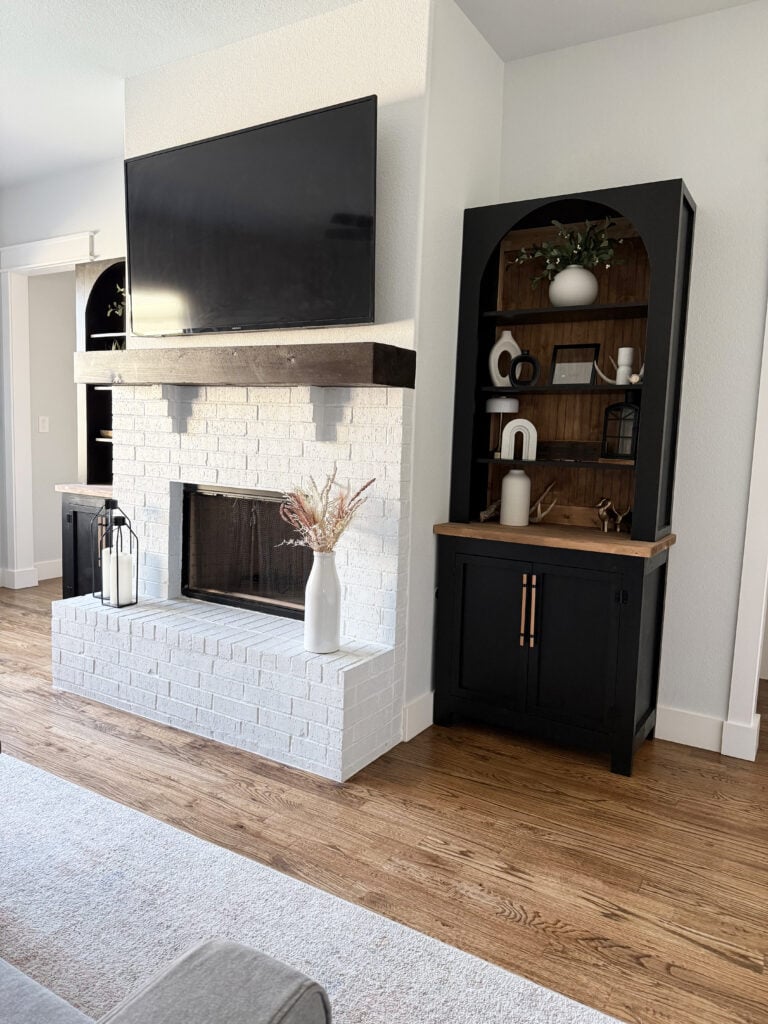
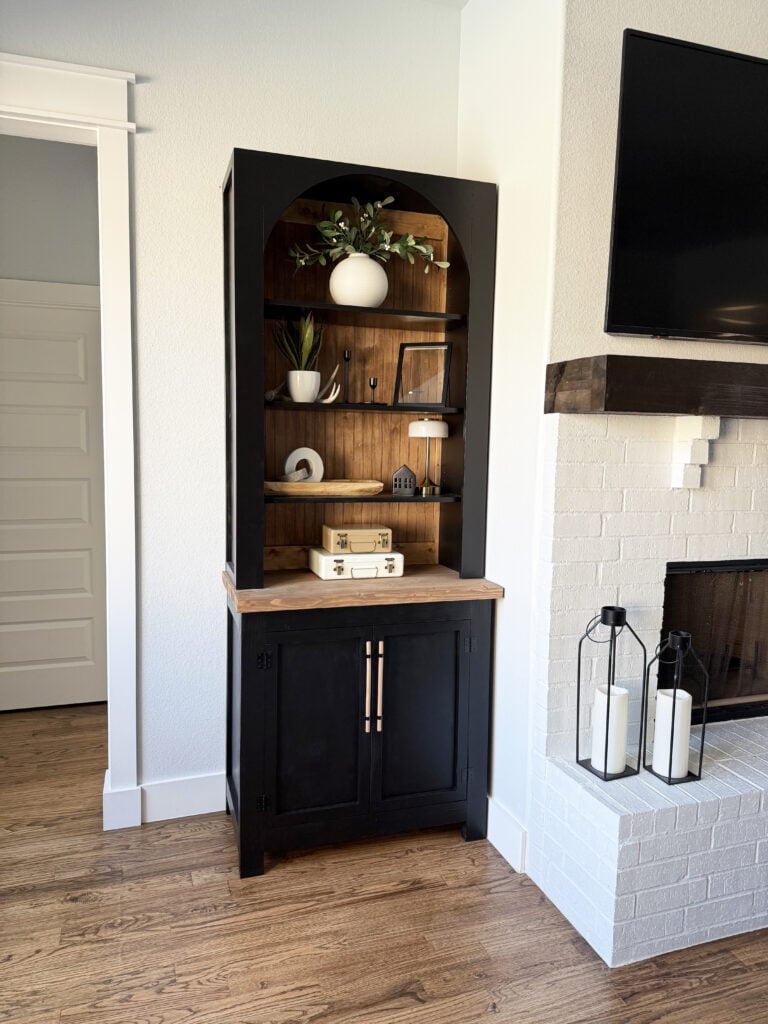
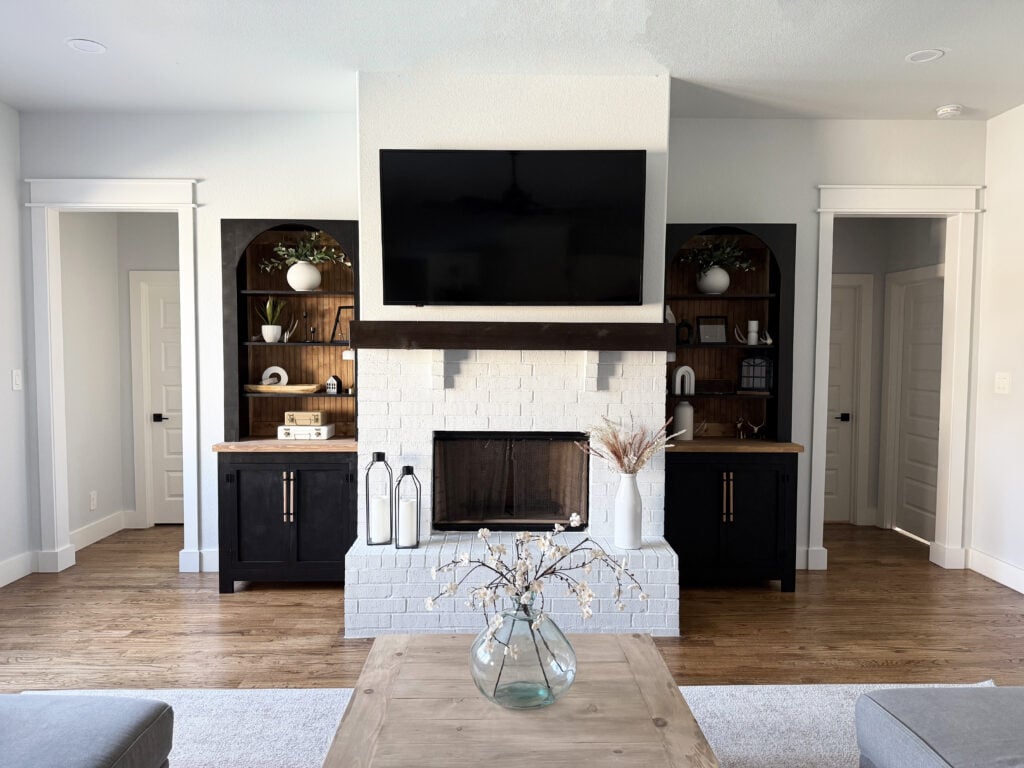
I’m honestly so happy with how these arched bookcases turned out. They brought so much life and character to my living room, and I finally feel like those empty spaces by the fireplace make sense. The cabinets give me a ton of hidden storage, and the open shelves are perfect for styling and seasonal décor. And the best part? Building them myself saved me a huge amount compared to anything I found in retail—and I ended up with something fully customized to my space, exactly the size, look, and function I wanted. If you build a set of your own, I hope you love them as much as I do.
Make sure to share your builds with us on social media and use #shanty2chic so we can share them too!
Happy Building!
More Projects I’ve Built for My Home


How I Cased My Rounded Openings

DIY Arched Bookcase: Free Printable Plans and Step-by-Step Tutorial
Tools
- Miter Saw
- Drill
- Kreg Jig
- Jigsaw
- Brad Nailer
- Sander
- Kreg Rip Cut w/ Circular Saw or Table Saw
- Kreg Shelf Pin Jig (optional)
Supply List
- 4 1x4x8 Primed MDF
- 1 1x12x8 Primed MDF
- 2 1x4x8 Pine or Common Boards
- 4 2x4x8 Framing Boards
- 2 2x6x8 Framing Boards
- 1 3/4" x 48" x 96" MDF
- 1 1/2" x 48" x 48" Hardwood Plywood
- 1 48"x96" Beaded Plywood
- 2 Cabinet Pulls
- 4 Cabinet Hinges
- Shelf Pins (optional)
- Wood Glue
- Finish
Instructions
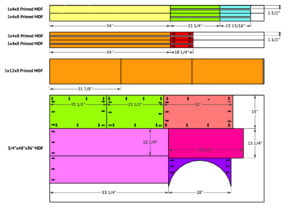
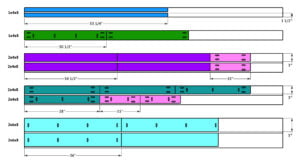
Cut List
- Cut List 1

- Cut List 2

- Cut List 3

Building the Cabinet
- Cut the side aprons and side panels to size. Drill 3/4 pocket holes on all sides of the panel and 1 1/2" pocket holes on bot ends and one edge of the top apron. Attach the panel to the 2×4 pieces with 1 1/4" pocket hole screws and wood glue. The back of the panel should be flush with the back of the aprons. Build two side assemblies.

- Cut the cabinet frame pieces to size and drill 1 1/2" pocket holes at both ends of the horizontal pieces and one edge of the top horizontal piece. Attach them together with 2 1/2" pocket hole screws and wood glue. The bottom horizontal piece should be 3" from the bottom of the legs. Build 2 frames.

- Attach a side panel to each side of the cabinet frame with 1 1/4" pocket hole screws and wood glue. The side aprons should be flush with the frame legs and the top aprons should be flush.

- Attach the second cabinet frame to the side panels with 1 1/4" pocket hole screws and wood glue.

- Measure and cut the bottom panel to size. Drill 3/4" pocket holes around the edge and attach it to the inside of the cabinet frame with 1 1/4" pocket hole screws and wood glue. The bottom panel should be flush with the top of the bottom apron.

- Cut the top planks to size and drill 1'1/2" pocket olds on one edge of three of the boards. Attach them together with 2 1/2" pocket holes.

- Attach the top to the cabinet base with 2 1/2" pocket holes from the inside of the aprons and into the planked tops. There should be a 1" overhang on both sides, 1 1/4" on the front and 3/4" on the back.


Building the Hutch
- Cut the hutch side panels and top to size. Drill 3/4" pocket holes at one end of both side pieces. Attach the top to the side pieces with 1 1/4" pocket hole screws and wood glue. The front of the top piece should be flush with the front of the side panels. The back of the top piece should overhang a 1".
- Cut the hutch back frame pieces to size and drill 3/4" pocket holes at both ends and one edge of the horizontal pieces. Attach them to the vertical pieces with 1 1/4" pocket hole screws and wood glue.

- Flip the hutch on it's front side (so that the overhang is facing up) and attach the back frame to the hutch. Use 1 1/4" pocket holes and wood glue to attach the frameto the top of the hutch and 1 1/4" brad nails and wood glue to attach it to the side panels. the side of frame should be flush with the side panels.

- Measure and cut the side trim pieces to size and drill 3/4" pocket holes at each end of both short trim pieces. Attach them to the long trim pieces with 1 1/4" pocket hole screws and wood glue. Build two side frame assemblies.

- Attach the side trim assemblies to the sides of the hutch with 1 1/4" brad nails and wood glue.

- Measure and cut the hutch face frame pieces to size. Drill 3/4" pocket holes at the ends of both of the arch piece and one end of the long boards. Attach the long face frame pieces to the arch with 11/4" pocket hole screws and wood glue. Add a few 1 1/4" brad nails towards the bottom of the arch, securing the arch to the long trim pieces.

- Attach the hutch face frame to the front of the hutch with 1 1/4" brad nails and wood glue.

- Cut the beaded plywood to size and attach it to the back of the hutch with 1" staples and wood glue. I stained the beaded plywood before attaching it.


Creating the Cabinet Doors
- Cut the door panels to size then measure and cut the door trim size. The doors should have a 1/8" gap around all sides. Attach the door trim to the door panels with 1 1/4"brad nails and wood glue.

- Attach the doors to the cabinet with the cabinet hinges. I waited until after painting the cabinet to attach.

The Finish
- Attach the hutch to the cabinet base with 1 1/4" pocket hole screws through the pocket holes on the back frame of the hutch and into the cabinet top. Follow up with 1 1/4" pocket holes from the inside of the hutch face frame and into the cabinet top.Fill any exposed nail holes and sand the entire piece down, then add a finish and hardware!Make it your own! Make sure to share your builds with us on social media and use #shanty2chic so we can share them too!Happy Building!