Learn how to build an Outdoor Lounge Chair with free plans, a how-to video and detailed instructions by Shanty2Chic!
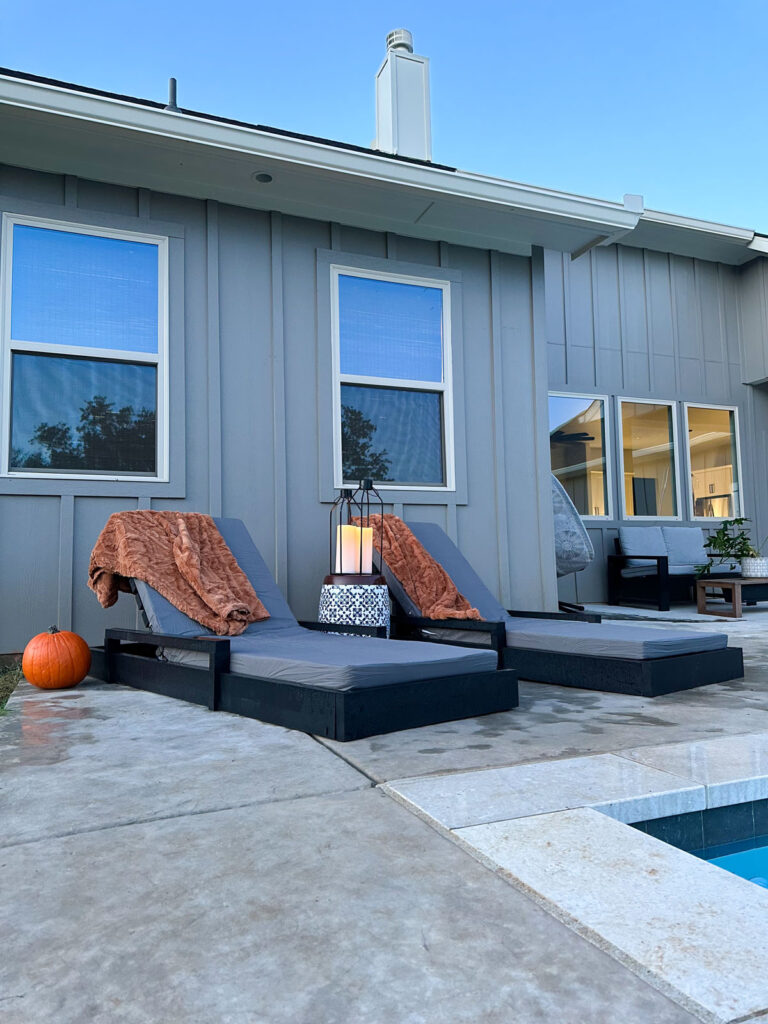
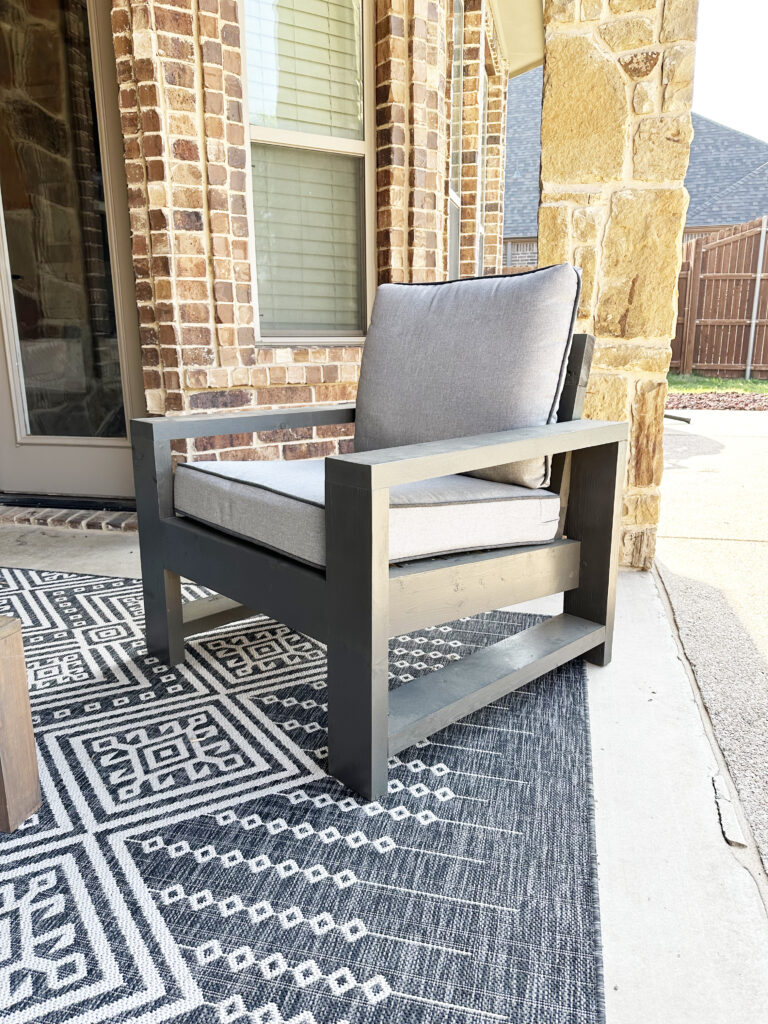
I know it’s the beginning of Fall but we have been close to 100° until this week. I moved into my new home in June and I’ve been trying to get settled, get my shop organized and start building furniture! One of the first pieces I wanted to build was a set of lounge chairs for my pool. After I built my outdoor couch and chairs, I wanted a set of lounge chairs that matched a little better. I designed this set to be low profile but I also added a little arm rest on top. It’s great for a place to set your drink and I like the modern aesthetic of it! This is an easy, straight forward build and it won’t break the piggy bank!
You can watch Whitney and I build it together, just click the play button in the box below!
How fun was that? Super easy, inexpensive and so much bang for your buck!
Now, let’s get to building! You can find the free chaise lounge plans in the link below and follow along with the step-by-step instructions to follow!
Click HERE TO JUMP TO THE FREE PLANSTable of Contents
DIY Lounge Chair
MATERIALS
Tools:
Supplies:
- 3 – 2x6x8 Pine or Framing Lumber
- 10 – 2x4x8 Pine or Framing Lumber
- 2 – 1x4x8 Pine or Whitewood
- 2 1/2″ Pocket Hole Screws
- 1 1/4″ Pocket Hole Screws
- 2 1/2″ Wood Screws
- 1 1/4″ Brad Nails
- 2 1/2″ Hinge
- Piano Hinge
- Wood Glue
- Finish
Building the Chair Frame
Note: This set of lounge chair plans is for one lounge chair. Double the materials list if you build two.
Step 1: Assembling the Base

To start, cut the frame boards to size and drill 1 1/2″ pocket holes at both ends of the long boards with a Kreg Pocket Hole Jig.

Attach the long boards to the short boards with 2 1/2″ pocket hole screws and wood glue.
Step 2: Attaching the Bottom Support

Next, cut the bottom support to size and drill 1 1/2″ pocket holes at both ends. Attach it to the inside of the frame, 6″ from the edge and flush with the top of the frame boards, with 2 1/2″ pocket hole screws and wood glue. Pocket holes should face up. This will be the bottom side of the lounge chair.
Step 3: Cleats


Measure and cut the cleats to size. Flip the frame over, so that it is right-side-up. Attach the cleats to the long frame boards, 2″ from the top, with 2 1/2″ wood screws and wood glue. We used our Kreg Quick Flip to pre-drill the holes. This tool is great for concealing screw holes!
How to Create the Seat and Back of the Chair
Step 4: Seat Slats

Use your tape measure to measure for the seat slats and cut them according to your measurement. Space them out evenly (according to the diagram in the plans), from the end of the frame (opposite end of the bottom support) and attach them to the cleats with 2 1/2″ wood screws and wood glue. The board on the end should be flush with the end frame board. We used 3/4″ scrap wood between the slats for spacing.
Step 5: Back Slats

Cut the back slats and the back braces to size. Spread the slats out (according to the plans), and attach the back braces to the slats with 1 1/4″ wood screws and wood glue.
Step 6: Back Track

The back track assembly will hold the stop blocks and create a spot for the arm rest to support the back at different angles. To build it, cut the back track pieces to size and drill 3/4″ pocket holes on both edges of the middle board. Attach the side board to the middle board with 1 1/4″ pocket hole screws and wood glue.
Step 7: Attaching the Back Track

Now, attach the back track to the center of the back assembly with 1 1/4″ wood screws and wood glue.
Step 8: Back Stops

With the back stops cut to size, attach them to the inside of the track with 1 1/4″ wood screws and wood glue. Note: You can place these where you prefer the back assembly to rest.
Step 9: Installing the Back Assembly

This is where your piano hinge comes to play! Lay the back assembly upside down and on top of the seat slats. Attach them together with the piano hinge. Make sure to give a little bit of space between the back slat assembly and the seat slats. You can use 1/8″ scrap wood or a piece of a cardboard box. This will allow the back assembly to move up and down freely.
Step 10: Creating the Arm Support for the Backrest

The arm support is just a 2×4 (ripped to 3″) that has a 45° angle cut at one end. Once it is cut to size, attach the square end of the arm to the frame support with a 2″ outdoor hinge. The long point of the mitered edge should be on the top.
Building the Arm Rests
Step 11: Attaching the Arm Rest Blocks

The arm rests are an optional feature that I highly recommend! To create them, cut the short arm rest blocks to size and drill 3/4″ pocket holes in one end of all of the blocks. Attach the blocks to the top of the lounge chair frame with 2 1/2″ pocket hole screw and wood glue. The pocket holes should face out.
Step 12: Installing the Top of the Arm Rest

To get a perfect fit for the top arm rest piece, measure from one block to the other and cut the two pieces to size. Lay them on the top of the blocks and attach with 2 1/2″ wood screws and wood glue. The back side of the top piece should be flush with the back side of the blocks. You can see we used our Quick Flip here as well.
Step 13: Adding the Arm Rest Trim

The final step to creating the arm rest is to add the trim. This will cancel the pocket holes on the arm rest blocks. Just measure and cut the arm rest trim pieces to size and attach them to the front of the blocks, and over the chair frame, with 1 1/4″ brad nails and wood glue.
Finishing the DIY Outdoor Chaise Lounge Chair
Step 14: Filling Exposed Holes

Fill any exposed holes with outdoor wood filler.
Step 15: Sanding the Chair

With a 120-grit sandpaper, sand down the entire chair. Follow up with a 180-grit and then a 220-grit for a smooth finish. I used my orbital sander for this.
Step 16: Add a Finish!

I chose an outdoor paint tinted with Tricorn Black! If you choose to stain your chair, make sure to add an outdoor protective finish!

That was it! I love my new lounge chairs and although we’ve passed swim season, it’s the perfect spot to chill, poolside on my deck, on a fall night 🙂


Make sure to subscribe to our Youtube Channel so you don’t miss another build!
Check Out Some of our Other Outdoor Furniture Projects


DIY Outdoor Lounge Chair Plans
Tools
- Kreg Jig
- Drill
- Miter Saw
- Brad Nailer
- Sander
- Table Saw (optional)
Supply List
- 10 2x6x8 Framing Lumber
- 4 2x4x8 Framing Lumber
- 2 1x4x8 Pine or Whitewood
- 1 1/4" Pocket Hole Screws
- 2 1/2" Pocket Hole Screws
- 2 1/2" Wood Screws
- 1 1/4" Brad Nails
- 1 2 1/2" Hinge
- 1 Piano Hinge
- Wood Glue
Instructions
Cut List
- Cut List 1

- Cut List 2


Building the Chair Frame
- Step 1: Cut the frame boards to size and drill 1 1/2" pocket holes at both ends of the long frame boards. Attach the long boards to the short boards with 2 1/2" pocket hole screws and wood glue.

- Step 2: Cut the bottom support to size and drill 1 1/2" pocket holes at both ends. Attach it to the inside of the frame, 6" from the edge and flush with the to of the frame boards, with 21/2"pocket hole screws and wood glue. Pocket holes should face up. This will be the bottom side of the lounge chair.

- Step 3: Cut the cleats to size. Flip the frameover, so that it is right-side-up. Attach the cleats to the long frame boards, 2" from the top, with 2 1/2" wood screws and wood glue.


How to Create the Seat and Back of the Chair
- Step 4: Cut the seat slats to size. Space them out evenly, from the end of the frame (opposite end of the bottom support) and attach them to the cleats with 2 1/2" wood screws and wood glue. The board on the end should be flush with the end frame board.

- Step 5: Cut the back slats and back braces to size. Spread the slats out and attach the back braces to the slats with 1 1/4" wood screws and wood glue.

- Step 6: Cut the back track pieces to size and drill 3/4" pocket holes on both edges of the middle board. Attach the. side board to the middle board with 1 1/4" pocket hole screws and wood glue.

- Step 7: Attach the back track to the center of the back assembly with 1 1/4" wood screws and wood glue.

- Step 8: Cut the backstops to size and attach them inside the track with 1 1/4"wood screws and wood glue. Note: You can place these where you prefer the back assembly to rest.

- Step 9: Lay the back assembly upside down and on top of the seat slats. Attach them together with a piano hinge.

- Step 10: Cut the arm to size and attach the square end to the frame support with an outdoor hinge. The long point of the mitered edge should be on the top.


Building the Arm Rests
- Step 11: Cut the short arm rest blocks to size and drill 3/4" pocket holes in one end of all of them. Attach the blocks to the top of the lounge chair frame with 2 1/2" pocket hole screws and wood glue. Pocket holes should face out.

- Step 12: Measure from one block to the other and cut the arm rest top pieces to size.Attach them to the top of the blocks with 2 1/2" wood screws and wood glue. The back side of the top piece should be flush with the back side of the blocks.

- Step 13: Measure and cut the arm rest trim pieces to size and attach them to the front of the blocks and over the chair frame with 1 1/4" brad nails and wood glue.


The Finish
- Step 14: Fill any exposed holeswith wood filler, sand it down and give it a finish!Make sure to share your builds with us on social media and use #shant2chic so we can share them too!Happy Building!


The layout is breathtaking. It is both trendy and striking.
Great great great girls! Thanks from a DIY lover from France = you helped me a lot in my next project =)
Is the wood Pine in your picture?
Cheers
This is all great advice and feel a bit more confident I can do this on my setup.
As always, it looks great! How do the 1x pine pieces hold up to the weather?
I am impressed with its design. It looks very fashionable and eye-catching.I am impressed with its design. It looks very fashionable and eye-catching.