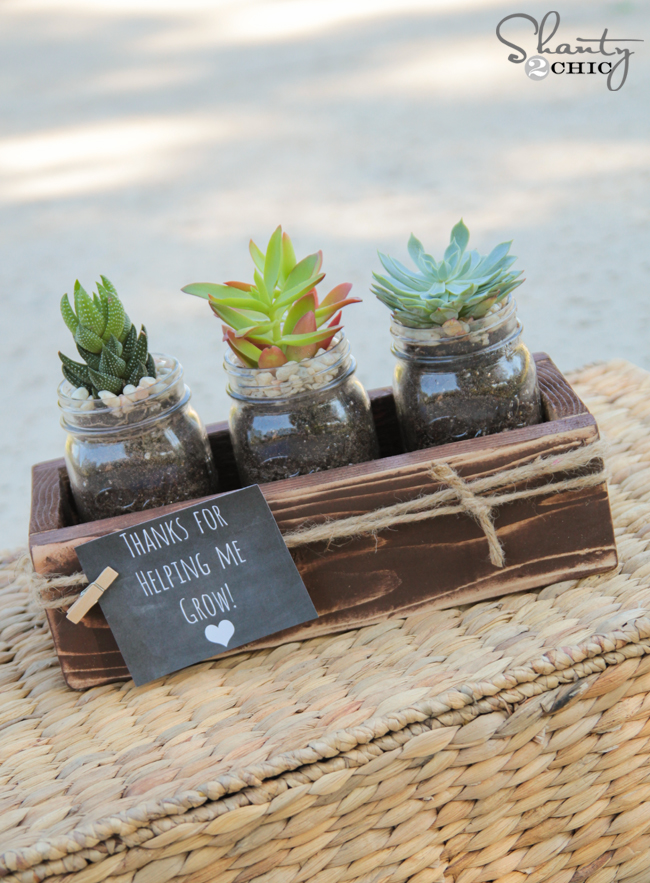
Learn how to build this homemade planter box with free plans, a how-to video and detailed instructions by shanty2chic.com.
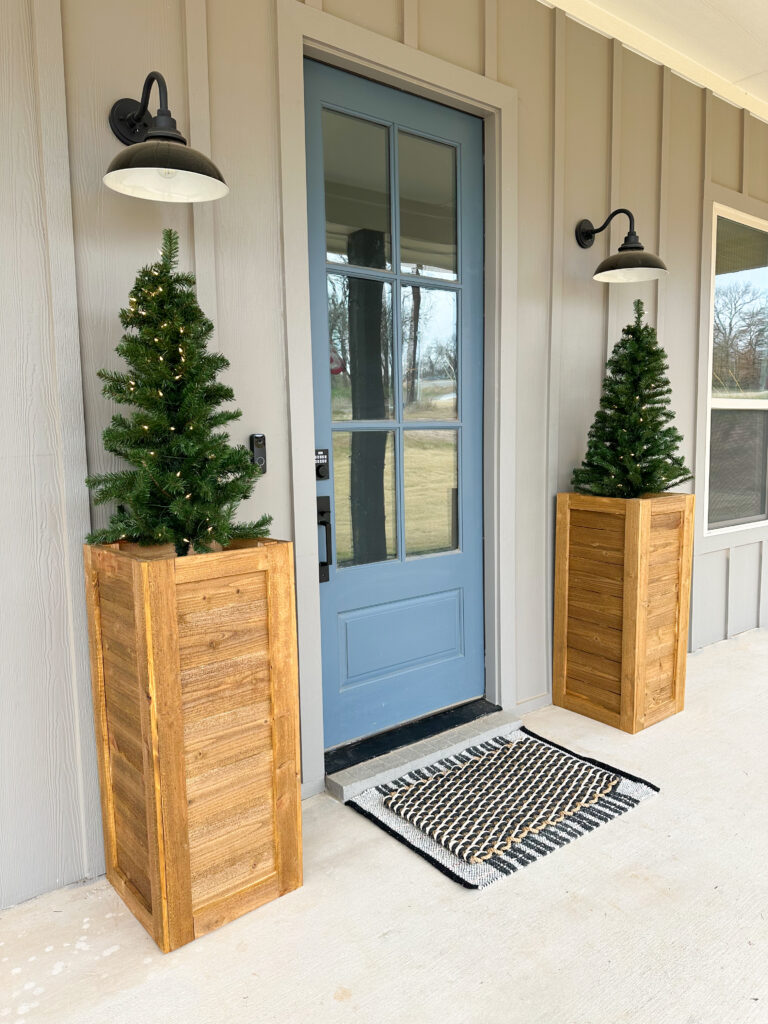
I’ve been in my new house for about 6 months now and I am slowly but surely making it a home. So far, I have built a few new pieces already and this Planter Box was one of the DIY Projects at the top of my list! I’ve never had a large front porch and I love my new front porch. It has cedar columns, windows and a great big concrete patio. It’s just screaming for some pretty planter boxes and maybe a couple of porch swings 😉
I pictured, in my head, a set of taller cedar planter boxes and I actually search for some that I could purchase but none of them were the large and tall dimensions that I wanted and the prices were crazy expensive! So, I got busy designing what was in my head and got to building! I love these guys so much and I was able to build them for about $50 each in lumber!
This is a SUPER EASY build so grab a cup of coffee and come build it with us!
How easy was that?!
You can follow along with us in the step-by-step tutorial below and make sure to download the free set of printable plans!
Click to Jump to the Free PlansSo, let’s get to building!
Table of Contents
How to Build a DIY Planter Box
Materials:
Tools:
- Miter Saw
- Kreg Jig
- Drill
- Table Saw (optional)
- Brad Nailer
Supplies:
- 6 – 1x6x8 Cedar Fence Pickets (redwood or whichever wood species is available)
- 2 – 2x4x8 Framing Lumber or Pine
- 3/4″ Outdoor Wood Screws
- 2 1/2″ Outdoor Pocket Hole Screws
- 1″ Brad Nails
- 1 1/4″ Brad Nails
- Wood Glue
- Finish
Build the Planter Box Frame
Note: This set of planter box plans is for one box.
Step 1: Assembling the Frame

Cut the frame pieces to size and drill 1 1/2″ pocket holes at both ends of the short rung pieces. We used our favorite Kreg Jig model to drill the pocket holes.

Attach the rungs to the legs of the frame with 2 1/2″ pocket hole screws and wood glue. Your pocket holes can face inside or outside for this part.
Step 2: Adding the Shelf Pieces

With the frame complete, use your tape measure to measure and cut the shelf pieces to size. You only need 2 shelf pieces but I opted for four because I had enough lumber and I can keep the bottom shelf pieces in there when they are not in use. Do not attach these shelf pieces so that you can move them if needed.
Attaching the Slats to Create the Sides of the Planter
Step 3: Attaching the Short Slat Pieces

You can start on any side for this. Measure and cut the short slat pieces to size. Line them up, side-by-side, starting at the top of the frame. Attach them to the legs of the frame with 3/4″ wood screws and wood glue. The slats should be flush with the ends of each frame. Once you finish the first side, flip the frame over to the opposite side and do the same. We used our Kreg Quick Flip to drill pilot holes in the slats to prevent the boards from splitting.
Step 4: Long Slat Pieces

Measure and cut for the long slat pieces and attach them the same way, on the two remaining sides. The long slats should be flush with the edges of the short slats.
Adding the Trim
Step 5: Short Slat Side Trim

Now that all of the sides are covered with slats, it’s time for the trim. This will finish the wooden planter box off nicely and hide the ugly sides of the slats. First, measure and cut the side trim pieces to size. Attach the first et of trim pieces, on the short trim sides, of the planter box with 1 1/4″ brad nails and wood glue. Do this for both short trim sides.
Step 6: Long Slat Side Trim

Turn the frame over to work on a long slat side and attach the remaining long trim pieces to the long slat sides with 1 1/4″ brad nails and wood glue. They should be flush with the short slat trim pieces, so that they cover the edges of the long trim on the short slat side.
Step 7: Short Top Trim

For the final trim pieces, measure and cut the short top trim pieces to size and attach them to the top and bottom of both short slat sides of the planter box with 1″ brad nails and wood glue. The trim pieces should be flush with the top and bottom of the planter frame.
Step 8: Long Top Trim

Now, measure and cut the long top trim pieces to size and attach them to the long sides the same way.
The Finish
Step 9: Stain or Paint

You can paint or stain your planter box if you prefer! I decided to stain mine with one coat of Golden Oak stain.
Step 10: Protective Finish
Make sure to add a protective outdoor finish to your box. If you choose not to satin or paint your planter, you can still use an outdoor clear coat to protect it and keep it weather resistant and the cedar looking beautiful!
That was it! I am in LOVE with my new set of Planter Boxes! I had these finished in time to decorate them for Christmas but I plan to change them out seasonally!


These wooden planters would look perfect for a porch, deck or even inside for an indoor plant!
Links to Products
You can find the items I used to style my front porch in the links below!
Make sure to share your builds with us on social media and use #shanty2chic so we can share them too!
Happy Building!
Check Out Some of Our Other Outdoor Planter Projects


DIY Cedar Planter Box
Tools
- Drill
- Kreg Jig
- Miter Saw
- Nailer
- Table Saw (optional)
Supply List
- 8 1x6x8 Cedar Fence Pickets
- 2 2x4x8 Framing Lumber
- 3/4 Wood Screws
- 2 1/2" Pocket Hole Screws
- 1 1/4" Brad Nails
- 1" Brad Nails
- Wood Glue
Instructions
Cut List
- Cut List


Building the Frame
- Cut the frame pieces to size. Drill 1 1/2" pocket holes at both ends of the short rung pieces. Attach them to the long frame pieces with 2 1/2" pocket hole screws and wood glue.

- Cut the bottom slats to size and lay them in place inside the frame. You do not need to secure these pieces.


Attach the Slats
- Cut the short slat pieces to size and attach them to the opposite sides with 3/4" wood screws and wood glue. The slats should be flush with the ends of each frame.

- Measure and cut for the long slat pieces and attach them the same way, on the tow reamaining sides of the planter box. The long slats should be flush with the edges of the short slats.


Adding the Trim
- Measure and cut the side trim pieces to size and attach the first set of trim pieces, on the short slate sides, of the planter box with 1 1/4" brad nails and wood glue. The trim pieces should be flush with the ends of the long slats and the top and bottom of the frame.

- Attach the remaining long trim pieces to the long slat sides with 1 1/4" brad nails and wood glue. they should be flush with the short slat trim pieces, so that they cover the edges of the long trim on the short slat side.

- Measure and cut the short top trim pieces to size and attach them to the top and bottom of both short sides of the planter box with 1" brad nails and wood glue. The trim pieces should be flush with the top and bottom of the planter box.
- Measure and cut the long top trim pieces to size and attach them the same way.


The Finish
- All finished!You can paint or stain it if you prefer or just add an outdoor clear coat protectant to show off the beautiful cedar!Make sure to share your builds with us on social media and use #shanty2chic so we can share them too!Happy Building!


This planter box design is both practical and visually appealing—great for adding structure and greenery to outdoor spaces. Projects like this really depend on material selection and proper finishing to handle moisture and weather exposure over time. Using well-treated or moisture-resistant boards can help maintain durability and structural integrity. We’ve come across useful material insights on platforms like https://plywoodbazar.com/
for similar outdoor and interior applications. Very well-designed and easy-to-follow build!
This planter box design is a great example of how simple woodworking can enhance outdoor spaces while keeping the build process practical and accessible. The clean structure and proportions make it versatile for patios, balconies, or garden areas, and it’s nice to see how natural materials can add warmth to exterior environments.
From an interior and exterior design perspective, planter boxes like this are becoming increasingly popular in residential and hospitality projects where greenery is used to soften architectural spaces and improve visual balance. Thoughtful material selection and sturdy construction also play an important role in ensuring durability outdoors. We’ve been following similar trends in outdoor materials and design applications across the interior industry here: https://plywoodbazar.com/
I really like your articles. Only here you can get a lot of cool ideas. Thank you!
I did it step by step as you wrote and I got a very cool toy box. Thank you!
Maybe I am missing it, but what did you use for the trim pieces? I am not seeing those materials on your list.
I’m so sorry. I left them off of the plans. Just added them and updated. Thank you for letting us know!
I followed your instruction and made a planter box. It is easy. Thanks for sharing it