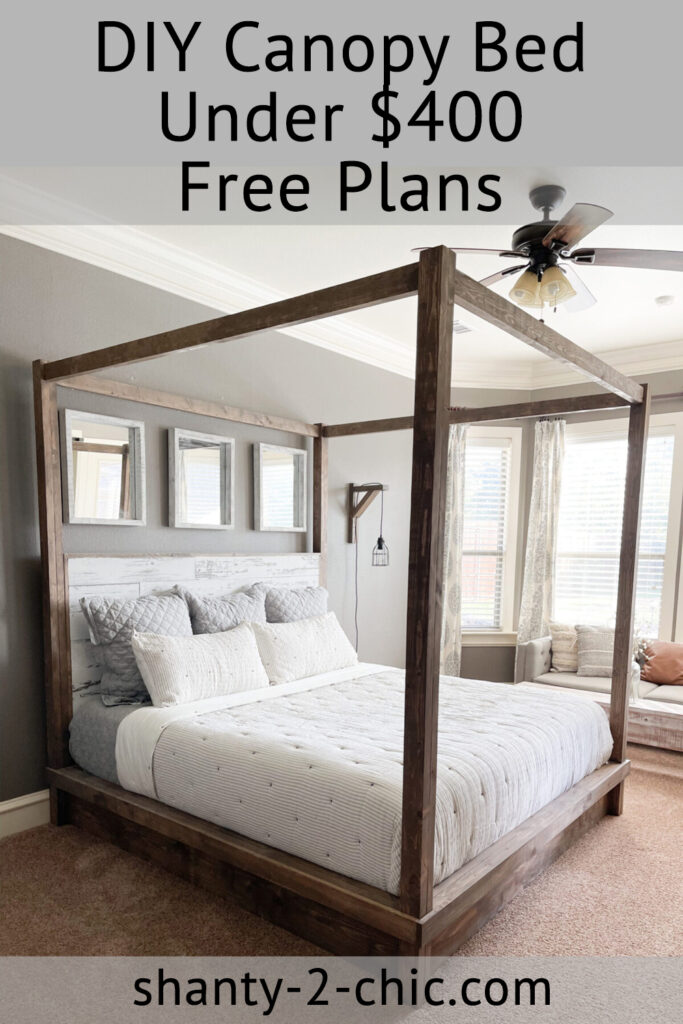
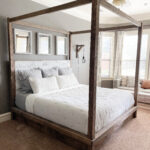
This DIY Canopy Bed can be built with just a few basic tools and about $375 in lumber! We share the free plans, how-to video and a step-by-step tutorial so you can build your own!
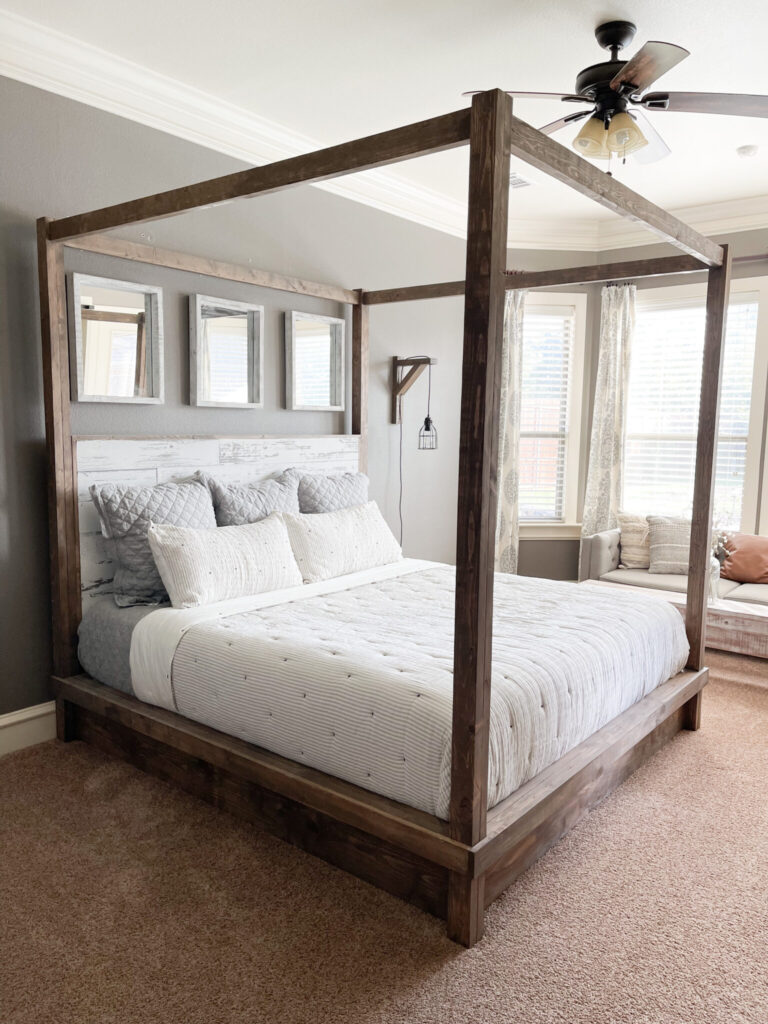
I am so excited about my new DIY Canopy Bed! I’ve always loved the vibe a four-poster bed gives a room but I’ve never owned one because I was afraid it would make my room look smaller with the bed posts running up towards the ceiling.
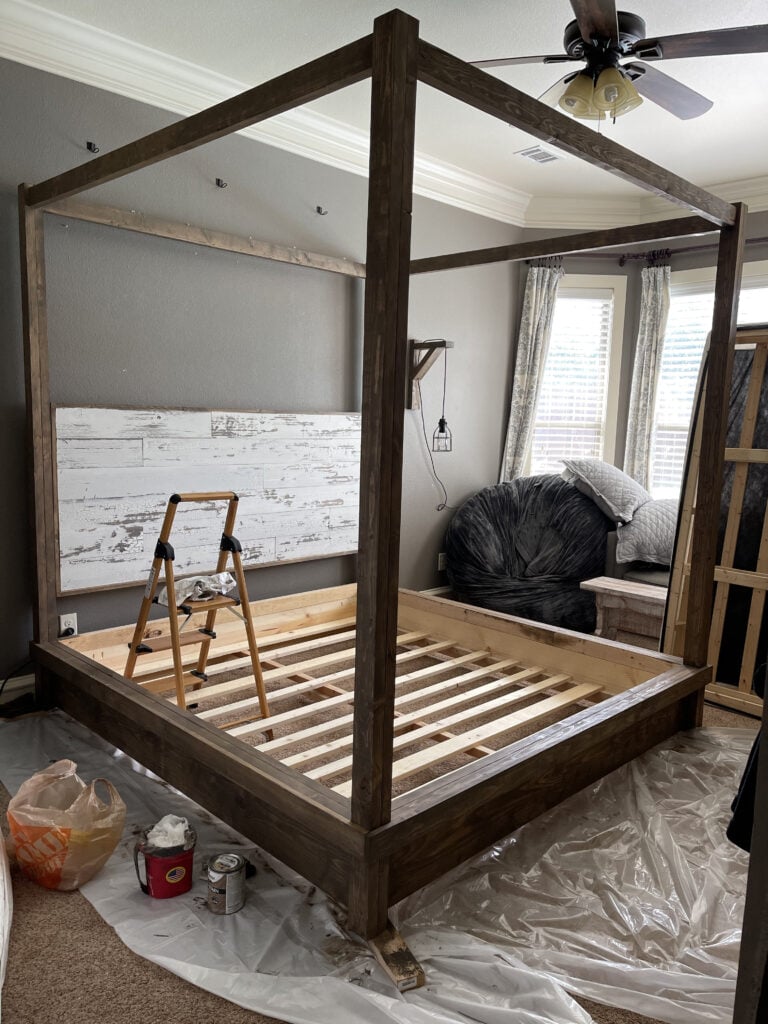
I’ve been wanting to build a new bed so I was looking online for inspiration when I found a few canopy bed ideas that I loved! The pictures convinced me that my room wouldn’t feel smaller with the four-poster bed and that I needed one yesterday 😉 The retail price for the beds was over $2,000 before shipping. So, I got busy designing my new DIY Canopy Bed idea and had Whitney come over to help me build it! We were able to build it for about $375 in framing lumber that we found at our local hardware store!
Come build it with us! Just click play in the box below!
Pretty simple right?!
Click here to jump to the free printable plans!Follow along in the step-by-step guide below.
Table of Contents
How to Build a DIY Canopy Bed
Materials
Tools:
- Miter Saw
- Kreg Jig
- Drill
- Table Saw (optional)
- Brad Nailer
- Pin Nailer (optional)
- Sander
Supplies:
- 22 – 2x4x8 Pine or Common Board
- 4 – 1x10x8 Pine or Common Board
- 6 – 1x6x8 (I used Timeline Wood Skinnies)
- 22 – 1x4x8 Pine or Common Board (13 can be furring strips, 2 are unnecessary if you are using barn wood)
- 1/2″x48″x96″ Hardwood Plywood (if using barn wood)
- 1 1/4″ Pocket Hole Screws
- 2 1/2″. Pocket Hole Screws
- 3/4″ Pin Nails
- 1 1/4″ Wood Screws
- 2″ Wood Screws
- Wood Glue
- Wood Filler
Laminating the Rails and Legs
Step 1: Laminating the Posts
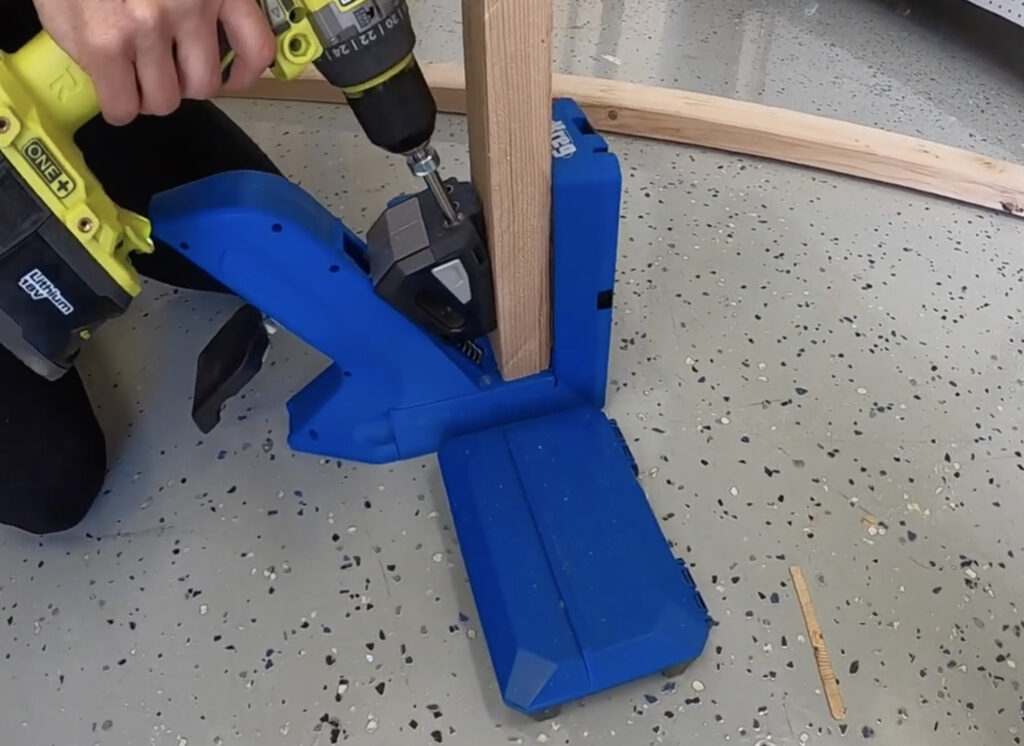
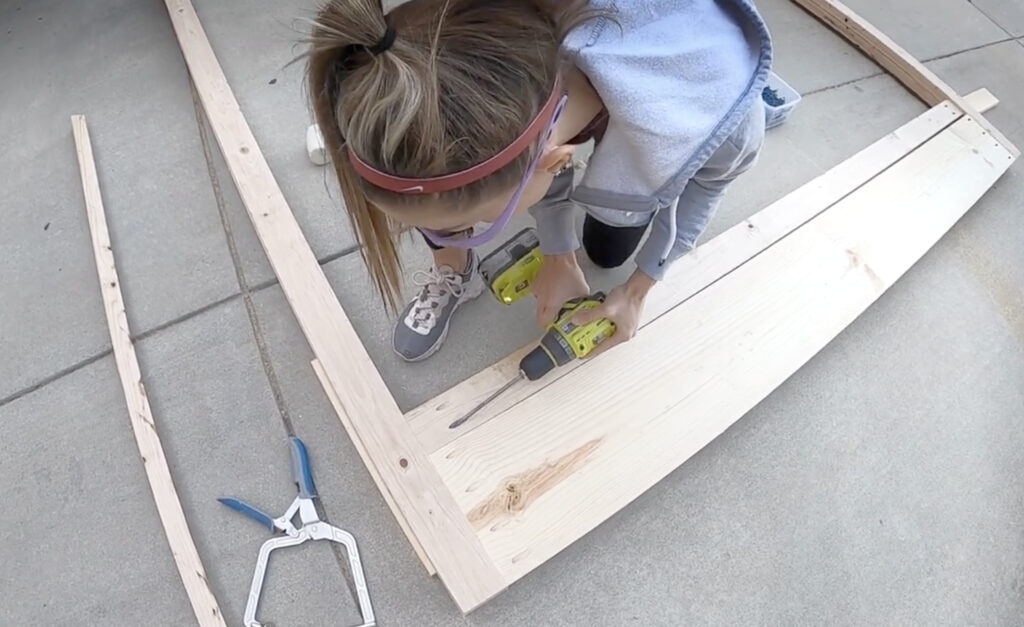
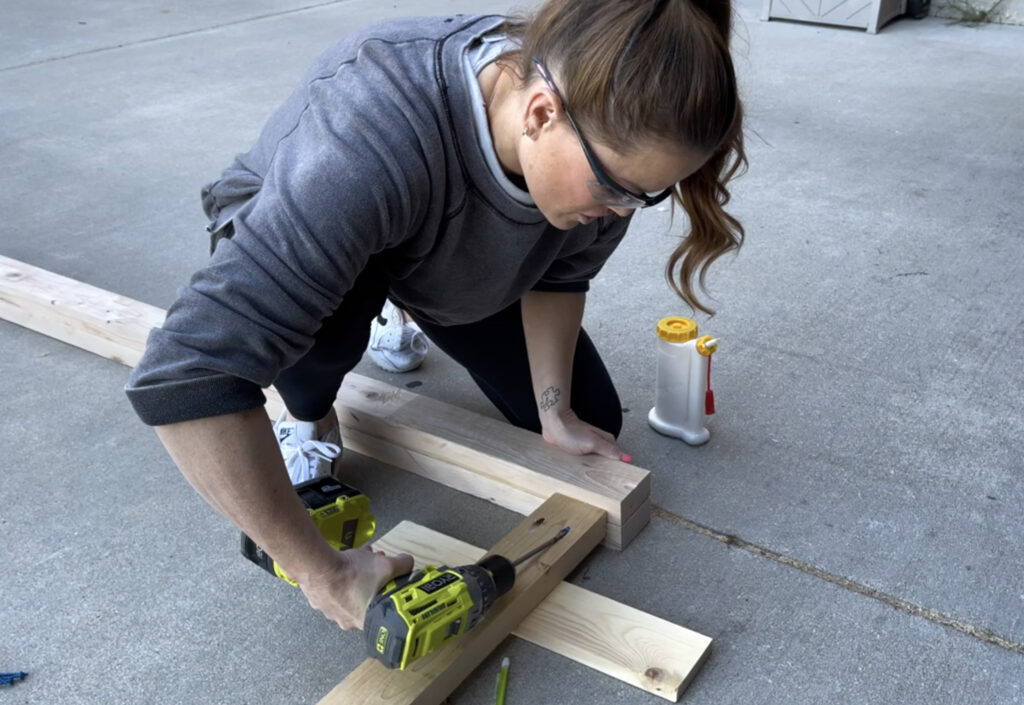
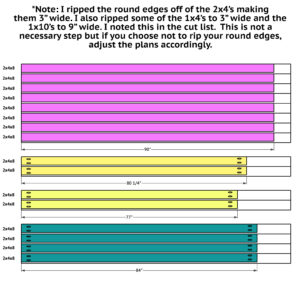
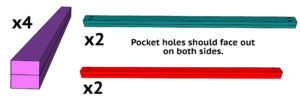
Cut the boards for the legs, end rails and side rails. Drill 1 1/2″ pocket holes at the ends of 2 of the side rails and 2 of the end rails.
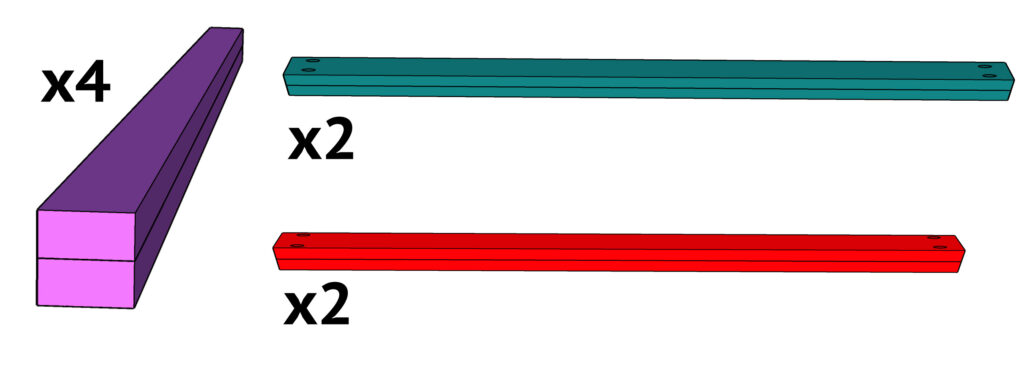
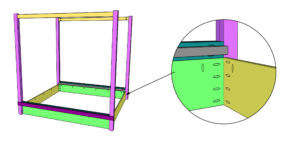
Attach 2 leg pieces together, 2 side rail pieces together and 2 end rail pieces together with wood glue and secure with clamps. Let them dry completely before unclamping. Build 4 leg assemblies, 2 side rail assemblies and 2 end rail assemblies. Make sure the pocket holes face up and down (exposed on both sides).
Building the Side Assemblies
Step 2: Assembling the Bottom Side Rails

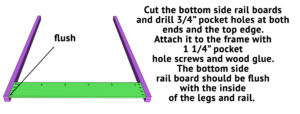
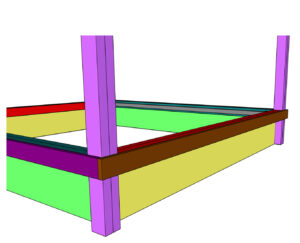
Cut the bottom side rail boards and drill 3/4″ pocket holes at both ends and the top edge.
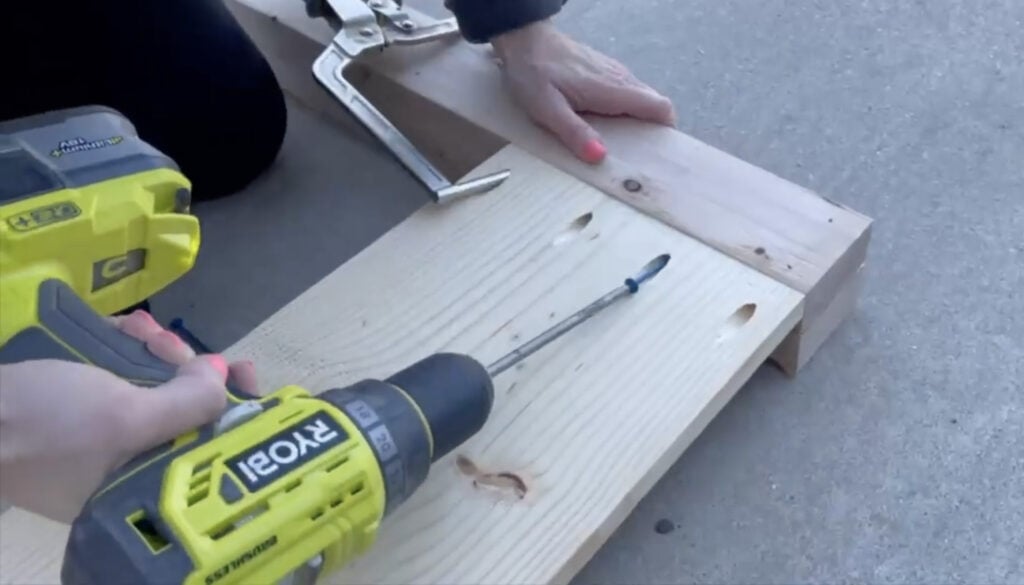
Attach it to the posts with 1 1/4″ pocket hole screws and wood glue. The bottom side rail board should be flush with the inside of the legs and rail.
Step 3: Attaching the Posts
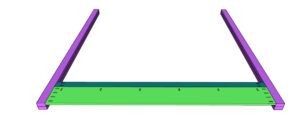
Attach the bottom side rail assembly to the top of the side rail and the legs with 2 1/2″ pocket hole screws and wood glue.
Step 4: Top Rails
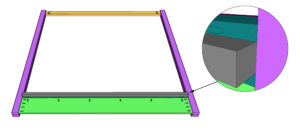
Cut the top side rails to size and drill 1 1/2″ pocket holes at both ends. Center them on the legs, 3/4″ down from the top and attach them with 2 1/2″ pocket hole screws and wood glue.
Step 5: Cleats
Cut the cleat to size and attach it to the side rail with 2″ wood screws and wood glue. It should be 3/4″ down from the top of the side rail.
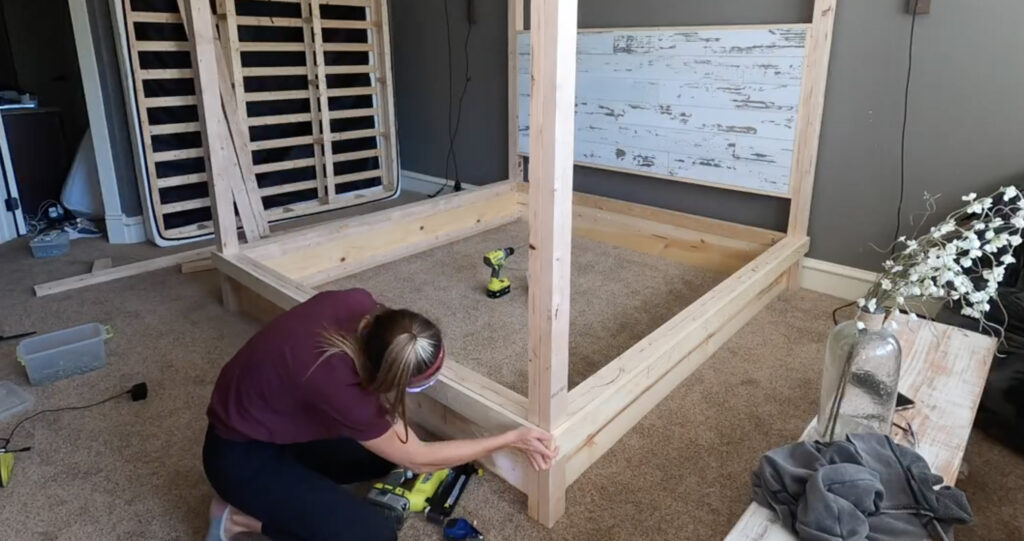
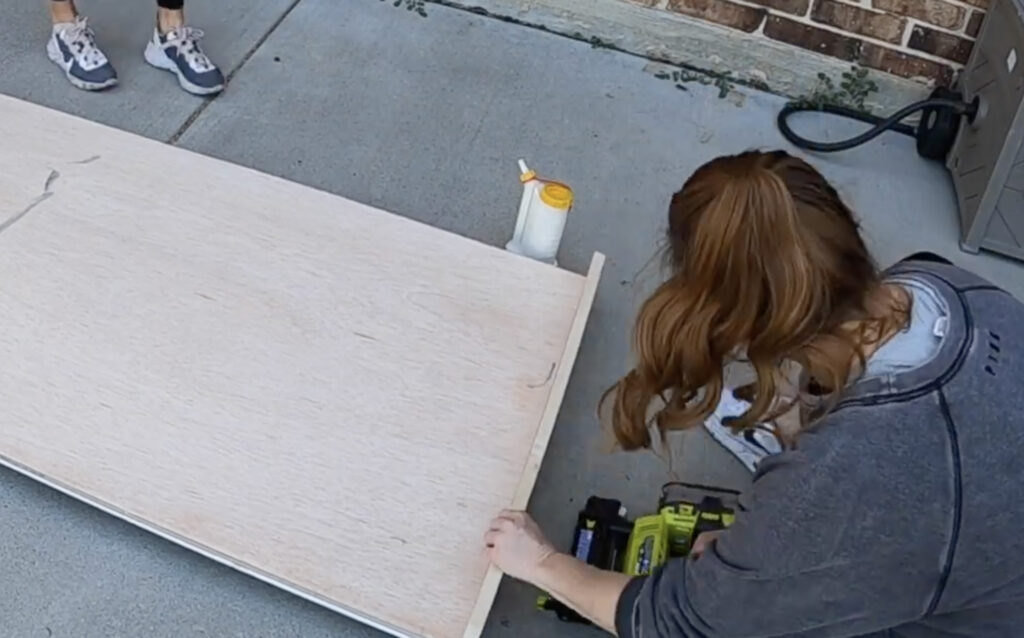
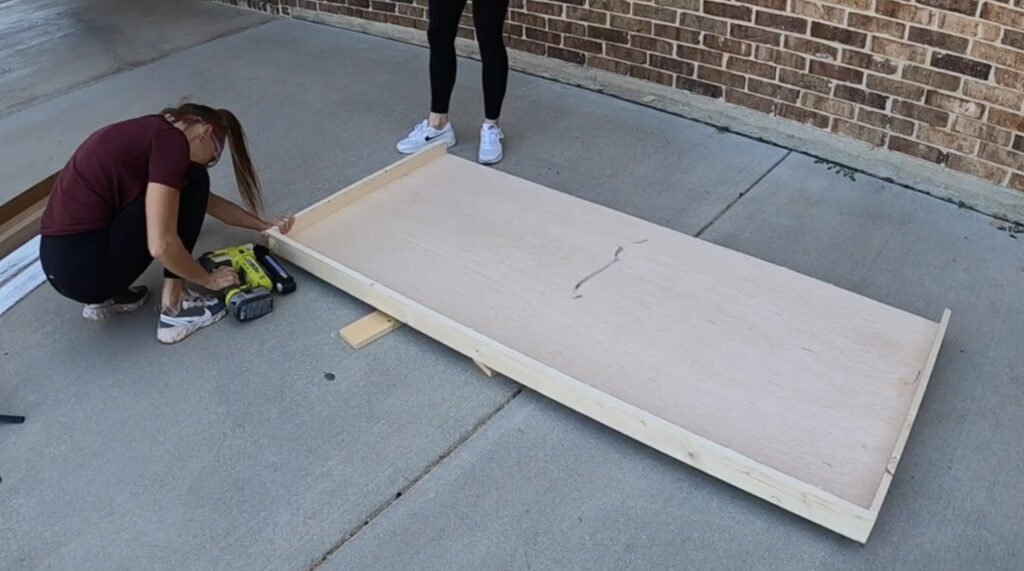
Step 6: Adding the Side Trim

Flip the side assembly over. Attach the rail assembly to the legs with 2 1/2″ pocket hole screws. Next, cut the side trim piece to size and attach the trim piece to the front of the side rail with 1 1/4″ brad nails and wood glue.
Building the Headboard and Footboard Canopy Frame
Step 7: Headboard and Footboard Rail Attachment

Cut the headboard and footboard rails to size and drill 3/4″ pocket holes at both ends and one edge of each board. Attach them to the side assemblies with 1 1/4″ pocket hole screws and wood glue.
Step 8: End Rails
Attach the end rail assemblies (from step 1) on top of the end rails. Attach them with 2 1/2″ pocket hole screws and wood glue, into the legs. Use 1 1/4″ pocket hole screws and wood glue to attach them to the end rails.
Step 9: Headboard and Footboard Trim
Cut the headboard and footboard trim to size. Attach it over the rails with 1 1/4″ brad nails and wood glue.
Headboard Assembly
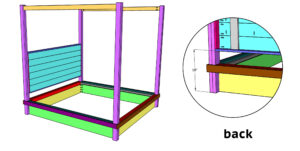
Step 10: Planking the Headboard
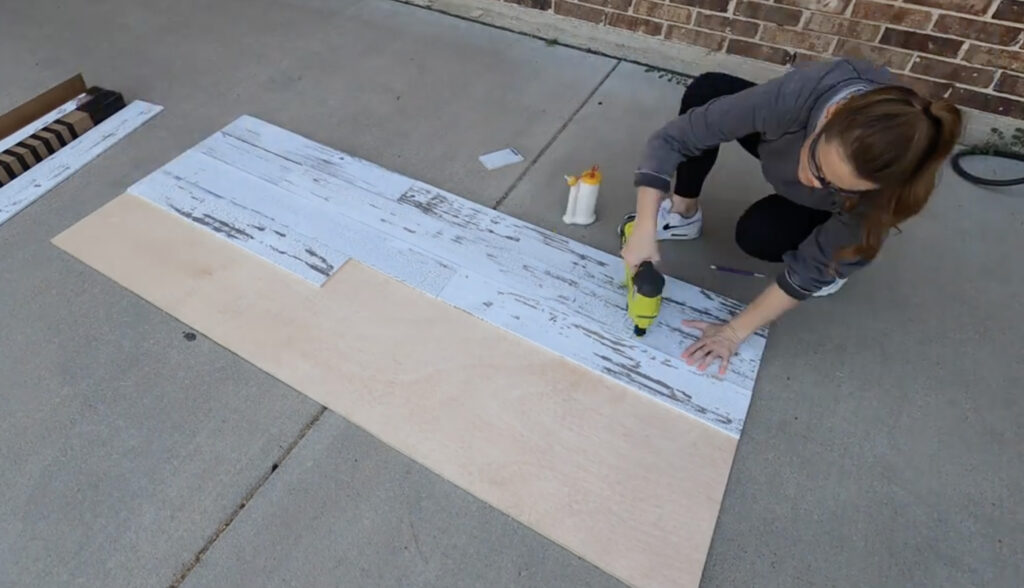
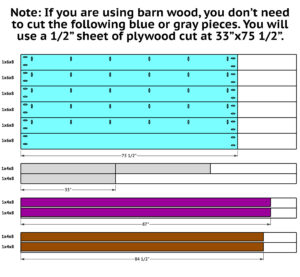
If you’re using the barn wood planks, cut the 1/2″ plywood and barn wood planks to size and attach them to the 1/2″ plywood with 3/4″ pin nails and wood glue. Then, skip to the step 3.
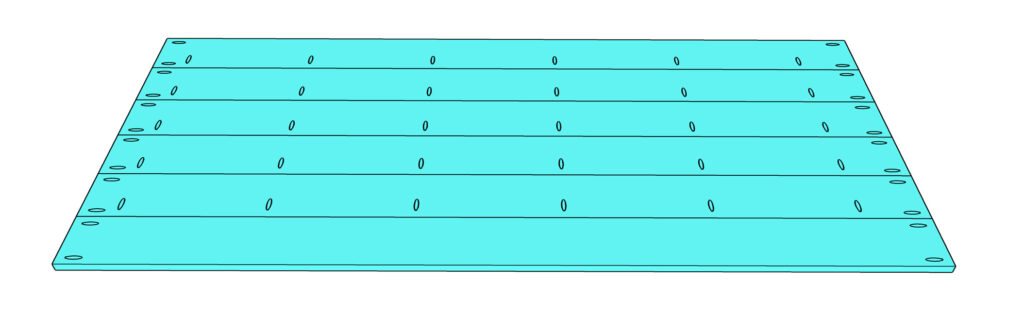
Cut the 1×6 boards to size and drill 3/4″ pocket holes according to the diagram. Attach them together with 1 1/4″ pocket hole screws and wood glue.
Step 11: Cleats for the Headboard
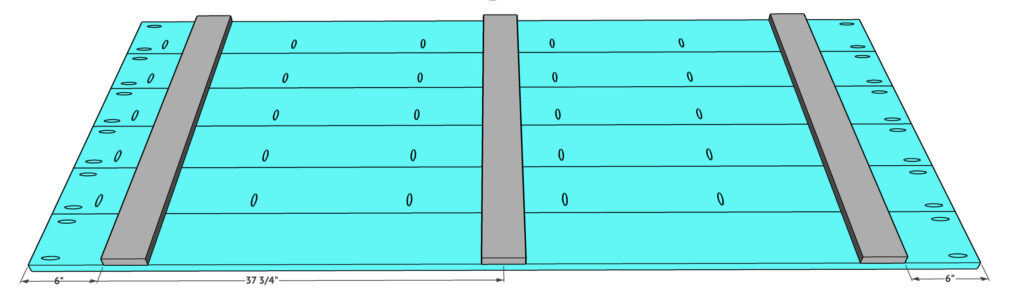
Cut the headboard cleats to size and attach them to the headboard planks with 1″ brad nails and wood glue, from the cleats into the back of the headboard planks.
Step 12: Headboard Side Trim
Cut the headboard side trim to size and attach it to the ends of the headboard. If you are using 1×6 attach with 1 1/4″ pocket hole screws and wood glue. If you are using barn wood planks, attach the trim with 1″ brad nails and wood glue.
Step 13: Top and Bottom Headboard Trim
Cut the top and bottom trim pieces to size and attach them the same way.
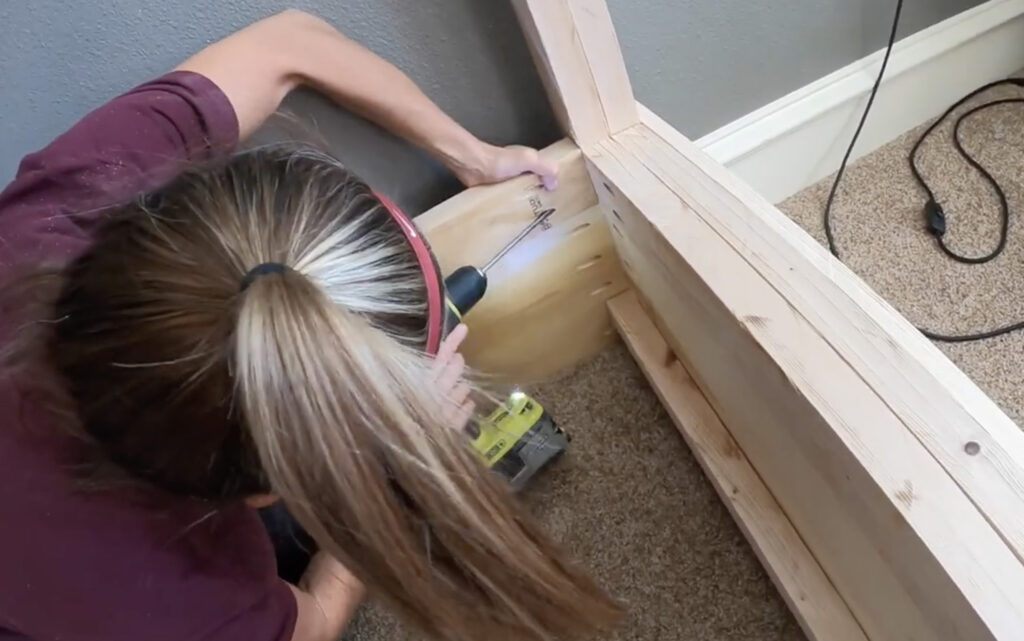
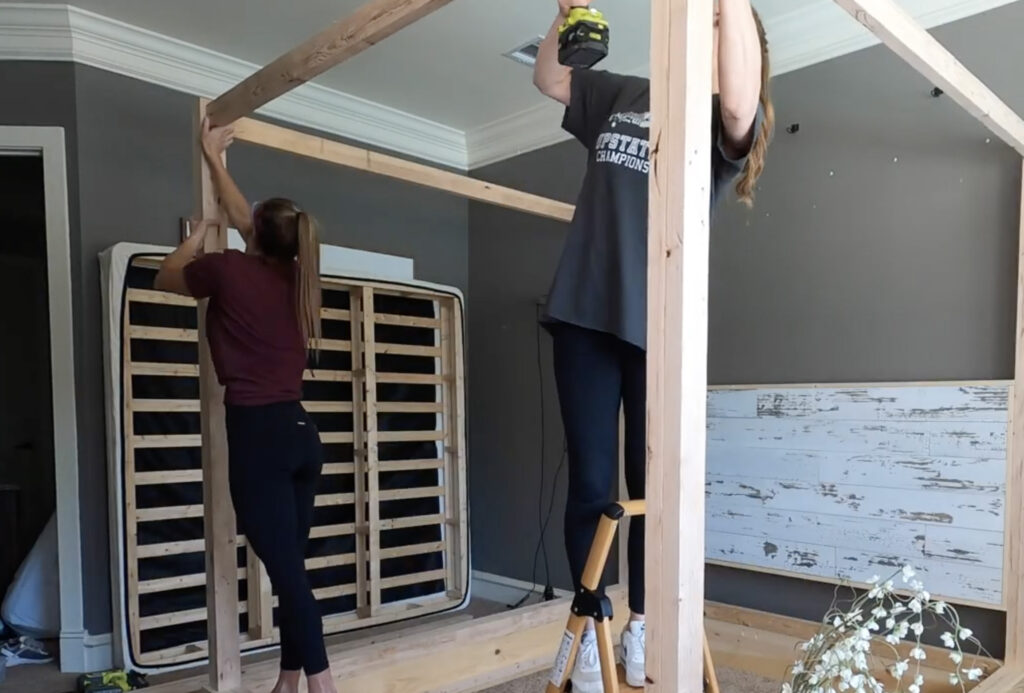
Step 14: Attaching the Headboard to the Posts

Attach the headboard to the posts with 2″ wood screws, from the inside of the headboard trim, into the legs.
Step 15: Headboard and Footboard Top Rails
Cut the headboard and footboard top rails to size. Drill 1 1/2″ pocket holes at both ends and attach them to the legs with 2 1/2″ pocket hole screws.
Attaching the Mattress Slats on the Canopy Bed Frame
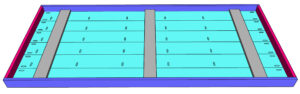
Step 16: Middle Cleat
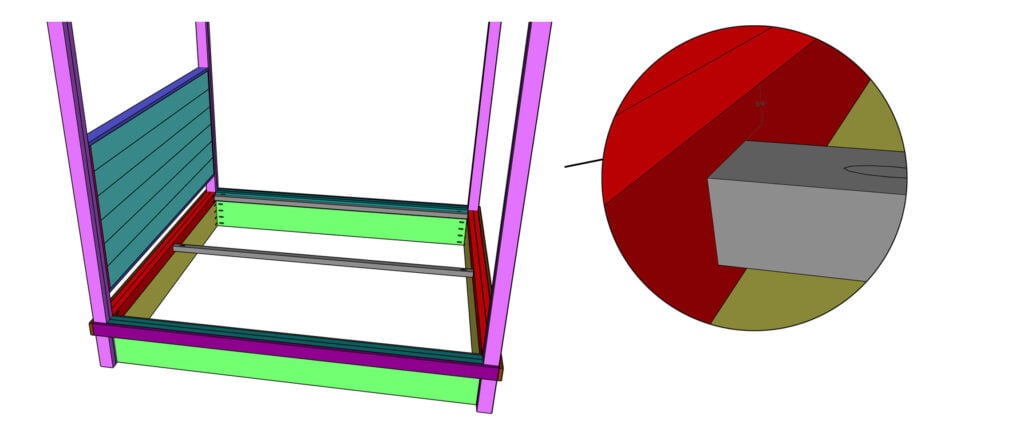
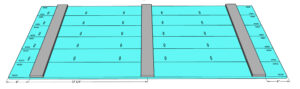
Cut the middle cleat to size and drill 3/4″ pocket holes at both ends. Center it on the headboard and footboard rail assemblies, 3/4″ down from the top of the rail. Attach it with 1 1/4″ pocket hold screws.
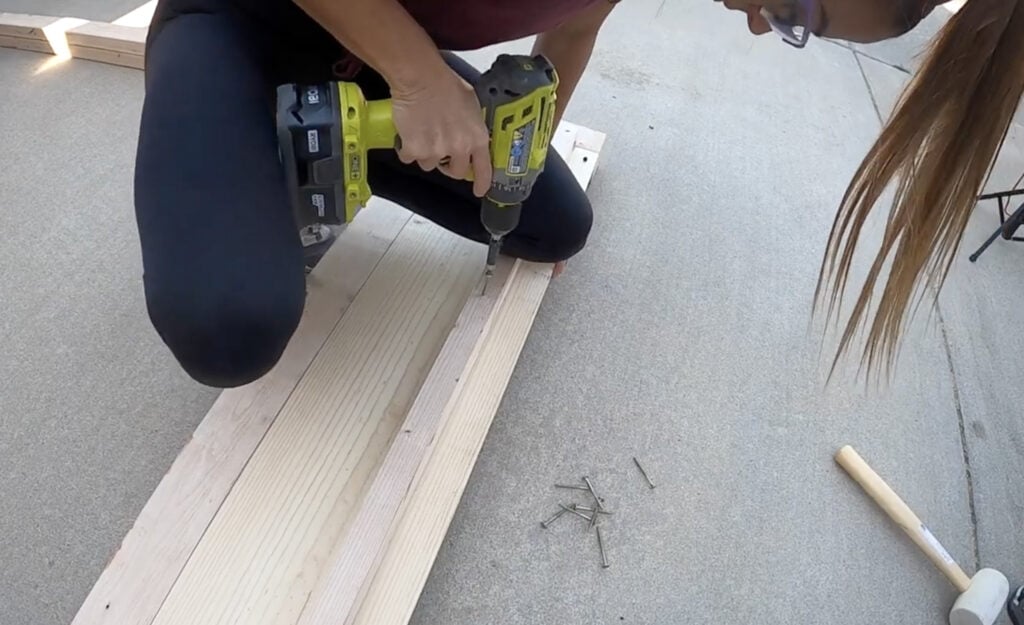
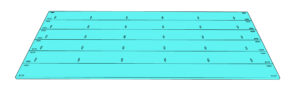
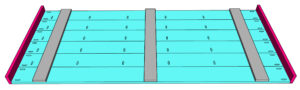
Step 17: Mattress Slats

Cut the mattress slats to size, spread them out evenly on the cleats and attach them to the cleats with 1 1/4″ wood screws.
Finishing The Canopy Bed
Step 18: Filling Holes with Wood Filler

Fill all exposed nail and screw holes with wood filler.
Step 19: Adding a Finish
Fill your exposed pocket holes and nails holes and add a finish!

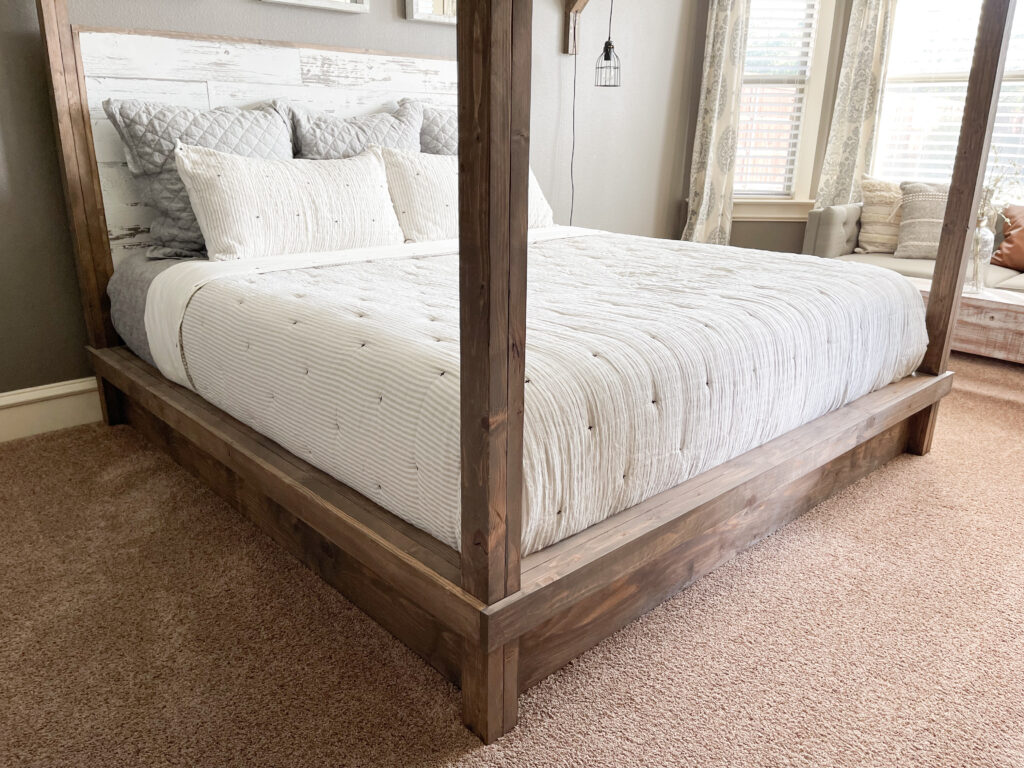
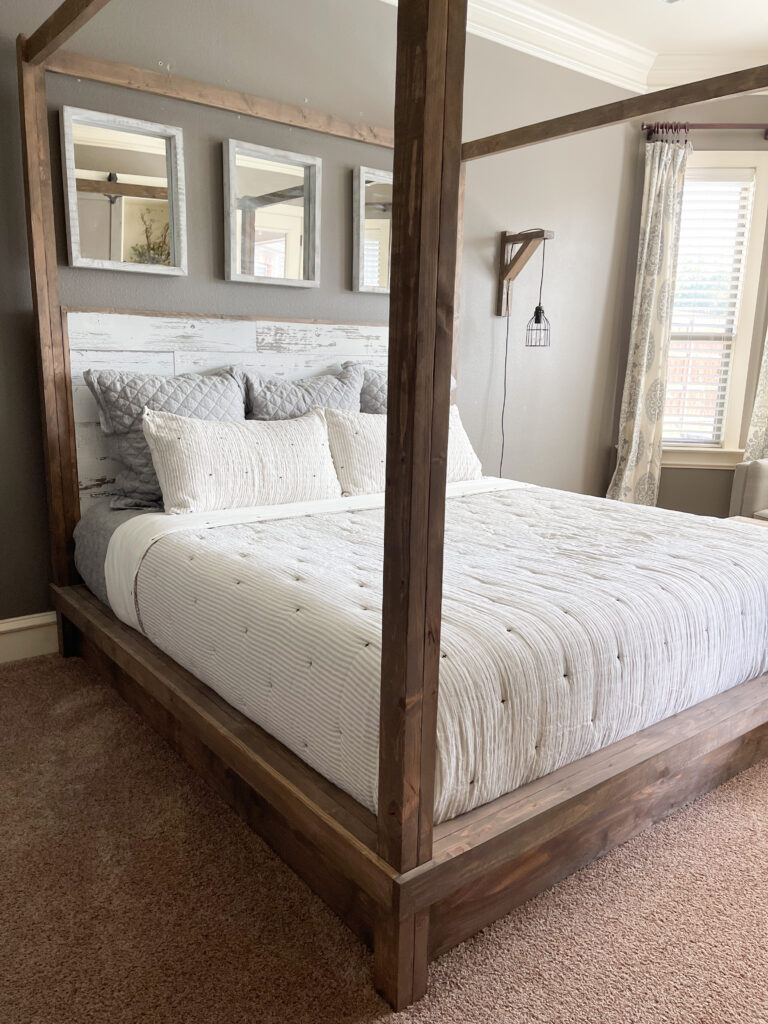
I am so in love with my new DIY Canopy Bed! Beds are the easiest way to completely change the look of a room. I love how it fits in my room and the new look it gives this space! I’m now debating adding string lights 🙂 I’ve seen people hang fabric panels or sheer fabric panels on the canopy but I prefer the open look for my space.

Have fun with it and make it your own. Make sure to share your builds with us on Instagram, Facebook and Pinterest and use #shanty2chic so we can share them too!
Happy Building!
Links to Decor
- Striped Comforter
- Gray Quilt
- Light Sconce
- I found the curtains at Pottery Barn years ago
- I found the curtain rods, hooks and brackets at Lowe’s
Modifications to Fit Other Mattress Sizes
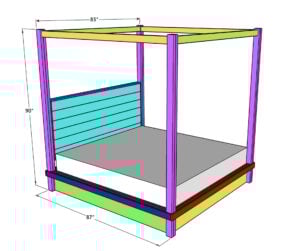
This set of plans is for a king sized mattress but it’s a very simple to modify these plans to fit any mattress size. I’m listing the standard mattress sizes below.
Just subtract the width of your bed and the length of your bed from the original king dimensions.
The only boards that will change on the width will be the headboard, footboard and mattress slats. The only boards that will change for the length of your mattress will be the side frame pieces.
- King Mattress: 76″x80″
- Queen Mattress: 60″x80″
- Full Mattress: 54″x75″
- Twin Mattress: 38″x75″
DIY Canopy Bed
Tools
- Miter Saw
- Kreg Jig
- Drill
- Table Saw (optional)
- Brad Nailer
- Pin Nailer
- Sander
Supply List
- 22 2x4x8 Pine or Common Board
- 4 1x10x8 Pine or Common Board
- 6 1x6x8 Pine or Common Board (I used Barn Wood)
- 22 1x4x8 Pine or Common Board (13 can be furring strips, 2 are unnecessary if you are using barn wood)
- 1 1/2"x48"x96" Hardwood Plywood
- 1 1/4" Pocket Hole Screws
- 2 1/2" Pocket Hold Screws
- 3/4" Pin Nails
- 1 1/4" Wood Screws
- 2" Wood Screws
- Wood Glue
- Wood Filler
Instructions
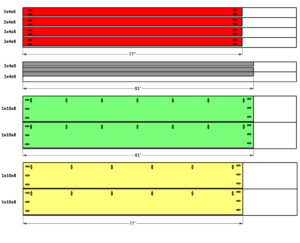
Cut List
- Cut List 1

- Cut List 2

- Cut List 3

- Cut List 4


Laminating the Rails and Legs
- Cut the boards for the legs, end rails and side rails. Drill 1 1/2" pocket holes at the ends of 2 of the side rails and 2 of the end rails. Attach 2 leg pieces together, 2 side rail pieces together and 2 end rail pieces together with wood glue and secure with clamps. Let them dry completely before unclamping. Build 4 leg assemblies, 2 side rail assemblies and 2 end rail assemblies. Make sure the pocket holes face up.

Building the Side Assemblies
- Cut the bottom side rail boards and drill 3/4" pocket holes at both ends and the top edge. Attach it to the frame with 1 1/4" pocket hole screws and wood glue. The bottom side rail board should be flush with the inside of the legs and rail.

- Attach 2 leg assemblies to the top of the side rails and legs with 2 1/2" pocket hole screws and wood glue.

- Cut the top side rails to size and drill 1 1/2" pocket holes at both ends. Center them on the legs, 3/4" down from the top and attach them with 2 1/2" pocket hole screws and wood glue.

- Cut the cleat to size and attach it to the side rail with 2" wood screws and wood glue. It should be 3/4" down from the top of the side rail.

- Cut the side trim piece to size, flip the side assembly over and attach the trim piece to the front of the side rail with 1 1/4" brad nails and wood glue.


Building the Headboard and Footboard
- Cut the headboard and footboard rails to size and drill 3/4" pocket holes at both ends and one edge of each board. Attach them to the side assemblies with 1 1/4" pocket hole screws and wood glue.

- Attach the end rail assemblies (from step 1) on top of the end rails. Attach them with 2 1/2" pocket hole screws and wood glue, into the legs. Use 1 1/4" pocket hole screws and wood glue to attach them to the end rails.

- Cut the headboard and footboard trim to size. Attach it over the rails with 1 1/4" brad nails and wood glue.

Headboard Assembly
- If you're using the barn wood planks, cut them to size and skip to the next step. Cut the 1×6 boards to size and drill 3/4" pocket holes according to the diagram. Attach them together with 1 1/4" pocket hole screws and wood glue.

- Cut the headboard cleats to size and attach them to the headboard planks with 1" brad nails and wood glue, from the cleats into the back of the headboard planks.

- Cut the headboard side trim to size and attach it to the ends of the headboard. If you are using 1×6 attach with 1 1/4" pocket hole screws and wood glue. If you are using barn wood planks, attach the trim with 1" brad nails and wood glue.

- Cut the top and bottom trim pieces to size and attach them the same way.

- Attach the headboard to the posts with 2" wood screws, from the inside of the headboard trim, into the legs.

- Cut the headboard and footboard top rails to size. Drill 1 1/2" pocket holes at both ends and attach them to the legs with 2 1/2" pocket hole screws.


Attaching the Mattress Slats
- Cut the middle cleat to size and drill 3/4" pocket holes at both ends. Center it on the headboard and footboard rail assemblies, 3/4" down from the top of the rail. Attach it with 1 1/4" pocket hold screws.

- Cut the mattress slats to size, spread them out evenly on the cleats and attach them to the cleats with 1 1/4" wood screws.

- Fill your exposed pocket holes and nails holes and add a finish!Have fun with it and make it your own. Make sure to share your builds with us on social media and use #shanty2chic so we can share them too!Happy Building!


I absolutely love this DIY canopy bed project! The step-by-step instructions are super easy to follow, and I can’t wait to try it out in my own bedroom. The design looks so elegant and cozy. Thank you for sharing such an inspiring idea!
I absolutely love this DIY canopy bed project! The design is beautiful and the step-by-step instructions are super easy to follow. I can’t wait to try this in my own space! Thanks for sharing such a fantastic idea!
I absolutely love this DIY canopy bed project! The step-by-step instructions are so clear, and the final result looks stunning. I can’t wait to try this in my own bedroom. Thanks for sharing such a creative and beautiful idea!
Wow, this DIY canopy bed is absolutely stunning! I love how you’ve detailed each step; it makes it feel so achievable. Can’t wait to try this in my own bedroom—thanks for the inspiration!
I absolutely love this DIY canopy bed project! The step-by-step instructions and photos are super helpful. Can’t wait to try this out in my own bedroom. Thanks for sharing such a beautiful and inspiring idea!
I absolutely love this DIY canopy bed idea! Your step-by-step instructions make it feel so achievable, and the design is just gorgeous. I can’t wait to give it a try in my bedroom—thanks for sharing your creativity!
Wow, this DIY canopy bed is absolutely gorgeous! I love how you’ve made it look both elegant and accessible for a weekend project. The step-by-step instructions are super helpful. I can’t wait to try this in my own bedroom! Thanks for sharing!
I absolutely love this DIY canopy bed idea! The detailed instructions and beautiful photos make it feel doable for anyone. Can’t wait to try this in my own bedroom! Thanks for sharing your creativity!
I absolutely love this DIY canopy bed idea! The design is so elegant yet easy to follow. I can’t wait to try this project in my own bedroom. Thanks for sharing such a detailed tutorial!
I absolutely love this DIY canopy bed project! The step-by-step instructions are so clear, and the design is gorgeous. I can’t wait to try this out in my own bedroom. Thanks for the inspiration, Shanty 2 Chic!
I absolutely love this DIY canopy bed project! The step-by-step instructions are so clear, and the end result looks amazing. I can’t wait to try this in my own bedroom. Thank you for sharing such a detailed tutorial!
I absolutely love this DIY canopy bed project! The step-by-step instructions are super helpful, and the finished look is so elegant. I can’t wait to try this in my own bedroom. Thanks for the inspiration, Shanty 2 Chic!
The article “Top 10 WordPress Comments Plugins for 2023” on WPJetSpot provides an overview of the best plugins to enhance the commenting experience on WordPress blogs. Each plugin is reviewed for its features, pros, and cons, helping users choose the most suitable one based on their needs and budget. Notable plugins include Jetpack for its all-in-one solutions, Disqus for its advanced engagement features, and GraphComment for its user-friendly design and guest commenting capabilities.
for more click here https://wpjetspot.com/top-10-wordpress-comments-plugins/
What size of bed is this?
I’m building this out and the cut list dimensions for the side boards, top and bottom side rails should all be the same, correct? Instead they’re 81”, 84”, and 80 1/4” respectively, Am I missing something?
This is a great question! Why could this have happened?
Pretty cool. What program was used for this please? I want to see about adding secret drawers underneath for our tiny space, thanks.