Welcome to Day 8 of our 12 Days of Christmas series!

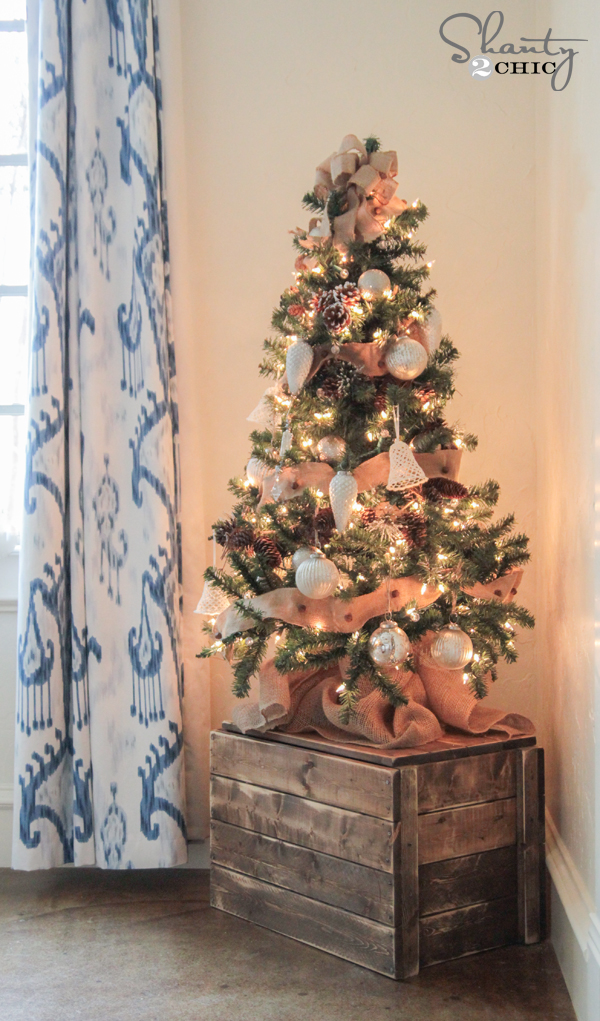
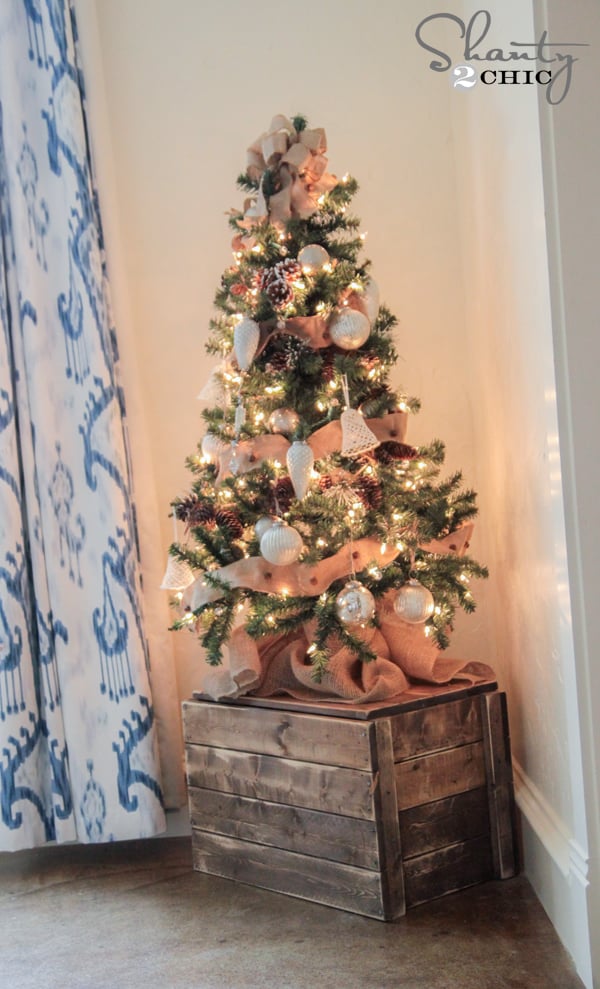
Today I am sharing a really fun way to display a mini Christmas tree. Check out my DIY Christmas Tree Crate!
This is super easy to make! I used brad nails and wood glue on the whole thing.
You will need 4 – 1×4″ furring strips and 1 – 1×2″ furring strip.
That makes your total cost of wood under $10… Woohoo!! I have walked you through the entire build here, and you can also download the free printable plans by clicking here or the button below!

I made all my cuts first. These are the cuts you will need to make.
1×4″ furring strip cuts –
8 at 22″ (long sides)
8 at 13″ (short sides)
4 at 20.5″ (bottom)
1×2″ furring strip cuts –
4 at 13 3/4″
That’s it!
I started by laying my short side pieces out like this.

Using my Ryobi AirStrike brad nailer and Gorilla Wood Glue I attached my small pieces to the sides like this…

I made 2 small sides just like that and then attached them with my long sides. Again, I used brad nails and Gorilla Wood Glue. I added some glue to my sides…

And attached the long sides like this…


I did the same thing to the other side.
To finish my box off I added my bottom slats. Using Gorilla Wood Glue and 1.25″ brad nails I attached them like this…

That was it! Well… Almost! I wanted to shanty them up just a bit more, so I added some black upholstery tacks around the whole box. They look like nail heads. They serve absolutely no safety or technical purpose, but they are so cute (which is just as important, right??;))
These can be found on the hardware aisle.

My long sides…

My short sides…

And I added a few to the bottom as well!
To finish it off I gave it a coat of my very fav!
Varathane Ultimate Wood Stain in Dark Walnut
You can find it at Home Depot!
After letting it completely dry, I used my Ryobi Corner Cat with 80 grit paper to take some of the finish off. I also rounded my edges with it. I think it gives it a great “I didn’t make this in my garage” look!
It fit the space perfectly! And, it will work for other purposes all year long… And, did I mention it cost me under $10 in wood?? Yup… I love it even more!
Also, be sure to check out the other great Day 8 projects from our friends by clicking the buttons below!


How tall is the Christmas tree?
What size tree?
What are the dimensions of the crate in feet? Also, how tall is the Christmas tree?
I’d love to do something like this but would like to make sure I have the right measurements first.
How tall is the tree?
What size if this Christmas tree?
I really like the look of this. So many things I could use it for. I just might build one today. Thanks!
VERY cool! Now I can make my own instead of having to hunt for them! Great call for a smaller tree too…
Do you have a link to where I can find the fabric from the curtains?? Thanks!
Here it is Alex 🙂 http://www.onlinefabricstore.net/robert-allen-at-home-robert-allen-khandar-indigo-fabric-.htm -Abbey
This is GREAT! I’ve always wanted an unconventional tree skirt. I may have to give this one a try. You girls make everything look SO SIMPLE! Love that.
xo Michael