***I have completed the matching benches to this table and you can get the plans for the benches HERE!***
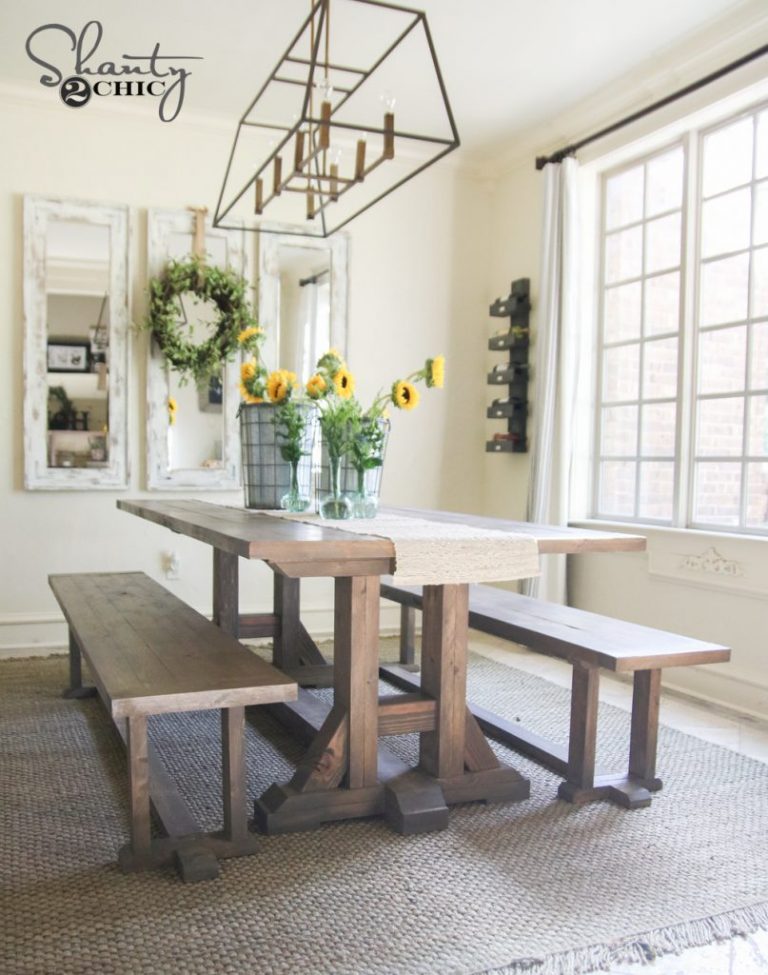
Happy Friday! Holy moly, I am so excited to share my latest build with you! I had to take a break from all the Christmas posts to share my new farmhouse table because I just couldn’t wait!

I got the inspiration from a beautiful table that I saw while I was out shopping. There is no way I could have a $1,000 (plus shipping and tax) dining table in our home with 2 boys and a toddler![]() So, as always, I enlisted the help of our very sweet and talented friend, Ana White! She nailed it and after her awesome plans and my elbow grease, I now have a ridiculously gorgeous, expensive-looking, grand dining table and it only cost me $125! I know, insane!
So, as always, I enlisted the help of our very sweet and talented friend, Ana White! She nailed it and after her awesome plans and my elbow grease, I now have a ridiculously gorgeous, expensive-looking, grand dining table and it only cost me $125! I know, insane!
I have shared the steps I took and the tips I learned as I went. This was not challenging at all and it took me about 10 hours of work from cutting the wood to applying the finish!
Find Ana’s plans HERE!
Let’s start with the legs:


A little Gorilla Glue Wood Glue goes a long way!
Easy enough![]() Now let’s build the bases:
Now let’s build the bases:
I used my Kobalt sliding compound miter to make the mitered cuts.


Time to put these babies together!


Adding the decorative arcs:


I love my cordless 18-volt Ryobi jig saw. This step may seem intimidating but it is very simple! Just draw an arc on each piece and follow with the jig saw. I use my Ryobi cordless sander to sand away any jagged cuts.
Now for the table top:


I constructed the entire table top with my Kreg Jig®, Gorilla Glue and my cordless Ryobi brad nailer.
On to the finish:

I picked my favorite, Rust-Oleum Early American stain, to stain this table. I applied one-coat with a bristle brush and wiped away after 5 minutes. Tip: because this table is so big, I worked small areas at a time…i.e. legs first, one side of table top, etc. I also stained the legs, runner and table top separately before attaching.

I applied one-coat of Rust-oleum Ultimate Polyurethane (in Satin), with a bristle brush, to protect the finish.
***This table is 9 ft. and heavy (not a bad thing![]() )! After the stain was dry, I brought the pieces in the house to assemble the table. I chose to attach the table top to the legs before pushing the runner through and this worked great for us. I also did not use wood glue to attach the table top to the legs (just wood screws) so that it can be disassembled and moved easily.***
)! After the stain was dry, I brought the pieces in the house to assemble the table. I chose to attach the table top to the legs before pushing the runner through and this worked great for us. I also did not use wood glue to attach the table top to the legs (just wood screws) so that it can be disassembled and moved easily.***
That’s it!


Who would have thought 2×4’s and pine boards could be so fancy![]()
Click HERE for the matching Bench Plans!
Thanks so much for stopping by!
~Ashley
I have added links to purchase items/tools I used in this post for your convenience!
Kreg Pocket Hole System
Ryobi Cordless Jig Saw

Kobalt Compound Sliding Miter Saw

Gorilla Glue Wood Glue
Ryobi 18-Volt Drill

Ryobi Brad Nailer


Started buying materials this weekend to do this. Hit up Lowes and Home Depot, had an awful time finding any good lumber at either. HD’s was moldy and full of bugs, Lowes had a bunch but it looked like they had dropped it off the truck a few miles away and drug it to the store. I spent almost 2 hours at lowes picking through lumber and have about half of what I need.
What do you think one of these would sell for?
Build this great table for my wife for mothers Day. It turned out pretty nice. The plans were not correct however in the lumber count. Grab a couple extra 10′ 2×6’s.
This table design was the spring-board for the one I just built. Mine is 64″x40″ to fit our dining room nook perfectly. The 1-13/16″ thk Red Oak was from a local Michigan sawmill (~$350) including planing & truing 1-side, the top is an off-the-shelf 1-3/4″ thk Baltic Birch butcher block island top from Lowe’s (~$250), and chairs are from the “At Home” store ($89ea). Required a joiner, planar, 3HP table saw, clamps, and a drill press. The poly-urethane is high build clear gloss and there are 7 coats on the top and 3 coats on the base. The legs are 3-pieces and held together with 8qty 3/8×5″ long hex screws (counter-bored). Top is held on with 4qty 3/8×3″ long hex screws (counter-bored). My total cost was around $1k for the whole set, DIY of course. This was my first time building a piece of furniture and first time working with real oak. I plan to build a 50″ bench for one side of the table eventually (as the family grows).
Thanks again for the inspiration!!
Dan A.
NW Ohio
Turned out really nice. Not too difficult of a build.
Can you please tell me the name of the stains you use on your beautiful table you made
Minwax Wood Stain and the color is Provincial 211. The construction grade 2X4 take the stain darker than the Pine top giving it the two tone color. I also used a high gloss polyurethane finish with 5+ coats of coverage.
thank you so much
Loved this plan and it was a breeze to build thanks to the easy to follow instructions. I tweaked the dimensions a bit to better fit the space… 95″ long x 44″ wide. Finished it in a dark Jacobean Stain with 3 coats of Satin Poly and it came out great. Next up will be a sideboard to match!
Looks great Rick! Did you still use 3 pedestals or did you only use 2? I’m going to build it about the same size as you did.
I stayed with 3 and it worked well. Thanks and good luck!
Hi Rick – Where did you find the plans to assemble the top of the table? i’ve only come across the photos and nothing is listed on Ana’s site. Thanks
Just finished this for my fiance as our very first dining table in our new home. With the cost of good dining tables at $2k+, we were not going to be getting one any time soon! This was my first woodworking project and I am officially hooked and already planning my next furniture builds. I look forward to using your website in the future! Thanks!
BEAUTIFUL!!
Gorgeous! Where did you purchase your chandelier?
My father and I are currently building this table at my wife’s request. He and I are amazed at how well it is going. Where can I send pictures if it looks as good when it is finished?
Beautiful table. I have tons of 3x6x20ft real verticle grain old growth. redwood. I think it would be magnificent. I am thinking of making it 10ft by 46 in wide. Should be easy enough to adapt the plans Will be great on a patio.
Wonderful design.
Greg Hindle.
Where are the measurements ?
Did you ever build the triple pedastal table?
Thanks so much for the info and instructions. It looks amazing!
We’re in the process of making this table with the top out of walnut and the base out of white pine. We have most of the top done except for the trim where the plans call for us to nail and glue the 1x2s to the underside and then countersink 3″ screws through the 2×2 below it. Are we countersinking them all the way through to the table top itself or just into the 1×2?
Just curious since we want to make this as sturdy as possible and I assume this is where people would lift this table. We’re military so it will be moved quite a few times over its lifespan.
thanks for the free plans. i followed your plans for the legs and the overall frame. instead of staining the studs, i covered them in reclaimed lath i got for free on craigslist. it was way more tedious, but i’m happy with how it turned out. i also decided to make it a dining room table that can have a removable top to double as a shuffle board table. i haven’t made the table top yet. the shuffleboard playing board is not a true professional butcher block, but it’s working just fine for me. i joined pine boards, made a stud frame underneath, used a wood burner for the numbers, and then poured a couple of coats of epoxy on. the lath is lightly sanded with water based poly. thanks again
We made this table for a friend who really wanted it for her counter height chairs. Here is what it turned out like….i think I like it better as a “normal” height table 🙂 We are making one for ourselves now
I want to make this table sooooooooo badly. Now to convince hubby >.<