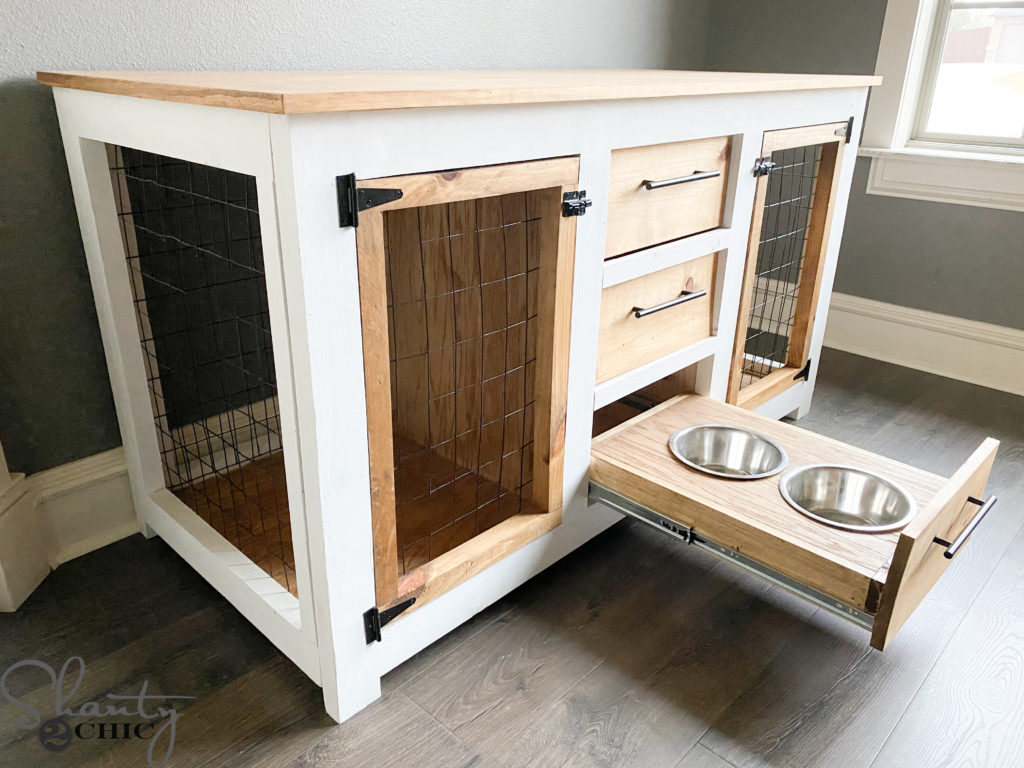
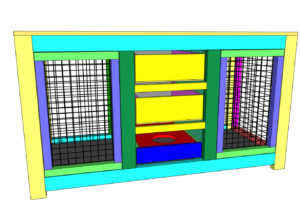
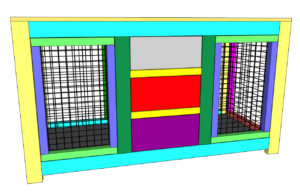
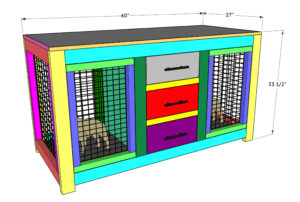
Build this DIY Dog Crate Console with free plans by Shanty2Chic.
I have been wanting to build this DIY Dog Crate Console for so long and I finally took the plunge! We get so many requests for a dog crate console that looks like a piece of furniture but will accommodate two dogs and that’s just what I needed after adopting my newest little pet, our frenchie, Lola! Check out my DIY Large Kennel!
We teamed up with Buildsomething.com to share these dog kennel plans today! Buildsomthing.com is an online community where you can share your plans with other creators, find plans that inspire you and vote on your favorites! We shared this plan on Buildsomething.com , go check out the 1000’s of other plans that have been shared!
This is a simple build that won’t break the bank! So, let’s get building! Just follow the step-by-step instructions below!
Click here to jump to the Free Printable PlansDIY Dog Crate Console
Tool List
Supply List
- 8 – 2x4x8 Framing Lumber
- 3 – 2x2x8 Pine or White Wood
- 1 – 1x4x8 Pine or White Wood
- 1 1/4″ pocket hole screws
- 2 1/2″ pocket hole screws
- 3/4″ staples
- 1″ pin nails
- 1 3/4″ wood screws
- 3 ft. Black PVC Coated Welded Wire
- 22″ Drawer Slides – 3 sets
- Hinges – 4
- Latches – 2
- Dog Bowls – 2
- Wood Glue
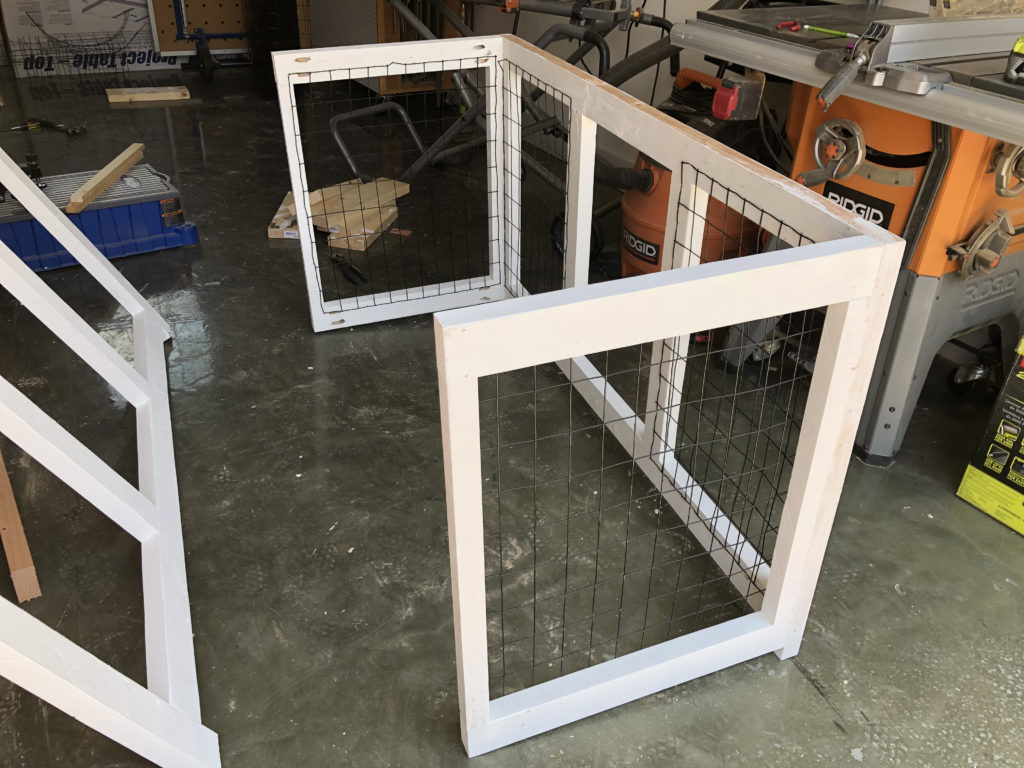
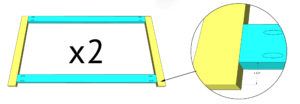
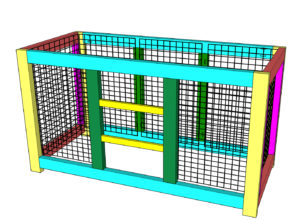
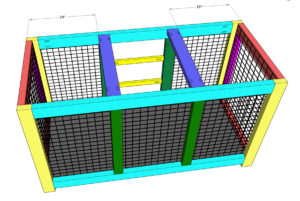
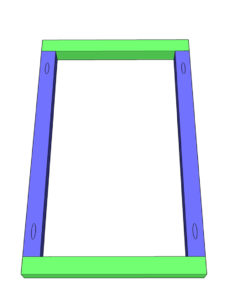
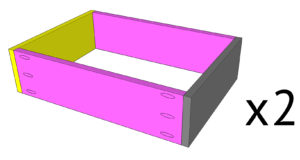
Building the Dog Kennel Frames
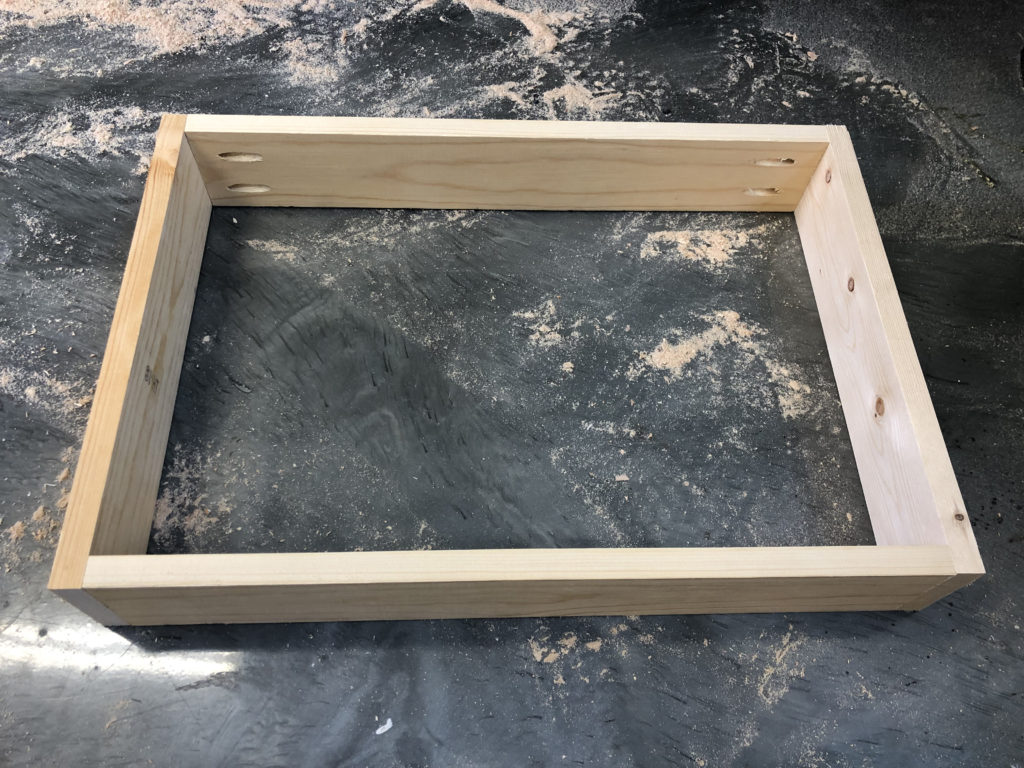
Step 1
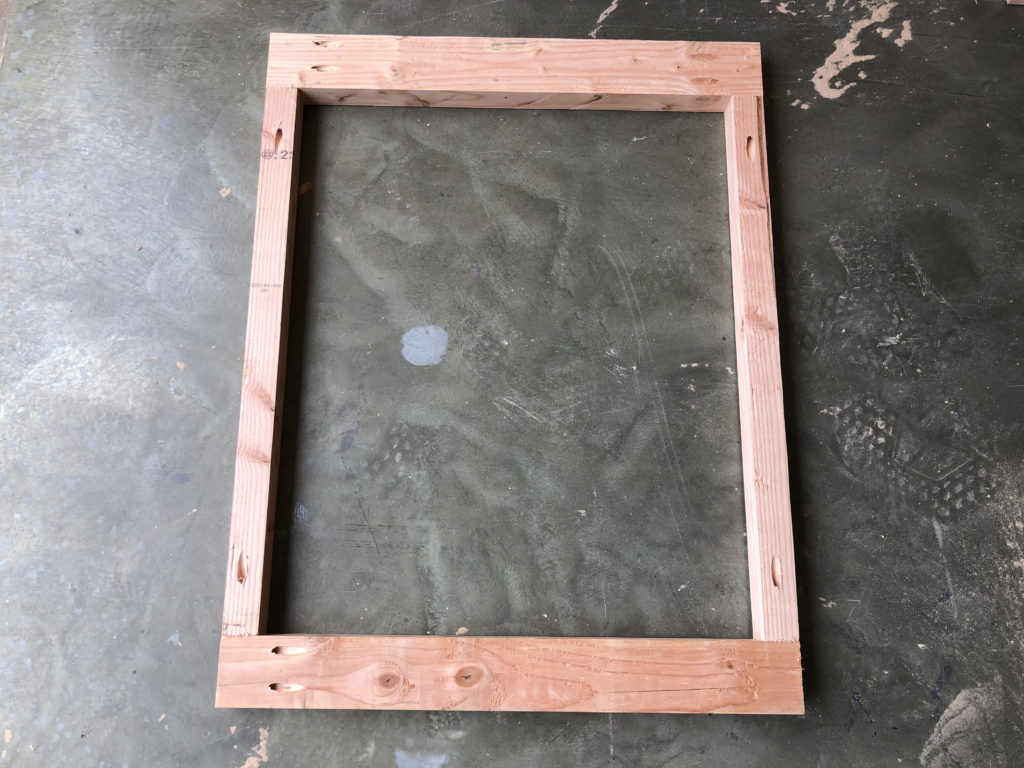
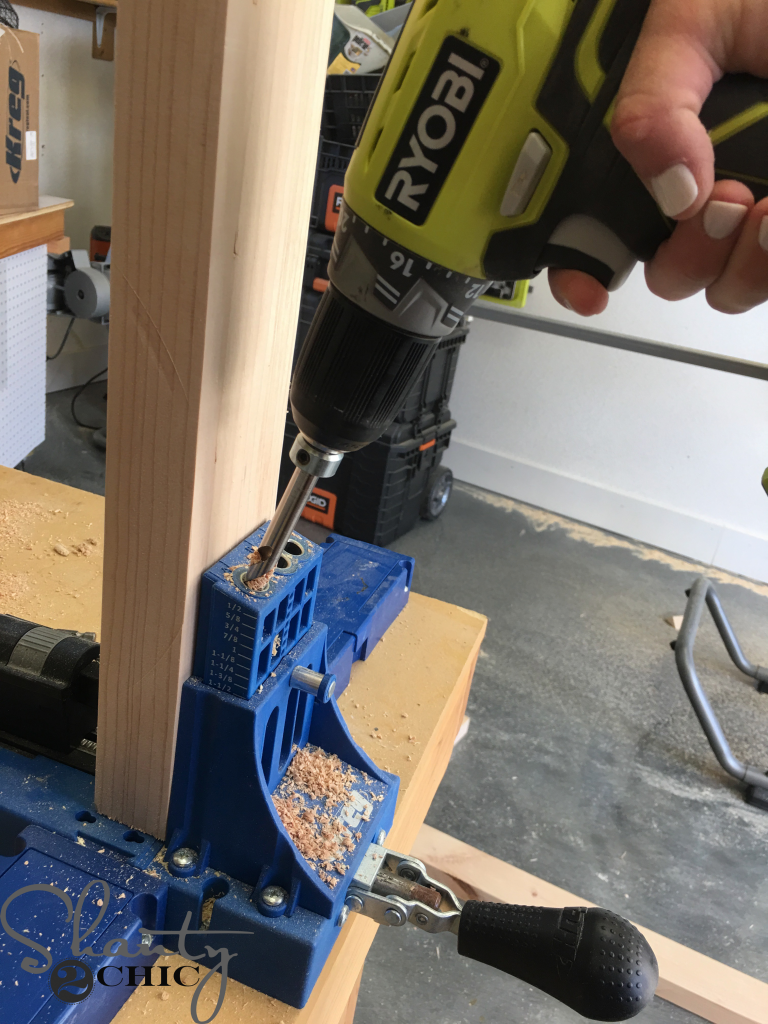
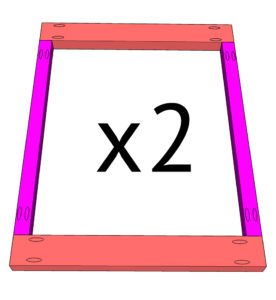
Cut the side frame pieces to size and drill 1 1/2″ pocket holes in the two side boards. Attach the side pieces to the top pieces with 2 1/2″ pocket hole screws and wood glue. Build two frames.
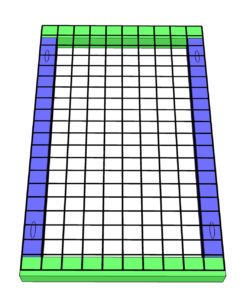
Step 2
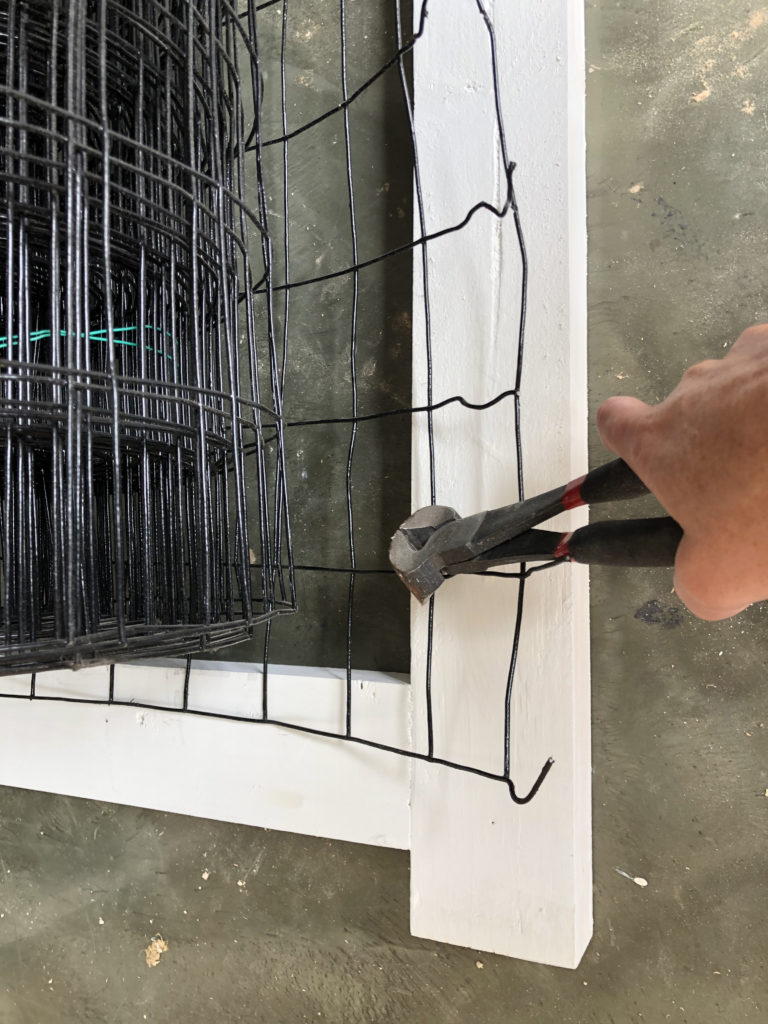
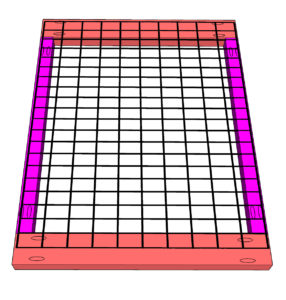
I used wire mesh to allow plenty of fresh air inside the dog house. Cut the mesh to size and attach it to the back of the side assemblies with 3/4″ staples. I used nippers to cut the mesh.
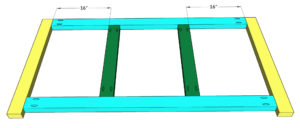
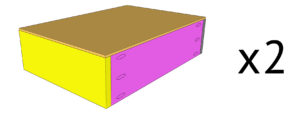
Step 3
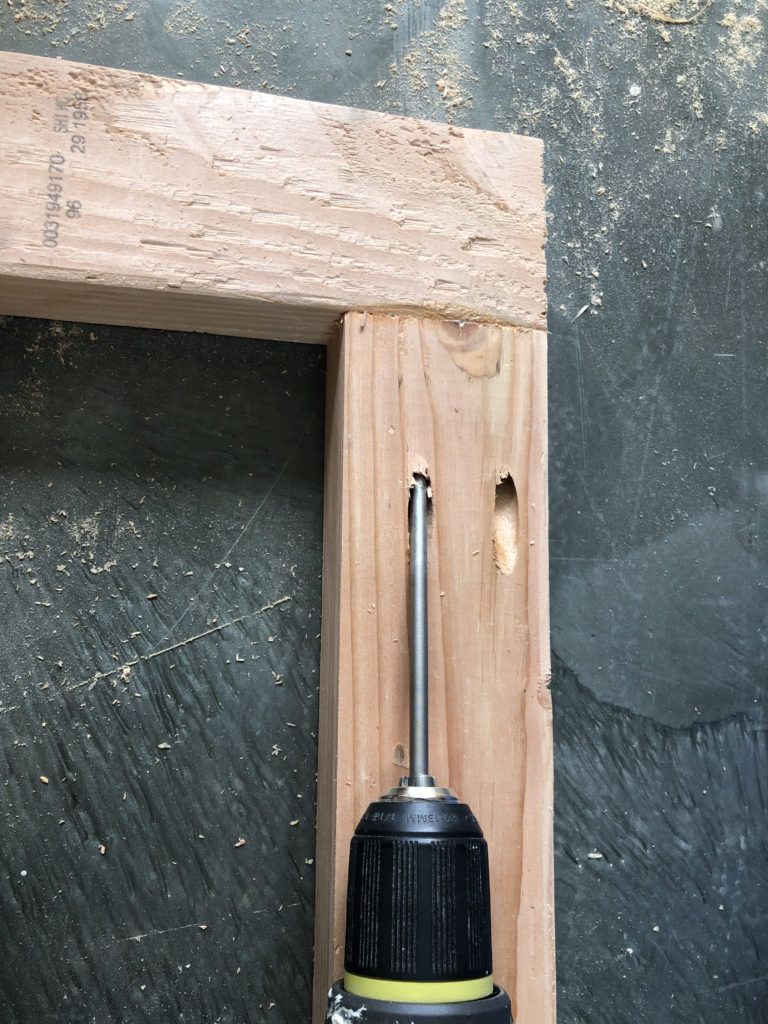
Cut the front and back frame pieces to size and drill 1 1/2″ pocket holes, with your pocket hole jig, into the ends of the top and bottom apron pieces. Attach the apron pieces to the legs with 2 1/2″ pocket holes and wood glue. Build two frames.
Step 4
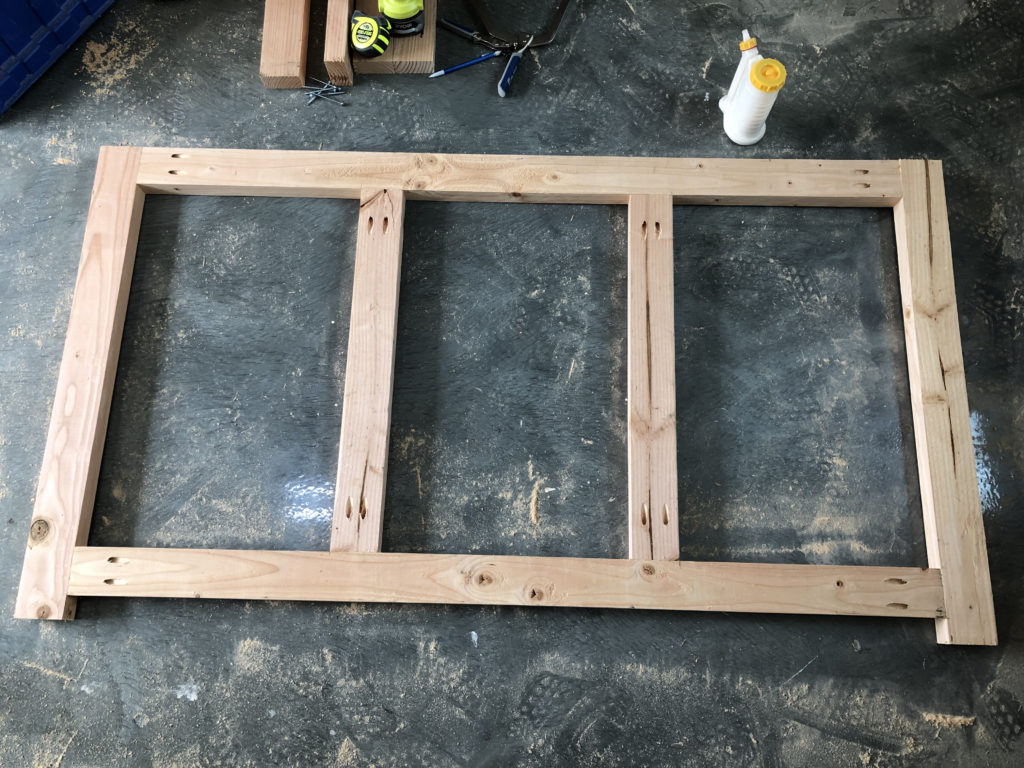
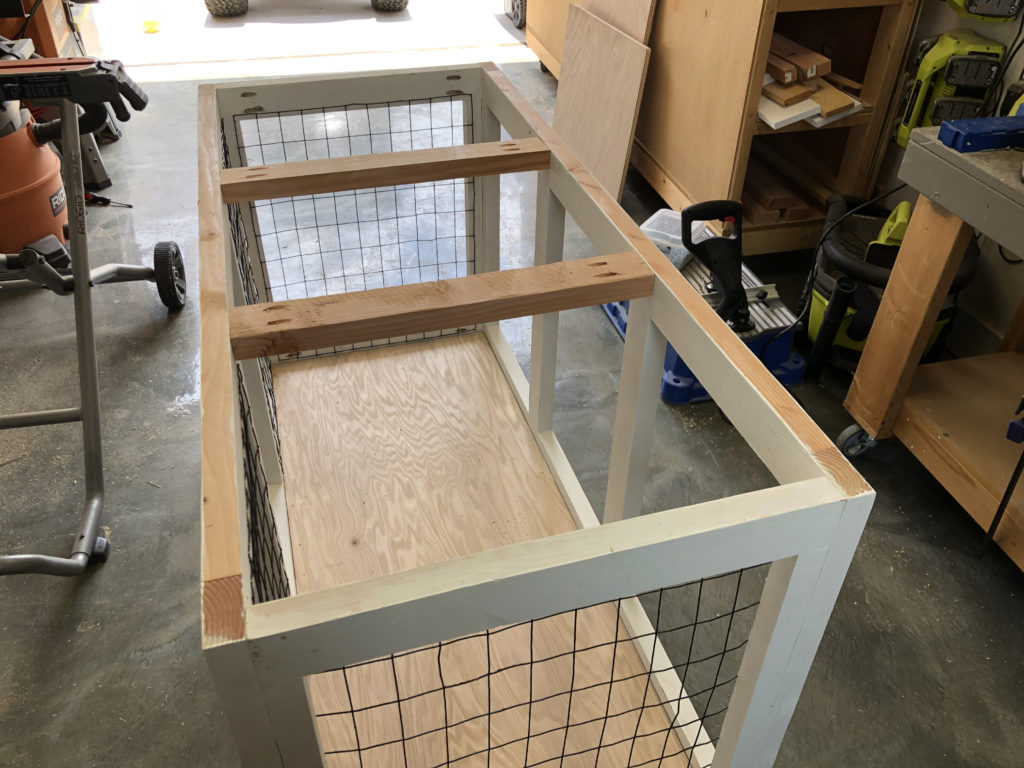
Cut the vertical dividers to size and drill 1 1/2″ pocket holes in both ends. Attach them to the top and bottom apron pieces with 2 1/2″ pocket hole screws and wood glue. Do this for both frames.
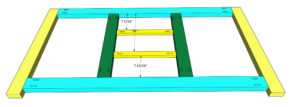
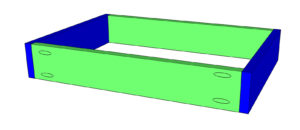
Step 5
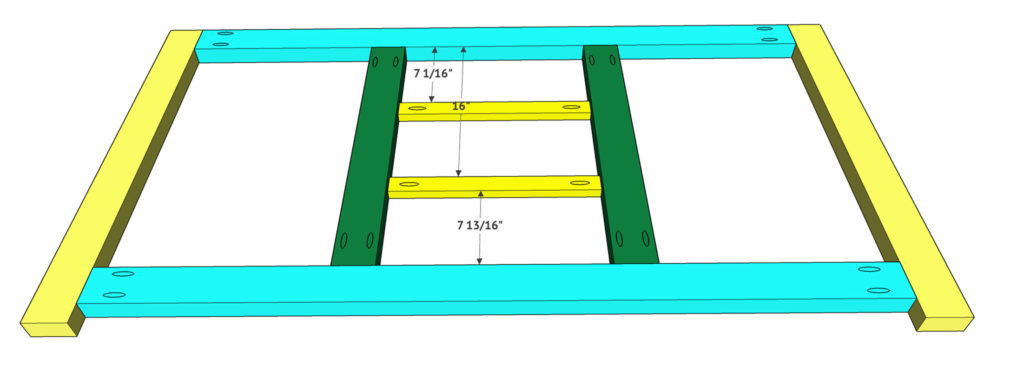
*Front frame only* Cut the horizontal dividers to size and drill 3/4″ pocket holes into both ends. Attach them to the vertical dividers with 1 1/4″ pocket hole screws and wood glue.
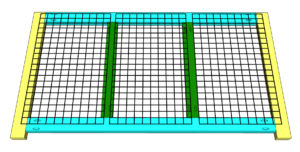
Step 6
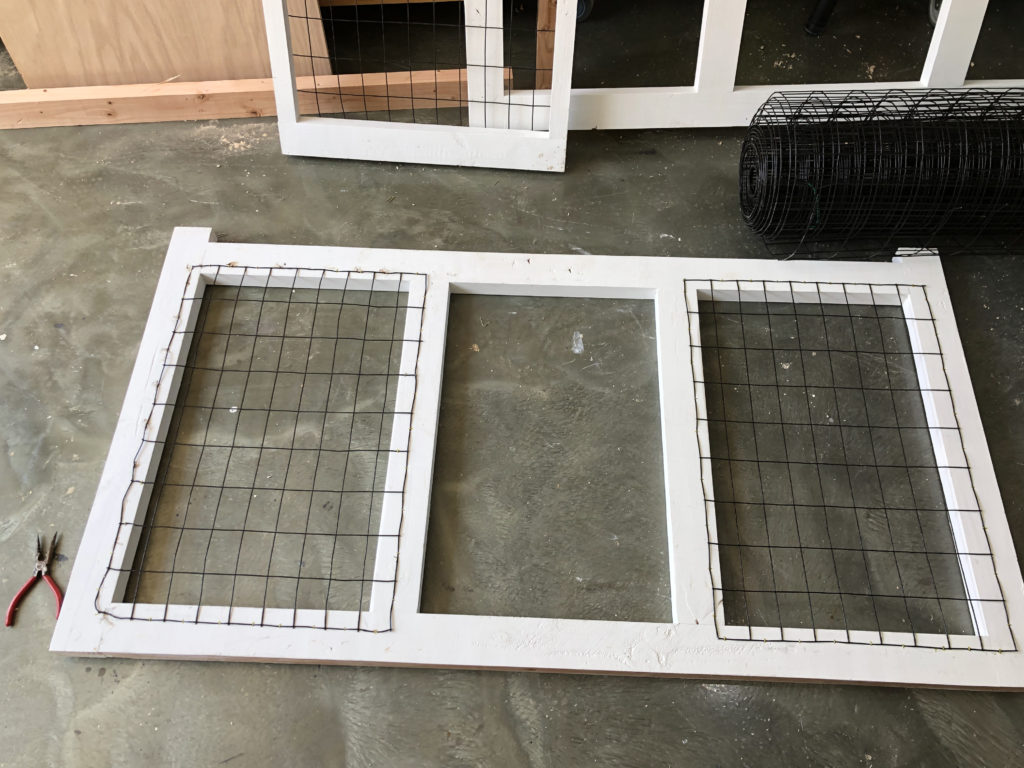
Cut the mesh to size and attach it to the back frame with 3/4″ staples.
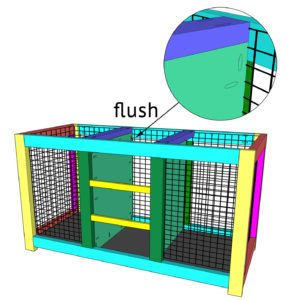
Assembling the Cabinet
Step 1
Attach the side assemblies to the back frame with 2 1/2″ pocket hole screws and wood glue.
Step 2
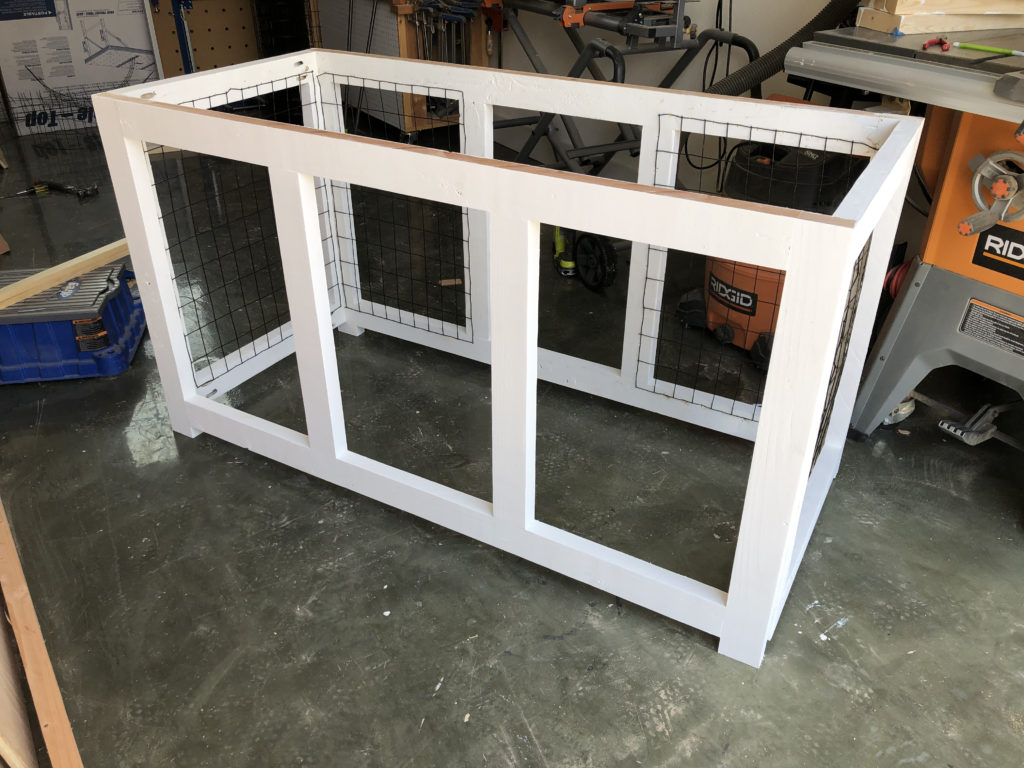
Attach the front frame to the side frames with 2 1/2″ pocket hole screws and wood glue.
Step 3
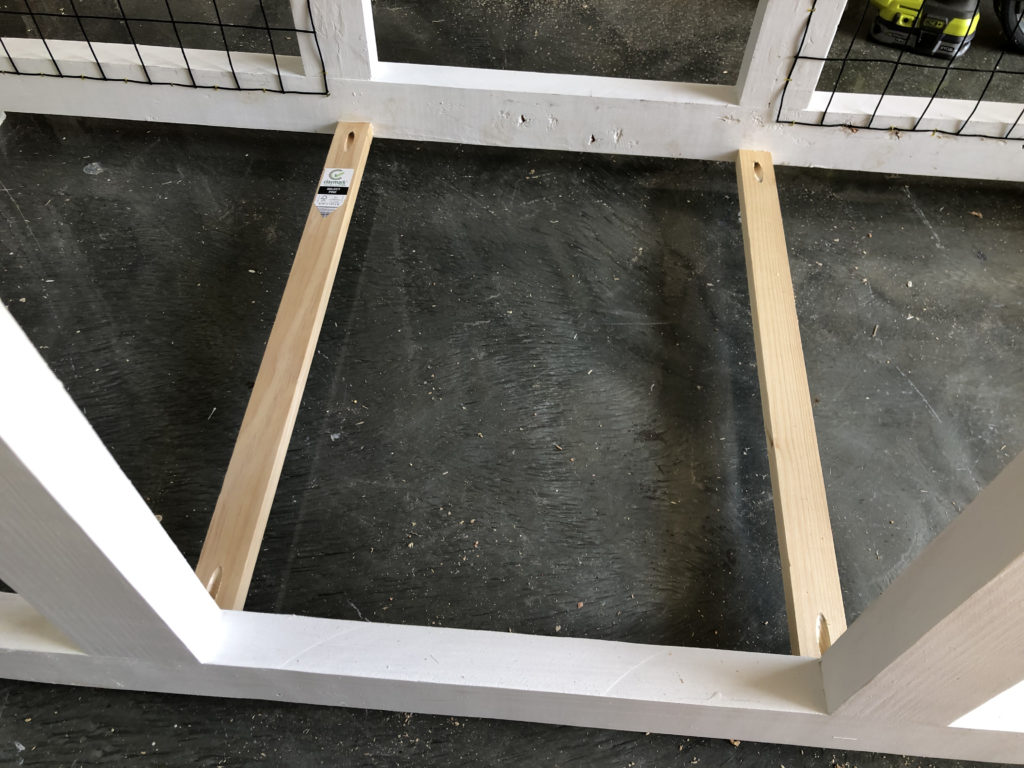
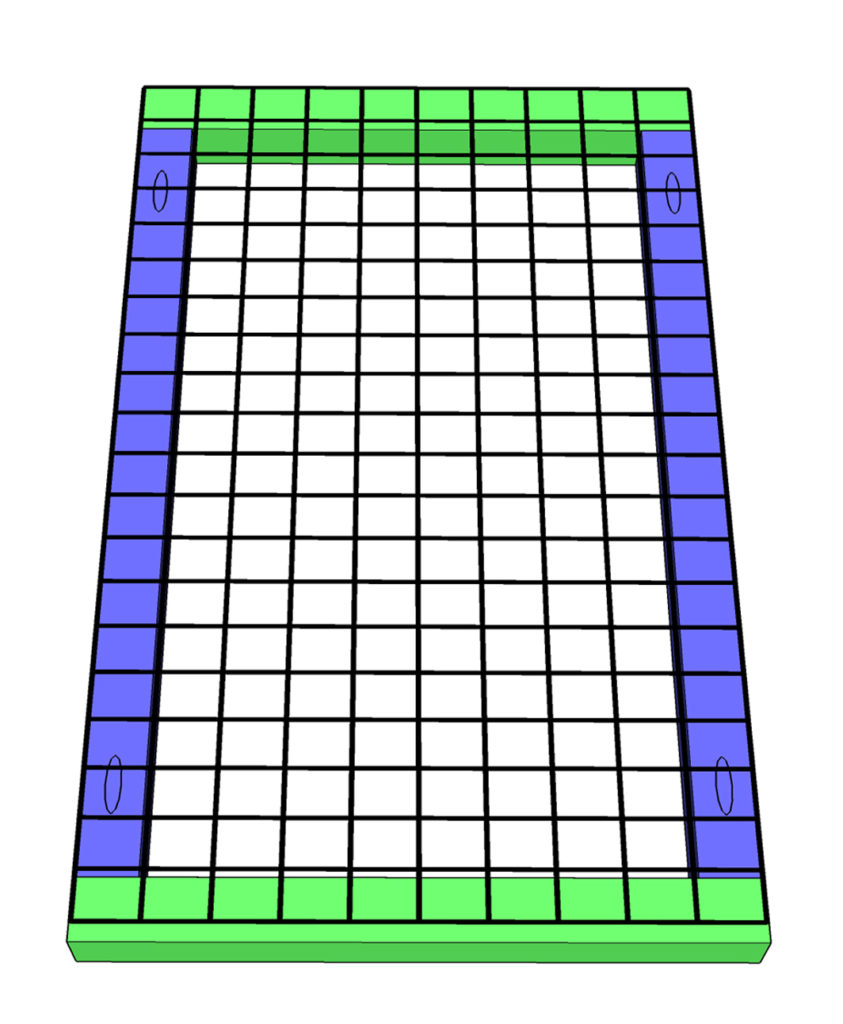
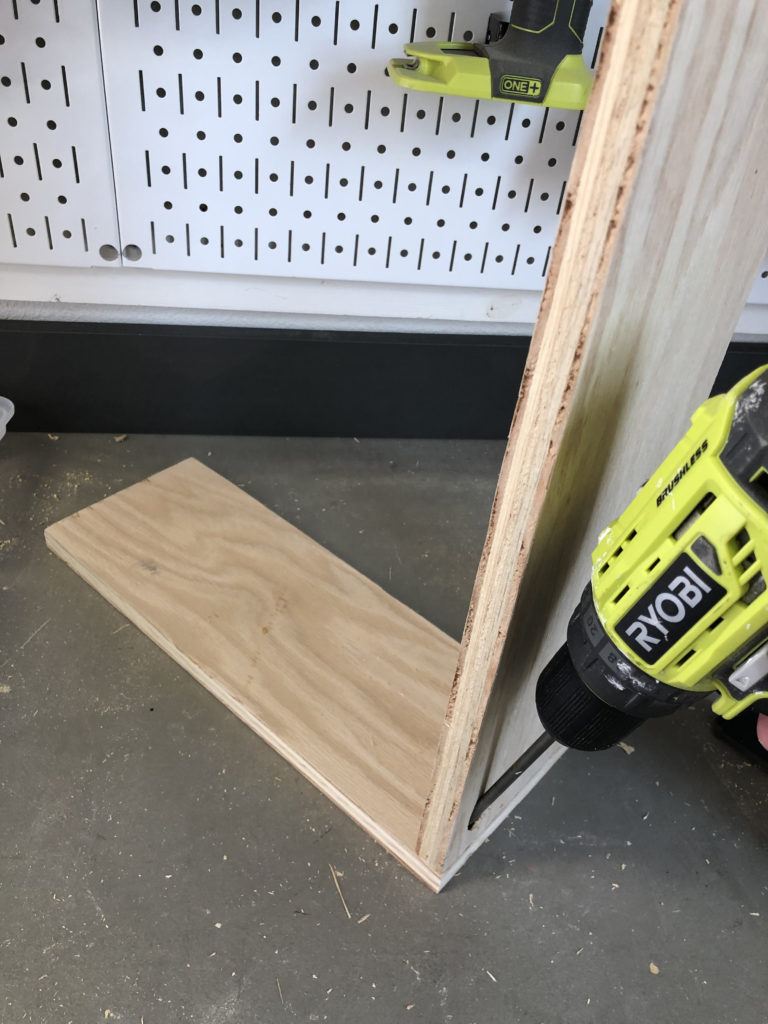
Cut the bottom supports to size and drill 3/4″ pocket holes into both ends. Attach them to the bottom, front and back aprons with 1 1/4″ pocket hole screws and wood glue.
Step 4
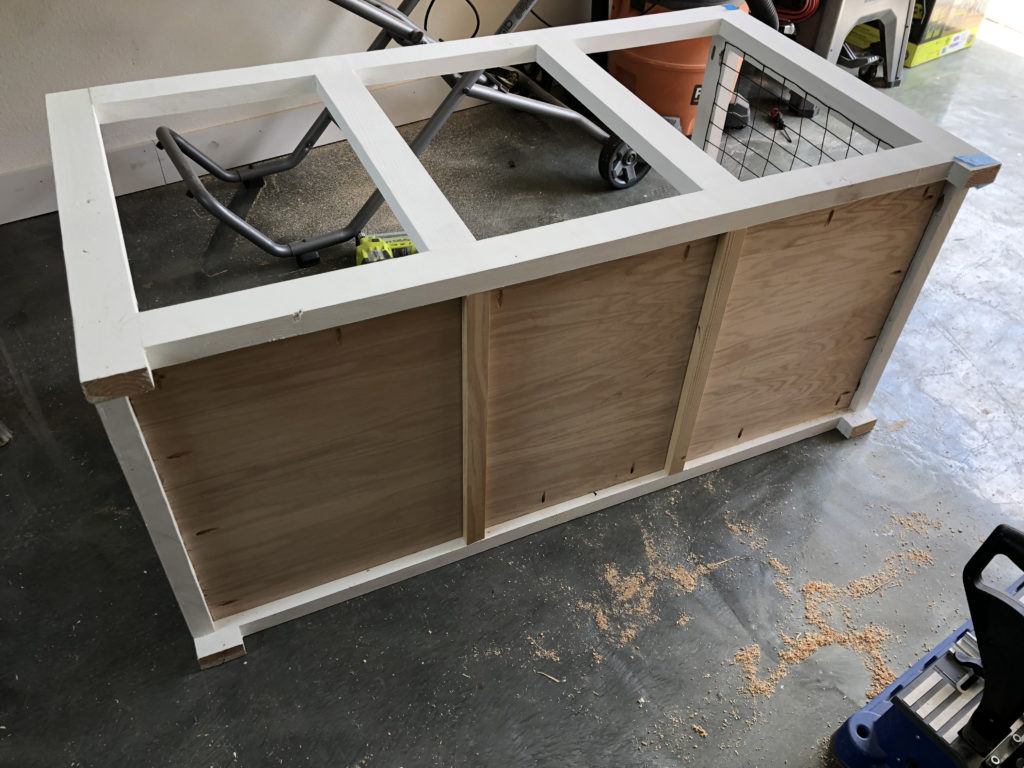
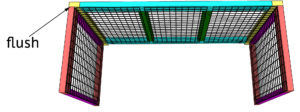
Cut the bottom panel to size and drill 3/4″ pocket holes around all edges. Slide it on top of the bottom supports and attach it to the bottom and side aprons with 1 1/4″ pocket hole screws and wood glue. The bottom panel should be flush with the top of the bottom aprons.
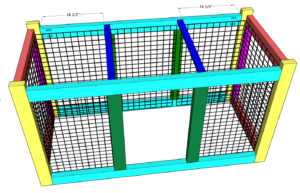
Step 5
Cut the top support pieces to size and drill 1 1/2″ pocket holes into both ends. Attach them to the top aprons with 2 1/2″ pocket hole screws and wood glue.
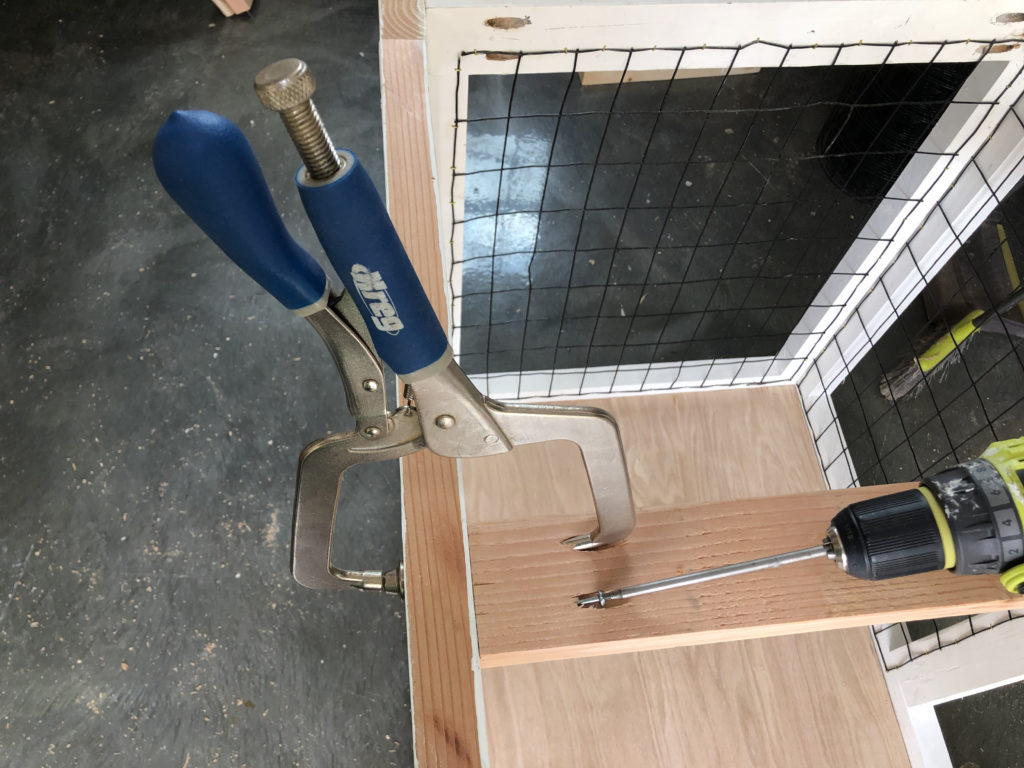
We love using the Kreg Right Angle Clamps for extra “hands” when we build!
Step 6
Cut the center dividers to size and drill 3/4″ pocket holes around all edges. Attach them tot he vertical dividers with 2 1/2″ pocket hole screws and wood glue.
Building the Doors
Step 1
Cut the door pieces to size and drill 1 1/2″ pocket holes into the side boards. Attach them to the top and bottom pieces with 2 1/2″ pocket hole screws and wood glue.
Step 2
Cut the mesh to size and attach it to the back of teh door frames with 3/4″ staples.
Building the Drawers
Step 1
Cut the top and middle drawer pieces to size and drill 3/4″ pocket holes into the ends of the long pieces. Attach the long pieces to the short pieces with 1 1/4″ pocket hole screws and wood glue. Build two drawers.
Step 2

Cut the drawer bottoms to size and attach them to the bottom of the drawer frame with 3/4″ staples and wood glue.
Step 3
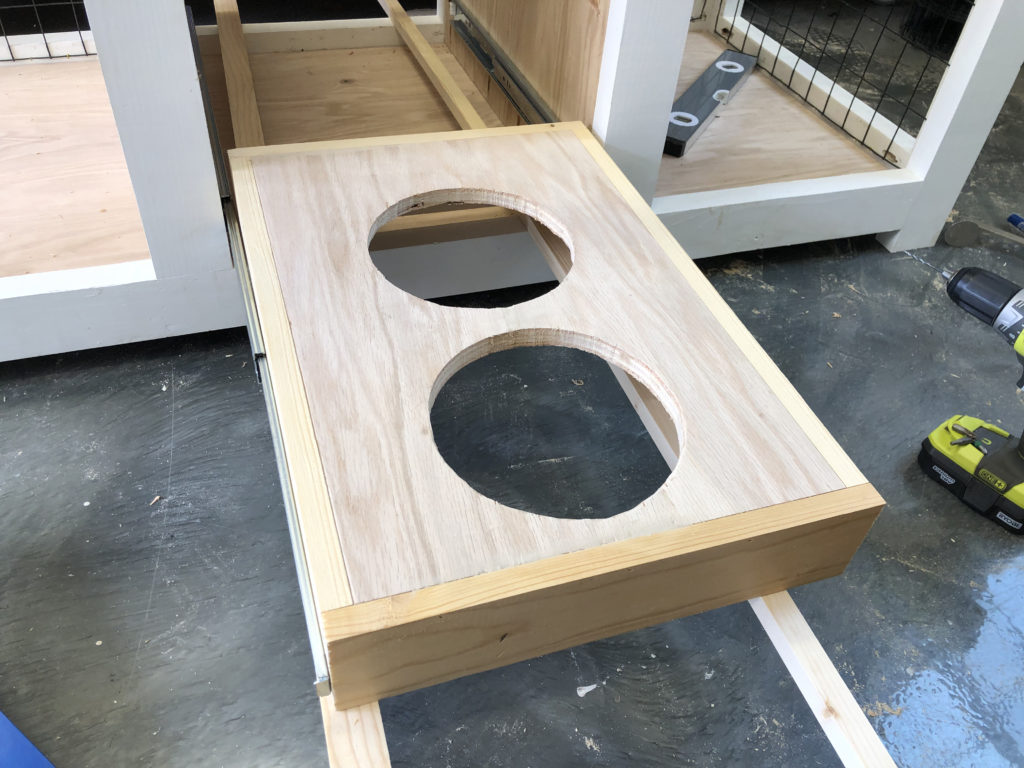
Cut the bowl drawer pieces to size. Drill 3/4″ pocket holes into both ends of the long pieces and attach them to teh short pieces with 1 1/4″ pocket hole screws and wood glue.
Step 4
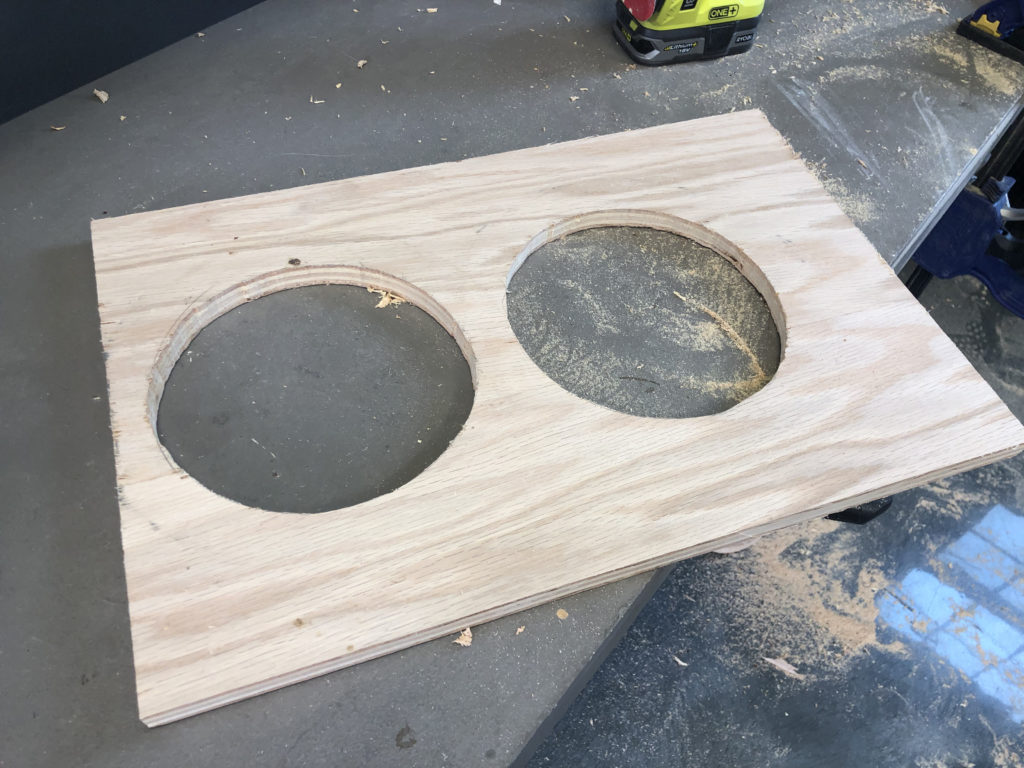
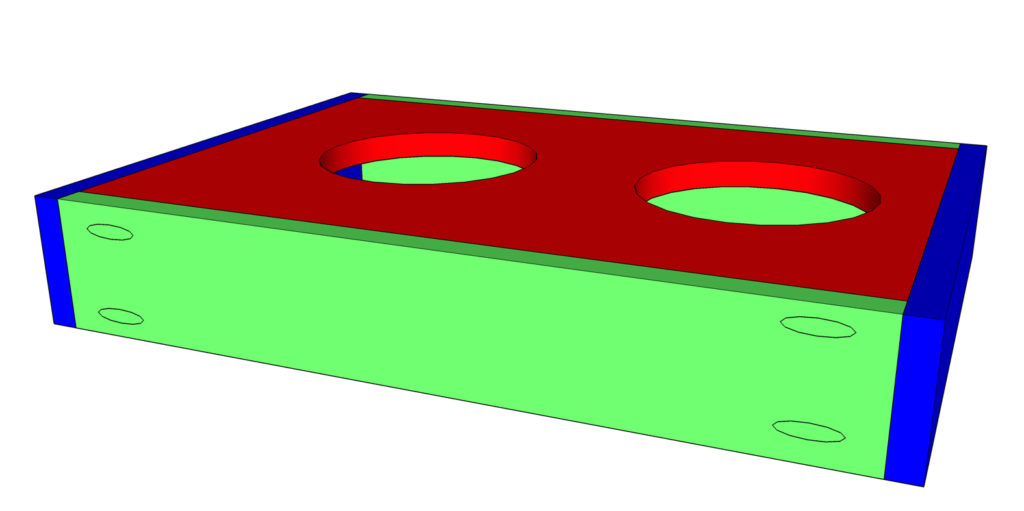
Cut the top piece of the dog bowl to size and use a jigsaw to cut the circles for the bowls. Attach the top inside the frame and use 1 1/4″ brad nails and wood glue to attach. The top should be flush with the top of the frame.
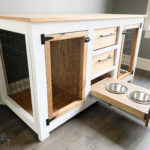
Installing the Drawers
Step 1
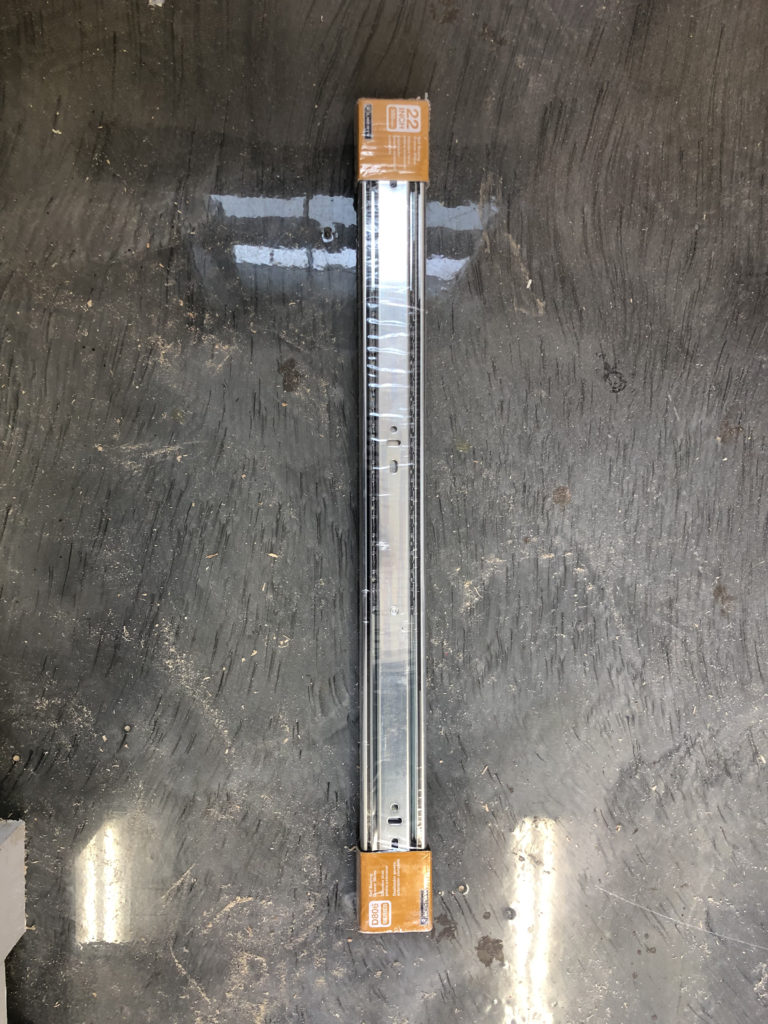
Install the drawers inside the cabinet with drawer slides. For t.he bottom drawer, use two scrap 1x boards to hold the drawer off of the bottom of the cabinet.
Step 2
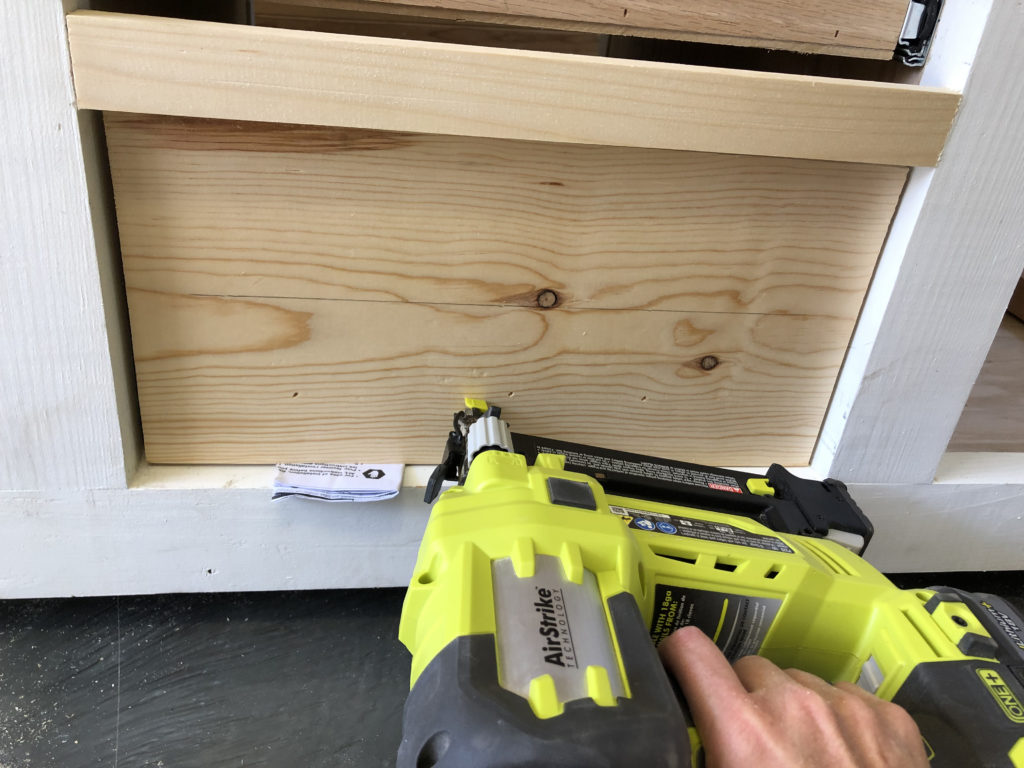
Cut the drawer face pieces to size and attach them to the front of the drawers with 1 1/4″ wood screws, from the inside of the drawer and into the back of the drawer face. I used my 18 gauge brad nailer to pop a few nails in the front to hold the drawer face in place. Then I went inside the drawer and added the screws.
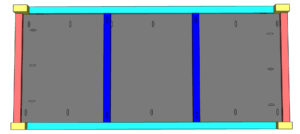
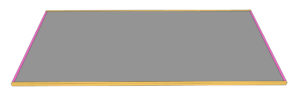
Building the Top
Step 1

I used my Kreg Rip Cut to cut the plywood top to size. The Rip Cut is a great, affordable alternative to a table saw and perfect for cutting plywood sheets!
Step 2

Cut the top panel to size then, measure and cut the side trim pieces to size. Attach the side trim pieces with wood glue and 1″ pin nails.
Step 3
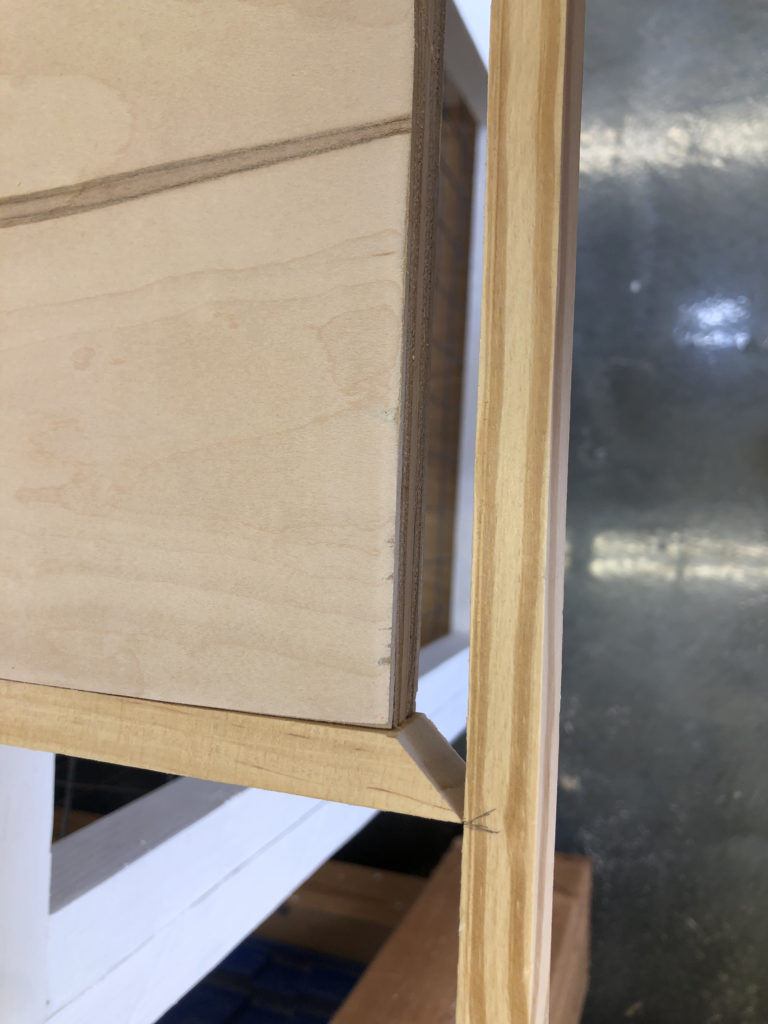
Measure and cut the front and back trim pieces to size. Attach them to the top panel with 1″ pin nails and wood glue.
Step 4
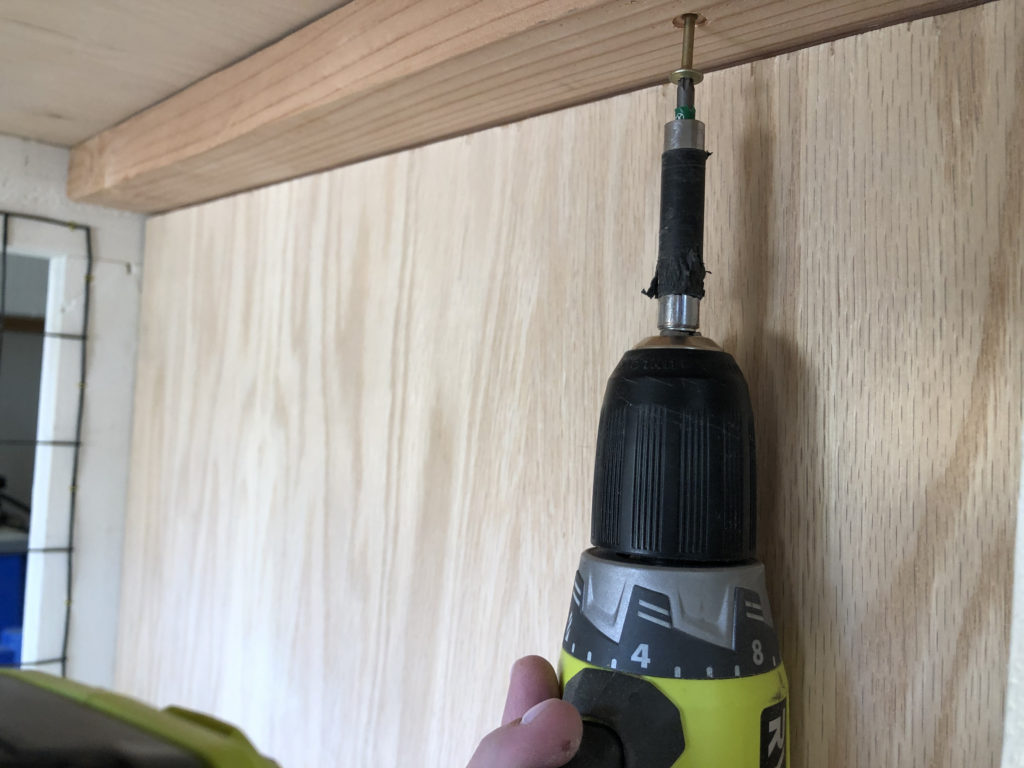
To attach the top, use 1 3/4″ wood screws from the top supports and into the plywood top.
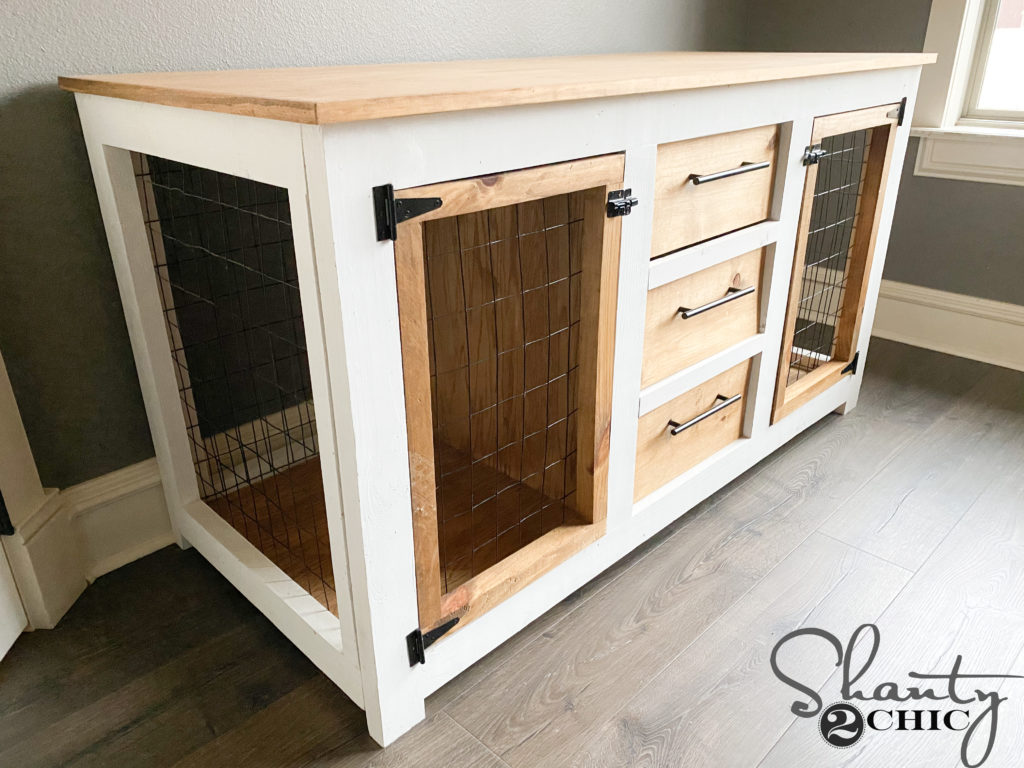
Now, just add a stain and protective finish, hardware and dog bowls and you’re done! This is a great shelter for a medium dog’s size.
Make sure to share your builds with us on social media and use #shanty2chic so we can share them too! Happy Building!
DIY Dog Crate Console
Tools
- Miter Saw
- Drill
- Kreg Jig
- Jig Saw
- Table Saw
- Nippers
Supply List
- 8 2x4x8 Framing Lumber
- 3 2x2x8 Pine or White Wood
- 1 1x4x8 Pine or White Wood
- 1 1/4" pocket hole screws
- 2 1/2" pocket hole screws
- 3/4" staples
- 1" pin nails
- 1 3/4" wood screws
- 3 ft. Black PVC Coated Welded Wire
- 3 sets 22" Drawer Slides
- 4 Hinges
- 2 Latches
- 2 Dog Bowls
- Wood Glue
Instructions
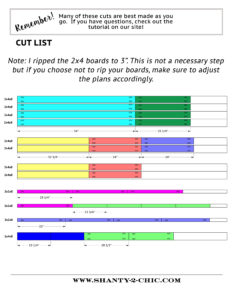
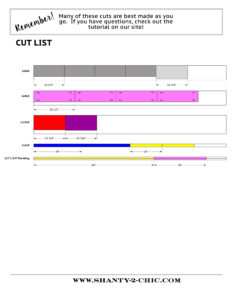
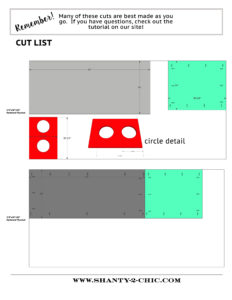
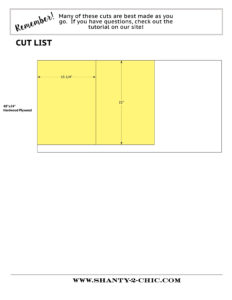
- Cut List 1

- Cut List 2
- Cut List 3
- Cut List 4
- Cut the side pieces to size and drill 1 1/2" pocket holes in the two side boards. Attach the side pieces to the top pieces with 2 1/2" pocket hole screws and wood glue. Build two frames.

- Cut the mes to size and attach it to the back of the side assemblies with 3/4" staples.

- Cut the front and back frame pieces to size and drill 1 1/2" pocket holes into the ends of the top and bottom apron pieces. Attach the apron pieces to the legs with 2 1/2" pocket holes and wood glue. Build two frames.

- Cut the vertical dividers to size and drill 1 1/2" pocket holes in both ends. Attach them to the top and bottom apron pieces with 2 1/2" pocket hole screws and wood glue. Do this for both frames.

- *Front frame only* Cut the horizontal dividers to size and drill 3/4" pocket holes into both ends. Attach them to the vertical dividers with 1 1/4" pocket hole screws and wood glue.

- Cut the mesh to size and attach it to the back frame with 3/4" staples.

- Attach the side assemblies to the back frame with 2 1/2" pocket hole screws and wood glue.

- Attach the front frame to the sode frames with 2 1/2" pocket hole screws and wood glue.

- Cut the bottom supports to size and drill 3/4" pocket holes into both ends. Attach them to the bottom, front and back aprons with 1 1/4" pocket hole screws and wood glue.

- Cut the bottom panel to size and drill 3/4" pocket holes around all edges. Slide it on top of the bottom supports and attach it to the bottom and side aprons with 1 1/4" pocket hole screws and wood glue. The bottom panel should be flush with the top of the bottom aprons.

- Cut the top support pieces to size and drill 1 1/2" pocket holes into both ends. Attach them to the top aprons with 2 1/2" pocket hole screws and wood glue.

- Cut the center dividers to size and drill 3/4" pocket holes around all edges. Attach them tot he vertical dividers with 2 1/2" pocket hole screws and wood glue.

- Cut the door pieces to size and drill 1 1/2" pocket holes into the side boards. Attach them to the top and bottom pieces with 2 1/2" pocket hole screws and wood glue.

- Cut the mesh to size and atta h it to the back of teh door frames with 3/4" staples.

- Cut the top and middle drawer pieces to size and drill 3/4" pocket holes into the ends of the long pieces. Attach the long pieces to the short pieces with 1 1/4" pocket hole screws and wood glue. Build two drawers.

- Cut the drawer bottoms to size and attach them to the bottom of the drawer frame with 3/4" staples and wood glue.

- Cut the bowl drawer pieces to size. Drill 3/4" pocket holes into both ends of the long pieces and attach them to teh short pieces with 1 1/4" pocket hole screws and wood glue.

- Cut the top piece of the dog bowl to size and use a jigsaw to cut the circles for the bowls. Attach the top inside the frame and use 1 1/4" brad nails and wood glue to attach. The top should be flush with the top of the frame.

- Install the drawers inside the cabinet with drawer slides. You can get more details on how we installed ours in the post above!

- Cut the drawer face pieces to size and attach them to the front of the drawrs with 1 1/4" wood screws, from the inside of the drawer and into the back of the drawer face.

- Cut the top panel to size then, measure and cut the side trim pieces to size. Attach the side trim pieces with wood glue and 1" pin nails.

- Measure and cut the front and back trim pieces to size. Attach them to the top panel with 1" pin nails and wood glue. To attach the top, use 1 3/4" wood screws from the top supports and into the plywood top.

- Now, just add a finish, hardware and dog bowls and you're done! Make sure to share your builds with us on social media and use #shanty2chic so we can share them too! Happy Building!


You’ve left out several wood sizes in the supply list! What type of plywood?
Why did you rip the 2×4’s down to 2x3s instead of just getting 2x3s? Availability I assume?
Please call me. I want to know if you take the orders to have one made.
240-375-7947
Yay for another furniture build!!