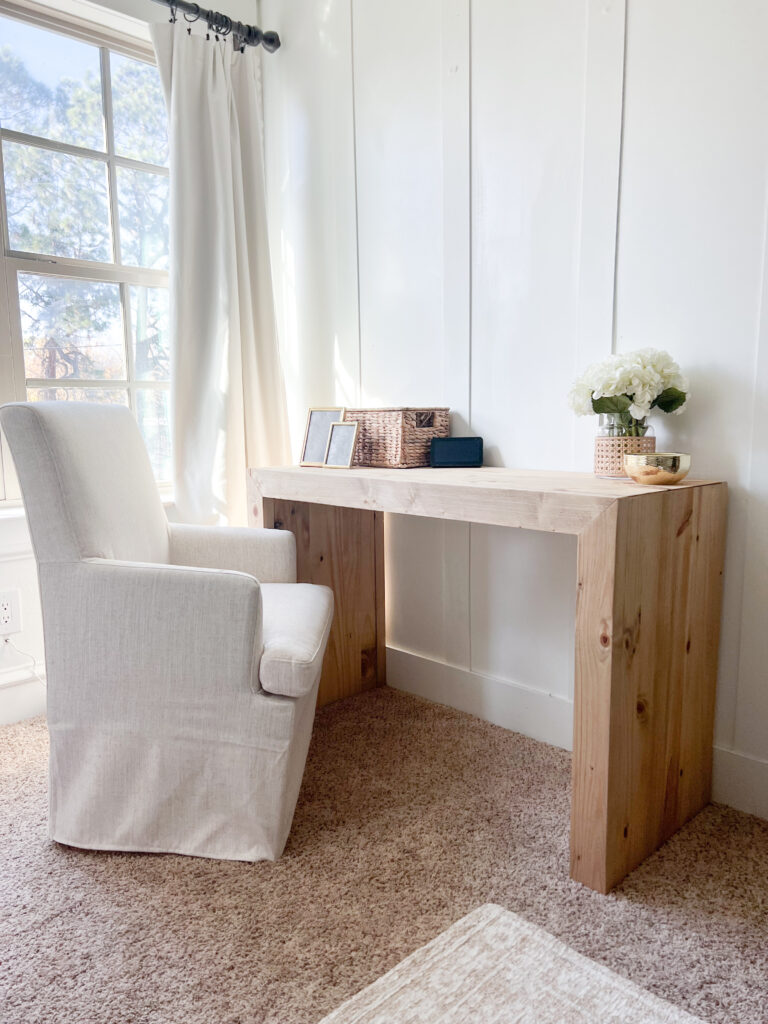
If you’re searching for free DIY desk plans that are stylish, functional, and beginner-friendly, you’ve found your next woodworking project. I built this DIY farmhouse desk with a drawer for my new home office, and I’m sharing the free plan, diagrams, supply list, and full YouTube video so you can make your own.
This design features a solid planked top with breadboard ends, pocket hole jig joinery for quick assembly, gorgeous turned legs, and a smooth-sliding drawer for storage. It’s perfect for creating a roomy area in your home office, vanity space in a bedroom, or even as a central workstation in an entire room makeover.

Want to see every step in action? Watch our full DIY desk build video for tips on cutting, assembling, and finishing.
Before starting, here’s the materials list and tools I used:
Table of Contents
Tools List
Supply List
- 7 – 2x6x8 Framing Lumber
- 1 – 1x4x8 Pine or Common Boards
- 1 – 1x6x6 Pine or Common Boards
- 1 – 1/4″x23″x20 3/4″ Scrap MDF or Plywood
- 4 – Table Legs
- 1 1/4″ Pocket Hole Screws
- 2 1/2″ Pocket Hole Screws
- 5/8″ Staples
- 1 – Drawer Pull
- 1 – Set of 18″ Drawer Slides
- Stain
- Protective Finish
You can find the wood pieces, cut dimensions, and diagrams in the printable free plan linked below as well as detailed instructions on the build.
Click here to jump to the free printable plans!Step-by-Step: How to Build a Wooden Desk with Drawer
1. Tabletop Assembly

Step 1: Cut your long planks to size. Drill 1 ½” pocket holes on one edge and both ends of each plank using your Kreg pocket hole jig. Join the planks together with 2 ½” pocket hole screws to create your desk surface.

Tip: We always use the Kreg Face Clamps when we are planking a tabletop for a smooth finish between the planks.

Step 2: Cut the breadboards to size and attach them to the plank assembly with 2 ½” pocket hole screws. This gives the top a clean, finished look.
2. Building the Base

Step 3: Cut your long back apron to size. Drill 1 ½” pocket holes on one edge and both ends of the long apron and attach one leg to each end with 2 1/2″ pocket hole screws and wood glue.

Step 4: Cut your side aprons to length. Drill 1 ½” pocket holes on one edge and each end. Attach a leg to each apron end using 2 ½” pocket hole screws and wood glue.

Follow up with the short front aprons and attach them the same way.

Step 5: Cut the support pieces to size, drill 1 ½” pocket holes on one edge and both ends, and attach them between the aprons for stability.
3. Building the Drawer

Step 6: Cut your drawer frame pieces to size and attach them together with 1 1/4″ brad nails and wood glue. Tip: You can also use 1 1/4″ brad nails and wood glue to assemble the drawer.

Attach the ¼” backing with ⅝” staples and glue.

Step 7: Install the drawer using your chosen slides. (See the instruction insert with your slides for detailed installation.)

Step 8: Cut the drawer face to fit and attach it from inside the drawer using 1 ¼” brad nails and wood glue. I used my Kreg Drawer Front Mounting Jig. This little guy is like having an extra set of hands in the shop -so good.
4. Attaching the Desktop

Step 9: Place the planked top face down. Center the base on top and attach it with 2 ½” pocket hole screws.
5. Sand, Finish, and Add Hardware

Sand the desk until smooth.

For the finish, I used my favorite combination – Rustic Brown and White Wash Pickling Stain.

I used my Kreg Project Blocks to lift the desk off of the floor before staining. I love these project blocks and I use them every time I add a finish. They have retractable painting points to keep the piece from sticking to the blocks. I started by applying one coat of the pickling stain, letting it dry then following up with one coat of the rustic brown.

I used our favorite hardware jig – the Kreg Hardware Jig Pro! It’s perfect. This little tool is a must-have in your shop. It takes all of the guesswork out of hardware installation! It also works as a second set of hands and helps to line up your pull holes perfectly so you have consistent pull installation every time!
This pull that I used for the desk came with machine screws that were not long enough to fit my drawer. Rather than making another trip to the hardware sore, I opted for a DIY fix!

I used a 1/2″ paddle bit to bore out a hole on the inside of the drawer frame.

Problem solved and I was able to attach the pull with ease!
Make It Your Own

This desk design works as a home office desk, vanity, or even a student study station. You can adjust the wood pieces to change the width or depth and create the perfect fit for your roomy area.


Share Your Project
We would love to see your finished desk! Make sure to share your builds with us on social media and use #shanty2chic so we can share them too!
Happy Building!

Check out some of our other Free Desk Plans!

The Perfect Desk for a Small Space

DIY Wood Desk with Drawer
Tools
- Miter Saw
- Drill
- Kreg Jig
- Brad Nailer
- Stapler (or brad nailer)
- Sander
Supply List
- 7 2x6x8 Framing Lumber
- 1 1X4X8 Pine or Common Boards
- 1 1x6x6 Pine or Common Boards
- 1 1/4"x23"x20 3/4" Scrap MDF or Plywood
- 4 Table Legs
- 1 1/4" Pocket Hole Screws
- 2 1/2" Pocket Hole Screws
- 1 1/4" Brad Nails
- 5/8" Staples
- 1 Drawer Pull
- 1 Set of 18" Drawer Slides
- Stain
- Protective Finish
Instructions
Cut List
- Cut List


Table Top Assembly
- Cut the long planks to size and drill 1 1/2" pocket holes on one edge and both ends of each plank. Attach them together with 2 1/2" pocket hole screws.

- Measure and cut the breadboards to size and attach them to each side of the plank assembly with 2 1/2" pocket hole screws..


Base Assembly
- Cut the side aprons to size and drill 1 1/2" pocket holes on each end and one edge of the aprons. Attach one leg to the end of each apron piece with 2 1/2" pocket hole screws and wood glue.Build two side assemblies.

- Cut the long back apron piece and the two short front aprons to size. Drill 1 1/2" pocket holes on one edge of each apron pieces, both ends of the long apron and one end of each short apron. Attach them to the legs with 2 1/2" pocket hole screws and wood glue.

- Cut the support pieces to size and drill 1 1/2" pocket holes on one edge and both ends of the boards. Attach them to the from and back apron pieces with 2 1/2" pocket hole screws and wood glue.


Building the Drawer
- Cut the drawer frame pieces to size and attach them together with 1 1/4" brad nails and wood glue. Cut the 1/4" backing to size and attach it to the drawer frame with 5/8" staples and wood glue. You can use 1 1/4" brad nails to attach the backing as well.

- Install the drawer based on the instructions with your drawer slides. You can checkout the tutorial on our website to see how we installed our drawer.

- Measure and cut the drawer face to size and attach it to the drawer frame with 1 1/4" brad nails and wood glue. Attach from the inside of the drawer and into the drawer face.


Attaching the Top
- Lay the planked top upside down and center the base on top. Attach the base to the planked top with 2 1/2" pocket hole screws.


The Finish
- Sand down the desk, add a finish, poly and decorative hardware!Make sure to share your builds with us on social media and use #shanty2chic so we can share them too!Happy Building!