Make your own Easy DIY Floating Shelves in about an hour! This beginner woodworking project includes FREE printable instructions and a full tutorial. I LOVE how they turned out!

Table of Contents
Floating Shelf DIY Video
You all know how much we love DIY Floating shelves and all open shelving! We have built floating shelves for nearly every room in the house. I finally put use to a big blank wall I have been staring at in my dining room for far too long. I am LOVING how these wall shelves turned out! Be sure to check out the Just click the play button how-to video below! You can also download and print the free shelf plans at the bottom of this post.
Now, I am calling these floating shelves, because structurally that is what they are. But, I added some hardware to them for flair! I will share details on that after we build these things!
Build the DIY Floating Shelves frames
The first step is to create your cleats or frame. I used 2×4 studs for this part that I ripped down to 2″ wide each. You can also use 2×3 boards if your hardware store sells them. That might save you a few dollars!
Kreg Jig
We used our Kreg Jig to create the pocket holes on each of the shorter boards. One question we get asked consistently is, “What tools do I need to start building furniture”, We have always recommended three basic tools for beginners to get started, a miter saw, a drill and a Kreg Jig. What is a Kreg Jig? A Kreg Jig is a tool that drills pocket-hole joints. It makes joining two boards faster and gives you stronger and cleaner joints than countersinking a wood screw. Whitney and I discovered them shortly after we starting building furniture and it was a HUGE game changer for our furniture building! We were so impressed with how user-friendly they are and the strong joints it gave our builds! For this table, we used our Kreg 720PRO.

The Kreg Jig 720Pro is hands-down our favorite pocket hole jig! The Automaxx dual Clamp self-adjusts to your material thickness making it so fast and efficient for furniture building! It has built-in material support wings on the docking station for large panels like plywood, tons of storage features and includes a clamp to hold it in place to your workbench. Some additional accessories are a dust port with a vacuum adaptor, 160 pocket hole screws, It also folds up compact so it’s perfect for small shops.
WHAT’S INCLUDED WITH THE 720PRO?
- Easy-Set Drill Bit
- 3″ #2 Driver Bit
- 6″ #2 Driver Bit
- Easy-Set Drill Bit Collar
- Material Thickness Gauge
- Dust Collection Vacuum Adapter
- Kreg Docking Station with Material Support Wings
- Kreg Pocket-Hole JigClamp
- 1 Downloadable Plan
- 160 Kreg Pocket-Hole Screws
Once we made all of our pocket holes, we attached the shorter pieces to the longer board using wood glue and 2.5″ Kreg wood screws with our drill. Since we were building 2 of these shelves, we created 2 identical frames.

Build the boxes
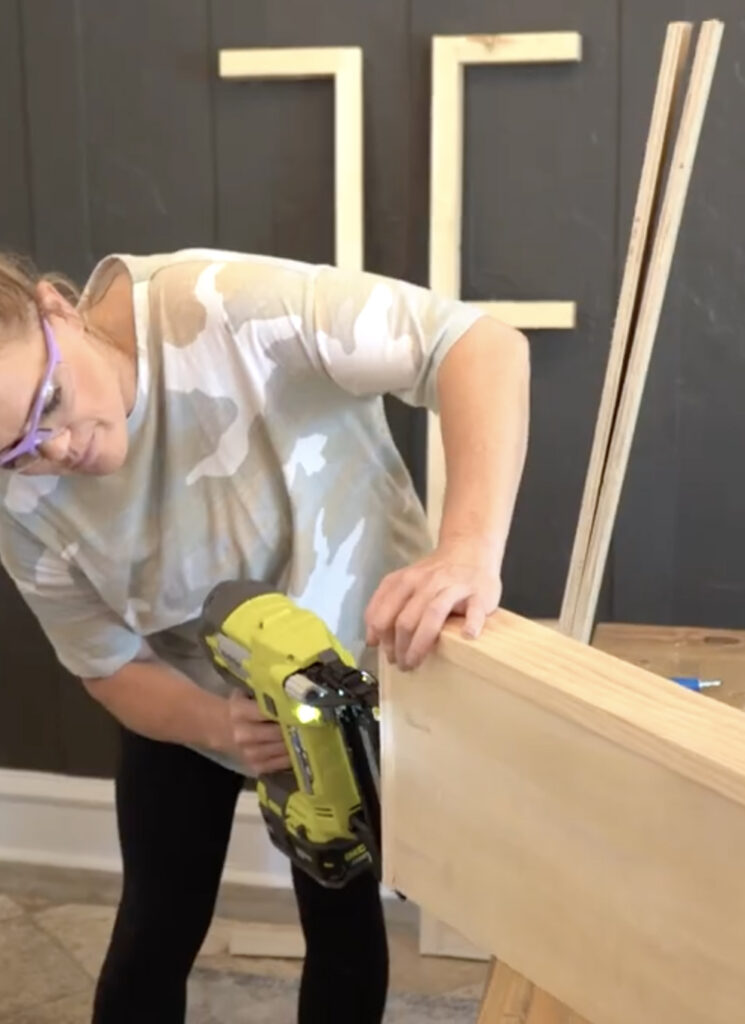
Now to build the boxes! The boxes of these shelves are created using 1/2″ sanded plywood and 1×4 pine boards. We ripped the sanded plywood to size using our table saw. We also ripped the 1×4 down to 3″ using the table saw as well.
As you may have seen in the video, my initial plan was to use pocket holes to create the box. I was doing this to minimize nail holes on the trim pieces, but I wasn’t able to easily access the pocket holes during assembly. So, we switched to using a brad nailer for this part! No biggie. Create the frame by attach nailing and gluing the outside trim pieces to the top and bottom piece. Both ends of the front piece are cut at 45º and one end of each of the smaller trim pieces will also be cut at 45º. Don’t forget to use wood glue and 1.25″ brad nails.
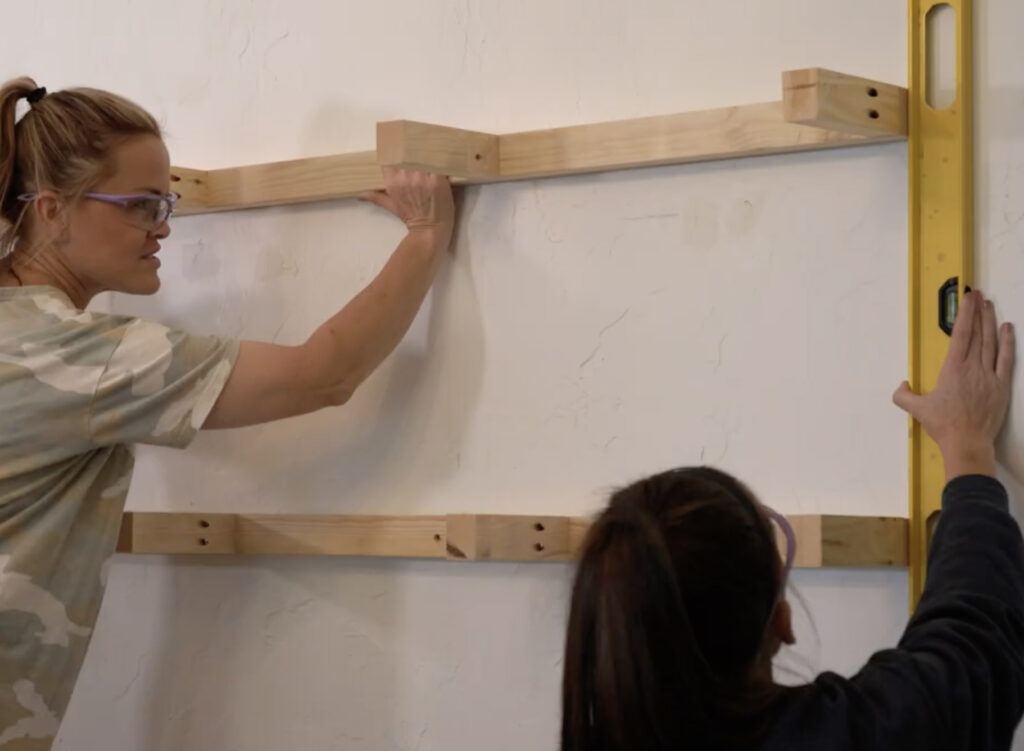
Attach cleat to wall
Once the boxes are constructed you are ready to attach the shelf frames or shelf cleats to the wall. We used our Kreg Stud Finder to find the studs behind the drywall in my wall. When building floating shelves, we always locate and attach to the studs for safety. It is always best to anchor these into solid wood. We also used a level on the wall to make sure the shelves sit straight. We used 3.5″ wood screws through the long cleat board and into the wall.


Staining the boxes
Now that the cleats are attached it’s time to put the boxes on. But, before installation I like to stop and stain and finish the boxes however you want. It keeps you from taping off and protecting the wall. First, sand each box before staining to give them a nice smooth finish.
I decided to create my own stain color by mixing three different stains. This is a really fun way to give you an even more custom look and it’s super simple! You can check out my reel on how I created this color here!
I used three different Varathane stain colors to create this. I started with an empty tub from the hardware store. These are super inexpensive. You can also use any empty container you have at home! I mixed two parts of Natural stain, one part of Golden Oak, and a splash of Weathered Gray. This gave me the perfect finish that I was looking for. You just put all of that into the bucket and stir it up just a bit and you’re ready to go! I love how it matches my dining table. I chose not to use a polyurethane on the shelves because I know they won’t see much wear like a table top would.
Attach the boxes to the cleats
To attach the boxes, place each one over a cleat and use 2″ wood screws through the top of the shelf and into the cleat on the wall. I like to attach through the back long cleat board.


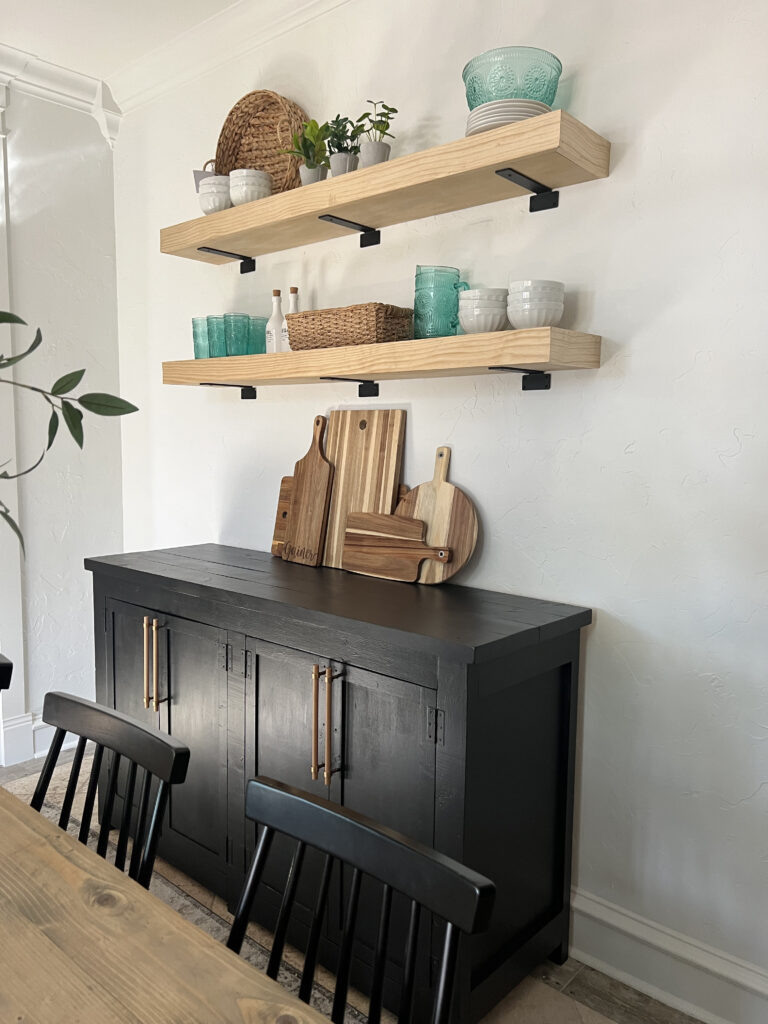
DIY Floating Shelf Brackets
As I mentioned, I chose to add some hardware to these shelves! I found THESE BRACKETS on Amazon. While these brackets do claim to hold a bunch of weight, I really just wanted to use them for their looks. So, I attached each bracket into the bottom of the box first and then used the screws into my wall. You can definitely anchor them and use them as shelf supports if you decide to.

DIY Floating Shelves
Here they are all finished up!

Free Plans!
You can download and print the free plans for these shelves here! Thanks for stopping by and happy building!


I absolutely love the idea of DIY floating shelves for the dining room! The step-by-step instructions are so easy to follow, and the design fits perfectly with my home decor. Can’t wait to try this project myself! Thank you for the inspiration!
I absolutely love the idea of DIY floating shelves for the dining room! The step-by-step instructions were super helpful, and I can’t wait to try out this project myself. It’s such a beautiful way to display my favorite dinnerware and add a personal touch to the space. Thanks for sharing this inspiring idea!
I absolutely love the idea of DIY floating shelves for the dining room! They add such a stylish touch and create extra storage space. The step-by-step instructions were really helpful and made me feel confident to tackle this project myself. Can’t wait to start on my own shelves and showcase some gorgeous decor! Thanks, Shanty 2 Chic!
I absolutely love the idea of DIY floating shelves in the dining room! The step-by-step instructions were super helpful, and I can’t wait to try this weekend. It’ll be a perfect way to display my favorite dishes and add some character to the space. Thanks for the inspiration!
I love this DIY floating shelf idea! The step-by-step instructions are so clear and easy to follow. I can’t wait to try this in my dining room to display my favorite decor pieces. Thanks for sharing such an inspiring project!
I absolutely love the idea of DIY floating shelves for the dining room! The designs are so stylish and effortless. Can’t wait to try this project out in my own space. Thanks for the inspiration!
I love the idea of DIY floating shelves for the dining room! The step-by-step instructions are super helpful, and the photos really inspire creativity. I can’t wait to try this project in my own space. Thanks for sharing such a great tutorial!
I absolutely love these floating shelves! They add such a beautiful and modern touch to the dining room. The step-by-step instructions are super clear and helpful. I can’t wait to try this DIY project myself! Thanks for the inspiration!
I love the idea of DIY floating shelves for the dining room! The step-by-step instructions make it feel so manageable, and I can’t wait to personalize them with my favorite decor pieces. Thank you for the inspiration!
I absolutely love this DIY floating shelves project! The step-by-step instructions are clear and easy to follow. These shelves would be a perfect addition to my dining room, and I can’t wait to try it out. Thank you for the inspiration!
I am LOVING how these wall shelves turned out!