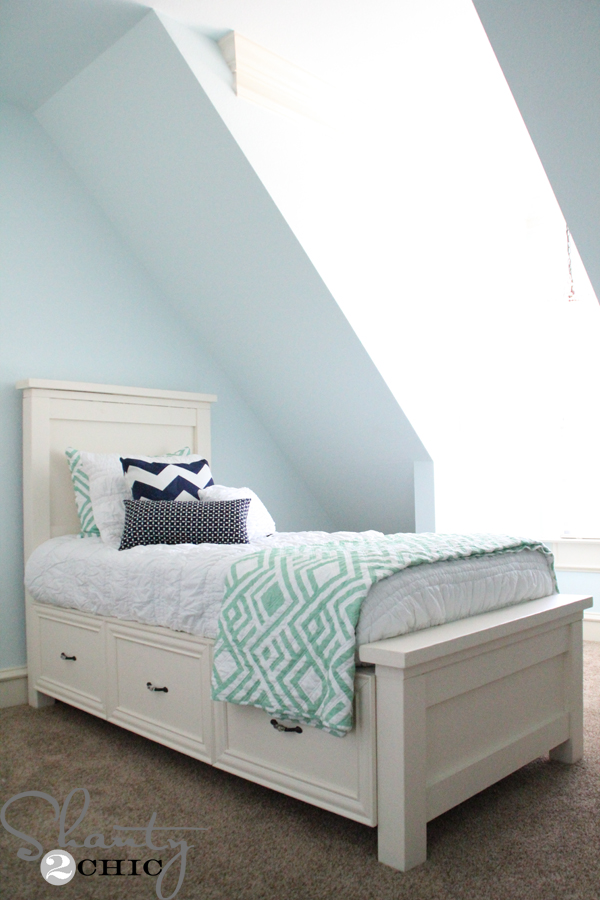
The Reclaimed Wood Headboard is complete!

This was the easiest piece I have ever built! It took me about 1 hour to put it together after I cut the wood! You can find the plans I used for this headboard on Ana’s Site but as always, I am taking you on my journey:)
Here are some pictures of the steps I took in order:

I started by placing one board on top of another…

This is a picture of the outside frame of the headboard.

Next, it is just patterns! 1×6, 1×4, 1×6 etc!

This is a picture of the trim on the front side of the headboard.

More front trim:)

Lookin’ good!

Final top trim.

I used my Ryobi Battery Brad Nailer to construct this entire piece along with a TON of Gorilla Glue Wood Glue!


I used Elmer’s Wood Filler to fill in the few nail holes that I had. I love the way Ana has you construct this because she starts from the back side. Doing this leaves almost zero nail holes and I strongly dislike filling nail holes:) I used a plastic knife to smooth the wood filler because it was the closest thing I had:)

Ahhh! I love stained wood! I used 2 coats of Minwax Dark Walnut stain followed by 1 coat of Minwax Polycrylic. I am in LOVE! I wish it was going in my room….

Here she is on the Full Storage Bed! To see the plans for the full storage bed click HERE!


I love, love, love how this headboard looks on the Full Storage Bed! I think I am motivated now to tackle the rest of his room…one project ALWAYS leads to another and I LOVE it;)
I hope ya’ll have a fun and safe weekend!

I am IN LOVE with the finish you used. I just completed my headboard and am copying your finish. And the nail gun was the greatest thing that happened to me during this project!! I agree.
Oooohh! Gorgeous! I would love to do something like this in our guest room!
I love the deep rich look! I think the wax really add to it too. Up next, another one for your room – huh!
Mad skillz, girl!
This is gorgeous!!! Question, did you just stain the wood or did you distress it any? That is my biggest fear when doing projects…i build it but then i’m afraid to stain or paint it and ruin it! 🙁
Thanks so much Gwen! I just stained it! That’s all:) I also added a Polycrylic but it was super easy. Don’t worry about messing it up! I stained mine in the garage and my husband decided to mow while it was drying and it had grass all over it. I wiped it off the best I could and salvaged it. You can’t even tell now. Good luck:)
I love it so much!!!!!!
greetz from Germany
First – I LOVE your website! So many fun projects and inspiration for me!!
Do you use your Ryobi Battery Nailer on all of your Shanty projects? I am looking for a nailer that is strong enough to do small projects around the house, but not take up all of my “crafting” money! My hubby already has a small set of Ryobi battery tools. Would you suggest the Ryobi Nailer?? Is there a project you have tried to use it on without it working? Just wondering your opinion before I go buy one of my own.
Thank you Ami! I do use the Ryobi nailer on most of my projects. It has bad reviews online but I havn’t had too many problems with it. If you are joining to edges it tends to shoot out the side but that’s it. For projects like this it is a big time saver. I bought it because my hubby has the other Ryobi battery tools as well and I am happy enough with it to keep using it;) Hope this helps!
that is gorgeous!!! i love the dark stain with the bedding- it looks utterly amazing.
Thank you Cassie:) Love Dark Walnut stain! Thanks for stopping by:)
Looks awesome! We are building ours as soon as our table saw arrives!
Awesome!!!! You will LOVE your table saw:) Please share with us when it’s complete:)
Wow! You make that look so easy! I REALLY need to get my husband to show me how to use at least one of his fifty saws!! Then I could be (try) making great surprises from your tutorials!! 🙂
Thank you Stephanie! Have him start teaching you with the smaller saws! You will be hooked;)
Phenomenal job. Maybe one day I’ll take a stab at it!
Well thank you! This is a great project for a first time build!
How beautiful this turned out! You should be really proud! Popping over from BNOTP!
Thank you Jacqueline:))
This is great! I would love to make one of these. Is it attached to the wall in any way?
None of the bed is attached to the wall. I actually didn’t even attach the headboard to the bed. I was going to but when I put it behind the bed it didn’t budge. It was easier than I had planned:)
I would love to make that storage bed for our king size bed!
Wouldn’t the storage be great! I think it would be the same just longer and you would have to add a center support…
Love it! I think Karsyn needs a storage bed now!
Thanks:) It was easy and soooo worth it! The crates underneath store a TON of toys and blankets;)