Hey friends!
I get asked about my roman shades all the time. I decided it was time to change mine out, and I thought this would be a great time to attempt a tutorial. You should be warned…. I feel like writing this tutorial is harder than making the darn shades… Just saying 😉
So, here we go. If you can sew a straight line, you can make these. Promise!
You need to measure your window. You can make these wider than your window, but for mine I prefer to mount them on the insides of the window. Measure your window width and write it down.
Fabric…
I decided to use good old drop cloth for mine!
Cheap and easy, and I will be stenciling it in a later step.

Your fabric needs to be cut 1″ wider than your window width, and 8″ longer than your window length.
You will also need your liner fabric. You can find drapery liner at any craft store. Your liner needs to be cut the same length as your other fabric, but 1″ smaller than your window width.
Lay your fabrics out. Fold each fabric up 3″ from the bottom to create a hem on each piece. Sew a straight line on each piece to hold this hem in place.
Now you will attach both pieces together like a giant pillowcase with the top and bottom open. Place the good sides of both fabric pieces together a do a straight stitch up both of the long sides.
Now for the dowels…
I use dowel rods to keep my shades folding clean and pretty. You can buy these at any craft store up to 36″ and Lowe’s sells them up to 48″. I use 1/4″ diameter dowels. Cut each dowel about 4″ less than the width of your window. My window measures 30″, so my dowels are cut at 26″. I just used a really sharp pair of scissors to cut mine.
I use Aleene’s Tacky Glue to attach the dowels to the fabric. This is what the bottle looks like.

You’re going to be attaching your dowels on the inside of your fabric piece, not your liner. Lay your fabric out flat on the ground.
Measure 9″ up from the bottom of your hem. Add a line of glue to attach your first dowel like this…

Now you will attach your other dowels. Measure 7″ up and glue down your next one. You will glue the dowels every 7″ until you get to the top of your fabric. It should look like this…

After your glue dries you will turn your fabric piece inside out. This can be a little tricky with the dowels, but just do it slowly and it’s easy. The front fabric piece will be just a bit wider than your liner fabric on the sides. Now it’s time to attach the rings. You can buy plastic rings at any craft store in the drapery or fabric section.
This is the tedious part because you have to sew these on with a needle and thread. It’s easy though! Starting with your bottom dowel, sew on three rings. You will sew one one each side and one in the middle. Put your thread in through the liner, or backside first. You will actually go through the front of the fabric also. Your thread will show just a bit on the front, so make sure to use a thread color that blends with your shade fabric. You won’t notice it at all when the shade is down.
Also, make sure you sew your thread around the dowel.


There will be three rings on every other dowel until your reach your top dowel.

Next, you need to attach your shade to a 1×2. These are super cheap. They can be easily cut with a cheap hand saw, or Lowe’s can cut them for you also. It needs to be 1/4″ smaller than the width of your window. Attach 3 eye hooks to one side of the wood like this.


Then, measure your fabric from the bottom hem. Draw a line on the back liner fabric at the length of your window. Attach the fabric to the wood at this line using a staple gun.

Cut any extra fabric off after you staple it.
Your final step before hanging it up will be attaching drapery cord. This can also be purchased at any craft store. Tie the cord to the bottom right ring and then string it through the rings above and through the eye hooks like this…
After going through your third eye hook cut the string at about 3-4′ and leave it to the side.

Now do the same thing starting with your middle bottom ring like this…

Finally, do the same thing starting with your bottom left ring. You will then have three long strings out to the side of your shade. I use a fan pull for my cord pull. I found mine at Lowe’s. Just run your three cord pieces through the pull and tie a knot like this…

Pull the knot into the pull like this…

Almost done I promise!
To hang your shades you will use an L bracket like this. Again, found mine at Lowe’s. Measure where your 1×2 will sit and attach them to your window like this…


Now you will put your shade up on your 1×2 and screw a wood screw up through the bottom of the L bracket like this to hold it in place.

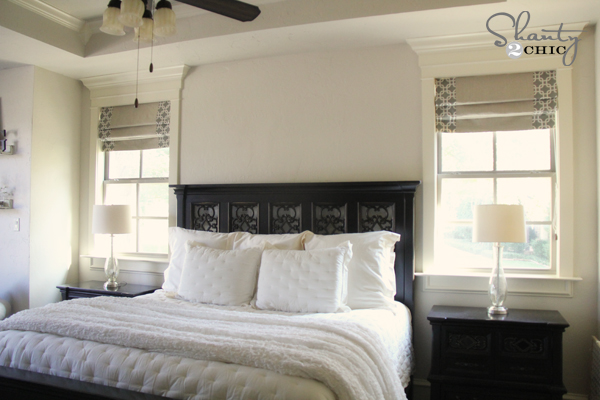
That’s it! I know it sounds like 4385734598743095 steps, but I promise it is super easy! It’s just really hard to put the steps into good words, so hopefully the pictures will help with that. If you have any questions just ask! You can also ask me on Facebook for a quick answer. Want to see it all finished??


I used plastic cord cleats like this (Lowe’s) to hold my cord…

Hope you like them! These babies will last too! I have had my other ones hanging for almost 3 years. I open and close them every day and have never had a problem with them.
If you like them, please Pin it, Stumble it, and Share it below! I would appreciate it!! 🙂
Have a great weekend!
~Whitney


Just wanted to let you know this is the most comprehensive and best looking Roman shade tutorial I’ve seen! Thank you!
Thank you so much!! It was hard to put into words, so I am glad you like it! 😉
Thanks so much Rico! Sorry for the late reply!! 🙂
Finally….Easy. Peasy directions. I understand these I had bought a pattern a few years ago and I never made my shades seemed like to much work. Love your shades and thanks for simplifying it for someone who has very limited sewing skills.
Great tutorial. I’m actually in the process of making it with your step by step instructions and have a question!! Do you ever sew the bottom hems together (after you flip the dowels to the inside)? Or do you leave the bottom open like the original pillowcase?? Thank you!!
GREAT instructions. I’ve been wanting to do this for quite some time, and these directions have definately given me the confidence to proceed. Mine will be in a kitchen/family room, so I am going to sew pockets to accept the wooden dowels and use velcro on the 1 x 2 top strip of wood. This way I should be able to remove the shades and launder them. THANKS for a terrific post and I’ll let you know how they turn out
Love how you explained this!! Great job!
Hi, I came across your blog by doing a google search for roman shades. I’ve pinned it as I know it is the easiest to understand tutorial out there. : ) I do have one question though. Do the pictures you took show the shade pulled up all the way? In other words, can the shade be pulled up higher than that? I’m wondering because I would like to lose as little as the view as possible with my shades. Would I just make my sections less than 7”? Thanks for any feedback!
What is the seem allowance? I am assuming half an inch, but can you clarify.
This is so just what I was looking for. Most of our windows are 72″ long though — would this hang as well with a width like that? Would you add an extra column of rings?
Thank you soooo much! I’ve always wanted to learn how to make these. The step-by-step pictures are great! Beautiful 🙂
This is great-thanks! I’ve been wanting roman shades for our bedroom for the longest time,but have been scared to do them as my sewing skills only extend as far as pillows and tablecloths so far,but these directions make it so clear I might be able to do them. Hey I was just wondering though-I can’t read all the directions because this column comes on the middle of the page with all these buttons? for Like,share,tweet,etc. Anybody else get that or know how to get it off so I can read all of the informative post?
I hope I can explain this (and I hope it works). If you change the size of the print on the page to make it smaller, sometimes those things will line up. To do so, hold down the CTRL key along with the – (minus or hyphen, whatever you want tocall it). To make the print larger, hold down the CTRL key along with the + key (the plus key….I’m sure you figured that out). That sometimes helps when I need to line things up. Hope that helps.
Just had another thought. Can you drag that column to the side of the page?
Happy Valentines’ Day!!
Excellent tutorial! And it got my creative juices flowing. How about using velcro to attach it to the 1×2 and making pockets for the dowels? Then you coud pop it off, pop out the dowels, and throw it in the wash. 🙂
The dowels are glued to the fabric. How would they pop out?
I’ve looked at so many roman shade tutorials online and this is the FIRST that made me think”I could do that!”
Thanks!!!!
I’m impressed. this tute makes me think “I can do this!”. I get my painters drop cloth at Harbor Freight tools.
It is heavy weight and cost about $6.00 for a 4′ by 12′ piece. Look for their 20% coupons in mailers, Family Handyman magazine and Parade section of the Sunday paper.
Thank you Gena!! I will so be buying mine there next time!
This is great. I am putting it on my to-do list.
Whitney, where can I find details on how you did the stenciling? It adds a very nice finishing touch in place of a fabric valance or header. Thanks for the great ideas!
It will be one of my next posts! 🙂