Table of Contents
A Planter That Works Overtime (and Looks Cute Doing It)
Summer’s in full swing, which means we’re knee-deep in sawdust and sunshine — just how we like it. Today, we’re building a front porch wall planter for our (very lucky) sister. Not only is this thing adorable, but it also multitasks. Yep – it holds plants and proudly displays your address numbers. That’s called efficiency with style, y’all.
Let’s dive in.

What You’ll Need
Materials:
- Wood planks (cut sizes in the free plans)
- 1×3 boards (for trim and planter box)
- Metal house numbers
- Pocket hole screws (1 ¼”)
- Brad nails (1 ¼”)
- Wood glue
Tools:
- Kreg Jig 720 Pro (or your fave Kreg jig)
- Drill/driver
- Nail gun or hammer
- Clamps
- Saw (miter or circular)
Step-by-Step Instructions
Kreg Jig
One of the questions we get asked all the time is, “What exactly is a Kreg Jig?” Simply put, it’s a pocket hole jig that helps you drill angled holes to create super strong joints. It makes joining boards quicker, cleaner, and sturdier than just driving screws straight in.
We discovered Kreg tools early on in our furniture-building journey, and it was a total game changer. The joints are rock solid, and the setup is beginner-friendly — which made us instant fans.
For this desk build, I used my Kreg Jig 720 PRO and I’m obsessed! If you already have another model, this one is absolutely worth the upgrade.
- Check out the Kreg Jig 720 Pro on Amazon
- Watch our How to Use a Kreg Jig video
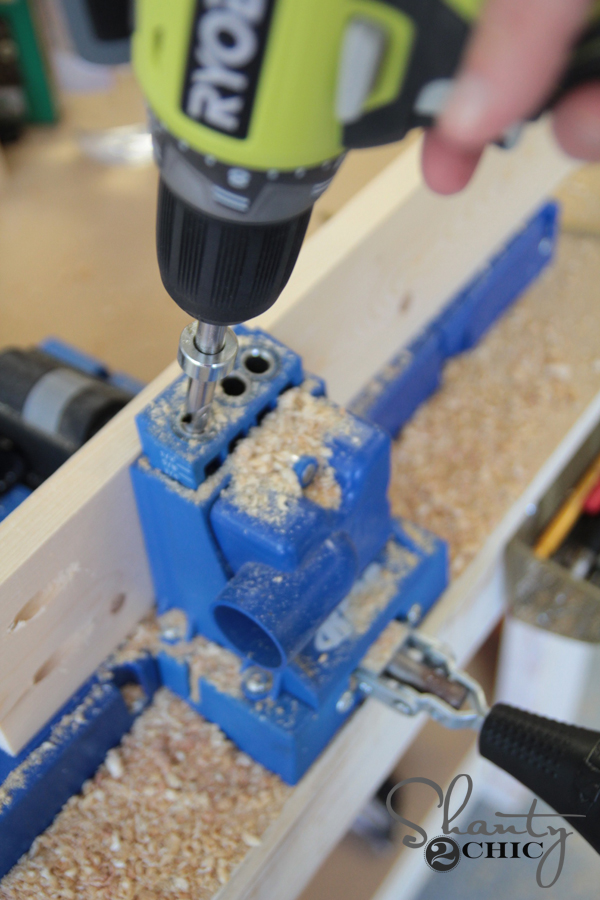
Step 1: Add Pocket Holes Like a Pro
Start by drilling pocket holes into the top and bottom planks of your planter face. These holes will allow you to attach the planks together and later add trim. We used the Kreg Jig 720 Pro, which makes adjusting for different board thicknesses easy and has built-in storage for all your doo-dads.


Step 2: Drill, Baby, Drill (Then Laugh About It)
Drill pocket holes into the side edges of one of the main boards too — this will help with trim later. We used 1 ¼-inch pocket hole screws to join all eight planks together. No wood glue needed at this stage — screws are plenty strong.


Also: faux plants? Fully encouraged. Foe is fun, folks.
Step 3: Frame It Out (Rustic-Style)
Time to add the top and bottom trim. We skipped mitered corners for a more rustic look and kept things flush with the front of the planter. Just flip the panel face-down, line up the trim, and attach with pocket hole screws and a dab of wood glue.

Bonus: all cut sizes are in the free printable plans you can download at the bottom of this post!
Step 4: Side Trim + Strong Opinions on Gardening
Next, we cut and attached the side trim. Again, line up the boards flush with the top and bottom, and attach using the pocket holes in the side of the planter — plus a little wood glue to keep things tight.

And yes, one of us would rather plant herself on the couch than in the garden. Respect.
Step 5: Flip It + Figure Out the Fun Stuff
With the frame done, we flipped the whole piece over and started plotting the layout. Our address numbers are going vertical (hello, modern vibe), and the planter box will sit lower on the piece to leave room for trailing or tall plants.

Staining or painting comes next — but we let our sister decide since it’s going on her porch (you’re welcome, Alicia!).
Step 6: Build the Planter Box (Scrap Wood Style)
We were almost out of wood, so we adjusted. Using skinnier cuts, we created a U-shape frame from 1x3s and attached it to the front panel with pocket holes. Total flexibility here – you can make it as wide or narrow as your space allows.


Also: feel free to use any numbers you want. Go wild. 90210? Cool. Your Wi-Fi password? Bold.
Step 7: Attach the Box & Finish Strong
We added a little wood glue and attached the front face of the planter box with 1 ¼-inch brad nails. Boom. Done.

Now just stain or paint it however you like. Then screw on the address numbers and hang that beauty up!
- You can find the address numbers I used.
Final Look: Cute, Custom, and Totally Doable
We love how this turned out — especially with a painted front door and crisp white trim behind it. It’s simple, stylish, and completely beginner-friendly.
Download the Free Plans
Want to build one yourself? Grab our free printable plans with exact measurements and step-by-step instructions:
Here they are!

DIY Wall Planter with Address Numbers
Instructions
- Cut eight 1×4 boards to 20" each. Drill 3/4" pocket holes into the top, bottom, and sides of each board. Attach them side-by-side using 1 1/4" pocket hole screws (no wood glue needed). This creates the planked front panel of the planter.

- Cut two 1×3 boards to 20" (same length as the panel). With the panel face down, attach one to the top and one to the bottom using pocket hole screws and a little wood glue. These pieces should sit flush with the front face.

- Cut two 1×3 boards to 29 1/2". These will run vertically along the sides of the panel. Attach them using the pocket holes on the side edges of the planks, plus wood glue for extra strength. These should also sit flush with the front face.

- Cut two side pieces at 7" and a bottom piece at 4" (all 1×3). Drill pocket holes to create a U-shaped box. Attach to the planks using pocket hole screws.

- Cut a front piece at 7" and attach it using wood glue and 1 1/4" brad nails. Position the box low on the panel and attach it from the back using screws through the planks. Stain or paint your planter as desired. Attach house numbers vertically down one side using screws or adhesive. Hang and fill with your favorite faux or real plants!


Don’t Miss the Next Project!
Make sure to subscribe to our channel so you never miss a tutorial, a build, or a bad pun.
Happy building, friends!
Check out my DIY Address Number Wall Planter!