This is one of my FAVORITE projects! It’s quick, easy and cheap! Lots of bang for your buck;)

I say cheap because I started with pieces from our scrap wood pile:)
 I used an old sheet of bead board, a 1×6 and 1×3’s.
 I trimmed out the bead board with the 1×3’s
 using Gorilla Glue wood glue and a staple gun to secure them.
 Next, I hammered a saw tooth hanger through the back.
 I attached the 1×6 with wood glue and drilled 2″ screws through the back (pre drill so the wood doesn’t split)
 I spray painted it with 1 coat of Rust-Oleum black gloss.
 I found these super cute glass knobs at Hobby Lobby (50% off of course;)
 and paired them with these pretty hooks from Home Depot.
 I pre drilled holes for the hooks
 and put the knobs through the top holes on the hooks then secured them on the back.
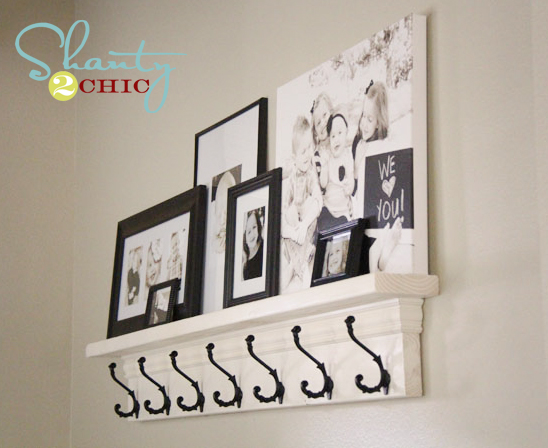
 I attached it to the wall, added the metal buckets (purchased at Ikea for $1 each) and filled them with dried hydrangea.


That was it! Time invested was about 1 hour and money invested was about $15! LOVE:)
Thanks so much for stopping by and Happy Friday!
~Ashley

What are the measurements for your wood pieces?
Hi Amy,
The main piece is 23.5″ wide by 21.5″ long. The shelf is 18 3/4″ long:)
Sent from my iPad
Thanks so much!!! 🙂
Stunning! I absolutely love this and I’ll make it! Very clever!! Thanks so much for sharing this!
This is such a great idea! I love how you dressed up the hooks with the knobs. Very creative. Love everything about it!
Love this!! I am working on my hook project now with chalkboard paint 🙂 Great for the kids and their “Stuff”! Love the buckets…
Lina
Fancy Frugal Life
This is fantastic! Love it! Will definitely try this one – Pinning on my Pinterest!
Kathy
Thank you Kathy!!!!
This is such a great idea! Our beloved IKEA secretary desk finally met its maker and I’ve been looking for something to use the remaining wood for. This project looks perfect!
Great idea Diana!!!! Love recycling old pieces:)
Wow what a great project from scraps.
I love it.
Thank you June!
Hey Girls!!! Here is my post on the board I made!!! Thanks again soooo much for the great inspiration!!!
http://gatheredinthekitchen.com/2011/07/26/shelfhook-board-decor/
I am going to be here all the time, that is sooo cool!!!
wow i luv luv this you make it so easy to make..
I’ll be honored for you to join our linking party every Wednesday at
http://www.passionatelyartistic.com/2011/07/american-pickers-with-linking-party.html
Have a fabulous week,
Maggie
http://passionatelyartistic.com
Thank you Maggie;)
This is so cute. I love the combo of the glass knobs and the hooks. I don’t thing I would have thought of that on my own. It adds just the right amount of sparkle to the whole thing.
Thank you Lynn!
Very creative! I love how you added the hooks, knobs and shelf. Nice work!
Pam
Thanks Pam;)
Looks sharp! Nice and functional yet has presence to it!
Thanks so much Kelee!!
This is SO cute! I would love something like this in our little entryway… I just might have to try this project! Thanks for sharing!
Thank you Emily! Please share if you make one:)))
Love that project! Super cute and creative!
Thanks Steph!!!