Hey friends!
Hope you all had a great weekend! Ours was beautiful here!
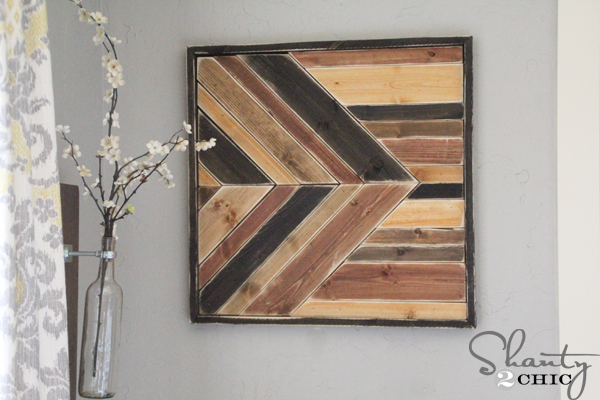
Many of you have seen Ashley’s Reclaimed Wood Wall Art she did for above her couch a while back. I LOVE hers. In fact, every time I go to her house it makes me want to change the art above my couch as well!
So… I came up with this!

Here is how I made it!
I started with wood from Lowe’s. This is the great part…
I went ahead and bought 8′ pieces and cut them in half to save money. I used furring strips for mine. You can have Lowe’s or HD cut yours in half for you if you don’t have a saw. Or, you can also use a super cheap hand saw like THIS one. It’s really easy to cut this type of wood with a hand saw.
2 – 1×2″ furring strips
2-1×3″ furring strips
2- 1×4″ furring strips
My cost for wood was under $15!
Once mine were cut I laid them out like this…


Then I used 1/4″x 3′ birch project sticks to attach all the wood together. These can be found with the other birch boards and they were really cheap… Like $1.50 a piece.
I marked where I would lay my stick and then added a little Gorilla Wood Glue!


Then I nailed my sticks to the boards like this. If you don’t have a nailer you can also use wood screws! Just pre-drill your holes and attach the screw through all the boards.

Next, I flipped it over and gave it a coat of my very fav…

Here it is drying…

Next for the fun part!
I used my Silhouette machine and Contact paper to make my stencils. You can also buy your own stencils at a craft store or print your own letters and use a craft knife to cut them out with contact paper.
The font I used is called Arial Black.
I cut my L, V and E. I also used a heart shape that came with a set of 9 hearts on Silhouette Software.
You can see a detailed post on cutting Contact paper with the Silhouette HERE.
I lined my letters up first to make sure I liked it…

Then I put the outsides of the letters on to be my stencil. I used some acrylic cream and coral paint to add my letters.


My final step before I hung it up was to shanty it up a bit! I used an 80 grit sanding block to lightly distress each letter. I LOVE the results…


To hang it I had to get the hubby’s help! I just used 2 1/2″ drywall screws straight through the sign into the studs of the wall. I used three screws on the sign and it is super sturdy!
Want to see it up on the wall??


What do you think???
I hope you LOVE it 😉 No pun intended….
If you do, I would love for you to share the LOVE and Pin it like crazy below! Oh I could go on and on 😀
Thanks so much!
~Whitney


i do LOVE it! i’m thinking of using the stencils to make a door mat for valentine’s day!
Hello! Is there anywhere to see the photos of this process? For some reason they’re no longer showing up in the post for me. I’d love to see how you put all the wood together! (Found you on Pinterest and I love the look of the original pin!)
I see all the photos, could be your web browser. Hope you get it worked out. 🙂
You are so creative!!! LOVE!
This sign is gorgeous – when you stick the contact paper stencil on the stained wood, do you have any issue with the paper damaging your stain when you pull it off? I’m concerned it might adhere too well and lift off some of the stain. Thanks!
Love this! That stain color is fabulous!! I do have a very random question, where did you get your couch? 🙂 it is exactly what I have been looking for. Lovely blog!
Just found your blog – love everything about it AND you! Definitely loving this “Love” sign, though I think I love it more with the new fabric flowers on the heart & am thinking I’d like to create a headboard using this idea… My question though is where did you get the fabulous sconces on either side of sign? I mean, if I’m going to copy you I need to do so thoroughly, no? :0) If you can’t remember where you got them or if that place doesn’t carry them anymore, any advice as to how to seek similar ones out? Is there a name for them?
Thanks so much! So excited to explore your blog more!
Hugs,
Christine aka The Stampin’ Ninja
Wow I LOVE your LOVE sign! Our living rooms have a few elements in common but I like yours better haha!! I might try my own take on your love sign if you don’t mind me copying?
This is too cute! I’m going to do it with a quote on it for my boys’ bedroom. Using a quote I found on pinterest. “go on an adventure, sail the high seas, climb a mountain ….”
I LOVE this sign.. U have talent and very good taste! Thank you.
Thank you so much Tracy!! 🙂
Love the sign and the size! what are the dimensions of it?
Ok-this is awesome! However, I am trying to put the birch project strips on back and they are not long enough. How long are yours? I have bought everything and waiting to see what you would do…thanks!
I really love your sconces/ ledge on either side of your sign. Did you make them? Is it posted? I have been trying to do something very similar on either side of a painting above my couch, too. Thank you!
buy The Mfa 2 Billion Year Journey mp3,atakio
I was told that paint wouldn’t stick to stain – but yours clearly did!! What kind of paint did you use?
What size are your letters? Thanks